


Comment rendre une vidéo plus sombre pour les vidéos de votre projet
En matière de production vidéo, une technique fréquemment utilisée consiste à assombrir certaines zones des séquences. Ce procédé peut être mis en œuvre pour plusieurs raisons, comme créer une ambiance ou une atmosphère, attirer l’attention sur une partie précise de l’écran ou encore aider à dissimuler des imperfections. L’une des principales raisons de rendre une vidéo plus sombre est d’ajouter du drame et de la tension à une scène. En réduisant l’exposition et en augmentant le contraste, les ombres sont intensifiées et les hautes lumières atténuées, ce qui donne aux images un aspect plus menaçant et inquiétant. Ce procédé peut être particulièrement efficace dans les films d’horreur ou les thrillers, où le public est censé se sentir sur le qui-vive. Pour la vidéo de votre projet, vous devez apprendre cette technique en suivant les guides détaillés ci‑dessous.

Partie 1. Comment assombrir une vidéo hors ligne
1. Convertisseur vidéo ultime
Video Converter Ultimate est une application puissante et un utilitaire de montage vidéo qui peut vous apporter tout ce dont vous avez besoin. Vous avez besoin d’aide pour réduire la luminosité de la vidéo de votre projet ? Cet outil propose une méthode efficace pour diminuer la luminosité de l’apparence de votre vidéo. Il est doté d’un utilitaire vidéo avancé, un « Video Enhancer » qui ajuste automatiquement la luminosité et le contraste de la vidéo du projet. Il analyse le fichier en interne et ajuste le contraste afin d’offrir un meilleur éclairage, comme si la séquence avait été capturée dans un environnement ou un réglage à faible luminosité. Vous pouvez consulter les indications ci‑dessous pour apprendre, étape par étape, comment utiliser cette application.
Étape 1. Télécharger l’application
Commencez à améliorer et à modifier votre fichier vidéo en téléchargeant le logiciel sur votre PC. Cliquez sur le bouton Téléchargement gratuit présenté sous cette étape. Récupérez le fichier d’installation et exécutez‑le sur votre ordinateur.
Téléchargement gratuitPour Windows 7 ou version ultérieureTéléchargement sécurisé
Téléchargement gratuitPour macOS 10.7 ou version ultérieureTéléchargement sécurisé
Étape 2. Importer la vidéo
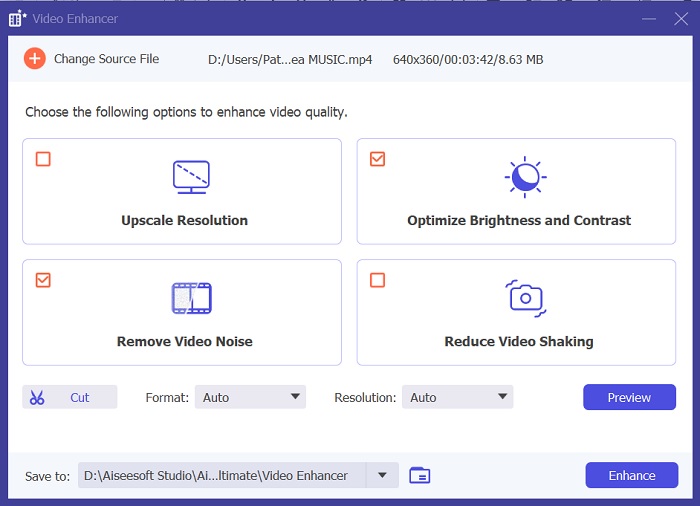
L’étape suivante consiste à lancer l’application et à ajouter la vidéo que vous devez améliorer. Allez dans l’option Boîte à outils, où se trouvent toutes les fonctionnalités avancées. Sélectionnez la fonction Video Enhancer pour accéder à sa boîte de dialogue. Importez le fichier en cliquant sur l’icône +.
Étape 3. Finaliser le processus
Ensuite, une fois la vidéo choisie importée, quatre options apparaîtront à l’écran. Sélectionnez le menu Brightness and Contrast Optimized pour traiter automatiquement la vidéo. La vidéo sera alors exportée vers le dossier de sortie désigné. Localisez le fichier et lisez‑le pour vérifier le contraste de la vidéo du projet.
2. Adobe Premiere Pro
Premiere Pro est un logiciel utilitaire vidéo innovant qui est devenu le choix incontournable de nombreux monteurs vidéo professionnels, avec son interface intuitive, son intégration transparente avec d'autres produits Adobe et ses fonctionnalités robustes. L'un des avantages essentiels de Premiere Pro est sa capacité à traiter une large gamme de formats vidéo, du SD au HD en passant par le 4K et au-delà. Cette fonctionnalité facilite le travail avec des images provenant de diverses sources, notamment des caméras, des appareils mobiles et des drones. S'il est nécessaire d'ajuster l'éclairage de votre vidéo, Adobe Premiere Pro est d'une grande aide grâce à sa fonction Lumetri Color Panel, qui permet d'ajuster le contraste et la luminosité d'un fichier. De plus, Premiere Pro propose des outils avancés de correction des couleurs, des capacités d'édition audio, des effets visuels et bien plus encore.
Étape 1. Pour modifier la luminosité dans Premiere Pro, vous devez d’abord télécharger l’application sur votre PC. Vous pouvez rechercher son programme d’installation sur sa page officielle et obtenir le firmware pour installer l’application. Lancez l’outil et importez le fichier vidéo en cliquant sur le bouton Import.
Étape 2. Ouvrez le panneau Lumetri Color en cliquant sur l’onglet Color dans le coin supérieur gauche de l’écran. Dans le panneau Lumetri Color, vous verrez différentes options de correction colorimétrique. Pour ajuster la luminosité, repérez la section Basic Correction. Vous pouvez utiliser le curseur Exposure pour modifier la luminosité du clip. Faites glisser le curseur vers la droite pour augmenter la luminosité ou vers la gauche pour la diminuer.
Étape 3. Enfin, cliquez sur le bouton Export pour enregistrer le fichier. Patientez le temps que la vidéo soit rendue, puis localisez‑la dans le dossier de sortie de l’outil. Lisez et prévisualisez les modifications sur la vidéo du projet pour voir si le résultat vous convient.
3. Adobe After Effects
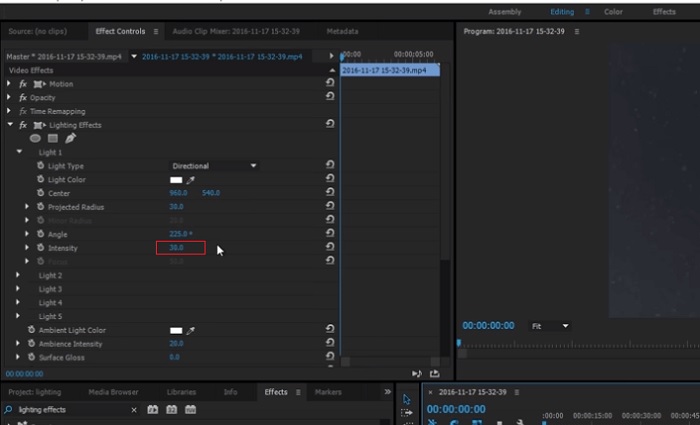
Lors du réglage de la luminosité dans After Effects, plusieurs fonctionnalités sont utiles. Premièrement, l'effet Niveaux peut être utilisé pour ajuster la luminosité et le contraste. Cet effet vous permet de définir des points en noir et blanc, ce qui permet de garantir que votre image ne devienne pas trop délavée ou trop sombre. Vous pouvez également utiliser l'effet Courbes pour ajuster la luminosité et le contraste de parties vidéo spécifiques. Cette fonctionnalité peut faire ressortir les détails dans les ombres ou les hautes lumières. Une autre fonctionnalité utile est l'effet d'exposition, qui vous permet de modifier la luminosité et le contraste de l'ensemble de l'image. Cet effet comprend également des options d'ajustement du gamma et du décalage, qui peuvent vous aider à affiner l'apparence de votre image.
Étape 1. La première étape pour modifier l’apparence d’une vidéo dans After Effects consiste à obtenir le firmware de l’outil et à l’installer sur votre PC. Vous pouvez le télécharger ou l’acquérir sur le site officiel d’Adobe et exécuter le programme d’installation. Ensuite, lancez l’application et explorez ses fonctionnalités.
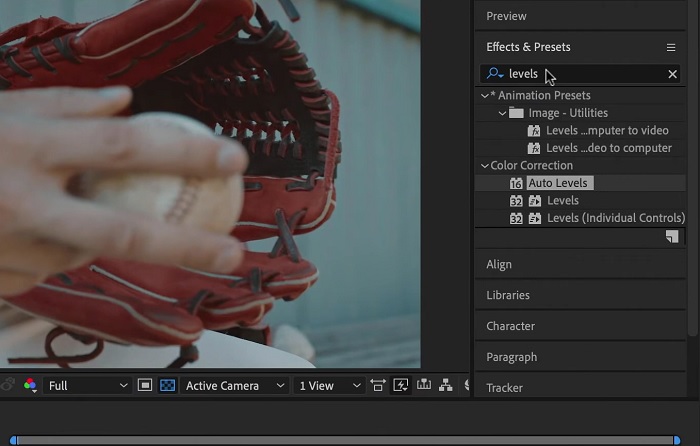
Étape 2. Importez ensuite la vidéo en allant dans l’option File puis en cliquant sur Import. Localisez votre vidéo et sélectionnez‑la pour l’ajouter au montage. Après cela, allez dans l’onglet Windows et cliquez sur Effects and Presets. Une zone de recherche apparaîtra, dans laquelle vous pourrez chercher l’option Levels.
Étape 3. Enfin, cliquez sur Auto Level et faites glisser cet effet sur la vidéo dont vous souhaitez réduire la luminosité dans votre clip de projet. Cliquez sur l’option Export pour enregistrer les modifications. Vous pouvez également utiliser différents préréglages pour ajuster la luminosité de votre fichier. Rendez‑vous dans le dossier de sortie pour prévisualiser et vérifier la vidéo de projet modifiée.
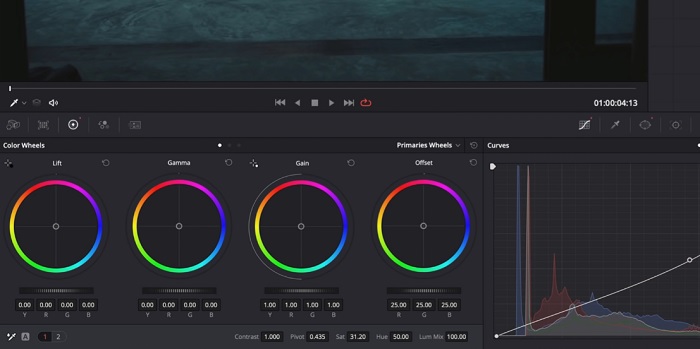
4. DaVinci Résoudre
En matière de modification vidéo, Davinci Resolve est un puissant logiciel et utilitaire vidéo qui offre une variété de fonctionnalités d'édition pour améliorer la qualité de vos images. L'une des techniques de montage les plus courantes consiste à assombrir une vidéo, ce qui peut affecter considérablement vos visuels. L'une des fonctionnalités préférées des utilisateurs de ce logiciel de montage vidéo est la possibilité d'étalonner facilement les couleurs des séquences. Le logiciel dispose d'une large gamme d'outils d'étalonnage des couleurs qui autorisent les utilisateurs à réviser l'apparence des images pour qu'elles correspondent à une vision artistique. Il est également livré avec un panneau de chronologie dans lequel les utilisateurs peuvent fournir un meilleur processus d'édition. Davinci Resolve rend ce processus simple et efficace grâce à ses outils avancés.
Étape 1. Le premier guide pour ajuster l’exposition d’une vidéo avec DaVinci Resolve consiste à installer l’outil sur votre PC. Téléchargez l’application depuis son site officiel et exécutez le programme d’installation pour l’acquérir. Ensuite, lancez le logiciel de montage vidéo et parcourez ses fonctions pour vous familiariser avec ses utilitaires d’édition.
Étape 2. Pour assombrir une vidéo avec DaVinci Resolve, importez la vidéo dans le projet en cliquant sur l’option File puis sur le bouton Import file. Vous pouvez ensuite utiliser les outils d’étalonnage colorimétrique du logiciel. Sélectionnez le clip que vous souhaitez assombrir dans la timeline, puis ouvrez la page Color.
Étape 3. À partir de là, vous pouvez utiliser les contrôles Lift, Gamma et Gain pour ajuster la luminosité et le contraste du clip. Ensuite, cliquez sur le bouton Export pour enregistrer les modifications apportées au projet vidéo. Accédez au dossier de sortie pour prévisualiser le fichier.
Partie 2. Comment assombrir une vidéo en ligne
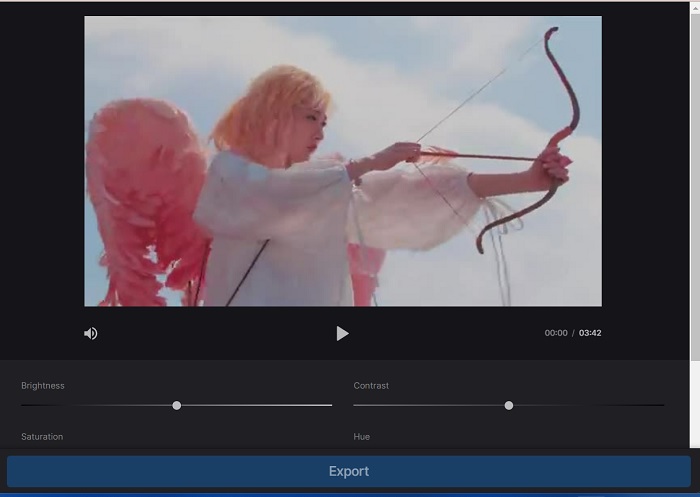
Vous en avez assez d'utiliser un logiciel de montage vidéo plus volumineux pour ajuster un simple clip vidéo sur votre PC ? Eh bien, Clideo peut être d'une grande aide comme alternative au montage vidéo, car il consomme une grande quantité d'espace informatique. Cet outil en ligne permet aux utilisateurs d'accéder facilement à son panneau de chronologie et d'importer des vidéos vers son API sans avoir besoin d'installer ou de se connecter à un compte. Les utilisateurs peuvent directement télécharger le fichier vidéo qu'ils doivent éditer, et l'outil en ligne analysera et fournira des fonctionnalités d'édition pour peaufiner et améliorer l'apparence du clip du projet. Vous pouvez consulter le guide détaillé ci-dessous sur l'utilisation approfondie de cette application en ligne.
Étape 1. Pour ajuster la luminosité avec Clideo, ouvrez l’application dans votre navigateur web. Affichez l’interface principale et commencez à téléverser votre clip vidéo sur la plateforme en cliquant sur Choose File. Sélectionnez la vidéo que vous devez modifier et importez‑la dans l’outil en ligne.
Étape 2. Ensuite, sélectionnez l’option Adjust dans le menu sous le lecteur vidéo. Cette méthode vous donnera accès à plusieurs outils de montage, dont une option pour régler la luminosité. Faites glisser le curseur de luminosité vers la gauche ou la droite pour diminuer ou augmenter la luminosité, respectivement.
Étape 3. Vous pouvez également utiliser le bouton d’ajustement automatique pour corriger la luminosité de façon automatique. Une fois que vous êtes satisfait du niveau de luminosité, cliquez sur l’icône ou le bouton Apply pour enregistrer vos modifications. Enfin, téléchargez votre vidéo éditée en cliquant sur l’option Export.
Pour aller plus loin :
Filtre vidéo : améliorez vos vidéos avec des filtres et des effets sur ordinateur
5 incroyables logiciels de création de films YouTube | Créez d’excellents contenus vidéo
Partie 3. FAQ sur l'assombrissement de la vidéo
Comment assombrir une vidéo sur un iPhone ?
Il existe différents logiciels que vous pouvez utiliser et installer sur votre appareil mobile pour ajuster l'exposition du clip de votre projet. Vous pouvez également utiliser un outil en ligne qui peut vous aider à ajuster les vidéos directement sur votre smartphone. Clideo est recommandé car il est accessible dans les navigateurs Web, notamment Safari et autres compatibles avec les appareils Apple.
Comment assombrir une vidéo sur iMovie ?
Ajustez les paramètres de luminosité et de contraste pour assombrir une vidéo sur iMovie. Vous pouvez également ajouter une superposition sombre ou un filtre à la vidéo pour la rendre plus sombre. Une autre option consiste à ajuster les niveaux d'exposition pour rendre la vidéo plus sombre. Expérimentez avec ces paramètres jusqu'à ce que vous obteniez l'apparence souhaitée pour votre vidéo.
Pourquoi voudriez-vous assombrir une vidéo sur un iPhone ?
Assombrir une vidéo peut être utile dans de nombreux scénarios, tels que l'amélioration de la qualité globale de la vidéo, l'amélioration du contraste ou la création d'une certaine ambiance ou atmosphère.
Conclusion
Après avoir essayé différentes méthodes, cet article montre qu’assombrir une vidéo sur PC peut être relativement simple. Vous devrez utiliser un logiciel de montage vidéo tel que Video Converter Ultimate, Adobe Premiere Pro, DaVinci Resolve ou After Effects pour y parvenir. Une fois le logiciel installé, vous pouvez facilement modifier l’exposition de votre vidéo afin d’obtenir l’effet assombri souhaité. Toutefois, il est essentiel de veiller à ce que la vidéo ne devienne pas si sombre qu’il soit difficile d’en distinguer les détails. Avec ces astuces sur comment corriger une vidéo trop lumineuse, vous pouvez assombrir efficacement votre vidéo et créer un produit final visuellement attrayant.
-
 Guide ultime pour changer la résolution vidéo disponible sur plusieurs plates-formes
 Besoin de changer la résolution vidéo de la vidéo ? Si tel est le cas, découvrez les différentes façons de modifier facilement la résolution vidéo de la vidéo que vous regardez.
-
 Qu'est-ce qu'un filigrane sur une vidéo et comment l'ajouter ou le supprimer
 Voulez-vous savoir ce qu'est un filigrane, quels sont les différents types et la raison pour laquelle les photographes en ajoutent un ? Eh bien, tout ce que vous avez à faire est de lire cet article.
-
 Comment recadrer un fichier MP4 sans perdre la qualité de la vidéo [2023]
 Apprenez à recadrer MP4 avec des étapes simples fournies spécialement pour vous. Alors continuez le rythme car nous vous présentons le meilleur des meilleurs outils de recadrage que vous pouvez utiliser.