


למד כיצד לערוך צילומי מסך ב-Windows/Mac/Online/Android/iOS [מדריך 2025]
Editing screenshots on various devices slightly vary in approach. Whether you're using a Mac, Windows, iPhone, or Android device, this article has you covered. We have prepared you with a couple of methods and techniques to effortlessly edit your captured screenshots, empowering you to enhance your visuals with confidence and precision. This article will surely equip you with the knowledge needed to elevate your screenshots to the next level. So, regardless if you're a beginner seeking a step-by-step method or an experienced user looking to refine your skills, this one is perfect for you.

חלק 1: הדרך האולטימטיבית לערוך צילום מסך ב-Mac וב-Windows [הטוב ביותר למתחילים]
Windows and Mac have built-in tools to screenshot images that users can eventually use to edit them. However, these methods don’t contain advanced features compared to using a third-party tool. FVC Screen Recorder is one of the best tools to seamlessly edit screenshots on Mac and Windows. This is a full-featured screen recording tool that allows you to capture everything on your screen, but more than that, it is best to use it to edit your screenshot photos. You can draw, change the size, add text, shape, image, and more.
Step 1. First, download and install the FVC Screen recorder on your Mac or Windows device.
הורדה חינמיתעבור Windows 7 או גרסה מאוחרת יותרהורדה מאובטחת
הורדה חינמיתעבור MacOS 10.7 או גרסה מאוחרת יותרהורדה מאובטחת
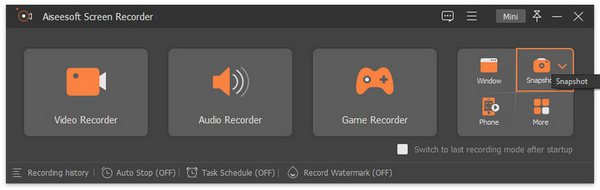
Step 2. After that, run the tool and click on the Snapshot icon in the right corner. Next, select Screen Capture.
Step 3. Now, drag the cursor to screenshot the area of the screen on your Mac or your Windows device.
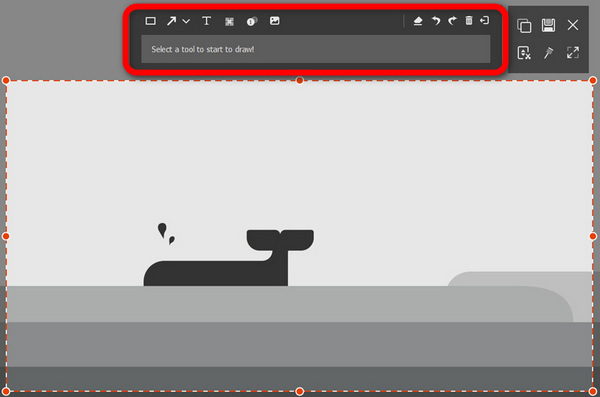
Step 4. Now, to edit your screenshot image, click on the menu, where you can find the Rectangular Shape, Text, and Add Image icons. Also, there’s a drop-down menu for pencils, ellipses, lines, arrows, and airbrushes. Feel free to utilize them depending on your editing needs.
Step 5. After that, click the Save button.
בעוד ש-Windows ו-Mac מציעים כלי צילום מסך בסיסיים, הם חסרים תכונות עריכה מתקדמות. לכן, הקלטת מסך FVC היא השיטה הטובה ביותר לערוך צילומי מסך בצורה חלקה. עם כמה שלבים, אתה יכול ללכוד, לערוך ולשפר את צילומי המסך שלך בצורה יצירתית בקלות.
חלק 2: כיצד לערוך צילום מסך ב-Mac עם תצוגה מקדימה
Preview הוא כלי מובנה ב-Mac, שהוא אפשרות מצוינת לעריכת צילומי מסך. הוא מכיל כלי עריכה, כגון הוספת טקסט, חיתוך ושינוי גודל, הכל בתוך ממשק קל לשימוש. יתרה מכך, מכיוון שמדובר בכלי מובנה עם מערכת ההפעלה macOS, אין צורך להוריד תוכנה נוספת.
כדי לערוך את צילום המסך שלך ב-Mac באמצעות תצוגה מקדימה, בצע את השלבים הבאים:
Step 1. First, access Preview on your Mac and open the specific screenshot you want to edit after you take a screenshot on your Mac.
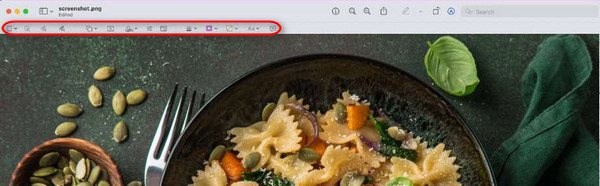
Step 2. Click on the Show Markup Toolbar option located in the top-right corner of the screen to reveal a drop-down menu with various editing tools. Here, you can utilize different selection tools, remove backgrounds, employ sketching tools, draw shapes, and add text or signatures to your screenshots.
Step 3. After completing your edits, navigate to the File tab and choose the Save option to finalize and save your edited screenshot.
עם Preview, אתה מקבל כלי עריכה קלים לצילומי מסך ב-Mac. זה נוח ומובנה אבל חסר תכונות מתקדמות שנמצאות בתוכנות אחרות.
חלק 3: כיצד לערוך צילום מסך ב-Windows עם כלי חיתוך
כלי החיתוך מאפשר למשתמשים לצלם ולערוך צילומי מסך. כלי זה מושלם גם אם המטרה העיקרית שלך היא לערוך צילומי מסך ב-Windows בגלל הממשק הפשוט שלו, מה שמקל על המשתמשים לערוך את צילומי המסך שלהם ללא צורך בתוכנת צד שלישי.
כדי לערוך את צילום המסך שלך ב-Windows, בצע את השלבים הבאים:
Step 1. First, to launch the Snipping Tool on your Windows, search the bar in the Start menu. From there, search the Snipping Tool.
Step 2. Now, take a screenshot by clicking the New button.
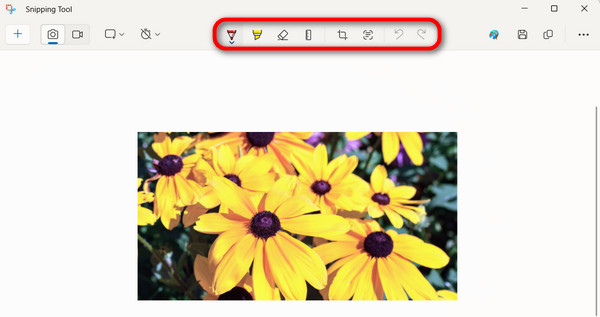
Step 3. After you take a screenshot, edit it by using the Menu above. There, you can draw, highlight, and crop your image.
Step 4. To save, access the File menu and choose Save As from the dropdown options.
ואכן, השימוש בכלי החיתוך ב-Windows הוא כלי שימושי מובנה ללכידה ועריכה של צילומי מסך. עם זאת, מתחילים יתנסו בקושי בניווט בו.
חלק 4: כיצד לערוך צילום מסך באייפון באמצעות כלי ברירת המחדל
עריכת צילומי מסך באייפון באמצעות כלי ברירת המחדל היא הדרך הקלה והנוחה ביותר לערוך צילום מסך באייפון. אתה יכול לעשות זאת מיד לאחר צילום המסך מבלי להזדקק לאפליקציות נוספות. עם תכונה זו, אתה יכול לעשות הרבה, כמו הוספת מסננים, אפקטים, טקסט, תיאורים, חתימות, שינוי האטימות והגודל ועוד רבים נוספים. כדי לעשות זאת, בצע את השלבים הבאים: הכלים המובנים של האייפון כדי לערוך את צילומי המסך קל לשימוש. אבל אולי זה לא נוח להשתמש באצבע שלך כדי לפעול לפרטים מסוימים.
עריכת צילומי מסך באייפון באמצעות כלי ברירת המחדל היא הדרך הקלה והנוחה ביותר לערוך צילום מסך באייפון. אתה יכול לעשות זאת מיד לאחר צילום המסך מבלי להזדקק לאפליקציות נוספות. עם תכונה זו, אתה יכול לעשות הרבה, כמו הוספת מסננים, אפקטים, טקסט, תיאורים, חתימות, שינוי האטימות והגודל ועוד רבים נוספים. כדי לעשות זאת, בצע את השלבים הבאים: הכלים המובנים של האייפון כדי לערוך את צילומי המסך קל לשימוש. אבל אולי זה לא נוח להשתמש באצבע שלך כדי לפעול לפרטים מסוימים.
Step 1. Screenshot first the object or the screen that you want to capture on your iPhone.
Step 2. After that, you will see a sample image preview on the screen. Tap it.
Step 3. Now, you will see various tools inside the Markup screen, like adding text, drawing shapes, highlighting important details, cropping, and resizing the image. Feel free to utilize them to edit your screenshot image on your iPhone.
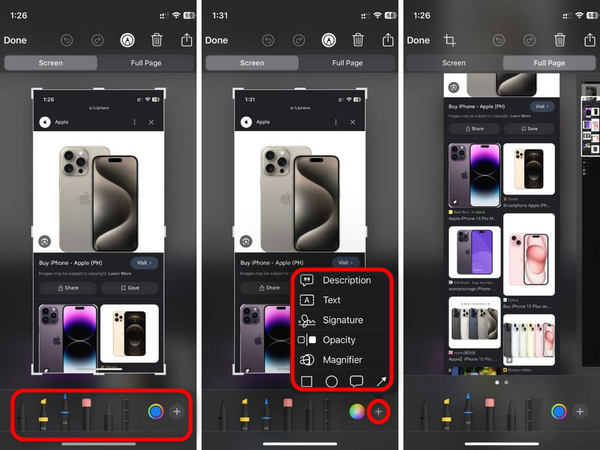
Step 4. If you’re done, tap the Done button to save it on your Photos.
הכלים המובנים של האייפון לעריכת צילומי המסך קלים לשימוש. אבל אולי זה לא נוח להשתמש באצבע שלך כדי לפעול לפרטים מסוימים.
חלק 5: כיצד לערוך צילום מסך באנדרואיד באמצעות עורך מובנה
בדיוק כמו האייפון, אתה יכול לערוך את צילום המסך שלך באנדרואיד לאחר צילום מסך בקלות. זה הכי טוב עבור משתמשי אנדרואיד שרוצים להתאים אישית את העריכה של תמונות המסך שלהם ממכשירי האנדרואיד שלהם. עם תכונה זו, משתמשים יכולים לחתוך, להוסיף טקסט, להדגיש, לצייר, ועוד.
Step 1. First, you need to capture a screenshot on your Android device. Once captured, the result will appear on your screen, similar to iOS devices. Click on this result to access the editing options.
Step 2. Once in the editing interface, you can use various tools to make changes. Common editing options include cropping, adding text, drawing with a stylus or your finger, applying filters, and adjusting brightness or contrast.
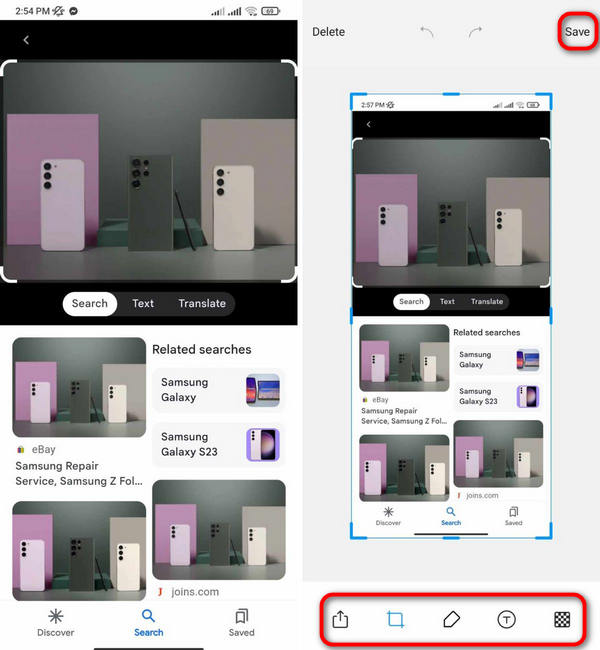
Step 3. After achieving the desired result, simply tap the Save icon to download the edited screenshot version onto your Android device effortlessly.
לכן, שימוש בעורך מובנה במכשירי אנדרואיד מציע נוחות לעריכת צילומי מסך ישירות במכשיר שלך. עם זאת, עבור תכונות עריכה מתקדמות יותר, ייתכן שתצטרך לחקור אפליקציות עריכה של צד שלישי.
חלק 6: שאלות נפוצות לגבי עריכת צילום מסך
האם אוכל להשתמש באפליקציות עריכה של צד שלישי במקום בעורך המובנה באנדרואיד?
כן. אתה יכול להשתמש באפליקציות עריכה של צד שלישי אם אתה מעדיף תכונות נוספות או ממשק אחר. עם זאת, העורך המובנה מציע נוחות ושילוב עם תכונות אנדרואיד אחרות.
האם עריכת צילומי מסך משפיעה על איכותם?
עריכת צילומי מסך בדרך כלל אינה משפיעה באופן משמעותי על איכותם, במיוחד אם נעשה שימוש בפונקציות עריכה בסיסיות כמו חיתוך והוספת טקסט. עם זאת, עריכה נרחבת, כמו סינון כבד או שינוי גודל, עשויה לפגום מעט באיכות התמונה.
האם ניתן לערוך צילומי מסך במחשבי Windows ללא תוכנת צד שלישי?
כן. אפשר לערוך צילומי מסך במחשבי Windows ללא תוכנת צד שלישי. Windows מספק כלי שירות מובנה בשם Paint המאפשר לך לבצע עריכות בסיסיות בצילומי המסך שלך, כגון חיתוך, הוספת טקסט וציור צורות. בנוסף, גרסאות חדשות יותר של Windows מציעות את הכלי 'Snip & Sketch', המספק אפשרויות עריכה מתקדמות יותר.
סיכום
In conclusion, learning how to edit screenshots on various platforms empowers you to enhance your images effortlessly. Whether you're on a Mac, Windows, iPhone, or Android, this guide provides step-by-step methods tailored to each platform. From using built-in tools to third-party apps like FVC Video Repair, you have everything you need to polish your screenshots. Start editing with FVC Video Repair now and unleash your creativity!
-
 מדריך שלב אחר שלב לצילום מסך ב-Dell [2025]
 למד כיצד לצלם צילום מסך במחשבי Dell עם המדריך שלנו שלב אחר שלב. הגדל את היעילות שלך וחסוך זמן עם תהליך פשוט זה. קרא עכשיו!
-
 כיצד לצלם בקלות צילומי מסך ב-HP [מדריך 2025]
 למד כיצד לצלם צילום מסך במחשבי Dell עם המדריך שלנו שלב אחר שלב. הגדל את היעילות שלך וחסוך זמן עם תהליך פשוט זה. קרא עכשיו!
-
 צילום מסך סרטון בקלות בעזרת המדריך הבסיסי הזה [2025]
 למד כיצד לצלם צילומי מסך מסרטונים בשיטות הפשוטות הללו בקלות. עקוב אחר המדריך שלנו והתחיל לצלם צילומי מסך של הסרטונים האהובים עליך עכשיו!