


כיצד לחתוך סרטון ב-QuickTime: מדריך מקיף למשתמשי מקינטוש
האם אי פעם צילמתם את הסרטון המושלם של החברים שלכם עושים משהו מצחיק, רק כדי לגלות אחר כך שיש ערימת כביסה ענקית או אדם אקראי שפוטובומב על הרקע? הייתי שם יותר פעמים ממה שאני רוצה להודות. בדרך כלל, האינסטינקט הראשון שלנו כמשתמשי מק הוא ללחוץ פעמיים על הקובץ ולפתוח אותו ב-QuickTime Player. זה מהיר, זה מובנה, וזה ממש שם. אבל אז, התסכול מכה. אתם מסתכלים בתפריטים, מחפשים כלי חיתוך, ו... כלום. אתם רואים חיתוך, אתם רואים סיבוב, אבל היכולת בפועל לחתוך את קצוות הפריים נראית חסרה.
עם זאת, אל תדאג; במדריך הזה נדון במה שאפשרי, במה שלא, ואיך תוכל להגיע לפריים המושלם בלי תואר בעריכת סרטים, על‑ידי כך שנראה לך איך לחתוך (לקרופ) קליפ וידאו ב‑QuickTime Player.
האם אתם מוכנים לתקן את הבעיה הזו? המשיכו לקרוא!

חלק 1. האם ניתן לחתוך סרטון ב-QuickTime
בואו נתחיל עם האמת, גם אם היא קצת מבאסת. אם אתם משתמשים בגרסה הסטנדרטית והחינמית של QuickTime Player שמותקנת מראש בכל מערכת ההפעלה macOS, האם תוכלו לחתוך סרטון ישירות ב-QuickTime? התשובה הקצרה היא: לא, לא כמו שאתם חושבים.
הסיבה מאחורי המגבלה
בניגוד לאפליקציית התמונות באייפון, הכוללת כלי חיתוך אינטואיטיבי מאוד, גרסת שולחן העבודה של QuickTime Player מיועדת בעיקר כנגן. אפל עיצבה אותו ככלי קל משקל לצפייה וביצוע עריכות בסיסיות, כגון חיתוך (קיצור האורך) או סיבוב.
כשאנשים שואלים על חיתוך וידאו ב-QuickTime, הם בדרך כלל מצפים שיופיע תיבת גרירה מעל הסרטון. למרבה הצער, תכונה זו אינה כלולה בתפריט הסטנדרטי. זוהי אחת מאותן תופעות מוזרות של מק, שבהן גרסת המובייל של התוכנה שלהם לפעמים עשירה יותר בתכונות מגרסת שולחן העבודה לעריכות מהירות.
אם אתם נחושים להישאר בתוך המערכת האקולוגית של QuickTime, עומדות בפניכם שתי דרכים עיקריות:
1. שדרוג ל‑QuickTime Pro: (הערה: זה פתרון ישן יותר, והוא רלוונטי בעיקר למערכות ותיקות, אבל זו הייתה הדרך הרשמית שבה התוכנה נהגה לטפל בזה).
2. עקיפת הקלטת המסך: זה הטריק האהוב עליי. בפועל אפשר לחתוך וידאו בעקיפין בעזרת פונקציית הקלטת המסך של QuickTime, כדי להקליט רק את החלק המסוים של הווידאו שברצונך לשמור.
נעמיק בשתי השיטות הללו בהמשך, כך שתוכלו לבחור את זו שמתאימה לסגנון שלכם.
חלק 2. כיצד לחתוך סרטון ב-QuickTime ב-Mac
מאחר שקבענו שאין כפתור חיתוך, בואו נדון בשתי הדרכים להשיג את התוצאה הרצויה באמצעות הכלים הקיימים של QuickTime.
שיטה 1: חיתוך סרטון באמצעות הקלטת מסך חדשה
זוהי הדרך האנושית ביותר לעשות זאת מבלי לבזבז כסף או להוריד תוכנה מורכבת. בעיקרון, אתם הולכים להפעיל את הסרטון שלכם ולאחר מכן להקליט מחדש את המסך, אך רק לבחור את החלק מהפריים שאתם רוצים לשמור.
שלב 1. פתח את הווידאו שלך
הפעל את QuickTime Player ופתח את הקובץ שברצונך לערוך. QuickTime תומך ב‑MOV, MP4, M4V וכו', ואתה יכול לייבא את קובץ הווידאו לכלי הזה כדי לחתוך אותו (QuickTime לא מצליח לפתוח קובץ MOV?).
שלב 2. הכן את הבמה
עצור את הווידאו בפריים שמציג את כל האזור שברצונך לשמור. הגדל את החלון ככל האפשר כדי לשמור על איכות גבוהה.
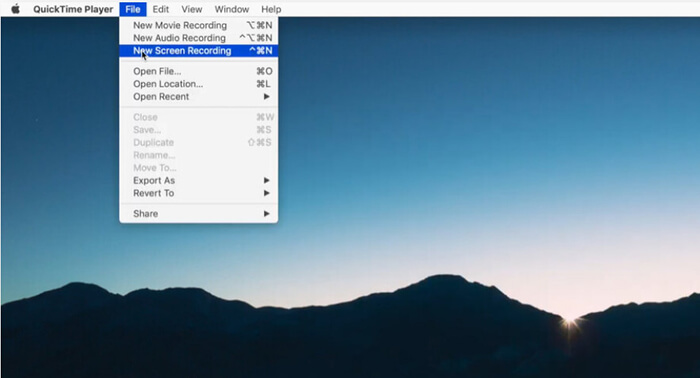
שלב 3. התחל הקלטת מסך חדשה
גש אל File > New Screen Recording (או לחץ Command + Shift + 5).
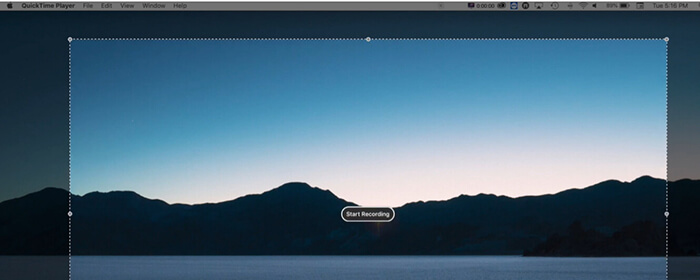
שלב 4. בחר את האזור
בסרגל הכלים של ההקלטה שיופיע, בחר Record Selected Portion. תראה תיבה מקווקוות. גרור את הפינות של התיבה כך שיתאימו באופן מושלם לאזור הווידאו שאותו אתה רוצה לחתוך.
שלב 5. הקלט והפעל
לחץ על Record. מיד לאחר מכן לחץ Play בווידאו שלך. תן לו לרוץ עד הסוף.
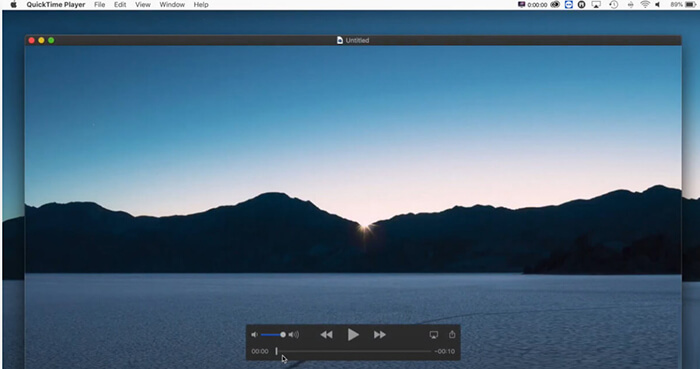
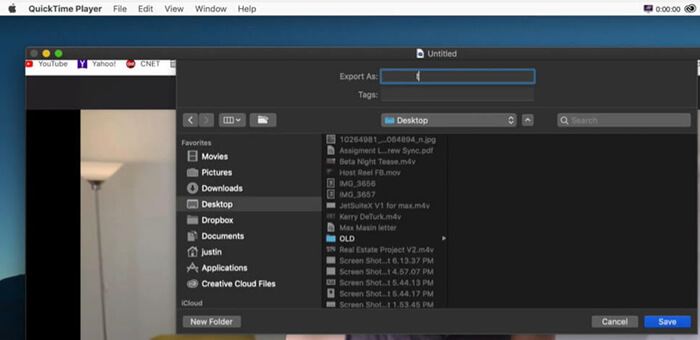
שלב 6. שמור קובץ וידאו חתוך
לאחר שהווידאו מסתיים, עצור את ההקלטה. כעת יש ברשותך קובץ וידאו חתוך.
שיטה 2: שימוש ב-QuickTime Pro 7 (שיטה מדור קודם)
למי שמשתמש במחשבי מק מאמצע שנות ה-2000, אולי זוכרים את QuickTime Pro. בעוד שאפל עברה לכיוון QuickTime Player, גרסת ה-Pro אפשרה שימוש במסכה לחיתוך סרטונים.
שלב 1. צור מסכה (Mask)
עליך ליצור תמונה בשחור‑לבן בתוכנה כמו Photoshop או Preview, התואמת לממדי הווידאו שלך, עם מלבן לבן שמייצג את האזור שברצונך להשאיר.

שלב 2. החל את המסכה
ב‑QuickTime Pro, עליך לגשת אל Windows > Show Movie Properties > Visual Settings ולייבא את המסכה הזאת.
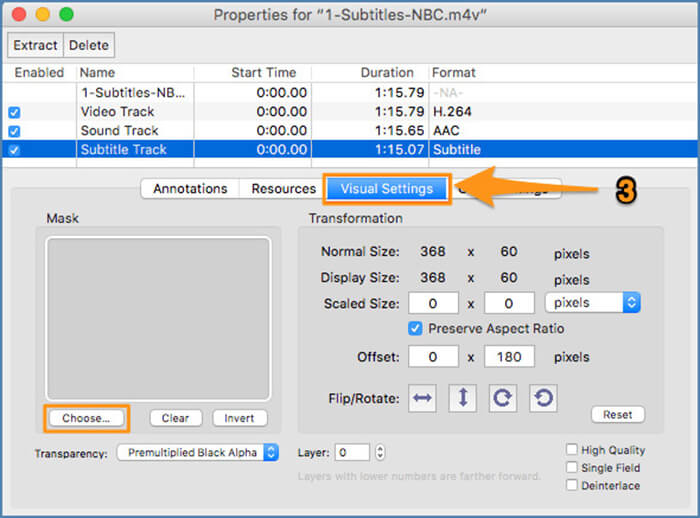
שלב 3. שמור וידאו חתוך
לאחר מכן תוכל לייצא ולשמור את הווידאו החתוך על‑ידי לחיצה על File > Export.

זה מייגע ביותר, ולמען האמת, מיושן. רוב גרסאות macOS המודרניות כבר לא תומכות ב-QuickTime 7. אני מזכיר את זה רק כי תראו את זה בפורומים ישנים, אבל אני לא ממליץ על זה לפרויקט מהיר של בית ספר תיכון.
חלק 3. האלטרנטיבה הטובה ביותר ל-QuickTime לחיתוך וידאו ב-Mac
בואו נהיה כנים: הטריק של הקלטת מסך בסדר לסרטון של 10 שניות, אבל אם יש לכם סרטון של 10 דקות, זה סיוט מוחלט. בנוסף, אתם מאבדים קצת איכות בכל פעם שאתם מקליטים מחדש את המסך. אם אתם רוצים לדעת איך לחתוך סרטון ב-QuickTime Player בלי כאב ראש, התשובה הטובה ביותר היא למעשה להשתמש בכלי ייעודי.
ההמלצה המובילה שלי אחרי בדיקה של תריסר אפליקציות שונות היא FVC Video Converter Ultimate.
זהו כלי עוצמתי שמרגיש כאילו תוכנן עבור אנשים שמוצאים עורכים מקצועיים כמו Adobe Premiere מאיימים מדי. זהו כלי אחד שמטפל בהמרה, דחיסה, וחשוב מכל, חיתוך מדויק בכמה לחיצות בלבד. בניגוד לפתרון QuickTime, כלי זה מאפשר לך להזין יחסי גובה-רוחב מדויקים (כגון 16:9 עבור YouTube או 9:16 עבור TikTok), מה שמבטיח שהסרטון שלך נראה מקצועי ויתאים בצורה מושלמת לכל מסך שאליו הוא מיועד. הוא גם משתמש בהאצת חומרה, כלומר הוא חותך ושומר את הסרטון שלך מהר משמעותית מרוב האפליקציות האחרות שניסיתי. אם נמאס לכם מהמגבלות של כלי Mac מובנים, זהו הצעד ההגיוני הבא עבור כל סטודנט או יוצר תוכן.
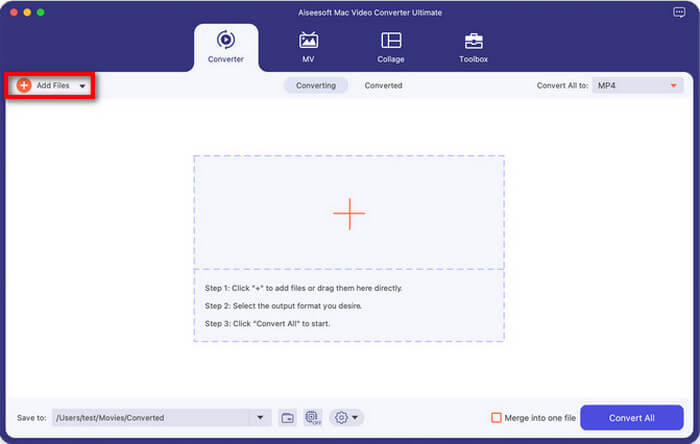
שלב 1. הוסף את הווידאו שלך
הורד בחינם את FVC Video Converter Ultimate למק שלך. פתח אותו, ותראה ממשק נקי במיוחד.
הורדה חינמיתל-Windows 7 ומעלההורדה מאובטחת
הורדה חינמיתל-MacOS 10.7 ומעלההורדה מאובטחת
לחצו על כפתור ה-+ הגדול באמצע, או גררו ושחררו את קובץ הווידאו שברצונכם לחתוך ישירות לתוך התוכנה.
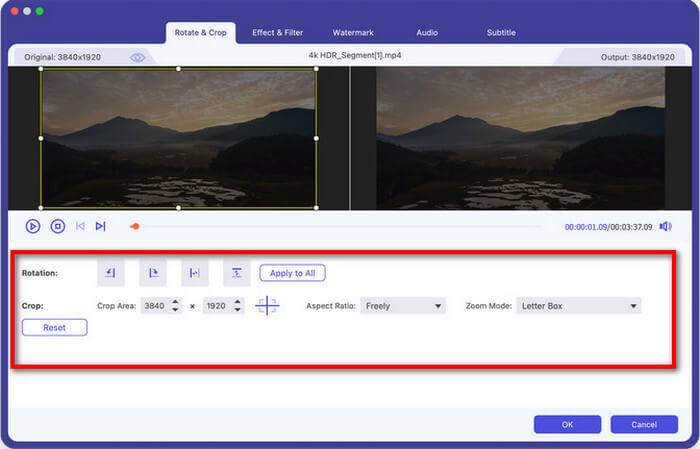
שלב 2. חתוך את קובץ הווידאו
לחץ על סמל ה‑Edit (שנראה כמו שרביט קסמים קטן או כוכב) הממוקם לצד תמונת התצוגה המקדימה של הווידאו.
גש ללשונית Rotate & Crop. כאן תוכל פשוט לתפוס את הפינות הצהובות של המסגרת ולגרור אותן כדי לחתוך את הווידאו. או, אם אתה כמוני ורוצה שהכול יהיה מושלם, השתמש בתפריט ה‑Aspect Ratio כדי לבחור יחס ממדים מוכן מראש.
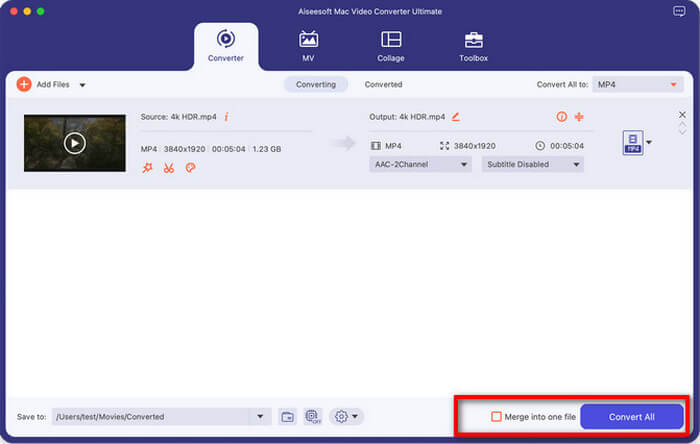
שלב 3. תצוגה מקדימה ושמירה
תוכל לראות תצוגה מקדימה בזמן אמת של איך נראה הווידאו החתוך. כשתהיה מרוצה, לחץ על OK. לאחר מכן חזור לחלון הראשי ולחץ על Convert All כדי לשמור את יצירת המופת החדשה והחתוכה שלך.
חותך הווידאו הזה מציל חיים כי הוא לא גורם לי לעשות חישובים כדי לחשב את ממדי הסרטון. אני אוהב שאני יכול לחתוך סרטון עבור הסטורי שלי באינסטגרם ואז להמיר אותו מיד לפורמט אחר במידת הצורך. היתרון הגדול ביותר הוא שמירת האיכות; זה נראה הרבה יותר חד משיטת הקלטת המסך ב-QuickTime.
חלק 4. שאלות נפוצות
מה ההבדל בין חיתוך לחתוך ב-QuickTime?
זהו מקור הבלבול הנפוץ ביותר!
• קיצוץ (Trimming) מתייחס לזמן. זה כמו להשתמש במספריים כדי לגזור את ההתחלה או הסוף של רצועת סרט. אתה מקצר את הווידאו.
• חיתוך (Cropping) מתייחס למרחב. זה כמו לקחת תמונה ולגזור את השוליים עם סכין יפנית. אתה משנה מה גלוי בתוך הפריים. QuickTime Player מצטיין בקיצוץ, אבל חסר בו כלי ייעודי לחיתוך (Cropping).
איך לחתוך סרטון ב-QuickTime?
אם הבנת שבפועל רק רצית לקצר את הווידאו, כך אפשר לעשות זאת במהירות:
1. פתח את הווידאו ב‑QuickTime.
2. לחץ Command + T או עבור אל Edit > Trim.
3. גרור את הידיות הצהובות כדי לבחור את החלק של הווידאו שברצונך לשמור.
4. לחץ על Trim ושמור את הקובץ.
למה הסרטון החתוך שלי מטושטש?
אם השתמשת בשיטת הקלטת המסך כדי לחתוך וידאו ב‑QuickTime Player, ייתכן שהוא ייראה מעט מטושטש. זה קורה מפני שבמהות אתה מצלם תמונה של תמונה.
• הפתרון: ודא שהווידאו המקורי שלך מתנגן ב‑Actual Size או Fit to Screen (Command + 3) לפני שאתה מתחיל להקליט. אם החלון קטן, ההקלטה תהיה ברזולוציה נמוכה.
• פתרון טוב יותר: השתמש בכלי כמו FVC Video Converter Ultimate, שחותך את נתוני הווידאו בפועל במקום רק להקליט פיקסלים מהמסך שלך.
האם אני יכול לחתוך סרטון בחינם במק בלי להוריד תוכנה נוספת?
טכנית, כן! אם QuickTime נראה מאתגר מדי, אפשר להשתמש ב-iMovie במקום. הוא מגיע בחינם ב-Mac. פשוט מייבאים את הסרטון, לוחצים על כפתור החיתוך מעל חלון התצוגה המקדימה, ואז מייצאים אותו. זה קצת יותר כבד מ-QuickTime, אבל זה אמצע יציב.
סיכום
ללמוד איך לחתוך וידאו ב‑QuickTime מרגיש קצת כמו ציד אוצרות. זה לא פשוט וישיר כמו שהיינו רוצים, אבל עם מעט יצירתיות והתוכנה החלופית המתאימה, זה בהחלט אפשרי.
לסיכום:
- נגן QuickTime רגיל לא יכול לחתוך ישירות.
- אתה יכול לזייף את זה על ידי שימוש בכלי הקלטת המסך כדי ללכוד אזור ספציפי במסך שלך.
- אם אתם רוצים תוצאה מקצועית בלי התחושה המגוחכת, FVC Video Converter Ultimate היא הפתרון.
תמיד שמור עותק של קובץ הווידאו המקורי, הלא‑ערוך. אין דבר גרוע יותר מאשר לחתוך וידאו, לשמור על גבי המקור, ואז לגלות שגזרת משהו חשוב!
קדימה, תן לווידאו הזה תספורת.
-
 עובדות מובילות שכדאי לדעת על QuickTime Slow Motion
 האם ניסית להשתמש ב-QuickTime Media Player כדי להפעיל וידאו בהילוך איטי? קרא מאמר זה כדי לדעת יותר על השירות המעולה שיש לנגן המדיה הזה.
-
 הדרך הטובה ביותר להאיץ וידאו ב-QuickTime בקלות ב-Mac
 צריך להאיץ את הסרטון ב-Quicktime? ובכן, כל הדברים שתצטרכו נמצאים במאמר זה, אז המשיכו לקרוא אותו כדי לדעת עליו יותר.
-
 3 דרכים קלות להמיר קבצי MP4 ל-QuickTime (MOV)
 למד כיצד להמיר MP4 ל-QuickTime (MOV) באמצעות המדריך הפשוט שלנו שלב אחר שלב, שיהפוך את חוויית המרת הווידאו שלך ללא טרחה ומהירה.