


अपने कंप्यूटर पर स्पीड रैम्पिंग कैसे करें, इस पर वॉक थ्रू गाइड
क्या आप स्पीड रैंपिंग करने का तरीका ढूंढ़ रहे हैं? बहुत से लोग ऐसे टूल्स खोजते हैं जो उन्हें अपनी वीडियो या फिल्मों की गति को धीरे‑धीरे बदलने में मदद कर सकें। किसी वीडियो में स्पीड रैंपिंग करना कई वीडियो एडिटर्स के बीच लोकप्रिय है, क्योंकि यह वीडियो पर नाटकीय प्रभाव डालता है। हालांकि, बहुत‑सी एप्लिकेशनों में ऐसा स्पीड रैंपिंग फ़ीचर नहीं होता जिसे आप इस्तेमाल कर सकें। लेकिन चिंता न करें, क्योंकि एक प्रसिद्ध वीडियो एडिटिंग सॉफ्टवेयर है जिसकी मदद से आप स्पीड रैंपिंग कर सकते हैं। यह गाइड पोस्ट लगातार पढ़ते रहें ताकि आप जान सकें कि स्पीड रैंपिंग कैसे करें।.

भाग 1. स्पीड रैंपिंग क्या है
वीडियो स्पीड रैंपिंग कई वीडियो संपादकों के बीच लोकप्रिय है, खासकर फिल्में बनाते समय। लेकिन वैसे भी स्पीड रैंपिंग क्या है?
स्पीड रैंपिंग आपके वीडियो की गति को धीरे-धीरे समायोजित कर रहा है ताकि आपके वीडियो पर एक शानदार सिनेमाई प्रभाव हो। साथ ही, आप इसे अपने वीडियो के त्वरण और मंदी के रूप में रख सकते हैं। एक ऐसे परिदृश्य की कल्पना करें जहां एक खलनायक किसी फिल्म में नायक को गोली मारने की कोशिश कर रहा हो। गोली लगने के बाद आप स्पीड रैंपिंग कर सकते हैं ताकि यह एक महत्वपूर्ण सिनेमाई प्रभाव पैदा करे।
संक्षेप में, स्पीड रैंपिंग शक्तिशाली प्रभाव पैदा करने के लिए मुख्य-फ़्रेम के बेहतर नियंत्रण के साथ आपके वीडियो की गति को बदल देता है। इसके अलावा, यह एक मानक वीडियो संपादन कार्य है जिसे आप अपने वीडियो में कर सकते हैं। इसलिए, अगले भाग को व्यापक रूप से पढ़ें यदि आप सीखना चाहते हैं कि अपने वीडियो पर स्पीड रैंपिंग कैसे करें।
भाग 2। प्रीमियर में स्पीड रैम्पिंग कैसे करें
Adobe Premiere सबसे उत्कृष्ट वीडियो संपादन सॉफ़्टवेयर में से एक है जिसका उपयोग आप अपने वीडियो को गति देने के लिए कर सकते हैं। Adobe Premiere में कई संपादन कार्य हैं जिनका उपयोग आप अपनी वीडियो फ़ाइल को संपादित करने या बढ़ाने के लिए कर सकते हैं। इसके अलावा, यह उच्च रिज़ॉल्यूशन और गुणवत्ता वाले शक्तिशाली आउटपुट का उत्पादन कर सकता है। क्या अधिक है, यह असीमित मल्टीकैम कोण प्रदान करता है जो आपके वीडियो को गति देने पर फायदेमंद होते हैं। और चूंकि नवीनतम अपडेट, आपके डिवाइस पर वीडियो आयात और निर्यात करना अधिक प्रबंधनीय है।
साथ ही, यदि आप प्रतिक्रियाशील गति वाला प्रोग्राम चाहते हैं तो Adobe Premiere एक बेहतरीन एप्लिकेशन है। कई पेशेवर वीडियो या फिल्मों को संपादित करने के लिए Adobe Premiere का उपयोग करना पसंद करते हैं क्योंकि इसमें वीडियो संपादन के लिए आवश्यक कई संगठनात्मक उपकरण हैं। इसके अलावा, यह प्रोग्राम विंडोज और मैक सहित सभी क्रॉस-मीडिया प्लेटफॉर्म पर डाउनलोड किया जा सकता है।
Adobe Premiere में स्पीड रैंपिंग कैसे करें:
स्टेप 1. अपने कंप्यूटर पर Adobe Premiere डाउनलोड और इंस्टॉल करें। प्रोग्राम इंस्टॉल करने के बाद, इसे अपने डिवाइस पर खोलें। सबसे पहले आपको वही वीडियो फ़ाइल इम्पोर्ट करनी है जिस पर आप स्पीड रैंप करना चाहते हैं। इम्पोर्ट करने के लिए आप अपनी फ़ाइलों से वीडियो को क्लिक करके खींचें और प्रोजेक्ट विंडो में छोड़ दें।.
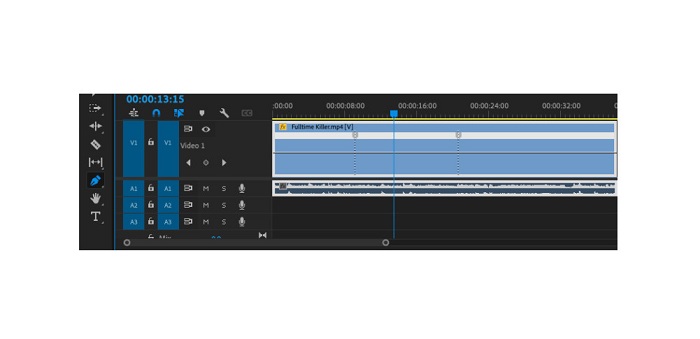
स्टेप 2. इसके बाद, क्लिप को टाइमलाइन पर ड्रैग करें ताकि वहीं पर एक सीक्वेंस तैयार हो जाए। फिर Adobe Premiere आपके लिए स्पीड रैंपिंग के लिए ज़रूरी सेटिंग्स के साथ ऑटोमैटिक रूप से सीक्वेंस बना देगा।.

स्टेप 3. इसके बाद, उस हिस्से का चयन करें जहाँ आप स्पीड रैंप करना चाहते हैं। जिस हिस्से को आप स्पीड रैंप करना चाहते हैं उसे अलग करने के तरीकों में से एक तरीका है इन और आउट पॉइंट सेट करना। उस मोमेंट को काटने के लिए Command + K दबाएँ। दूसरा तरीका है रेज़र ब्लेड टूल का उपयोग करके क्लिप को हिस्सों में बाँटना।.
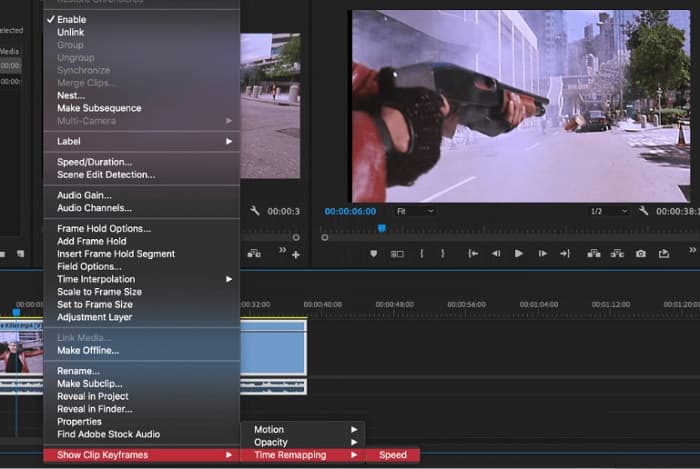
स्टेप 4. अगले चरण में, हम की‑फ्रेम बनाएँगे। लेकिन की‑फ्रेम सेट करने से पहले हमें यह सुनिश्चित करना होगा कि की‑फ्रेम दिखाई दे रहे हों। अपने वीडियो क्लिप पर राइट‑क्लिक करें और Show Clip Keyframes > Time Remapping > Speed चुनें।.
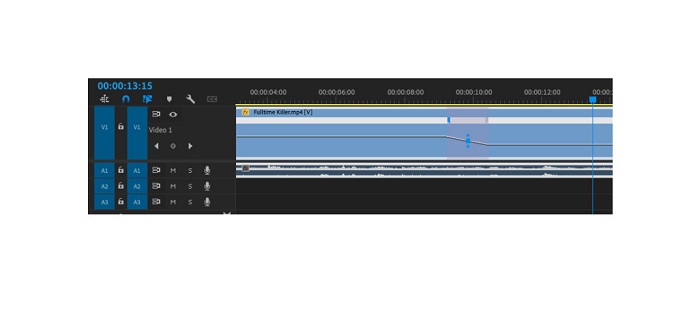
स्टेप 5. और फिर टूलबार पर पेन टूल चुनें। इसके बाद, की‑फ्रेम बनाने के लिए अपने वीडियो क्लिप के ऊपर चल रही सफेद लाइन पर क्लिक करें। वीडियो पर स्पीड रैंपिंग करने के लिए आपको दो की‑फ्रेम की ज़रूरत होगी। पहला की‑फ्रेम वहाँ सेट करें जहाँ से आप स्पीड रैंप शुरू करना चाहते हैं और दूसरा वहाँ जहाँ आप रैंप खत्म करना चाहते हैं।.
स्टेप 6. अब, हम उस हिस्से की स्पीड एडजस्ट करेंगे जिस पर आप स्पीड रैंप करना चाहते हैं। आपने जो की‑फ्रेम सेट किए हैं, उनके बीच की सफेद लाइन पर क्लिक करें, और सफेद लाइन को ऊपर या नीचे खींचें। वीडियो को तेज़ करने के लिए ऊपर की ओर और धीमा करने के लिए नीचे की ओर ड्रैग करें।.
और यह वह ट्यूटोरियल है जिसे आपको जानना आवश्यक है कि क्या आप Adobe Premiere में वीडियो को गति देना चाहते हैं।
भाग 3. स्पीड रैंपिंग करने का आसान तरीका
हालांकि Adobe Premiere उच्च गुणवत्ता के साथ अद्भुत आउटपुट दे सकता है, यह शुरुआती-अनुकूल टूल नहीं है। इसलिए, यदि आप स्पीड रैंपिंग के लिए नए हैं, तो वैकल्पिक तरीके की तलाश करना बेहतर है। सौभाग्य से, हमें यह शानदार एप्लिकेशन मिला है जिसका उपयोग आप किसी वीडियो को गति देने के लिए कर सकते हैं। इस एप्लिकेशन के बारे में अधिक जानने के लिए, नीचे दिए गए विवरण पढ़ें।
Video Converter Ultimate एक बेहतरीन सॉफ्टवेयर है जिसमें कई एडवांस्ड एडिटिंग फीचर मौजूद हैं। आप किसी वीडियो पर स्पीड रैंप करना चाहें तो इस सॉफ्टवेयर का उपयोग कर सकते हैं। इसके अलावा, इसका इंटरफ़ेस इस्तेमाल करने में आसान है, जिससे यह शुरुआती लोगों के लिए भी उपयुक्त है। साथ ही, यह सभी वीडियो फ़ॉर्मैट्स को सपोर्ट करता है, जैसे MP4, AVI, MOV, MKV, VOB, WMV, M4V, WebM, और 1000+ अन्य। इसमें कई एडिटिंग फीचर शामिल हैं, जैसे वीडियो स्पीड कंट्रोलर, वीडियो मर्जर, वीडियो वॉटरमार्क रिमूवर, कलर करेक्शन, और टूलबॉक्स के अंदर और भी बहुत कुछ।.
इसके अलावा, किसी वीडियो को गति देने के लिए इसके वीडियो स्पीड कंट्रोलर का उपयोग करते समय, आप इसके स्पीड प्रीसेट में से चुन सकते हैं। वीडियो कन्वर्टर अल्टीमेट के बारे में और भी बढ़िया बात यह है कि इसका तेज़ प्रोसेसिंग इंटरफ़ेस है, जो इसे कई उपयोगकर्ताओं के लिए सुविधाजनक बनाता है। आप इस ऐप को विंडोज, मैक और लिनक्स सहित सभी प्लेटफॉर्म पर डाउनलोड कर सकते हैं। और अगर आप वीडियो कन्वर्टर अल्टीमेट के वीडियो स्पीड कंट्रोलर का उपयोग करना चाहते हैं, तो नीचे दिए गए सरल गाइड का पालन करें।
वीडियो कन्वर्टर अल्टीमेट का उपयोग करके वीडियो को गति कैसे दें:
स्टेप 1. सबसे पहले, नीचे दिए गए डाउनलोड बटन पर क्लिक करके अपने कंप्यूटर पर ऐप डाउनलोड करें। ऐप डाउनलोड और इंस्टॉल करने के बाद, इसे अपने डिवाइस पर रन करें।.
फ्री डाउनलोडWindows 7 या बाद के संस्करण के लिएसुरक्षित डाउनलोड
फ्री डाउनलोडMacOS 10.7 या बाद के संस्करण के लिएसुरक्षित डाउनलोड
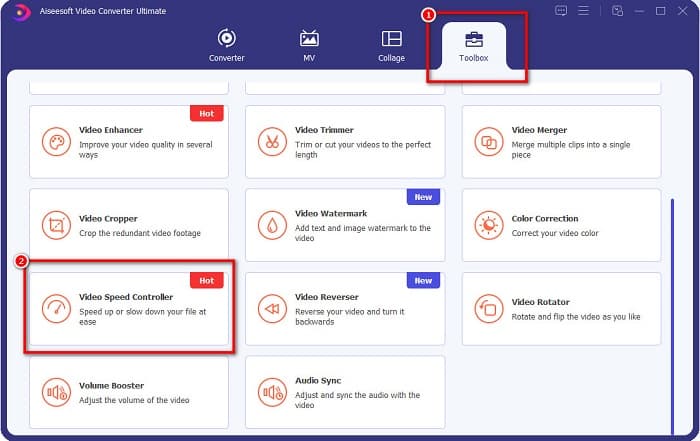
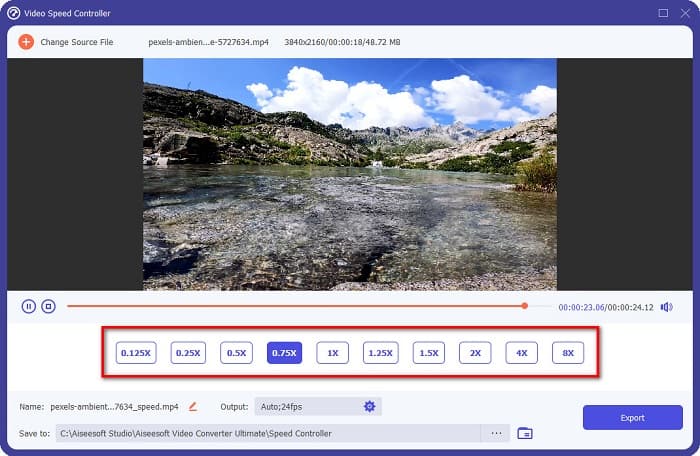
स्टेप 2. इसके बाद, एप्लिकेशन के मुख्य इंटरफ़ेस पर टूलबॉक्स पैनल में जाएँ और Video Speed Controller फ़ीचर चुनें।.
स्टेप 3. जिस वीडियो पर आप स्पीड रैंप करना चाहते हैं, उसे अपलोड करने के लिए प्लस (+) साइन बटन पर क्लिक करें या अपनी फ़ाइल को प्लस साइन बॉक्स पर ड्रैग और ड्रॉप कर दें।.

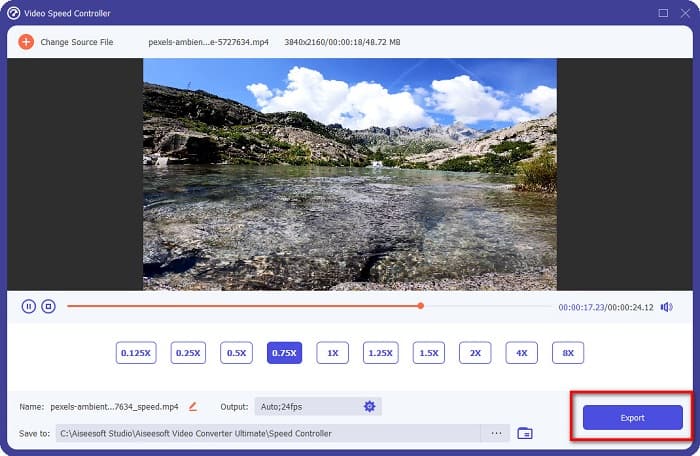
स्टेप 4. और अगली इंटरफ़ेस पर, अपने वीडियो के लिए वह वीडियो स्पीड चुनें जो आप चाहते हैं। आप इन विकल्पों में से चुन सकते हैं: 0.125x, 0.25x, 0.5x, 0.75x, 1x, 1.25x, 1.5x, 2x, 4x, और 8x।.
स्टेप 5. अंत में, यदि आप अपने वीडियो की स्पीड एडिट करना पूरा कर चुके हैं, तो आउटपुट को अपने डिवाइस पर सेव करने के लिए Export बटन पर क्लिक करें।.
से संबंधित:
After Effects में वीडियो को तेज़ कैसे करें [सबसे बेहतर स्पीड‑अप टूल]
Sony Vegas में वीडियो को तेज़ कैसे करें [आसान स्टेप्स]
भाग 4. स्पीड रैंपिंग के बारे में अक्सर पूछे जाने वाले प्रश्न
क्या आप अपने आईफोन पर फुटेज को तेज कर सकते हैं?
हां। यदि आप iPhone पर स्पीड रैंपिंग करना चाहते हैं, तो आप iMovie ऐप का उपयोग कर सकते हैं। iMovie iPhone के लिए एक जाना-पहचाना वीडियो एडिटिंग ऐप है जो आपको कई रेंज वाले वीडियो की स्पीड बढ़ाने या धीमा करने की सुविधा देता है।
क्या एडोब प्रीमियर मुफ़्त है?
नहीं। Adobe Premiere एक निःशुल्क ऐप नहीं है। यदि आप इसका उपयोग करना चाहते हैं तो आपको प्रति माह US$20.99 के लिए ऐप खरीदना होगा। लेकिन, आप इसे 7 दिन के फ्री ट्रायल के साथ फ्री में डाउनलोड कर सकते हैं।
क्या मैं CapCut में रैंप को गति दे सकता हूँ?
CapCut एक वीडियो एडिटिंग ऐप है, जहां आप अपने वीडियो को स्पीड रैम्प कर सकते हैं। इसके स्पीड कर्व टूल का उपयोग करके, आप अपने वीडियो की गति को तेज या धीमा करके संपादित कर सकते हैं।
निष्कर्ष
स्पीड रैंपिंग आपके वीडियो पर एक अनोखा सिनेमैटिक इफेक्ट बनाने का बेहतरीन तरीका है। साथ ही, यदि आप वीडियो एडिटिंग में प्रोफेशनल हैं, तो स्पीड रैंपिंग के लिए Adobe Premiere सबसे अच्छा टूल है। लेकिन यदि आप फ्री ऐप डाउनलोड करके वीडियो स्पीड रैंप करना चाहते हैं, तो Video Converter Ultimate आपके लिए सही एप्लिकेशन है।.
-
 प्रीमियर प्रो में और इसके विकल्पों के साथ वीडियो को कैसे गति दें
 क्या आप जानना चाहते हैं कि वीडियो को गति देने के लिए प्रीमियर प्रो का उपयोग कैसे करें? फिर आप सही लेख में हैं क्योंकि हम कदम और अन्य किफायती विकल्प प्रदान करते हैं।
-
 विंडोज मूवी मेकर में स्लो मोशन वीडियो बनाने का आसान तरीका
 क्या आप अपने वीडियो पर जोर देने के लिए नाटकीय प्रभाव डालना चाहते हैं या कम से कम एक क्लिप को धीमी गति से बाकी हिस्सों से अलग करना चाहते हैं, और आप नहीं जानते कि कैसे? अधिक जानने के लिए इस लेख को पढ़ना जारी रखें।
-
 टिक टॉक पर वीडियो की स्पीड बढ़ाने के 2 आसान तरीके
 क्या आप जानना चाहते हैं कि टिकटॉक पर वीडियो की स्पीड कैसे बढ़ाई जाए? फिर इस लेख को पढ़ें कि यह कैसे करना है और यह जानने के लिए कि अन्य 2 उपकरण कौन से हैं जो आपकी मदद करेंगे।