

सहायक योजना जो ओबीएस ऑडियो विलंब दुविधा से संबंधित है
आप एक वीडियो प्रेज़ेंटेशन रिकॉर्ड करना चाहते हैं ताकि आप उसे कल अपनी कक्षा में दिखा सकें या अपने बिज़नेस मीटिंग्स में प्रस्तुत कर सकें। ऐसा करने के लिए, आप रिकॉर्डिंग करने और उसे कंप्यूटर पर सेव करने के लिए OBS Studio का इस्तेमाल करते हैं। लेकिन जब आप प्रेज़ेंटेशन में कुछ विवरण जोड़ने के लिए वीडियो को एडिट करना शुरू करते हैं, तो आपको पता चलता है कि ऑडियो में देरी है और वह सिंक से बाहर है। इस लेख में, आप जानेंगे कि OBS का ऑडियो क्यों आउट‑ऑफ‑सिंक हो जाता है। और अगर आपको यह नहीं पता कि इस स्थिति से कैसे छुटकारा पाएँ, तो हम ऑडियो डिले को ठीक करने के लिए आसान तरीके भी प्रदान करते हैं।.

भाग 1. ओबीएस ऑडियो सिंक से बाहर क्यों है?
अधिकांश स्ट्रीमर्स की मुख्य समस्या तब होती है जब उनका ऑडियो आउट‑ऑफ‑सिंक होने लगता है; शुरू के कुछ मिनटों तक सब ठीक लगता है, लेकिन अगला घंटा बीतते‑बीतते ऑडियो में ऐसी देरी आ जाती है जो आपके होंठों की हरकत से मेल नहीं खाती। स्ट्रीम की इस अनिश्चितता को ठीक करने की हड़बड़ी में कुछ लोग एडवांस्ड ऑडियो प्रॉपर्टीज़ में जाकर सिंक ऑफ़सेट एडजस्ट करते हैं, जो केवल एक निश्चित समय के लिए ऑडियो सोर्स पर देरी जोड़ सकता है, जो कि सुझाया नहीं जाता। असल में, OBS का ऑडियो आउट‑ऑफ‑सिंक होने की वजह सैंपल रेट (Sample Rate) का मेल न खाना है।.
भाग 2. ओबीएस ऑडियो विलंब को ठीक करने के लिए 7 आसान कदम
ऑडियो विलंब किसी भी अवसर पर होता है; यह स्ट्रीमिंग प्लेटफॉर्म, रिकॉर्ड की गई प्रस्तुतियों और यहां तक कि लाइव प्रसारण में भी हो सकता है। ऐसा होने का अधिकांश कारण कनेक्टिविटी समस्याएँ, तकनीकी कठिनाइयाँ और दोषपूर्ण प्रोग्राम किए गए अनुप्रयोग हैं। उदाहरण के लिए, आप ओबीएस स्टूडियो को अपनी स्ट्रीमिंग गतिविधि के लिए एक मंच के रूप में उपयोग कर रहे हैं, और ऐसा होता है कि आपके द्वारा स्ट्रीम किए जाने वाले प्रत्येक वीडियो आउटपुट में कुछ देरी होती है। अच्छी बात यह है कि एक ही मंच का उपयोग करके इन स्थितियों को रोकने के लिए सही तरीके हैं। यहां पालन करने में आसान चरण दिए गए हैं:
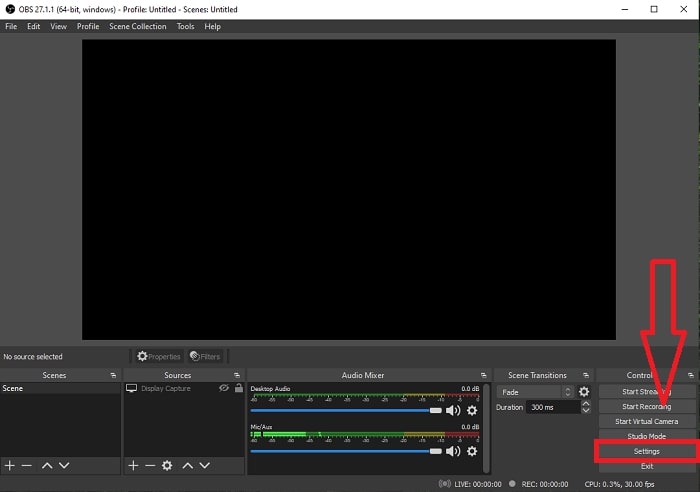
चरण 1: सेटिंग्स खोजें
एप्लिकेशन इंटरफेस के साथ आगे बढ़ने के लिए ओबीएस स्टूडियो खोलें और निचले दाएं कोने में सेटिंग्स पर क्लिक करें।
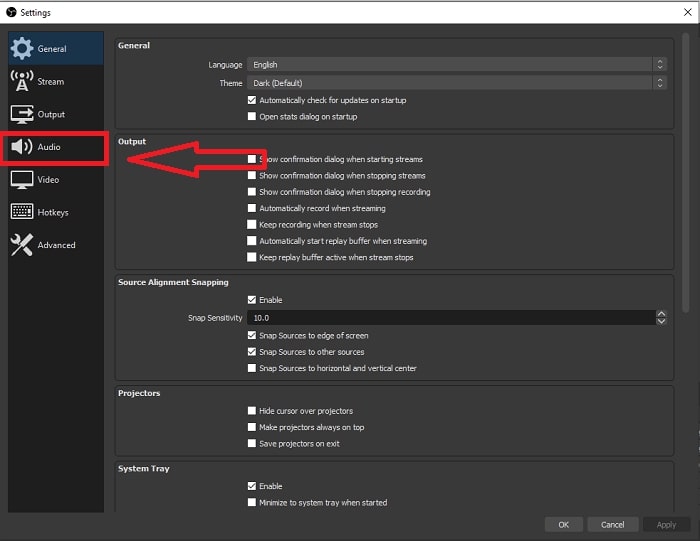
चरण 2: ऑडियो सेटिंग्स तक पहुँचें
जब आप Settings पर क्लिक करते हैं, तो आपकी स्क्रीन पर एक और इंटरफ़ेस दिखाई देगा। यह इंटरफ़ेस आपको OBS Studio की सामान्य सेटिंग्स का ओवरव्यू देगा। लेकिन OBS Studio के audio delay को ठीक करने की प्रक्रिया जारी रखने के लिए, इंटरफ़ेस के बाएँ कोने में मौजूद Audio पर क्लिक करें।.
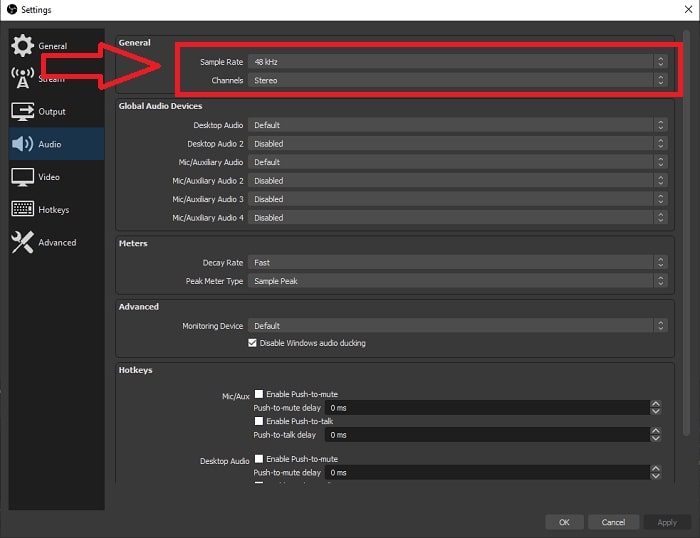
चरण 3: उपयुक्त Sample Rate चुनें
अपने डेस्कटॉप और रिकॉर्डिंग उपकरणों की पसंदीदा नमूना दर के आधार पर नमूना दर संपादित करें। मान लीजिए कि आपका रिकॉर्डिंग डिवाइस थोड़ा पुराना है, और आपके पास एक पुराना सेटअप है। उस स्थिति में, नमूना दर को 48 kHz के मानक नमूना दर से कम करना बेहतर होगा और यदि आप अपने डिवाइस की पसंदीदा नमूना दर का निरीक्षण करना चाहते हैं तो इसका समायोजन 48 kHz से बढ़ा दें। क्योंकि वीडियो की नमूना दर जितनी अधिक होगी, वह उतना ही मूल ऑडियो को फिर से बनाएगा। इसके अलावा, आप केवल चैनल विकल्प बदल सकते हैं जो इस बात पर निर्भर करता है कि आप वीडियो चलाने के लिए किस टूल का उपयोग करते हैं।
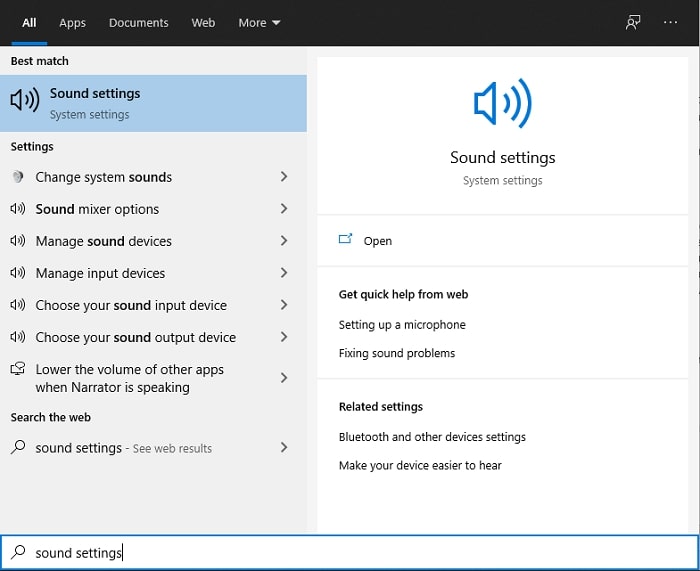
चरण 4: Sound Settings खोलें
OBS Studio में मनचाहा sample rate सेट करने के बाद, टास्कबार में मौजूद सर्च बार में Sound Settings टाइप करें, Sound Settings ढूँढें और अपने डेस्कटॉप सेटिंग्स में आगे बढ़ने के लिए उस पर क्लिक करें।.
चरण 5: Sound Control Panel खोजें
Sound Control Panel पर क्लिक करें। इसे खोलने के बाद आपकी स्क्रीन पर एक और साउंड इंटरफ़ेस दिखाई देगा—यह उन सभी उपलब्ध डिवाइसेज़ का ओवरव्यू है जिनका संबंध ऑडियो आउटपुट से है।.
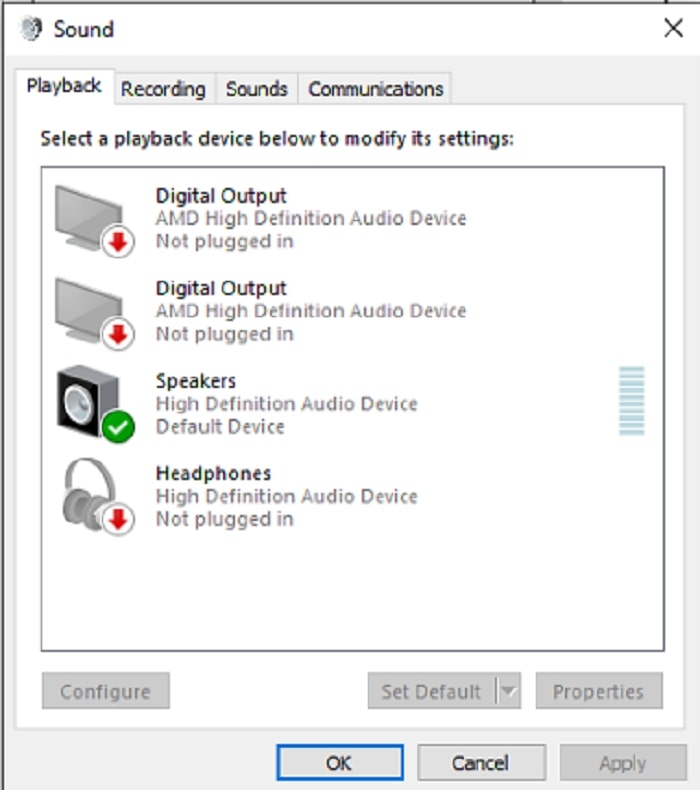
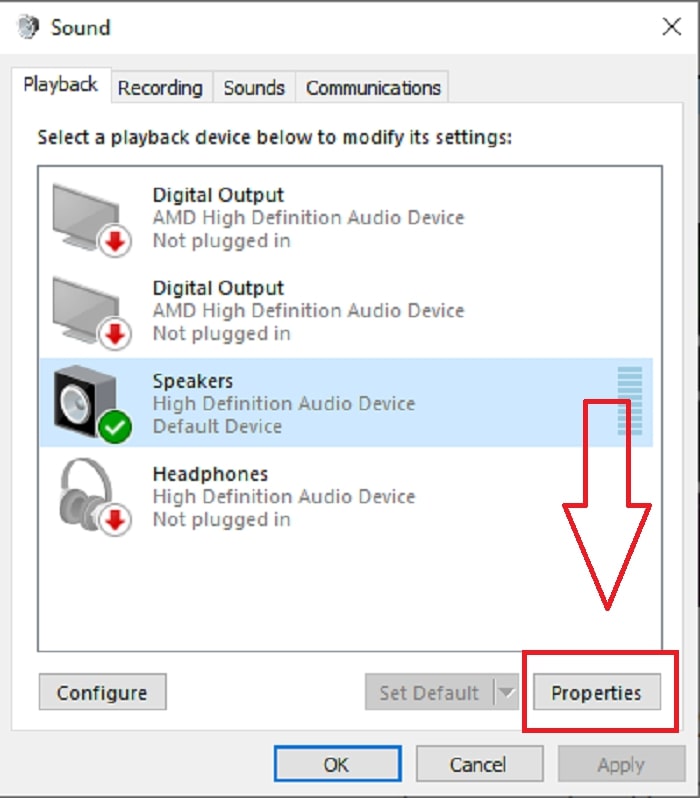
चरण 6: ऑडियो आउटपुट के लिए डिवाइस चुनें
मौजूद विकल्प आपके रिकॉर्डिंग सेटअप में उपलब्ध डिवाइस हैं, चाहे स्पीकर हो या हेडफ़ोन। चुनें कि कौन सा उपकरण ऑडियो को आउट-ऑफ-सिंक करता है और बाद में गुणों पर क्लिक करें।
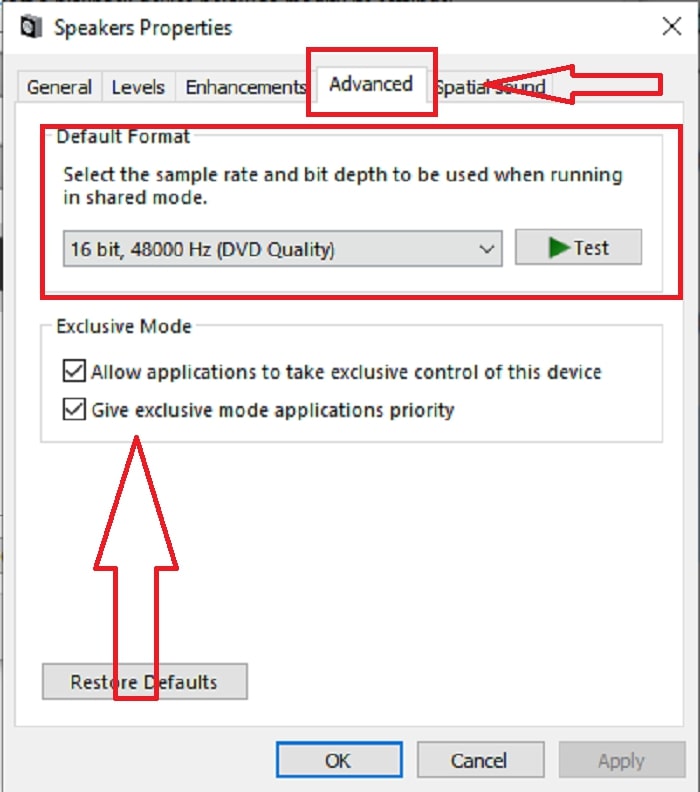
चरण 7: Advanced Settings में आगे बढ़ें
जैसे ही आप अपनी पसंद के ऑडियो आउटपुट डिवाइस की प्रॉपर्टीज़ पर क्लिक करते हैं, Advance पर क्लिक करें और आपको डिफ़ॉल्ट फॉर्मेट दिखाई देगा; विकल्पों में दिए गए हर फ़ॉर्मेट को टेस्ट करें और वह फ़ॉर्मेट चुनें जिसमें ऑडियो आउट‑ऑफ‑सिंक न हो।.
भाग 3. ओबीएस ऑडियो विलंब को ठीक करने का सबसे अच्छा तरीका
ऊपर दिया गया समाधान बताता है कि OBS Studio का इस्तेमाल करते हुए ऑडियो डिले से कैसे बचा जाए, लेकिन अगर समस्या यह हो कि जो रिकॉर्ड किया हुआ ऑडियो आप प्रस्तुत करना या अपलोड करना चाहते हैं, वही पहले से आउट‑ऑफ‑सिंक है? ऐसे में FVC Video Converter Ultimate का इस्तेमाल करें, जो किसी वीडियो क्लिप को बेहतर बनाने के लिए कई तरह की सुविधाएँ वाला सॉफ़्टवेयर है। इसकी जिन सुविधाओं में से एक फीचर, किसी वीडियो क्लिप के ऑडियो सिंक को उसकी डिले एडजस्ट करके ठीक कर सकता है। यह सॉफ़्टवेयर कैसे इस्तेमाल करना है, यह जानने के लिए नीचे दिए गए चरणों का पालन करें:
चरण 1: सॉफ़्टवेयर को अपने कंप्यूटर की हार्ड ड्राइव में सेव करने के लिए, Free Download बटन पर क्लिक करें। इसके बाद आप सॉफ़्टवेयर इंस्टॉल कर सकते हैं और अपनी पसंद के अनुसार सेटिंग्स को कस्टमाइज़ कर सकते हैं।.
फ्री डाउनलोडWindows 7 या बाद के संस्करण के लिएसुरक्षित डाउनलोड
फ्री डाउनलोडMacOS 10.7 या बाद के संस्करण के लिएसुरक्षित डाउनलोड
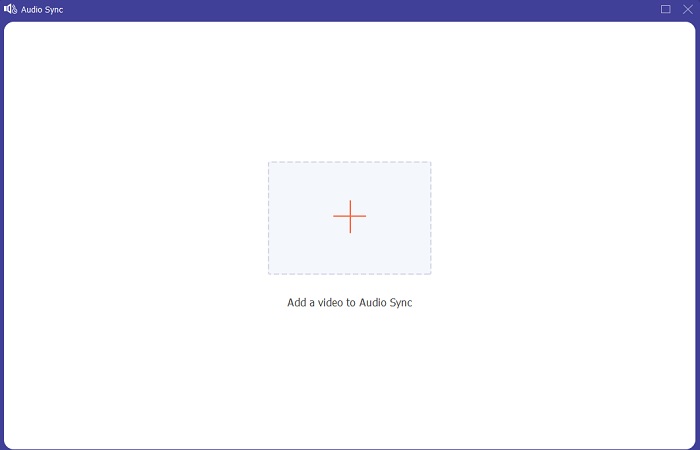
चरण 2: सॉफ़्टवेयर लॉन्च करने के बाद Toolbox फ़ीचर पर क्लिक करें, और आगे बढ़ते हुए Audio Sync पर क्लिक करें।

चरण 3: Audio Sync पर क्लिक करने के बाद + बटन पर क्लिक करें और वीडियो क्लिप को एडिट करना शुरू करें।.
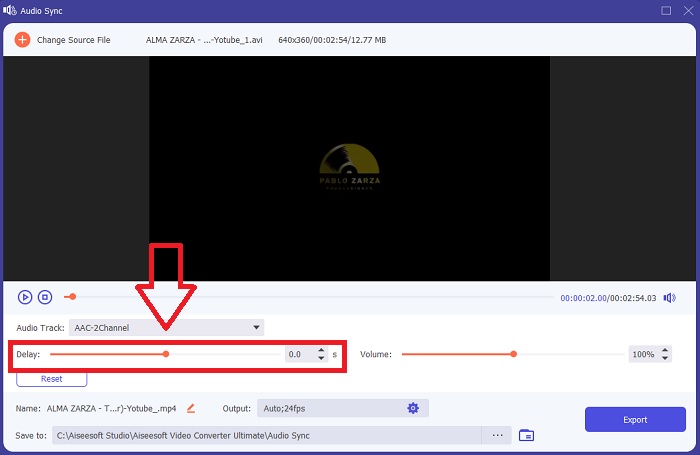
चरण 4: वीडियो क्लिप को ऑडियो के साथ सिंक करने के लिए ऑडियो के Slider को एडजस्ट करें। इसके साथ ही आप आउटपुट डिवाइस बदल सकते हैं और अपने वीडियो क्लिप की वॉल्यूम कस्टमाइज़ करना शुरू कर सकते हैं।.
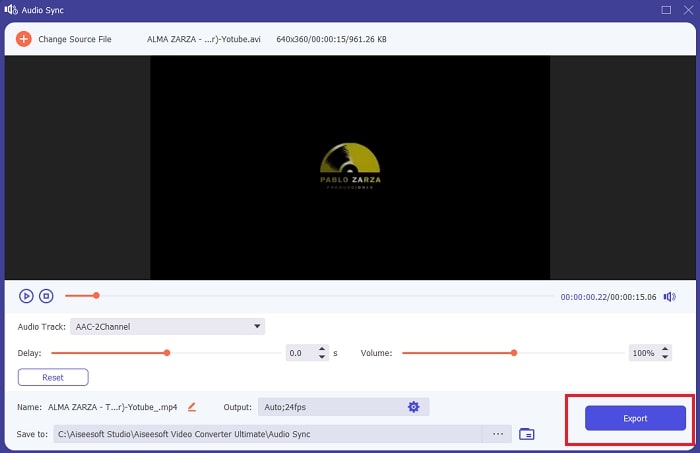
चरण 5: एडिटिंग समाप्त करने के बाद Export पर क्लिक करें और यह चुनें कि फ़ाइल को कहाँ सेव करना है।.
संबंधित:
VLC के साथ ऑडियो कैसे रिकॉर्ड करें
भाग 4. ओबीएस ऑडियो विलंब के बारे में अक्सर पूछे जाने वाले प्रश्न
नमूना दर बेमेल क्या है?
ऑडियो नमूना दर, किलोहर्ट्ज़ में व्यक्त की गई, वह गति है जिस पर सिस्टम इन मापों को लेता है। ऑडियो नमूना दर उस फ़्रीक्वेंसी रेंज को निर्धारित करती है जिसे आप डिजिटल ऑडियो में कैप्चर कर सकते हैं—अधिकांश डीएडब्ल्यू में नमूना दर आपकी ऑडियो प्राथमिकताओं में बदल जाती है। नमूना दर बदलने से आपके ऑडियो की गुणवत्ता प्रभावित होती है। हालांकि, नमूना दर बेमेल एक असमान प्राप्त करने और स्रोत को ऑडियो नमूना दर भेजने वाला है। यह घटना हमेशा तब होती है जब स्पीकर आउटपुट और हेडफ़ोन आउटपुट समान नमूना दर नहीं होते हैं जिससे ऑडियो विलंब होता है।
अगर मैं नमूना दर समायोजित करता हूं तो क्या मैं ऑडियो की गुणवत्ता खो देता हूं?
यदि आप अपने वीडियो क्लिप में ऑडियो सुनना चाहते हैं और इसे बदलना नहीं चाहते हैं तो नमूना दर बदल रही है। FVC वीडियो कन्वर्टर अल्टीमेट का उपयोग करने में, आप केवल वीडियो क्लिप के ऑडियो विलंब को उसके ऑडियो को सिंक करने के लिए बदल देंगे। अब आप नमूना दर को समायोजित नहीं करेंगे और ऑडियो गुणवत्ता खोने का डर होगा।
यदि मैं निम्न-गुणवत्ता वाले ऑडियो आउटपुट का उपयोग करता/करती हूं, तो किस नमूना दर को प्राथमिकता दी जाती है?
ऑडियो की गुणवत्ता ऑडियो आउटपुट पर निर्भर करती है। यदि आपका माइक्रोफ़ोन या स्पीकर केवल निम्न-आवृत्ति ऑडियो दर का समर्थन करता है, तो मानक नमूना दर को 48 हर्ट्ज़ पर सेट करने की तुलना में 44.1 kHz तक कम करना बेहतर है। यदि आउटपुट और इनपुट में समान आवृत्ति प्रवाह नहीं है, तो नमूना दर ऑडियो सिंक विलंब को प्रभावित कर सकती है।
निष्कर्ष
संक्षेप में, audio delay जो अक्सर OBS Studio में दिखाई देता है, उसे ठीक करने के कई तरीके मौजूद हैं। हमने sample rate के मेल न खाने और अलग‑अलग ऑडियो आउटपुट्स पर नज़र डालने की बात की, लेकिन ऑडियो को सिंक में लाने का सबसे बढ़िया तरीका FVC Video Converter Ultimate का इस्तेमाल करना है। ऑडियो सिंक को ठीक करने वाले फीचर के अलावा, इसमें और भी कई फीचर हैं जो आपके वीडियो क्लिप की गुणवत्ता को बेहतर बनाने में मदद कर सकते हैं।.
-
 डीवीडी नहीं चलाने वाले विंडोज मीडिया प्लेयर को हल करने के लिए 2 सर्वश्रेष्ठ समाधान
 जब आप Windows Media Player के माध्यम से DVD वीडियो चलाना चाहते हैं, लेकिन केवल "फ़ाइल प्रकार समर्थित नहीं है" त्रुटि प्राप्त करते हैं, तो आप DVD नहीं चला रहे Windows Media Player को ठीक करने के 3 आसान तरीके सीख सकते हैं।
-
 [हल] विस्तृत चरणों के साथ iPhone पर नहीं चल रहे वीडियो को कैसे ठीक करें
 गैलरी पर स्थानीय वीडियो डिफ़ॉल्ट वीडियो प्लेयर के माध्यम से आपके iPhone पर नहीं चलाए जा सकते हैं? IPhone पर नहीं चलने वाले ऑनलाइन YouTube वीडियो हमेशा होते हैं? इस लेख में आपकी मदद करने के लिए यहां 5 समाधान दिए गए हैं।
-
 एंड्रॉइड फोन पर नहीं चल रहे वीडियो को कैसे ठीक करें, इस पर गाइड
 जानना चाहते हैं कि आपके एंड्रॉइड डिवाइस पर वीडियो क्यों नहीं चलाए जा सकते हैं? और यदि हां, तो क्या समस्या को स्वयं ठीक करने का कोई तरीका है? अधिक जानने के लिए पढ़ना जारी रखें।