


QuickTime में वीडियो को क्रॉप कैसे करें: मैक उपयोगकर्ताओं के लिए एक व्यापक गाइड
क्या कभी आपके साथ ऐसा हुआ है कि आपने अपने दोस्तों की कोई मज़ेदार वीडियो बनाई हो, लेकिन बाद में पता चला कि बैकग्राउंड में कपड़ों का ढेर लगा है या कोई अनजान व्यक्ति बीच में आ गया है? मेरे साथ तो कई बार ऐसा हुआ है। आमतौर पर, मैक यूज़र्स के तौर पर हमारी पहली प्रतिक्रिया यही होती है कि हम उस फ़ाइल पर डबल-क्लिक करके उसे क्विकटाइम प्लेयर में खोलें। यह तेज़ है, इसमें पहले से ही फ़ीचर मौजूद है, और यह वहीं पर है। लेकिन फिर, निराशा छा जाती है। आप मेनू में क्रॉप टूल ढूंढते हैं, और... कुछ नहीं मिलता। आपको ट्रिम और रोटेट तो दिखते हैं, लेकिन फ्रेम के किनारों को काटने का विकल्प गायब सा लगता है।
फिर भी चिंता न करें; इस गाइड में हम यह चर्चा करेंगे कि क्या‑क्या संभव है, क्या नहीं है, और बिना फिल्म एडिटिंग की डिग्री के भी आप कैसे बिल्कुल सही फ्रेम वाला शॉट पा सकते हैं, आपको यह दिखाकर कि QuickTime Player में किसी वीडियो क्लिप को कैसे क्रॉप करें।.
क्या आप इस समस्या को ठीक करवाने के लिए तैयार हैं? आगे पढ़ें!

भाग 1. क्या क्विकटाइम में वीडियो को क्रॉप किया जा सकता है?
चलिए, सच्चाई से शुरुआत करते हैं, भले ही यह थोड़ी निराशाजनक हो। अगर आप macOS पर पहले से इंस्टॉल किए गए QuickTime Player के स्टैंडर्ड, मुफ़्त वर्शन का इस्तेमाल कर रहे हैं, तो क्या आप QuickTime में सीधे वीडियो क्रॉप कर सकते हैं? इसका सीधा जवाब है: नहीं, उस तरह से नहीं जैसा आप सोच रहे हैं।
इस सीमा के पीछे का कारण
आपके iPhone के Photos ऐप के विपरीत, जिसमें एक बहुत ही सहज क्रॉप टूल होता है, QuickTime Player का डेस्कटॉप संस्करण मुख्य रूप से एक प्लेयर के रूप में डिज़ाइन किया गया है। Apple ने इसे देखने और बुनियादी संपादन करने के लिए एक हल्के टूल के रूप में डिज़ाइन किया है, जैसे कि ट्रिमिंग (लंबाई कम करना) या रोटेट करना।
जब लोग QuickTime में वीडियो क्रॉप करने के बारे में पूछते हैं, तो वे आमतौर पर वीडियो के ऊपर क्लिक और ड्रैग करने वाला बॉक्स दिखने की उम्मीद करते हैं। दुर्भाग्य से, यह सुविधा स्टैंडर्ड मेनू में शामिल नहीं है। यह मैक की उन अजीबोगरीब कमियों में से एक है, जहाँ त्वरित संपादन के लिए उनके सॉफ़्टवेयर का मोबाइल संस्करण कभी-कभी डेस्कटॉप संस्करण से अधिक सुविधाओं से भरपूर होता है।
यदि आप QuickTime इकोसिस्टम के भीतर ही बने रहने के लिए दृढ़ संकल्पित हैं, तो आपके पास दो मुख्य रास्ते हैं:
1. QuickTime Pro में अपग्रेड करें: (ध्यान दें: यह एक पुराना समाधान है और ज़्यादातर पुराने सिस्टम पर लागू होता है, लेकिन पहले आधिकारिक तौर पर इसी तरह सॉफ्टवेयर यह काम करता था)।.
2. स्क्रीन रिकॉर्डिंग वाला वर्कअराउंड: यह मेरा पसंदीदा हैक है। आप वास्तव में QuickTime स्क्रीन रिकॉर्डिंग फ़ंक्शन का उपयोग करके केवल उस हिस्से को रिकॉर्ड कर सकते हैं जिसे आप रखना चाहते हैं, और इस तरह परोक्ष रूप से वीडियो को क्रॉप कर सकते हैं।.
हम नीचे इन दोनों तरीकों का विस्तार से विश्लेषण करेंगे, ताकि आप अपनी शैली के अनुरूप तरीका चुन सकें।
भाग 2. मैक पर क्विकटाइम में वीडियो को क्रॉप कैसे करें
चूंकि हमने यह स्थापित कर लिया है कि क्रॉप बटन नहीं है, तो आइए क्विकटाइम के मौजूदा टूल का उपयोग करके वांछित परिणाम प्राप्त करने के दो तरीकों पर चर्चा करें।
विधि 1: नई स्क्रीन रिकॉर्डिंग द्वारा वीडियो को क्रॉप करें
पैसा खर्च किए बिना या जटिल सॉफ़्टवेयर डाउनलोड किए बिना इसे करने का यह सबसे आसान तरीका है। मूल रूप से, आप अपना वीडियो चलाएंगे और फिर स्क्रीन को दोबारा रिकॉर्ड करेंगे, लेकिन केवल फ्रेम के उस हिस्से का चयन करेंगे जिसे आप रखना चाहते हैं।
स्टेप 1. अपना वीडियो खोलें
QuickTime Player लॉन्च करें और वह फ़ाइल खोलें जिसे आप एडिट करना चाहते हैं। QuickTime MOV, MP4, M4V आदि को सपोर्ट करता है, और आप क्रॉपिंग के लिए वीडियो फ़ाइल को इस टूल में इम्पोर्ट कर सकते हैं (QuickTime MOV नहीं खोल पा रहा है?).
स्टेप 2. स्टेज तैयार करें
वीडियो को उस फ़्रेम पर पॉज़ करें जिसमें वह पूरा एरिया दिख रहा हो जिसे आप रखना चाहते हैं। क्वालिटी बनाए रखने के लिए विंडो को जितना हो सके उतना बड़ा कर लें।.
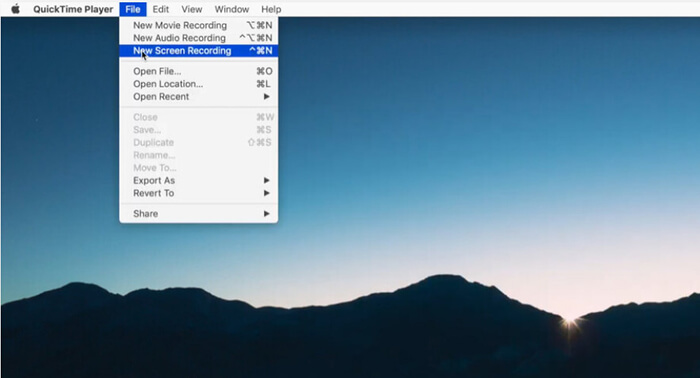
स्टेप 3. नई स्क्रीन रिकॉर्डिंग शुरू करें
File > New Screen Recording पर जाएँ (या Command + Shift + 5 दबाएँ)।.
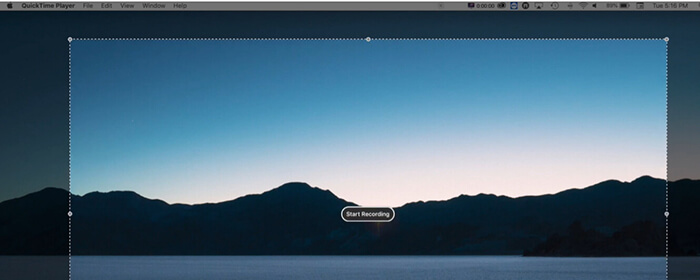
स्टेप 4. एरिया चुनें
जो रिकॉर्डिंग टूलबार दिखाई देगा, उसमें Record Selected Portion चुनें। आपको एक डैश वाली बॉक्स दिखाई देगी। इस बॉक्स के कॉर्नर को ड्रैग करके उसे बिल्कुल उसी एरिया पर फिट करें जिसे आप क्रॉप करके रखना चाहते हैं।.
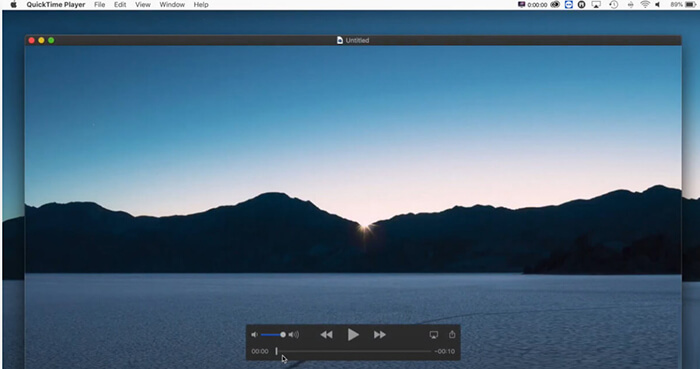
स्टेप 5. रिकॉर्ड करें और प्ले करें
Record पर क्लिक करें। फिर तुरंत अपना वीडियो प्ले कर दें। इसे अंत तक चलने दें।.
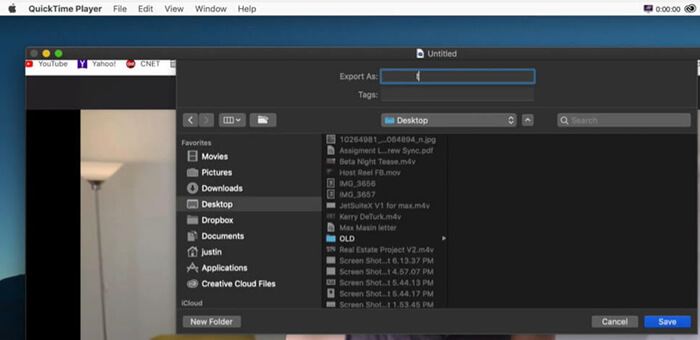
स्टेप 6. क्रॉप किया हुआ वीडियो सेव करें
जैसे ही वीडियो खत्म हो जाए, रिकॉर्डिंग रोक दें। आपके पास एक क्रॉप किया हुआ वीडियो फ़ाइल होगी।.
विधि 2: क्विकटाइम प्रो 7 का उपयोग करना (पुरानी विधि)
जो लोग 2000 के दशक के मध्य से मैक का उपयोग कर रहे हैं, उन्हें क्विकटाइम प्रो याद होगा। हालांकि ऐप्पल अब क्विकटाइम प्लेयर की ओर बढ़ चुका है, लेकिन प्रो संस्करण में वीडियो को क्रॉप करने के लिए मास्क का उपयोग करने की सुविधा थी।
स्टेप 1. एक मास्क बनाएं
आपको Photoshop या Preview जैसे प्रोग्राम में एक ब्लैक‑एंड‑व्हाइट इमेज बनानी होगी जो आपके वीडियो के डाइमेंशनों से मैच करे, जिसमें एक सफेद बॉक्स उस एरिया को दिखाए जिसे आप रखना चाहते हैं।.

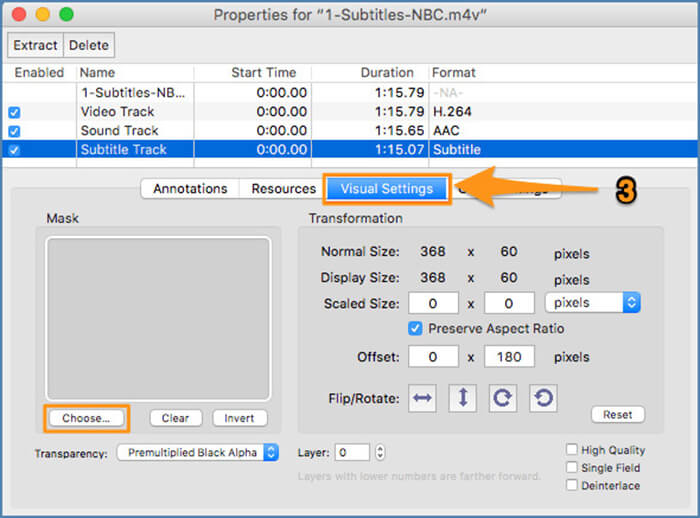
स्टेप 2. मास्क लागू करें
QuickTime Pro में, आप Windows > Show Movie Properties > Visual Settings पर जाएँगे और वहाँ वह मास्क इम्पोर्ट करेंगे।.
स्टेप 3. क्रॉप किया हुआ वीडियो सेव करें
उसके बाद आप File > Export पर क्लिक करके क्रॉप किया हुआ वीडियो एक्सपोर्ट और सेव कर सकते हैं।.

यह बेहद थकाऊ और, सच कहूँ तो, पुराना तरीका है। macOS के अधिकांश आधुनिक संस्करण QuickTime 7 को सपोर्ट नहीं करते। मैं इसका ज़िक्र इसलिए कर रहा हूँ क्योंकि आपको पुराने फ़ोरम में यह जानकारी मिल जाएगी, लेकिन मैं इसे हाई स्कूल के किसी छोटे-मोटे प्रोजेक्ट के लिए भी इस्तेमाल करने की सलाह नहीं दूँगा।
भाग 3. मैक पर वीडियो क्रॉप करने के लिए क्विकटाइम का सबसे अच्छा विकल्प
सच कहें तो, स्क्रीन रिकॉर्डिंग का यह जुगाड़ 10 सेकंड के क्लिप के लिए तो ठीक है, लेकिन अगर आपके पास 10 मिनट का वीडियो है, तो यह पूरी तरह से परेशानी का सबब बन जाता है। साथ ही, हर बार स्क्रीन को दोबारा रिकॉर्ड करने पर वीडियो की क्वालिटी थोड़ी कम हो जाती है। अगर आप बिना किसी झंझट के क्विकटाइम प्लेयर में वीडियो क्रॉप करना चाहते हैं, तो सबसे अच्छा तरीका है कि आप किसी खास टूल का इस्तेमाल करें।
कई अलग‑अलग ऐप्स को टेस्ट करने के बाद मेरी सबसे बड़ी सिफारिश है FVC Video Converter Ultimate।.
यह एक शक्तिशाली टूल है जिसे खास तौर पर उन लोगों के लिए बनाया गया है जिन्हें एडोब प्रीमियर जैसे प्रोफेशनल एडिटर्स बहुत मुश्किल लगते हैं। यह एक ऐसा टूल है जो कुछ ही क्लिक में कन्वर्जन, कंप्रेशन और सबसे महत्वपूर्ण, सटीक क्रॉपिंग का काम करता है। क्विकटाइम के जुगाड़ के विपरीत, यह टूल आपको सटीक एस्पेक्ट रेश्यो (जैसे YouTube के लिए 16:9 या TikTok के लिए 9:16) डालने की सुविधा देता है, जिससे आपका वीडियो प्रोफेशनल दिखता है और किसी भी स्क्रीन पर बिल्कुल फिट बैठता है। यह हार्डवेयर एक्सेलरेशन का भी उपयोग करता है, जिसका मतलब है कि यह आपके वीडियो को क्रॉप और सेव करने में मेरे द्वारा आजमाए गए अधिकांश अन्य ऐप्स की तुलना में काफी तेज है। यदि आप मैक के बिल्ट-इन टूल्स की सीमाओं से थक चुके हैं, तो किसी भी छात्र या कंटेंट क्रिएटर के लिए यह अगला तार्किक कदम है।
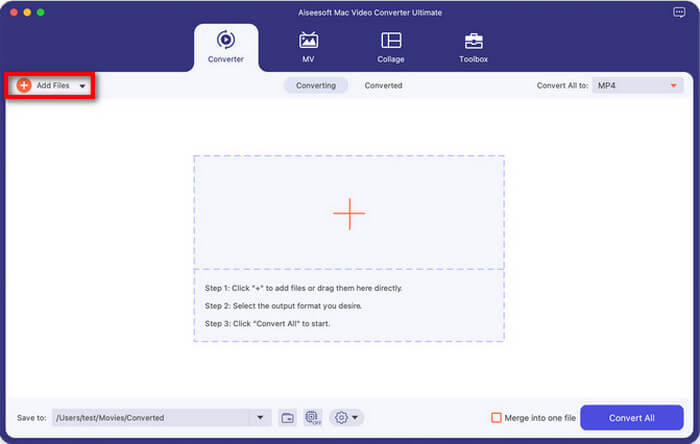
स्टेप 1. अपना वीडियो जोड़ें
अपने Mac पर FVC Video Converter Ultimate को फ्री डाउनलोड करें। इसे खोलें, और आपको एक बहुत ही साफ‑सुथरा इंटरफेस दिखेगा।.
फ्री डाउनलोडWindows 7 या बाद के संस्करण के लिएसुरक्षित डाउनलोड
फ्री डाउनलोडMacOS 10.7 या बाद के संस्करण के लिएसुरक्षित डाउनलोड
बीच में मौजूद बड़े + बटन पर क्लिक करें, या जिस वीडियो फ़ाइल को आप क्रॉप करना चाहते हैं उसे सीधे सॉफ़्टवेयर में ड्रैग और ड्रॉप करें।
स्टेप 2. वीडियो फ़ाइल क्रॉप करें
वीडियो थंबनेल के बगल में स्थित Edit आइकन (जो एक छोटी जादुई छड़ी या स्टार जैसा दिखता है) पर क्लिक करें।.
Rotate & Crop टैब पर जाएँ। यहाँ आप फ्रेम के पीले कोनों को पकड़कर और खींचकर वीडियो को आसानी से क्रॉप कर सकते हैं। या, अगर आप मेरी तरह सब कुछ बिल्कुल सटीक चाहते हैं, तो Aspect Ratio ड्रॉपडाउन का इस्तेमाल करके कोई प्रीसेट चुनें।.
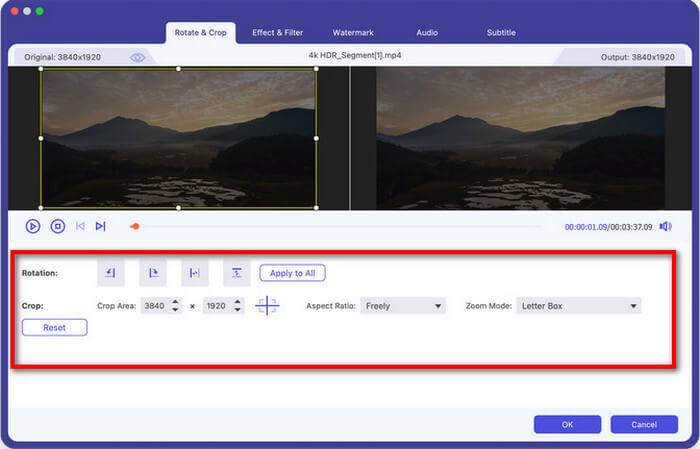
स्टेप 3. प्रीव्यू करें और सेव करें
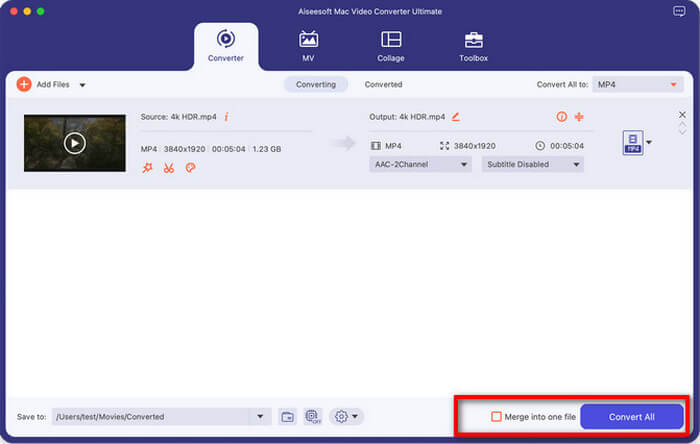
आप रियल‑टाइम में देख सकते हैं कि क्रॉप किया हुआ वीडियो कैसा दिख रहा है। जब आप संतुष्ट हो जाएँ, तो OK पर क्लिक करें। फिर मुख्य विंडो में लौटें और Convert All पर क्लिक करके अपनी नई, बेहतरीन क्रॉप की हुई वीडियो सेव करें।.
यह वीडियो क्रॉपर मेरे लिए किसी वरदान से कम नहीं है क्योंकि इससे मुझे वीडियो के डाइमेंशन निकालने के लिए गणित नहीं करना पड़ता। मुझे यह बहुत पसंद है कि मैं अपनी इंस्टाग्राम स्टोरी के लिए वीडियो क्रॉप कर सकती हूं और ज़रूरत पड़ने पर उसे तुरंत दूसरे फॉर्मेट में बदल सकती हूं। सबसे बड़ा फायदा इसकी वीडियो क्वालिटी का बरकरार रहना है; यह क्विकटाइम स्क्रीन रिकॉर्डिंग मेथड से कहीं ज़्यादा शार्प दिखता है।
भाग 4. अक्सर पूछे जाने वाले प्रश्न
QuickTime में Trim और Crop में क्या अंतर है?
यह सबसे आम कंफ्यूज़न की जगह है!
• Trimming समय से जुड़ा है। यह ऐसे है जैसे आप फिल्म स्ट्रिप की शुरुआत या अंत को कैंची से काट रहे हों। आप वीडियो को छोटा कर रहे हैं।
• Cropping जगह से जुड़ा है। यह ऐसे है जैसे आप एक फोटो लें और उसके किनारों को क्राफ्ट नाइफ से काट दें। आप फ्रेम के अंदर क्या दिख रहा है, उसे बदल रहे हैं। QuickTime Player ट्रिमिंग में बेहतरीन है, लेकिन इसमें क्रॉपिंग के लिए कोई समर्पित टूल नहीं है।.
QuickTime में वीडियो को ट्रिम कैसे करें?
अगर आपको एहसास हुआ कि आपको असल में सिर्फ वीडियो छोटा करना था, तो इसे करने का तेज़ तरीका यह है:
1. QuickTime में वीडियो खोलें।
2. Command + T दबाएँ या Edit > Trim पर जाएँ।
3. पीले हैंडलों को ड्रैग करके वीडियो के उस हिस्से का चुनाव करें जिसे आप रखना चाहते हैं।
4. Trim पर क्लिक करें और अपनी फ़ाइल सेव करें।.
मेरी क्रॉप की हुई वीडियो धुंधली क्यों है?
अगर आपने QuickTime Player में वीडियो को क्रॉप करने के लिए स्क्रीन रिकॉर्डिंग वाला तरीका इस्तेमाल किया है, तो यह थोड़ा धुंधला दिख सकता है। ऐसा इसलिए होता है क्योंकि आप मूल रूप से एक तस्वीर की ही दूसरी तस्वीर ले रहे होते हैं।
• समाधान: रिकॉर्डिंग शुरू करने से पहले यह सुनिश्चित करें कि आपका मूल वीडियो Actual Size या Fit to Screen (Command + 3) पर चल रहा हो। अगर विंडो छोटी होगी, तो रिकॉर्डिंग लो रेज़ोल्यूशन की होगी।
• और बेहतर समाधान: FVC Video Converter Ultimate जैसे टूल का उपयोग करें, जो सिर्फ आपकी स्क्रीन के पिक्सल रिकॉर्ड करने के बजाय वीडियो के वास्तविक डेटा को क्रॉप करता है।.
क्या मैं मैक पर बिना कोई अतिरिक्त सॉफ्टवेयर डाउनलोड किए मुफ्त में वीडियो क्रॉप कर सकता हूँ?
तकनीकी रूप से, हाँ! अगर QuickTime आपको ज़्यादा मुश्किल लगता है, तो आप iMovie का इस्तेमाल कर सकते हैं। यह आपके Mac पर मुफ़्त में उपलब्ध है। बस क्लिप को इंपोर्ट करें, प्रीव्यू विंडो के ऊपर क्रॉप बटन पर क्लिक करें और फिर उसे एक्सपोर्ट कर दें। यह QuickTime से थोड़ा ज़्यादा पावरफुल है, लेकिन एक बढ़िया विकल्प है।
निष्कर्ष
QuickTime में वीडियो क्रॉप करना सीखना थोड़ा खज़ाना खोजने जैसा लगता है। यह उतना सीधा नहीं है जितना हम चाहते हैं, लेकिन थोड़ी क्रिएटिविटी और सही वैकल्पिक सॉफ्टवेयर के साथ यह पूरी तरह मुमकिन है।.
संक्षेप में:
- स्टैंडर्ड क्विकटाइम प्लेयर सीधे क्रॉप नहीं कर सकता।
- आप स्क्रीन रिकॉर्डिंग टूल का उपयोग करके अपनी स्क्रीन के किसी विशिष्ट क्षेत्र को कैप्चर करके इसे नकली बना सकते हैं।
- यदि आप बिना किसी झंझट के पेशेवर परिणाम चाहते हैं, तो FVC वीडियो कन्वर्टर अल्टीमेट सबसे अच्छा विकल्प है।
हमेशा अपने मूल, बिना एडिट किए हुए वीडियो की एक कॉपी संभालकर रखें। इससे बुरा कुछ नहीं कि आपने वीडियो को क्रॉप किया, उसी पर सेव कर दिया, और बाद में पता चला कि आपने कोई ज़रूरी हिस्सा ही काट दिया!
अब आगे बढ़िए और अपने वीडियो को अच्छा‑सा हेयरकट दे दीजिए।.
-
 शीर्ष तथ्य जो आपको क्विकटाइम स्लो मोशन के बारे में जानना चाहिए
 क्या आपने धीमी गति में वीडियो चलाने के लिए क्विकटाइम मीडिया प्लेयर का उपयोग करने की कोशिश की है? इस मीडिया प्लेयर की उत्कृष्ट सेवा के बारे में अधिक जानने के लिए इस लेख को पढ़ें।
-
 मैक पर आसानी से क्विकटाइम में वीडियो को गति देने का सबसे अच्छा तरीका
 क्विकटाइम में वीडियो को गति देने की आवश्यकता है? खैर, आपको इस लेख में सभी चीजों की आवश्यकता होगी, इसलिए इसके बारे में अधिक जानने के लिए इसे पढ़ते रहें।
-
 MP4 फ़ाइलों को QuickTime (MOV) में बदलने के 3 आसान तरीके
 हमारे सरलीकृत चरण-दर-चरण मार्गदर्शिका का उपयोग करके MP4 को QuickTime (MOV) में परिवर्तित करना सीखें, जो आपके वीडियो रूपांतरण अनुभव को परेशानी मुक्त और त्वरित बना देगा।