


Hogyan készítsünk sötétebb videót a projektvideókhoz
Ha a videógyártásról van szó, az egyik gyakran használt technika a felvétel bizonyos részeinek elsötétítése. Ezt a folyamatot több okból is el lehet végezni, például hangulat vagy atmoszféra teremtésére, a kép egy bizonyos részére való fókuszálásra, vagy az esetleges hibák elfedésére. A videó elsötétítésének egyik elsődleges oka, hogy drámát és feszültséget adjon egy jelenetnek. Az expozíció csökkentésével és a kontraszt növelésével az árnyékok erőteljesebbé, a csúcsfények pedig visszafogottabbá válnak, ami baljósabb, fenyegetőbb hatást kölcsönöz a felvételnek. Ez a folyamat különösen hatásos lehet horrorfilmekben vagy thrillerekben, ahol a nézőnek folyamatosan feszültnek kell éreznie magát. A saját projektvideódhoz elengedhetetlen, hogy elsajátítsd ezt a technikát az alábbi részletes útmutatók segítségével.

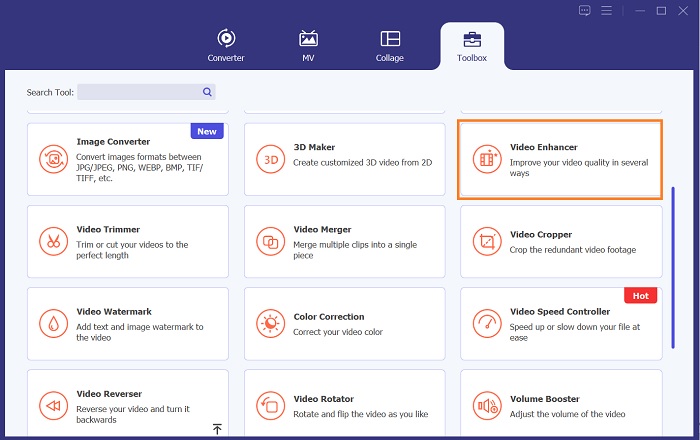
1. rész: Videó sötétítése offline módban
1. Video Converter Ultimate
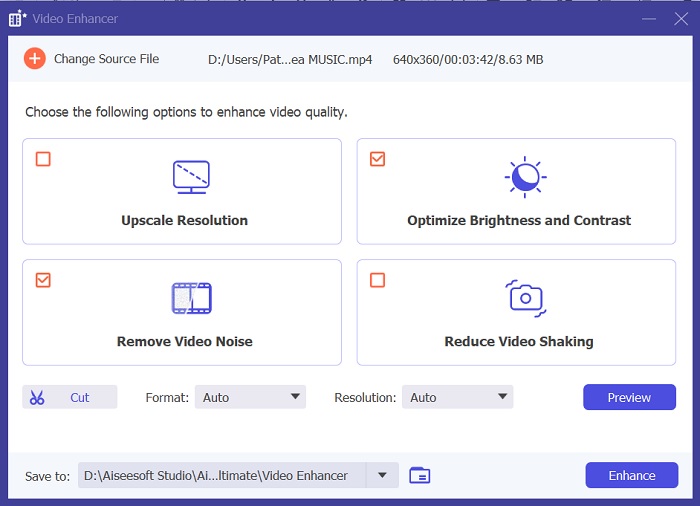
A Video Converter Ultimate egy nagy teljesítményű alkalmazás és videószerkesztő segédprogram, amely mindent biztosítani tud, amire szükséged lehet. Segítségre van szükséged a projektvideó fényerejének csökkentéséhez? Ez az eszköz egy praktikus módszert kínál a videó megjelenésének halványítására. Fejlett videós segédfunkcióval rendelkezik, a Video Enhancerrel, amely automatikusan beállítja a projektvideó fényerejét és kontrasztját. Belső elemzést végez a fájlon, és módosítja a kontrasztot, hogy jobb megvilágítást biztosítson a felvételen, mintha gyenge fényviszonyok között készült volna. Az alábbi útmutatókból megismerheted az alkalmazás használatának részletes lépéseit.
1. lépés: Az alkalmazás letöltése
Kezdd el a videofájl javítását és módosítását azzal, hogy beszerezed a szoftvert a számítógépedre. Kattints az erre a lépésre vonatkozóan alább látható Ingyenes letöltés gombra. Szerezd be a telepítőfájlt, majd futtasd azt a számítógépeden.
Ingyenes letöltésWindows 7 vagy újabb rendszerreBiztonságos letöltés
Ingyenes letöltésMacOS 10.7 vagy újabb rendszerreBiztonságos letöltés
2. lépés. Videó importálása
A következő lépés az alkalmazás elindítása és a módosítani kívánt videó hozzáadása. Lépj a Eszköztár lehetőségre, ahol az összes speciális funkció található. Válaszd a Video Enhancer funkciót, hogy megnyisd a párbeszédpaneljét. Importáld a fájlt a + ikonra kattintva.
3. lépés: A folyamat befejezése
Miután az általad kiválasztott videó importálásra került, négy opció jelenik meg a képernyőn. Válaszd az Optimalizált fényerő és kontraszt menüpontot, hogy a videó automatikusan feldolgozásra kerüljön. Ezt követően a videó exportálódik a kijelölt kimeneti mappába. Keresd meg a fájlt, és játszd le, hogy ellenőrizd a projektvideó kontrasztját.
2. Adobe Premiere Pro
A Premiere Pro egy innovatív videó-segédprogram, amely számos professzionális videószerkesztő kedvencévé vált, intuitív kezelőfelületével, más Adobe-termékekkel való zökkenőmentes integrációjával és robusztus funkcióival. A Premiere Pro egyik kritikus előnye, hogy képes a videoformátumok széles skálájának feldolgozására, az SD-től a HD-n át a 4K-ig és még tovább. Ez a funkció megkönnyíti a különféle forrásokból származó felvételek kezelését, beleértve a kamerákat, mobileszközöket és drónokat. Ha módosítani kell a videó megvilágítását, akkor az Adobe Premiere Pro nagy segítséget jelent a Lumetri Color Panel funkciójával, amellyel beállíthatja a fájl kontrasztját és fényerejét. Ezenkívül a Premiere Pro fejlett színkorrekciós eszközöket, hangszerkesztési lehetőségeket, vizuális effektusokat és még sok mást kínál.
1. lépés. A fényerő Premiere Pro-ban történő szerkesztéséhez először le kell töltened az alkalmazást a számítógépedre. A telepítőfájlt a program hivatalos weboldalán keresheted meg, majd töltsd le és telepítsd. Indítsd el az eszközt, és importáld a videófájlt az Importálás gomb megnyomásával.
2. lépés. Nyisd meg a Lumetri Color panelt a képernyő bal felső sarkában lévő Color fülre kattintva. A Lumetri Color panelen különféle színkorrekciós lehetőségeket találsz. A fényerő beállításához keresd meg a Basic Correction részt. Itt használhatod az Exposure csúszkát a klip fényerejének módosításához. Húzd a csúszkát jobbra a fényerő növeléséhez, vagy balra a csökkentéséhez.
3. lépés. Végül kattints az Export gombra a fájl mentéséhez. Várd meg, amíg a videó renderelése befejeződik, majd keresd meg az eszköz kimeneti mappájában. Játszd le és tekintsd meg a projektvideón végrehajtott módosításokat, és ellenőrizd, hogy megfelelnek‑e az elképzeléseidnek.
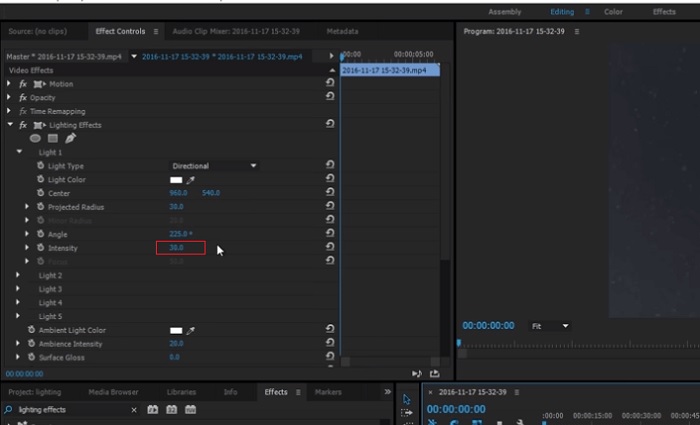
3. Adobe After Effects
Az After Effects fényerejének beállításakor számos funkció jól jöhet. Először is, a Levels effektus a fényerő és a kontraszt beállítására használható. Ezzel az effektussal fekete-fehér pontokat állíthat be, ami biztosítja, hogy a kép ne legyen túl elmosódott vagy túl sötét. A Görbék effektust használhatja az egyes videorészek fényerejének és kontrasztjának beállítására is. Ez a funkció kiemelheti a részleteket az árnyékban vagy a csúcsfényben. Egy másik hasznos funkció az Expozíció effektus, amely lehetővé teszi a teljes kép fényerejének és kontrasztjának módosítását. Ez az effektus magában foglalja a gamma és az eltolás beállítási lehetőségeit is, amelyek segíthetnek a kép megjelenésének finomhangolásában.
1. lépés. A videó megjelenésének After Effectsben történő szerkesztéséhez elsőként szerezd be az eszköz telepítőcsomagját, és telepítsd a számítógépedre. Letöltheted az Adobe hivatalos weboldaláról, majd futtasd a telepítőt. Ezután indítsd el az alkalmazást, és ismerkedj meg a funkcióival.
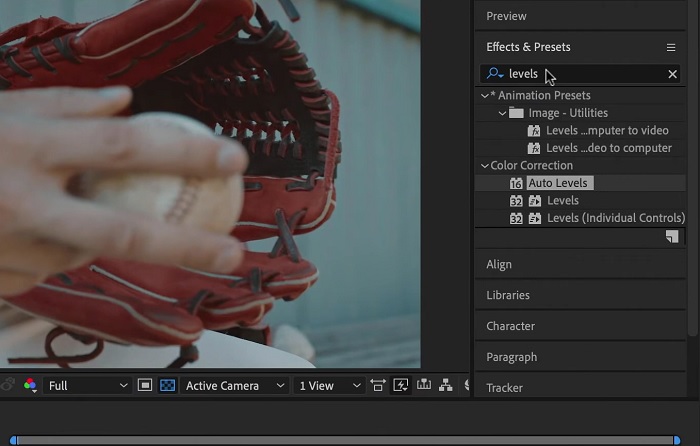
2. lépés. Ezután importáld a videót a File menüpontra, majd az Import opcióra kattintva. Keresd meg a videódat, és kattints rá, hogy hozzáadd a szerkesztéshez. Ezt követően lépj a Windows fülre, és válaszd az Effects and Presets lehetőséget. Megjelenik egy keresőmező, ahol rákereshetsz a Levels opcióra.
3. lépés. Végül kattints az Auto Level lehetőségre, majd húzd rá arra a videóra, amelynek a fényerejét csökkenteni szeretnéd a projektklipben. Kattints az Export opcióra a módosítások mentéséhez. Különböző előbeállításokat is használhatsz a fájl fényerejének módosítására. Nyisd meg a kimeneti mappát, hogy megtekintsd és ellenőrizd a módosított projektvideót.
4. DaVinci Resolve
Ha a videó módosításáról van szó, a Davinci Resolve egy hatékony szoftver és videó segédprogram, amely számos szerkesztési funkciót kínál a felvételek minőségének javítására. Az egyik leggyakoribb szerkesztési technika a videó elsötétítése, ami drámaian befolyásolhatja a látványt. A felhasználó egyik kedvenc funkciója ennek a videószerkesztő szoftvernek az a képessége, hogy egyszerűen színminőségű felvételeket készíthet. A szoftver a színbesorolási eszközök széles skálájával rendelkezik, amelyek feljogosítják a felhasználókat, hogy a felvételek megjelenését és hangulatát a művészi elképzeléseknek megfelelően módosítsák. Egy idővonal panellel is rendelkezik, amelyen a felhasználók jobb szerkesztési folyamatot biztosíthatnak. A Davinci Resolve ezt a folyamatot egyszerűvé és hatékonysá teszi fejlett eszközeivel.
1. lépés. A DaVinci Resolve segítségével történő expozícióállítás első lépése, hogy beszerezd az eszközt a számítógépedre. Töltsd le az alkalmazást a hivatalos weboldaláról, és futtasd a telepítőfájlt. Ezután indítsd el a videoszerkesztő alkalmazást, és ismerkedj meg a funkcióival, hogy átlásd a szerkesztőeszközöket.
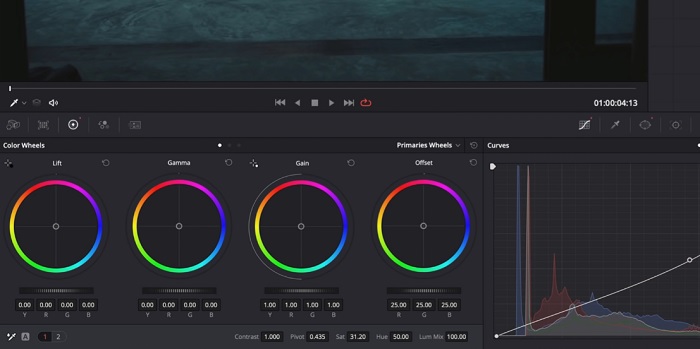
2. lépés. A videó elsötétítéséhez DaVinci Resolve-ban importáld a videót a File menüpont, majd az Import file gomb segítségével. Ezután használhatod a szoftver színkorrekciós és color grading eszközeit. Válaszd ki a sötétíteni kívánt klipet az idősávon, majd nyisd meg a Color oldalt.
3. lépés. Itt használhatod a Lift, Gamma és Gain vezérlőket a klip fényerejének és kontrasztjának beállításához. Ezt követően kattints az Export gombra a videóprojekten végzett módosítások mentéséhez. Nyisd meg a kimeneti mappát, hogy megtekinthesd a fájlt.
2. rész: Hogyan sötétítsük el a videót online
Belefáradt a terjedelmesebb videószerkesztő szoftver használatába, hogy egy egyszerű videoklipet állítson be számítógépén? Nos, a Clideo nagy segítség lehet a videószerkesztés alternatívájaként, hiszen rengeteg számítógépes helyet foglal el. Ez az online eszköz lehetővé teszi a felhasználók számára, hogy egyszerűen hozzáférjenek az idővonal panelhez, és videókat importálhassanak API-jába anélkül, hogy fiókot kellene telepíteniük vagy be kellene jelentkezniük. A felhasználók közvetlenül feltölthetik a szerkeszteni kívánt videofájlt, az online eszköz pedig elemzi és szerkesztési funkciókat biztosít a projektklip megjelenésének finomításához és javításához. Az alábbi részletes útmutatót megtekintheti az online alkalmazás alapos használatáról.
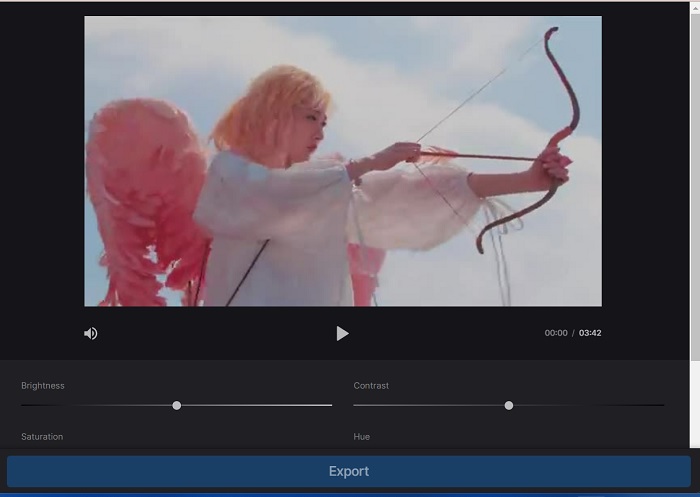
1. lépés. A fényerő Clideo-ban történő beállításához nyisd meg az alkalmazást a webböngésződben. Indítsd el a fő felületet, és töltsd fel a videoklipet a platformra a Choose File gombra kattintva. Válaszd ki a szerkeszteni kívánt videót, és importáld az online eszközbe.
2. lépés. Ezután válaszd az Adjust opciót a videólejátszó alatti menüből. Ezzel több szerkesztőeszközhöz is hozzáférsz, köztük a fényerő beállításának lehetőségéhez. Húzd a brightness slider csúszkát balra a fényerő csökkentéséhez, vagy jobbra a növeléséhez.
3. lépés. Használhatod az automatikus beállítást végző gombot is, hogy a rendszer magától módosítsa a fényerőt. Ha elégedett vagy a fényerő szintjével, kattints az Apply ikonra vagy gombra a módosítások mentéséhez. Végül töltsd le a szerkesztett videódat az Export opcióra kattintva.
További olvasnivaló:
Videószűrők: Dobd fel a videódat szűrőkkel és effektekkel asztali gépen
5 lenyűgöző YouTube filmkészítő – Készíts kiváló filmes tartalmakat
3. rész. GYIK a Darken Videoról
Hogyan lehet sötétíteni egy videót iPhone-on?
Különféle szoftverek használhatók és telepíthetők mobileszközére, amelyek beállíthatják a projektklip expozícióját. Használhat egy online eszközt is, amellyel közvetlenül az okostelefonon állíthatja be a videókat. A Clideo használata ajánlott, mivel elérhető webböngészőkkel, beleértve a Safarit és más Apple eszközökkel kompatibilis böngészőket is.
Hogyan lehet sötétíteni egy videót az iMovie-on?
Módosítsa a fényerő- és kontrasztbeállításokat a videó sötétítéséhez az iMovie-on. Sötét fedvényt vagy szűrőt is hozzáadhat a videóhoz, hogy sötétebbnek tűnjön. Egy másik lehetőség az expozíciós szintek beállítása, hogy a videó sötétebb legyen. Kísérletezzen ezekkel a beállításokkal, amíg el nem éri a videó kívánt megjelenését.
Miért akarsz sötétíteni egy videót iPhone-on?
A videó sötétítése sok esetben hasznos lehet, például javíthatja a videó általános minőségét, fokozhatja a kontrasztot, vagy bizonyos hangulatot vagy hangulatot teremthet.
Következtetés
Különböző módszerek kipróbálása után ez a cikk arra jutott, hogy a videó elsötétítése PC-n meglehetősen egyszerű lehet. Ehhez olyan videoszerkesztő szoftverre lesz szükséged, mint a Video Converter Ultimate, az Adobe Premiere Pro, a DaVinci Resolve vagy az After Effects. Miután telepítetted a programot, könnyedén módosíthatod a videó expozícióját, hogy elérd a kívánt sötétebb hatást. Ugyanakkor fontos, hogy a videó ne váljon annyira sötétté, hogy a részletek már alig legyenek kivehetők. Az itt bemutatott tippek segítségével, melyek azt mutatják meg, hogyan javíts ki egy túlságosan világos videót, sikeresen elsötétítheted a felvételedet, és esztétikus, látványos végeredményt hozhatsz létre.
-
 Végső útmutató a videofelbontás megváltoztatásához platformok közötti változatban
 Módosítania kell a videó felbontását? Ha igen, ismerkedjen meg a különféle módokkal, amelyek segítségével egyszerűen módosíthatja a megtekintett videó felbontását.
-
 Mi a vízjel egy videón és hogyan kell hozzáadni vagy eltávolítani
 Szeretné tudni, hogy mi a vízjel, milyen típusúak, és miért adnak hozzá a fotósok? Nos, csak annyit kell tennie, hogy elolvassa ezt a cikket.
-
 Az MP4 fájl levágása a videó minőségének elvesztése nélkül [2023]
 Tanulja meg, hogyan vághatja le az MP4-et az Ön számára biztosított egyszerű lépésekkel. Tehát tartsa a lépést, mert bemutatjuk Önnek a legjobb vágóeszközöket, amelyeket használhat.