

4つの最も簡単な方法 包括的な手順でビデオ解像度を変更する方法
There are many reasons why do you need to change the video resolution. One of the reasons could be to save some space for the video. Whatever your reason is, this guide will teach you the four methods to lessen or make the video quality high. Without any more delay, let's dig into the video resolution converters you can use to change the resolution of your video.

パート 1. 第 1 の方法: Windows および macOS でビデオ解像度を変更するための究極のデスクトップ ツール
Video Converter Ultimate is the ultimate tool for this task, as it can help you convert not only the video format but also the video quality within a few clicks. This tool supports an ultra-fast conversion process to easily convert your video quality to the highest or standard video resolution. Isn't it lovely to use this software? Want to know more? If so, this tool supports both desktop platforms. Even though it supports Windows and Mac, what you can see on Windows features are available on Mac features or vice-versa. We know the tools have something special, so we added this to this list. So now, if you want a step-by-step guide, you can follow the written tutorial below to learn how to change video resolution successfully.
Step 1. Click the appropriate button to download the program to your drive successfully. Open the downloaded file and follow the installation process that will show on your screen. After successfully installing it, open the video resolution converter and proceed to the next steps.
無料ダウンロードWindows 7 以降に対応安全なダウンロード
無料ダウンロードMacOS 10.7 以降に対応安全なダウンロード
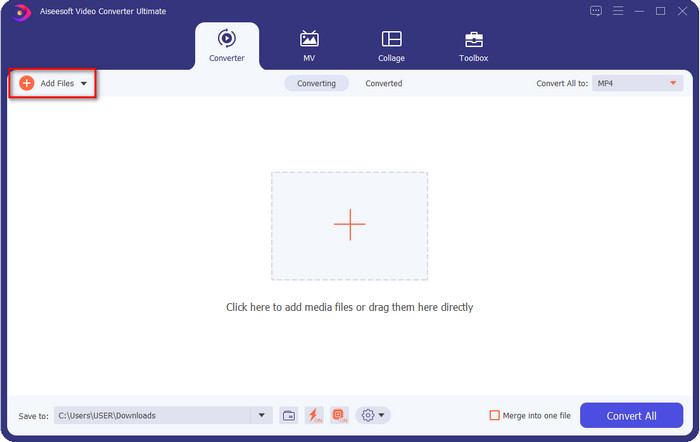
Step 2. To insert the video file you want to change the resolution, click the Add File button. Browse the file on the computer folder that will show, click it, and hit Open.
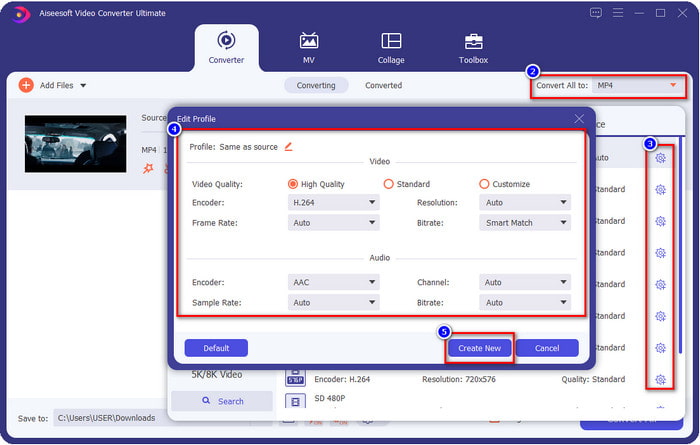
Step 3. Look at the upper-right part and click the drop-down button on the main interface. Choose the video format you want to have, MP4, MOV, AVI, MKV, FLV, and 200+ more formats are available here. After you choose the format, click the widget button to edit the profile of the format. Here you can make your resolution higher or lower change the encoder, quality, bitrate, and more to increase video resolution or not. To save the modification, click Create New.
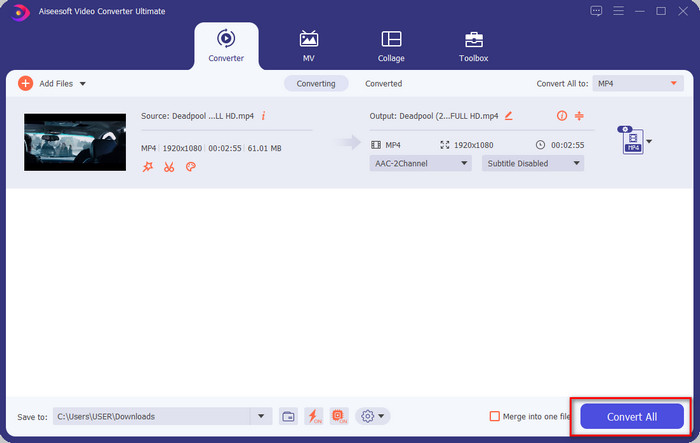
Step 4. Lastly, by clicking the Convert All, the resolution conversion will begin. With that, you have now converted the resolution of the video with the help of the Video Converter Ultimate.
パート 2. 第 2 の方法: ビデオ解像度をオンラインで変更するためのシンプルで無料の方法
Want to change video resolution online? In that case, you must use the online free version of the ultimate tool, the FVC Free Video Converter Online. This tool can help you to convert the resolution of your video freely. It is an online tool, so expect it needs internet connectivity to function. Additionally, this tool doesn’t support all video formats, so there is a limitation on adding video format here. So now, let's try to use the tool to change the resolution by following the steps below.
Step 1. To open the online video resolution converter, click this link to open the tool directly.
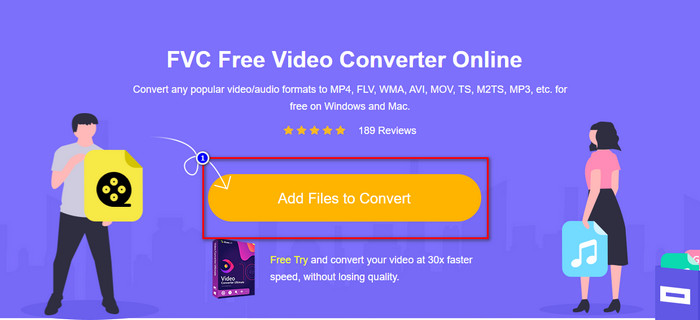
Step 2. Press Add Files to Convert to download the launcher for the first-timer, re-click it again after you've downloaded the installer. After you've clicked it, a folder will show, locate the video file on the folder and click Open.
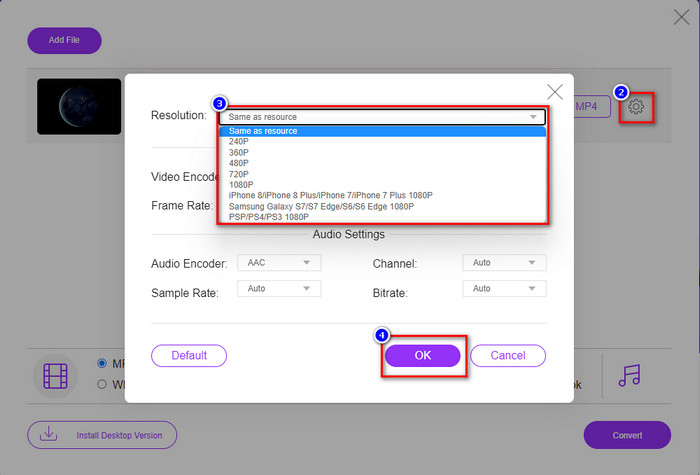
Step 3. Click the gear button to open a new window to change the video resolution on the window. At the top of the new window, click Resolution, choose the video resolution you want and click OK to save it.
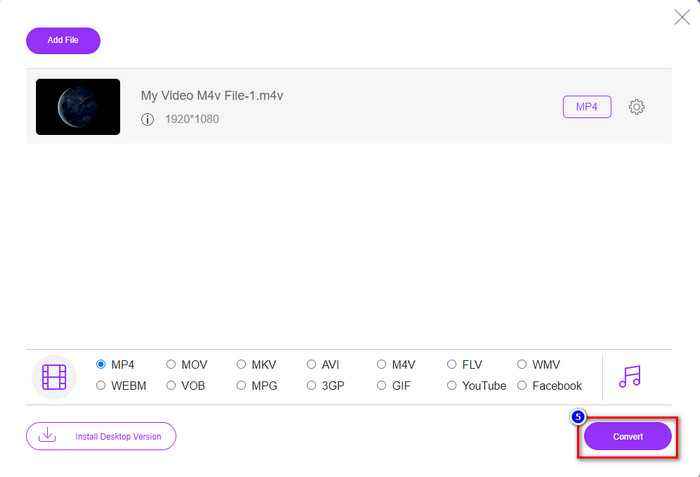
Step 4. Choose the format on the setlist and click Convert to begin converting the resolution process.
関連記事:
パート 3. 3 番目の方法: iPhone および Android でビデオ解像度を変更するモバイルベースの方法
これらの方法ではビデオの解像度を変換できませんが、より低い解像度またはより高い解像度のビデオを撮影できます。さらに、ビデオを撮影するときにビデオ解像度を変更する方法を見てみましょう。
1. 組み込みの iPhone ビデオ解像度
iOS ユーザーの場合は、必要に応じて撮影するビデオの解像度を変更できます。ただし、カメラでは見つからないため、見つからない場合は、以下の手順に従って、ビデオを撮影する前に iPhone でビデオの解像度を変更する方法を確認してください。
これらの手順は iPhone X モデルのものであるため、他のバージョンの iPhone に似た名前や機能とは手順が若干異なる場合があります。
Step 1. Open the Settings of your iPhone.
Step 2. Under it, find the Camera and click it.
Step 3. Click Record Video and choose which resolution you want to have as you shoot the video. Go back to Home, go to your Camera, and film the video with the resolution you've set back on the settings.
2. ビルトインの Android ビデオ解像度
Android ユーザーの場合、カメラのビデオ解像度に直接アクセスできます。私たちが提供する手順は、設定をセットアップする必要がないため、iPhone の場合ほど複雑ではありません。 Android でビデオの解像度を変更するには、以下の手順に従ってください。
これらの手順は Redmi 10 から取られたものであるため、名前や機能など、他の一部の Android デバイスでは手順が少し異なる場合があります。
Step 1. On your phone, click the Camera app to open it.
Step 2. After it is open, go to the Video, click the three-parallel lined, and choose the video resolution you want.
Step 3. Press the red button to record the video with the set video resolution.
パート 4. ビデオ解像度の変更に関する FAQ
ビデオの解像度は?
フレームごとに含まれるピクセル数は、ビデオ解像度と呼ばれるものです。また、画像をどれだけ鮮明にするかなど、1 つのビデオで表示できる詳細も制御します。さらに、さまざまなビデオ解像度の種類があります。 HD 以上から始まる高解像度を、1 秒あたりのフレーム数が多いと呼びます。低解像度は SD 以下から始まりますが、このビデオ解像度は高解像度より帯域幅が少なくなりますが、1 秒あたりのフレーム品質はより小さくなります。
1080 が最適なビデオ解像度ですか?
これは、YouTube やその他のビデオ ストリーミング アプリで最も一般的に選択されている、最も選択されたビデオ解像度のユーザーの 1 つを生成します。ただし、720 よりもビデオをバッファリングするのに時間がかかる可能性があるため、高品質のビデオを視聴するのに常に最適な選択とは限りません。変更しても、両方の品質に大きな変化はありません。
解像度を下げると品質に影響しますか?
はい、ビデオの品質を下げると変化があります。たとえば、ビデオが HD の場合、SD に変更すると、品質が大幅に変わります。そのため、ビデオの解像度を変更すると、急激な変化が見られますが、その後も視聴可能です。
結論
最後に、必要に応じてビデオ解像度を変更できるようになりました。さまざまなツールを使用してビデオの品質を変更できますが、オンライン、オフライン、組み込みの最も安全で最適なツールを紹介します。この記事が解像度の変更に役立つことを願っています。さらに質問がある場合は、下にコメントを残してください。実際にコメントに返信します。
-
 トップ10HDビデオコンバータソフトウェアのレビュー(無料および商用)
 読んで比較し、10 の推奨事項から最高の HD ビデオ コンバーター ソフトウェアを入手してください。マルチプラットフォーム対応の各 HD ビデオ コンバーターの詳細なレビューは次のとおりです。
-
 M4AをWAVに変換する方法に関するガイドライン[PCおよびMac]
 詳細な手順と選択可能なさまざまなツールを使用して、M4AをWAVに変換する方法について詳しく知ることができます。
-
 MKVをAVI形式に変換するための優れた選択肢
 あなただけのために提供された簡単なステップでMKVビデオを変換する方法をマスターしてください。方法を知りたいですか?次に、このリンクをクリックして詳細を確認してください。