


コンピューターでスピードランピングを行う方法に関するウォークスルーガイド
スピードランプの方法を探していますか?多くの人が、動画や映画の再生速度を徐々に変化させられるツールを探しています。動画にスピードランプをかけることは、多くの動画編集者の間で人気があり、動画に劇的な効果を与えます。しかし、スピードランプ機能を搭載しているアプリケーションはそれほど多くありません。ですが心配はいりません。スピードランプを行うために使える有名な動画編集ソフトがあります。このガイド記事を読み進めて、スピードランプのやり方を学びましょう。

パート 1. スピードランピングとは
Video Speed Ramping は、多くのビデオ編集者、特にムービーの作成時に人気があります。しかし、とにかくスピードランピングとは何ですか?
スピード ランピングとは、動画の速度を徐々に調整して、動画に優れた映画のような効果を与えることです。また、ビデオの加速と減速としても使用できます。映画で悪役がヒーローを撃とうとするシナリオを想像してみてください。弾丸が発射されたときにスピード ランピングを実行して、重要な映画効果を生み出すことができます。
つまり、スピード ランピングは、キーフレームをより適切に制御してビデオの速度を変更し、強力な効果を作成します。さらに、それはあなたのビデオに対して実行できる標準のビデオ編集機能です。したがって、ビデオでスピードランピングを行う方法を学びたい場合は、次の部分を包括的に読んでください.
パート 2. Premiere でスピード ランピングを行う方法
Adobe Premiere は、ビデオを高速化する場合に使用できる最も優れたビデオ編集ソフトウェアの 1 つです。 Adobe Premiere には、ビデオ ファイルを編集または強化するために使用できる多くの編集機能があります。さらに、高解像度と高品質で強力な出力を生成できます。さらに、無制限のマルチカム アングルが提供されるため、ビデオを高速化する場合に役立ちます。また、最新の更新以降、デバイスへのビデオのインポートとエクスポートがより管理しやすくなりました。
また、Adobe Premiere は、応答速度の高いプログラムが必要な場合に最適なアプリケーションです。多くの専門家は、ビデオ編集に必要な組織ツールが多数あるため、Adobe Premiere を使用してビデオやムービーを編集することを好みます。さらに、このプログラムは、Windows や Mac を含むすべてのクロスメディア プラットフォームにダウンロードできます。
Adobe Premiere でスピード ランピングを行う方法:
ステップ1. パソコンにAdobe Premiereをダウンロードしてインストールします。インストール後、Premiereを起動します。最初に行うべきことは、スピードランプをかけたい動画ファイルを読み込むことです。ファイルから動画をクリック&ドラッグしてプロジェクトウィンドウに入れることでインポートできます。
ステップ2. 次に、そのクリップをタイムラインにドラッグして、シーケンスを作成します。すると、Adobe Premiere がスピードランプに必要な設定を自動的に備えたシーケンスを作成してくれます。

ステップ3. そして、スピードランプをかけたい部分を選択します。スピードランプをかけたい箇所を切り出す方法のひとつは、インポイントとアウトポイントを設定することです。瞬間をカットするにはCommand + Kを押します。もうひとつの方法は、レザーブレードツールを使ってクリップを分割するやり方です。
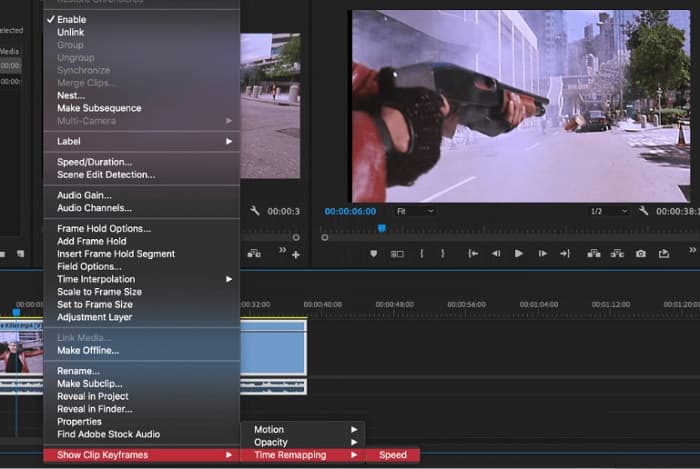
ステップ4. 次のステップではキーフレームを作成します。ただしキーフレームを設定する前に、キーフレームが表示されていることを確認する必要があります。動画クリップを右クリックし、Show Clip Keyframes > Time Remapping > Speed(クリップキーフレームを表示 > タイムリマップ > 速度)を選択します。
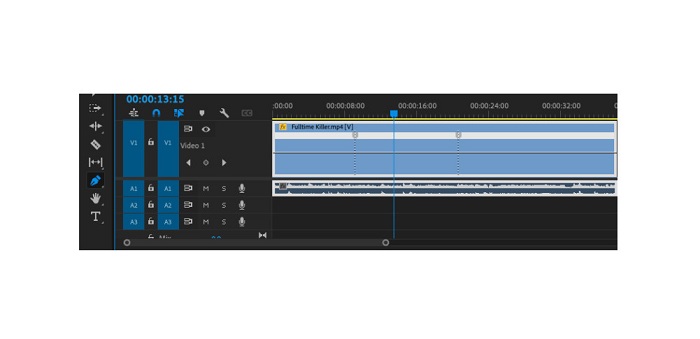
ステップ5. そしてツールバーからペンツールを選択します。次に、動画クリップ上にある白い線をクリックしてキーフレームを作成します。スピードランプを行うには、2つのキーフレームが必要です。スピードランプを開始したい位置に1つ目のキーフレームを、ランプを終えたい位置にもう1つのキーフレームを設定します。
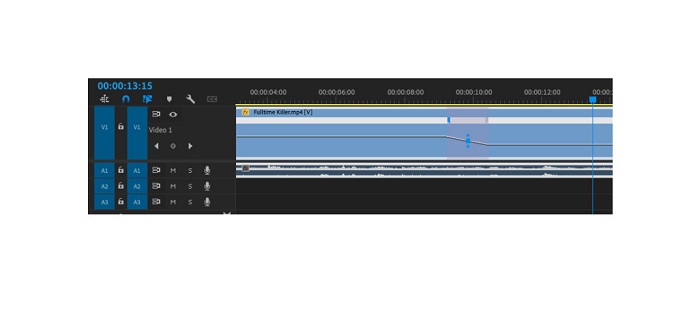
ステップ6. ここで、スピードランプをかけたい部分の速度を調整します。設定したキーフレーム間の白い線をクリックし、その白い線を上下にドラッグします。上にドラッグすると速くなり、下にドラッグすると遅くなります。
これは、Adobe Premiere でビデオを高速化する場合に知っておく必要があるチュートリアルです。
パート 3. スピードランピングを行う簡単な方法
Adobe Premiere は高品質で素晴らしい出力を生成できますが、初心者向けのツールではありません。そのため、スピード ランピングに慣れていない場合は、別の方法を探すことをお勧めします。幸いなことに、ビデオの高速化に使用できるこの優れたアプリケーションを見つけました。このアプリケーションの詳細については、以下の説明をお読みください。
Video Converter Ultimateは、高度な編集機能を多数備えた優秀なソフトウェアです。動画にスピードランプをかけたい場合、このソフトを利用できます。さらに、直感的で使いやすいインターフェースを採用しており、初心者でも扱いやすくなっています。MP4、AVI、MOV、MKV、VOB、WMV、M4V、WebM など、あらゆる動画形式をサポートし、その数は1000種類以上に及びます。ツールボックスには、動画速度コントローラー、動画結合、動画透かし削除、カラー補正など、多くの編集機能が含まれています。
さらに、ビデオ スピード コントローラーを使用してビデオをスピード ランプする場合、スピード プリセットの中から選択できます。 Video Converter Ultimate のさらに優れた点は、その高速処理インターフェースであり、多くのユーザーにとって便利です。このアプリは、Windows、Mac、Linux を含むすべてのプラットフォームでダウンロードできます。また、Video Converter Ultimate のビデオ スピード コントローラーを使用する場合は、以下の簡単なガイドに従ってください。
Video Converter Ultimate を使用してビデオを高速化する方法:
ステップ1. まず、下のダウンロードボタンをクリックしてパソコンにアプリをダウンロードします。ダウンロードとインストールが完了したら、アプリを起動します。
無料ダウンロードWindows 7 以降に対応安全なダウンロード
無料ダウンロードMacOS 10.7 以降に対応安全なダウンロード
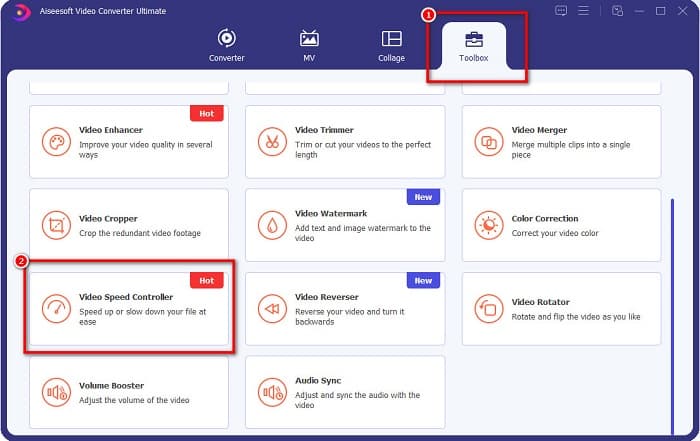
ステップ2. そして、アプリのメインインターフェースでツールボックスパネルに移動し、動画速度コントローラー機能を選択します。
ステップ3. スピードランプをかけたい動画を読み込むには、プラス(+)ボタンをクリックするか、ファイルをプラスマークの枠にドラッグ&ドロップします。

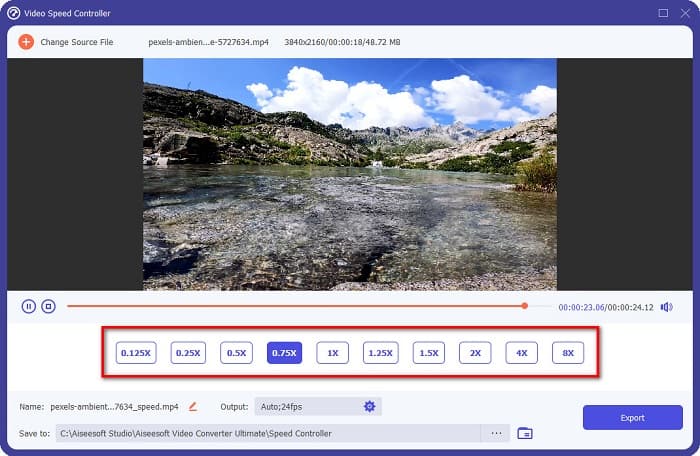
ステップ4. 次の画面で、動画に適用したい再生速度を選択します。0.125x、0.25x、0.5x、0.75x、1x、1.25x、1.5x、2x、4x、8xの中から選べます。
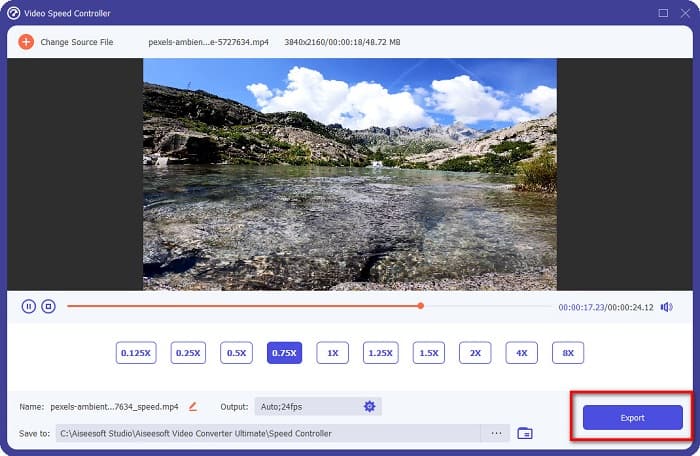
ステップ5. 最後に、動画の速度編集が完了したら、エクスポートボタンをクリックして、出力ファイルをデバイスに保存します。
関連:
After Effectsで動画を早送りする方法【おすすめの高速化ツール】
パート 4. Speed Ramping に関する FAQ
iPhoneで動画をスピードアップできますか?
はい。 iPhone でスピード ランピングを行いたい場合は、iMovie アプリを使用できます。 iMovie は iPhone 用の有名なビデオ編集アプリで、複数の範囲でビデオの速度を上げたり下げたりできます。
アドビ プレミアは無料ですか?
いいえ。Adobe Premiere は無料のアプリではありません。使用するには、月額 US$20.99 でアプリを購入する必要があります。ただし、7日間の無料トライアルで無料でダウンロードできます.
CapCut でスピード ランプを使用できますか?
CapCut は、ビデオをスピード ランプできるビデオ編集アプリです。速度曲線ツールを使用すると、ビデオの速度を上げたり下げたりして、ビデオの速度を編集できます。
結論
スピードランプは、動画に独自のシネマティックな効果を与える優れた方法です。また、プロとして動画編集を行っているのであれば、Adobe Premiere はスピードランプに最適なツールと言えるでしょう。一方、無料アプリをダウンロードして動画にスピードランプをかけたい場合は、Video Converter Ultimateがおすすめのアプリケーションです。
-
 PremiereProとその代替でビデオを高速化する方法
 Premiere Proを使用してビデオを高速化する方法を知りたいですか?次に、手順やその他の手頃な代替案を提供するので、正しい記事になります。
-
 Windowsムービーメーカーでスローモーションビデオを作成する簡単な方法
 ビデオに劇的な効果を与えて、スローモーションでクリップを強調したり、少なくとも他のクリップから目立たせたりしたいのですが、その方法がわかりませんか?詳細については、この記事を読み続けてください。
-
 TikTokでビデオをスピードアップする方法に関する2つの簡単な方法
 TikTokでビデオを高速化する方法の秘密を知りたいですか?次に、この記事を読んで、それを行う方法についてのアイデアを持ち、あなたを助ける他の2つのツールが何であるかを知ってください。