


iPhoneで簡単にスクリーンショットを撮る4つの方法
iPhoneのスクリーンショット機能は、私たちの多くにとってとても便利な機能です。重要な情報や思い出、興味深いコンテンツを保存するなど、さまざまなことに活用できます。文字どおり、画面に表示されるあらゆるものをスクリーンショットとして残せるのです。また、操作手順もわずか数ステップなので、ほとんどの人が簡単に覚えられます。さらに、撮ったスクリーンショットをメッセージアプリや各種SNSに手軽に共有できるため、より効果的なコミュニケーションにも役立ちます。創造的なかたちで他者と関わるすばらしい手段にもなります。もし今、4つの異なる方法でiPhoneでスクリーンショットを撮るやり方を探しているなら、ぜひこの記事を読んで詳しく学んでください。

パート1:Face IDを使ってiPhoneでスクリーンショットを撮る
iPhone でスクリーンショットを撮る方法は、モデルによって異なります。iPhone X 以降の最新モデルでは、Face ID 機能により、スクリーンショットの撮り方が変わりました。この機能は、顔認識によるスムーズで安全な認証手段を実現するために、新しい iPhone モデルに導入されました。これにより、スクリーンショットを撮るために頻繁に使用されていたホームボタンが削除されました。Face ID を搭載した iPhone では、スクリーンショットを撮るのは簡単ですが、ホームボタンを押す代わりに、ユーザーは物理ボタンの組み合わせを使用して同じ結果を実現します。
iPhone 14やFace IDを搭載した他のモデルでスクリーンショットを撮る場合は、次の手順に従う必要があります。
ステップ1. まず、サイドボタンと音量を上げるボタンを同時に押します。
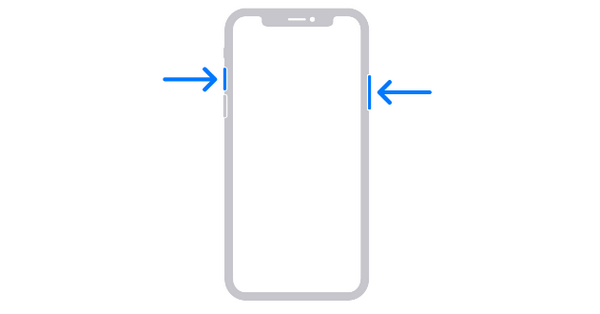
ステップ2. そのあと、すぐに両方のボタンを離します。
これは現在、iPhone、特に最新モデルのiPhoneでスクリーンショットを撮る一般的な方法です。
パート2: ホームボタン付きiPhoneのスクリーンショット
一方、iPhone SE 1 世代、iPhone 5、6、7、8 などのホームボタン付きの iPhone を使用している場合は、スクリーンショットを撮る従来の方法を使用します。この方法では、電源ボタンとホームボタンの両方を押すだけです。これにより、iPhone は現在画面に表示されているものをスクリーンショットするように求められます。これはスクリーンショットを撮るシンプルで迅速な方法であり、長い間 iPhone の標準機能となってきました。
ステップ1. サイド ボタンと ホーム ボタンを同時に押します。
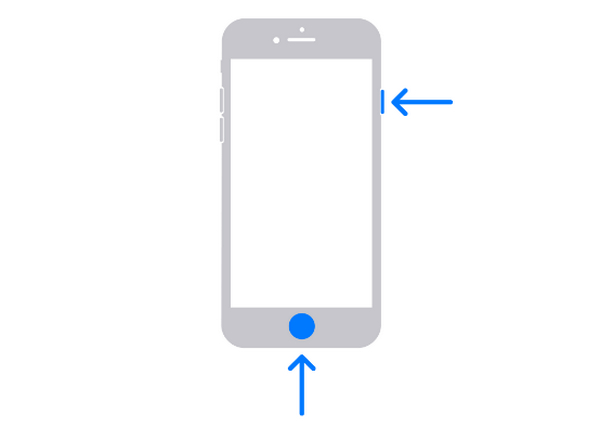
ステップ2. すぐに両方のボタンを離します。
この方法でも、プレビューが一時的にポップアップ表示されます。タップして開くか、左にスワイプして閉じます。
したがって、ホームボタン付きのiPhoneをまだ使用している場合は、この古典的な方法がiPhoneでスクリーンショットを撮る最良の方法です。
パート3: ボタンなしでiPhoneでスクリーンショットを撮る
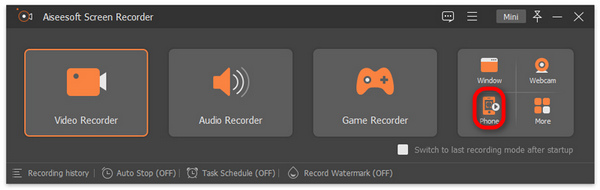
もしお使いのiPhoneに物理ボタンがなかったり、スクリーンショット機能がうまく動作しない場合は、FVC Screen Recorder のようなサードパーティ製ツールを使うことで、iPhoneで簡単にスクリーンショットを撮る代替手段になります。このツールを使えば、ボタン操作なしでiPhone画面に表示されている内容を手軽にキャプチャできます。必要な手順はわずかで、一度設定してしまえば、iPhone画面をスクリーンショットしたいときにクリックするだけで済みます。最後に、直感的なインターフェースのおかげで、複雑な画面録画ツールと比べて、ユーザーが操作に圧倒されることもありません。
ボタンを使わずに iPhone でスクリーンショットを撮る方法のガイドは次のとおりです。
ステップ1. WindowsパソコンにFVC Screen Recorderをダウンロードして起動します。
無料ダウンロードWindows 7以降に対応安全なダウンロード
無料ダウンロードMacOS 10.7以降に対応安全なダウンロード
ステップ2. ツールのウィンドウ右側にある3つの他のオプションと並んで表示されている中から、Phone Recorder オプションをクリックします。
ステップ3. 続いて、iOS Recorder オプションをクリックします。
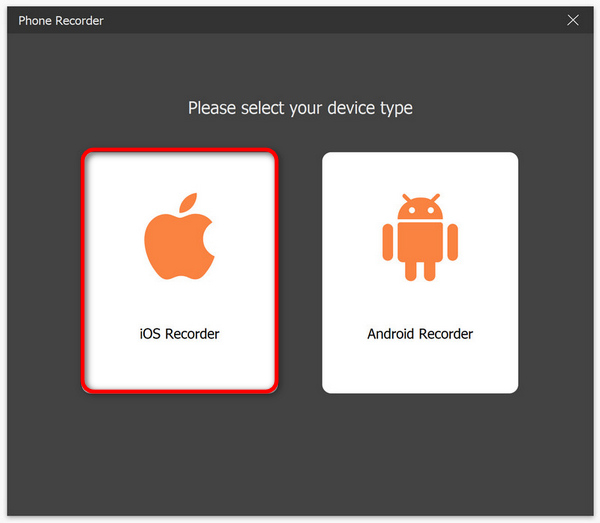
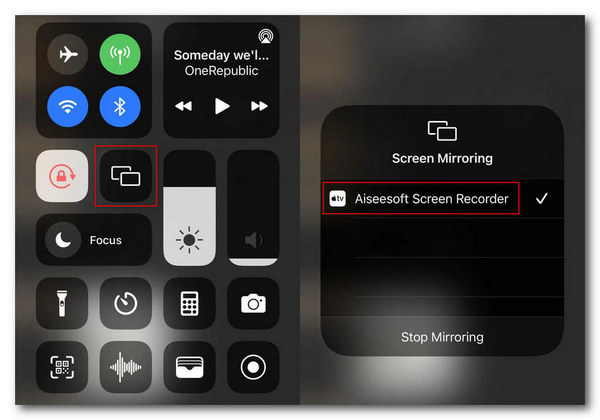
ステップ4. オンスクリーンの手順が表示された新しいウィンドウが開きます。また、画面ミラーリングか音声ミラーリングかを選択するよう求められるので、この場合は画面ミラーリングを選びます。
ステップ5. 次に、iPhone側でコントロールセンターを開きます。画面ミラーリングをタップしてドロップダウンリストを表示し、そこから「Aiseesoft Screen Recorder」をタップしてiPhoneとパソコンを接続します。
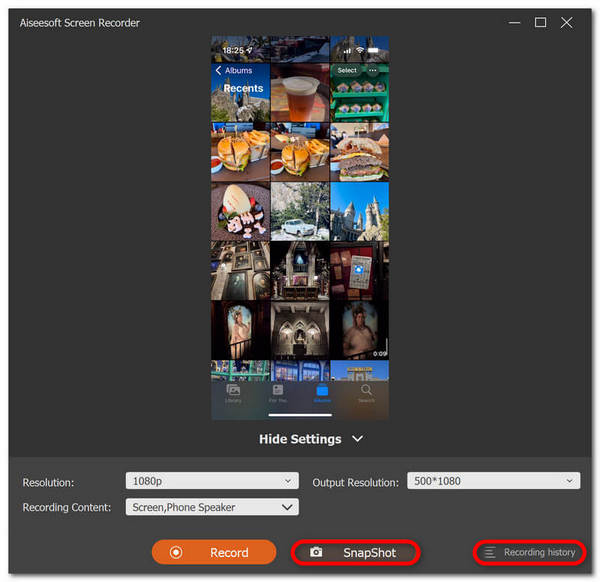
ステップ6. 最後に、iPhoneのスクリーンショットを撮るには、スナップショットアイコンをクリックするだけです。なお、撮影したスクリーンショットは、直接パソコンのWindowsフォルダーに保存されます。
FVC スクリーン レコーディング ツールを使用して iPhone でスクリーンショットを撮るのは、その直感的でわかりやすいインターフェイスのおかげで、確かに簡単です。したがって、このツールは、iPhone でスクリーンショットを撮る信頼できる方法を探している人にとって、今や必須のツールです。
パート4:タップしてiPhoneでスクリーンショットを撮る
iPhone 8 から最新モデルまでの iPhone には、スクリーンショットを撮る別の方法があります。一部の人にとっては便利ですが、他の人にとっては設定が少し複雑です。ただし、この機能を使用すると、画面をタップするだけでスクリーンショットを撮ることができるため、物理的なボタンをクリックしたり、他の外部アプリケーションに頼ったりする必要がなくなります。
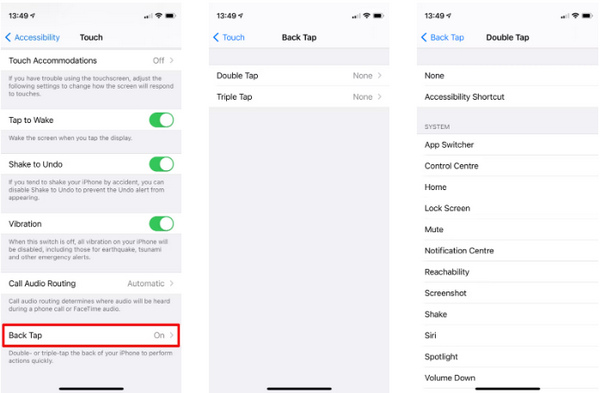
ステップ1. まず、iPhone本体で設定アプリを開きます。
ステップ2. その後、下にスクロールしてアクセシビリティを探します。
ステップ3. 次に、アクセシビリティの中からタッチを探してタップします。
ステップ4. ゆっくり下までスクロールすると、一番下に背面タップがあるので、それをタップします。
注意: ここでは、ダブルタップとトリプルタップのどちらのジェスチャでiPhoneのスクリーンショットを撮るか、2つのオプションから選択できます。
ステップ5. 最後に、利用可能なアクションの一覧が表示されるので、スクリーンショット用に設定する場合は、その中からスクリーンショットを選びます。
iPhone のこの組み込み機能を有効にして利用することで、iPhone でスクリーンショットを効率的に撮ることができ、より速く、より直感的に操作できるようになります。ただし、この設定は一部の iPhone ユーザーにとって少し面倒かもしれません。
パート5: iPhoneでのスクリーンショットの撮影に関するよくある質問
iPhone のスクリーンショットはどうなりますか?
iPhone でスクリーンショットを撮ると、スクリーンショットは自動的にフォト ライブラリに保存されます。これにアクセスするには、写真を開いてアルバムを選択する必要があります。少し下にスクロールし、メディア タイプでスクリーンショットをクリックします。
タップジェスチャを使用してスクリーンショットを撮ると、iPhone のバッテリーの消耗が早くなりますか?
まったくそうではありません。iPhone で行うすべてのアクティビティはバッテリー電力を消費するというのは事実かもしれません。ただし、タップ ジェスチャを使用して iPhone でスクリーンショットを撮っても、iPhone のバッテリー寿命に大きな影響を与えることはありません。これらのジェスチャは iPhone の効率を高めるように設計されているため、iPhone のバッテリーの電力消費は最小限に抑えられ、バッテリーの消耗が早まることはありません。
タップジェスチャを使用してスクリーンショットを撮ると、iPhone の他の機能に影響しますか?
いいえ。iPhone でタップ ジェスチャを使用してスクリーンショットを撮っても、デバイスの他の機能には影響しません。これらの種類の機能は、iPhone 上の他のアクションやコマンドに問題や競合が発生しないように、明確かつ邪魔にならないように設計されているからです。
結論
まとめると、さまざまな方法でiPhoneでスクリーンショットを撮るやり方を覚えておくことは、特に初心者で、もっと使いこなしたい人にとって非常に役立ちます。また、ボタン操作、タップジェスチャ、サードパーティ製ツールなど、選べる方法がたくさんあるため、どの方法にするか迷ってしまう場合もあるでしょう。まずは、自分のiPhoneにとっていちばん扱いやすいスクリーンショットの方法を選び、画面のスクリーンショットを撮ることから始めてみてください!
-
 この基本ガイドでMacで簡単にスクリーンショットを撮る方法
 Mac でスクリーンショットを撮りたいけれど、やり方がわからない? 大丈夫です! 画面のスクリーンショットを撮って画像を保存する最も簡単で素早い方法を紹介します。
-
 スクリーンショットを簡単に編集する方法 [初心者向けガイド]
 さまざまなデバイスでスクリーンショットを編集する方法をお探しですか? 正しい道に来ました。この記事では、さまざまな方法をわかりやすく説明します。
-
 Windows で Print Screen なしでスクリーンショットを撮る方法 [2025 ガイド]
 Windows でプリント スクリーンを使わずにスクリーンショットを撮る方法をお探しですか? この記事は簡単です。今すぐこれを読んで、楽に画面をキャプチャしましょう!