


必須のツール 5 つを使って色を修正する方法
カラー補正は、ビデオ編集における基本的なプロセスであり、映像内の色を改善し、なじませることで、視覚的に魅力的で目を引く仕上がりを実現します。コントラスト、彩度、明るさ、色相といった要素を調整し、理想的なビジュアルの雰囲気を作り上げる作業です。プロのビデオグラファーであれ、これから活躍したいコンテンツクリエイターであれ、カラー補正のやり方を理解することは、印象的な映像を作るうえで大きな武器になります。まずは、映像素材における既存のカラーバランスやハイライト、シャドウ、中間調を見極め、分析するところから始めます。そのうえで、これらの色要素を細かくコントロールできる専用ソフトを使って調整を行います。それでは、本記事で信頼して使える最適なツールを用いてビデオの色問題を修正する方法を詳しく見ていきましょう。

パート 1. ビデオの色を修正する 5 つの方法
ビデオの視覚的な魅力を高めるさまざまな無料のビデオ エディターの色補正をオンラインで見つけるのは、思っているほど簡単かもしれません。ただし、ビデオに適切な雰囲気を作り出すために、より高度で信頼性の高いものを探すのは少し難しいです。さまざまな汎用ソフトウェアを使用してビデオの色を完璧にし、ストーリーテリングを強化し、視聴者を魅了する 5 つの効果的な方法を発見します。
1.ビデオコンバーターアルティメット
Video Converter Ultimate は、明るさ・コントラスト・彩度といった重要なパラメータを調整して映像品質を向上できる、オールインワンの動画ソリューションです。この便利なカラー補正ツールでは、トリミング、クロップ、結合などの編集機能も利用できます。さらに、豊富な動画変換オプションを備えており、動画を数千種類もの形式に変換し、MP4、MKV、MOV、MP3、AAC、GIF、iPhone、Samsung、Apple TV など、さまざまなデバイス向けに最適化することができるため、異なるプラットフォーム間で楽しめます。また、字幕やウォーターマークを追加して、よりパーソナライズされた動画に仕上げることも可能です。わかりやすいインターフェースを備えているため、初心者から上級者まで幅広いユーザーに適しています。以下の手順に従って、Video Converter Ultimate を使って動画のカラー補正を行う方法を学びましょう。
手順 1:カラー補正ツールをダウンロード・インストール
まずは、下記のいずれかの無料ダウンロードボタンをクリックしてツールを入手します。お使いのコンピューターの OS に応じて、適切なバージョンの Video Converter Ultimate をダウンロードしてください。画面の指示に従ってインストールを完了させます。
無料ダウンロードWindows 7 以降対応安全なダウンロード
無料ダウンロードMacOS 10.7 以降対応安全なダウンロード
ステップ 2:Video Converter Ultimate を起動
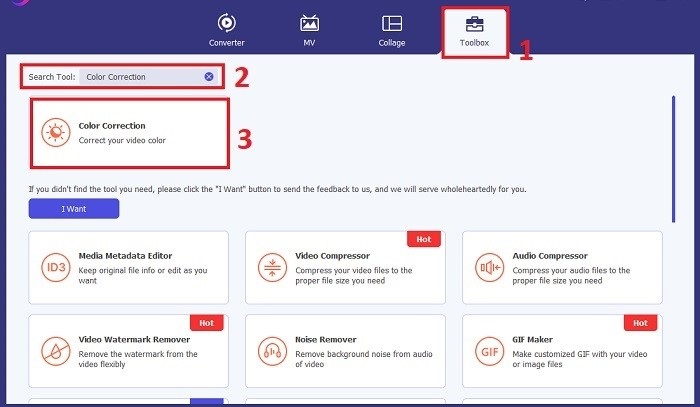
インストールが完了したら、Video Converter Ultimate を起動します。メインメニューからツールボックスに進み、カラー補正機能を探します。見つかったらクリックして次へ進みます。
手順 3:カラー補正したい動画を読み込む
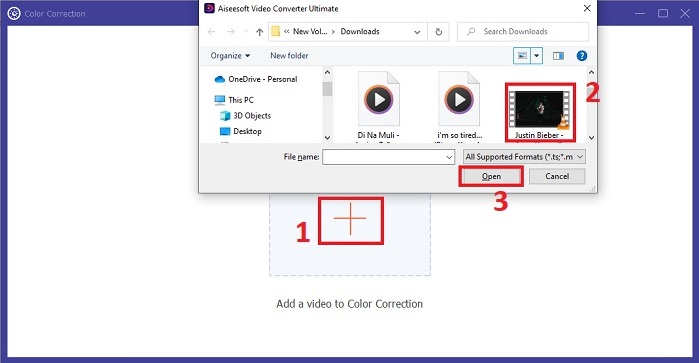
次に、プラスボタンをクリックして、カラー補正したい動画を読み込みます。パソコン内から該当する動画ファイルを探し、開くを選択してソフトに取り込みます。
手順 4:動画の色設定を調整して保存
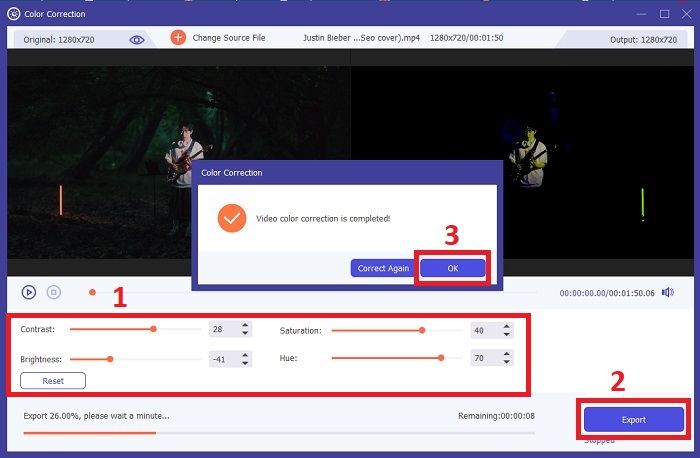
動画を読み込んだら、明るさ、コントラスト、彩度、色相などのカラー項目を細かく調整し、理想の色味に仕上げます。色調整に満足できたら、エクスポートをクリックします。ツールに動画の処理を行わせ、補正後の動画を指定した保存先に保存します。
2. カラーコレクション Premiere Pro
Premiere Pro は、高品質のビデオ編集ソフトウェアと包括的な色補正機能で知られています。正確な調整を行うための多様なカラー グレーディング ツールとエフェクトを提供します。カラーコレクション Premiere Pro を使用すると、カラーバランスと露出を調整したり、クリエイティブな外観を適用して、希望のビジュアルスタイルを実現したりできます。また、何百もの内蔵ビデオエフェクトやトランジションから選択したり、プロがデザインしたテンプレートから始めてそれらを修正して希望の出力を作成したりすることもできます。さらに、コラボレーション機能があり、他の Adobe ソフトウェアとスムーズに統合できるため、専門家の間でトップの選択肢となっています。
手順 1. Premiere Pro を起動して動画を読み込みます。その後、カラー ワークスペースに移動します。
手順 2. カラー ワークスペース内で、Lumetriカラーパネルを使い、露出、カラーバランス、クリエイティブなルックを調整します。
手順 3. スコープを使用して、狙いどおりの仕上がりになるよう色調整が正確かどうか確認します。最後にプレビューし、補正後の動画を書き出します。

3. Davinci Resolveカラーコレクション
卓越したカラー グレーディング能力を体験してください。このオールインワン ソフトウェアは、プロフェッショナルな編集、色補正、視覚効果、オーディオ ポストプロダクションを組み合わせたものです。このツールの使いやすいインターフェイスと包括的な機能セットにより、クリエイティブなビジョンを正確かつスタイリッシュに実現できます。 Davinci Resolve Color Correction の高度なカラー グレーディング ツールを使用すると、ビデオを目立たせることができます。最先端のハリウッド映画に取り組んでいる場合でも、個人的なプロジェクトに取り組んでいる場合でも、このツールを使用すると、専門家や愛好家が比類のない品質で魅力的な物語を作成できるようになります。
手順 1. Davinci Resolve を開き、動画を読み込みます。取り込みが完了したら、Color タブに進みます。
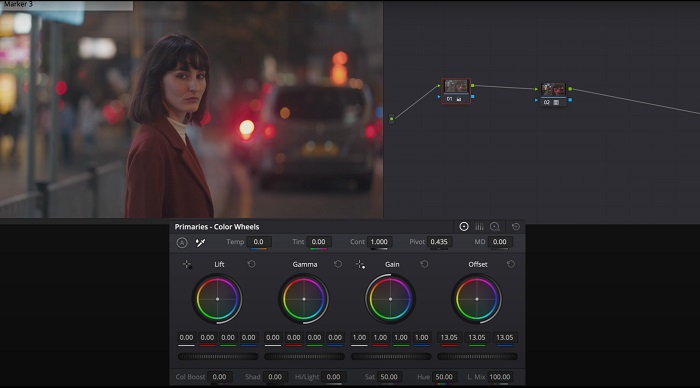
手順 2. Colorタブ内で、カラーホイール、カーブ、ノードを活用して動画のカラーを補正します。より精密な調整には、用意されているスコープも利用できます。
手順 3. 必要なカラー調整を行ったら、補正後の動画をプレビューし、期待どおりの仕上がりになっているか確認します。問題なければ、動画を書き出して利用できる状態にします。
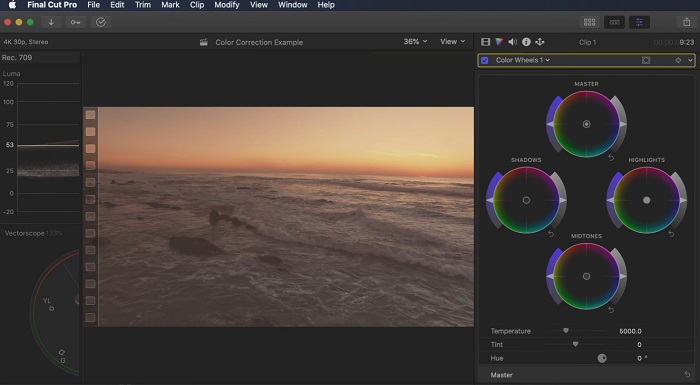
4. Final Cut Proの色補正
一流のビデオ編集アプリケーションを探している Mac ユーザーなら、Final Cut Pro が最適な選択肢です。ユーザーフレンドリーなインターフェイスと、編集を簡単にする強力な機能を備えています。色補正に関しては、Final Cut Pro は露出、彩度、色相を調整するためのカラーボードとカラーホイールを提供します。リアルタイムのカラー効果を適用し、高度なグレーディング ツールを使用して映像を強化できます。さらに、Apple デバイスや人気のオンライン プラットフォームにスムーズにエクスポートできます。効率性と創造性を求めるプロフェッショナルなら、Final Cut Pro を選ぶのは間違いありません。最適なパフォーマンスを得るには、macOS 13.4 以降と Apple シリコンを搭載した Mac コンピューターを使用していることを確認してください。
手順 1. Final Cut Pro に動画を読み込んで作業を開始し、カラー ワークスペースへ移動します。
手順 2. カラーボードまたはカラーホイールを使って、露出、彩度、色相などの基本的な調整を行います。
手順 3. 追加のカラーグレーディングツールを用いて、さらに色味を追い込み、可能な限りベストな結果を目指します。作業が完了したらプレビューし、補正後の動画を書き出します。
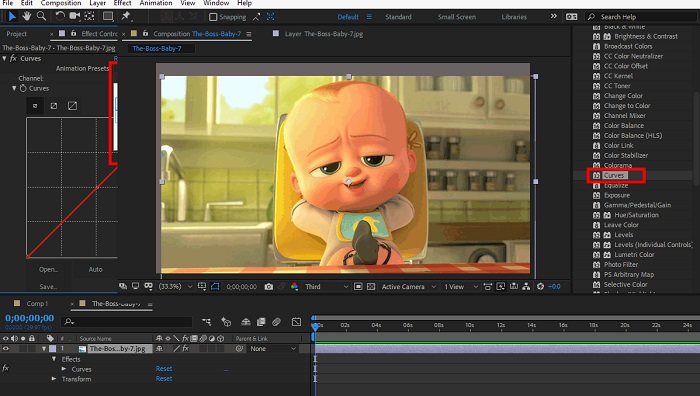
5.After Effectsの色補正
After Effects は、堅牢な色補正機能を備えた有名なモーション グラフィックスおよび視覚効果ソフトウェアです。基本的な色補正効果とは別に、色を強化および変更するためのさまざまな調整レイヤーと効果が提供されます。テキストやグラフィックをすばやくアニメーション化し、魅力的な動きで生命を吹き込むことができます。カラーコレクション After Effects を使用すると、レベル、カーブ、ブレンドモードを活用して、希望のカラーグレーディングを実現できます。これは、さまざまな Adobe 製品との統合、およびチュートリアルとプラグインを提供する大規模なコミュニティのおかげで、多用途の色補正オプションです。さらに、このソフトウェアは継続的に進化し、直感的なプロパティ パネル、透明レイヤー コントロール、効率的なマルチフレーム レンダリングなどの機能を導入して、ワークフローを合理化し、創造性の最先端を維持します。
手順 1. ツールのプロジェクトに動画クリップを読み込みます。Effects & PresetsパネルからCurves、Levels、Color Balanceなどの適切なカラー補正ツールを選び、カラー補正エフェクトを適用します。
手順 2. 適用したカラー補正エフェクトをクリックしてパラメータにアクセスします。そのうえで、露出、コントラスト、彩度、色相などの設定を変更し、動画の色を補正・強調します。
手順 3. コンポジションパネルで動画をプレビューし、カラー補正が映像にどのような影響を与えているか確認します。プレビューを見ながら微調整を行い、望んだカラー補正ができたら、レンダリングまたは書き出しを行います。
さらに詳しく読む:
Android&iOS向け 無料のおすすめ写真カラー強化アプリ
Windows & macOS で動画にフィルターをかける 4 つの驚くべき方法
パート 2. ビデオ カラー コレクターに関する FAQ
iMovie で色補正を行うにはどうすればよいですか?
iMovie でカラー補正を行うには、動画クリップを読み込んで選択し、カラー補正ボタン(魔法の杖アイコン)をクリックします。露出、彩度、色のスライダーを動かして、好みの見た目になるよう調整します。
OpenShot の色補正ツールにアクセスするにはどうすればよいですか?
OpenShot Video Editor でカラー補正を行うには、クリップを選択し、エフェクトタブからColor Correctionをクリックします。明るさ、コントラスト、色相、彩度のスライダーを調整して、目的のカラー補正を行います。
Sony Vegas の色補正ツールにアクセスするにはどうすればよいですか?
Sony Vegas でカラー補正を行うには、補正したいクリップを選択し、Video FXタブへ進んでColor Correctorを検索します。これをクリップにドラッグ&ドロップし、Effect Controlsウィンドウで色のプロパティを調整します。
結論
カラー補正をマスターすることは、映像の視覚的な魅力を高め、印象的な視聴体験を生み出すために不可欠です。本ガイドでは、完璧なカラー補正を実現するための 5 つの強力なカラー補正ツールを紹介しました。高品質な動画編集ツールを探しているなら、Video Converter Ultimate、Premiere Pro、Final Cut Pro、DaVinci Resolve、After Effects の利用を検討してみてください。これらのプログラムは、プロ仕様の映像を制作するための幅広い機能と性能を備えています。それぞれのソフトには異なる特徴や操作性があり、好みやスキルレベルに応じて選ぶことができます。
-
 画像とビデオを投稿する前にInstagramフィルターを追加して作成する方法
 Instagramのフィルターは何ですか?それを適用する方法は?作り方は?これらの質問は、この投稿で簡単に答えられるので、読んでください。
-
 画像を白黒に変換するトラブルのない方法
 あなたの写真をノスタルジックに見せたいですか?答えがあります。この投稿では、カラー画像を白黒に変換する注目すべき方法を紹介します。
-
 Snapchatの6つのお気に入りの選択肢SnapchatアニメーションSnapchatフィルター
 Snapchatビデオにフィルターを追加するための最良の方法を知りたいですか?これをクリックして、Snapchatビデオに適用するために使用できるさまざまなフィルターを学ぶことができます。