


[해결됨] 안드로이드에서 스크린샷을 찍는 4가지 방법
스크린샷 찍기는 오늘날 우리가 휴대폰으로 가장 자주 하는 작업 중 하나입니다. 스크롤을 하다가 화면에 보이는 사진, 텍스트, 게시물을 저장하고 싶을 때 우리는 그것을 스크린샷으로 남깁니다. 지금 안드로이드 기기를 사용 중이고, 스크린샷 기능을 어떻게 활용할지 궁금하다면 여기서 모두 알려드립니다! 이 글에서는 안드로이드에서 스크린샷을 찍는 4가지 방법을 알아보고, 기기의 기능을 최대한 활용해 보세요. 계속 읽으며, 스크린샷으로 당신에게 중요한 콘텐츠를 저장해 보세요!

1부: Android 휴대폰에서 스크린샷을 찍는 방법
궁금하실 수도 있지만 Android에서 스크린샷을 찍는 것은 기기 제조업체와 운영 체제 버전에 따라 다릅니다. 따라서 Android 사용자이고 스크린샷을 찍고 싶을 때 어떤 방법을 사용해야 할지 모르겠다면 아래 단계를 확인하세요.
방법 1: 하드웨어 버튼 사용
Android 기기에서 스크린샷을 찍는 가장 일반적인 방법은 하드웨어나 물리적 버튼을 사용하는 것입니다. 접근성과 편의성으로 인해 Android에서 스크린샷을 찍을 때 가장 많이 사용되는 방법입니다.
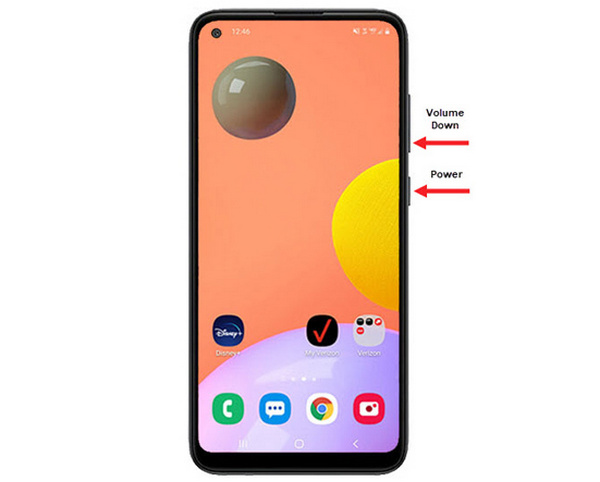
1단계. 먼저, 안드로이드 폰에서 볼륨 내리기 버튼과 전원 버튼을 동시에 누르세요. 스크린샷이 찍힐 때까지 계속 누르고 있습니다.
2단계. 그다음, 갤러리 앱에서 찍은 스크린샷을 확인하세요.
따라서 하드웨어 버튼이 제대로 작동하는 경우 이 방법을 따라 Android에서 쉽게 스크린샷을 찍을 수 있습니다.
방법 2: 바로가기 사용
오늘날 일부 Android 기기에는 빠른 설정 패널에 스크린샷 기능이 내장되어 있어 빠르게 스크린샷을 찍는 데 유용합니다.
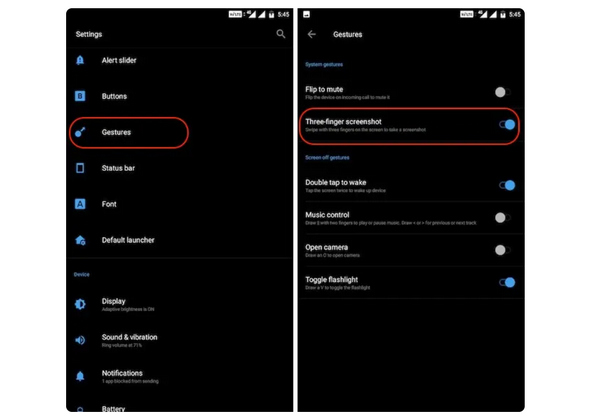
1단계. 먼저, 안드로이드 폰에서 설정으로 이동합니다. 화면을 조금 아래로 스크롤한 뒤 제스처 또는 버튼 옵션을 선택하세요.
2단계. 거기에서 스크린샷 옵션을 찾아 켭니다.
3단계. 마지막으로, 이 기능을 이용해 스크린샷을 찍으려면 캡처하고 싶은 화면에서 세 손가락으로 아래로 쓸어내리기만 하면 됩니다.
이 방법은 버튼을 눌러 스크린샷을 찍고 싶지 않을 때 가장 좋습니다. 하지만 먼저 설정에서 이를 설정해야 합니다. 따라서 익숙하지 않다면 위의 단계를 따르십시오.
방법 3: Google 어시스턴트 사용
한편, Android 휴대폰에 Google 어시스턴트가 있으면 이를 사용하여 쉽게 스크린샷을 찍을 수 있습니다.
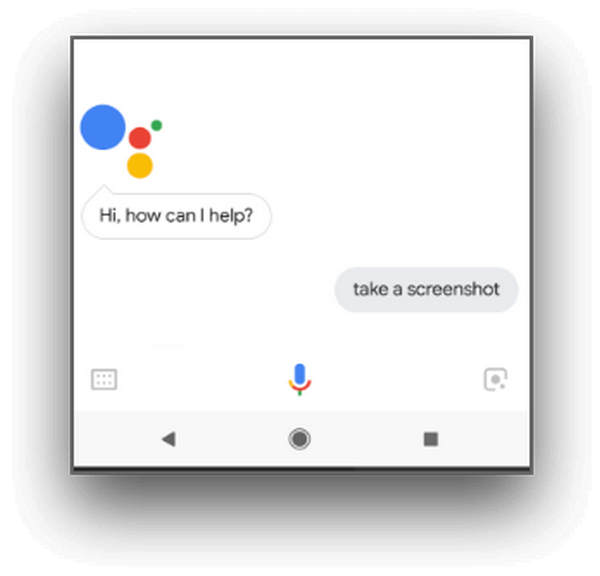
1단계. 먼저, 홈 버튼을 누르거나 OK, 헬로 구글이라고 말하는 음성 명령으로 Google 어시스턴트를 활성화합니다.
2단계. 어시스턴트가 활성화되면 스크린샷 찍어 줘 또는 스크린샷이라고 말합니다.
참고: 스크린샷이 찍혔다는 것을 알 수 있도록 애니메이션이 보이거나 소리가 들려야 합니다.
3단계. 휴대폰의 갤러리 앱에서 Screenshots 폴더로 이동해 스크린샷을 확인할 수 있습니다.
참고: 이 기능은 모든 안드로이드 기기에서 사용할 수 있는 것은 아닙니다. 휴대폰의 Google 어시스턴트가 음성 명령으로 스크린샷 찍기를 지원한다면, 여기 나와 있는 단계만 따라 하면 됩니다.
2부: Android 태블릿에서 스크린샷을 찍는 방법
Android 태블릿을 소유하고 있고 이를 사용하여 스크린샷을 찍는 방법이 궁금하다면 방법은 다음과 같습니다.
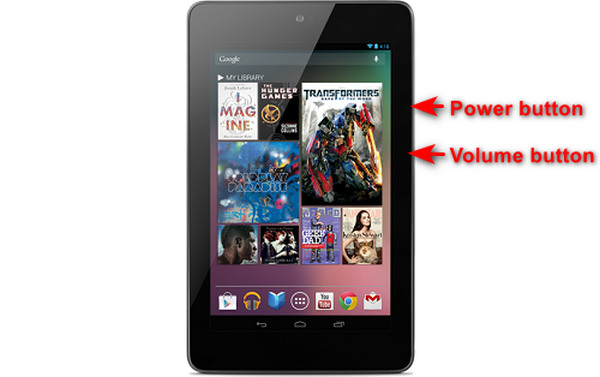
1단계. 안드로이드 태블릿에서 전원 버튼과 볼륨 내리기 버튼을 동시에 눌러 몇 초간 유지합니다.
참고: 스크린샷이 찍히면 알림이 표시되어야 합니다.
2단계. 그런 다음 태블릿의 갤러리 앱에서 Screenshots 폴더로 이동해 스크린샷을 확인합니다.
이 방법이 Android 태블릿에서 작동하지 않으면 다음으로 해야 할 일은 스크린샷을 찍을 수 있도록 Google Play 스토어에서 타사 앱을 사용하는 것입니다.
3부: 컴퓨터를 사용하여 Android에서 스크린샷을 찍는 방법
이제, 위의 방법들이 휴대폰에서 잘 작동하지 않아 컴퓨터를 사용해 안드로이드에서 스크린샷을 찍고 싶다면, 가장 좋은 도구는 FVC Screen Recorder입니다. 이 도구는 컴퓨터에 미러링된 어떤 휴대폰 화면이든 스크린샷을 찍을 수 있도록 설계되어 안드로이드 기기와도 완벽하게 호환됩니다. 따라서 Phone Recorder 기능을 사용하면 사용자는 컴퓨터를 통해 안드로이드 화면을 간편하게 캡처할 수 있습니다. 게다가 요즘 사용 가능한 다른 서드파티 도구들과 비교했을 때, 이 도구는 매우 직관적이고 사용자 친화적인 인터페이스를 갖추고 있어 사용하는 데 어려움이 없습니다.
1단계. 먼저, 컴퓨터에 FVC Screen Recorder를 다운로드해 실행합니다.
무료 다운로드Windows 7 이상용안전한 다운로드
무료 다운로드macOS 10.7 이상용안전한 다운로드
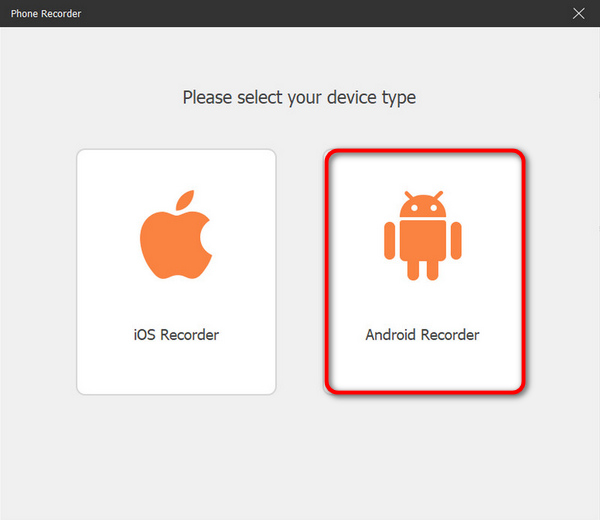
2단계. 이제 Phone recorder 옵션을 클릭합니다. 이 옵션은 도구 창의 오른쪽에 있는 다른 3가지 옵션과 함께 표시됩니다.
3단계. 다음으로 Android Recorder를 클릭합니다.
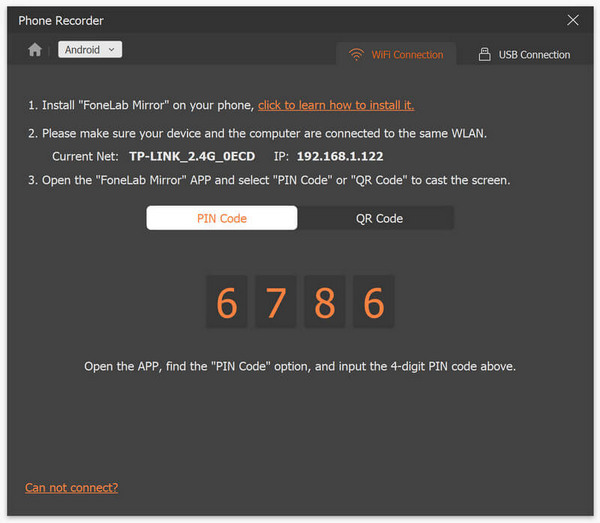
4단계. 휴대폰 화면을 캐스팅하는 방법은 WiFi 또는 USB를 통해 할 수 있습니다. 다만 WiFi를 선택하는 경우, PIN Code나 QR Code를 통해 컴퓨터의 Phone recorder 기능으로 휴대폰 화면을 쉽게 전송할 수 있습니다.
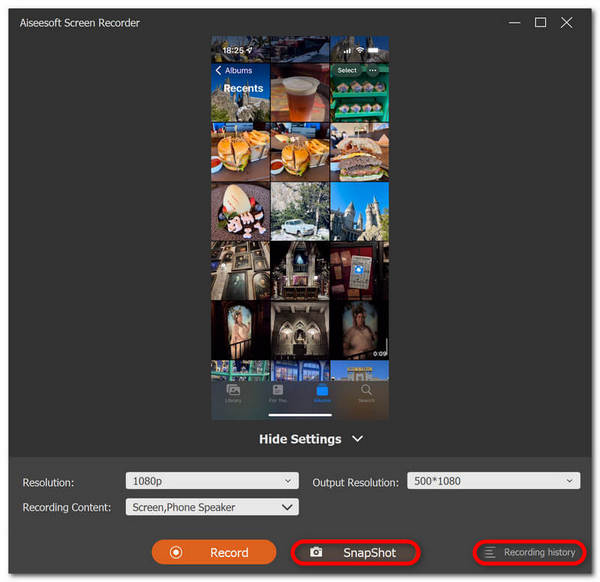
5단계. 미러링이 완료되면, 컴퓨터에서 안드로이드 화면의 스크린샷을 찍기 위해 Snapshot 아이콘을 클릭하기만 하면 됩니다.
6단계. 마지막으로, Windows 컴퓨터에서 지정된 폴더로 바로 이동해 스크린샷 이미지를 확인하세요.
FVC Screen Recorder는 안드로이드에서 컴퓨터로 스크린샷을 찍고 싶을 때 완벽한 도구입니다. 전화 녹음 기능을 사용하면 장치 설정부터 실제로 스크린샷을 찍는 것까지 모든 것이 쉬워집니다. 이 도구에는 필요한 모든 것이 있습니다.
4부: Android에서 스크롤 스크린샷을 찍는 방법
웹 페이지의 스크린샷을 찍거나 Android에서 긴 대화를 한 번에 찍고 싶다면 여러 장의 스크린샷을 찍는 대신 아래 단계를 따르세요.
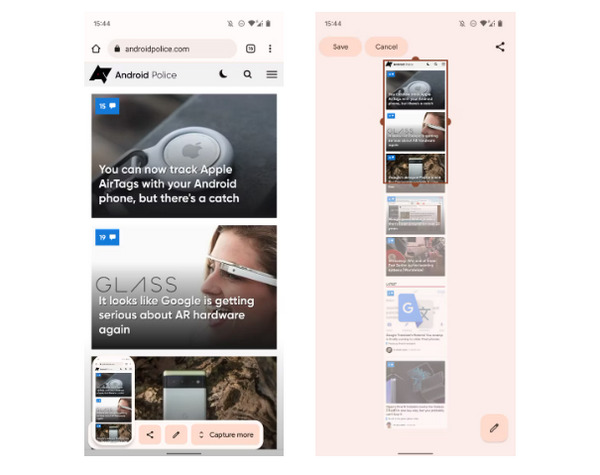
1단계. 먼저, 안드로이드 폰에서 스크린샷을 찍습니다.
2단계. 다음으로, 스크린샷 미리보기를 누른 후 나타나는 더 캡처 버튼을 탭합니다.
참고: 스크린샷을 확장하는 창을 사용할 때 시스템은 더 정확하게 선택할 수 있도록 돋보기를 표시합니다.
3단계. 마지막으로, 저장을 탭해 스크린샷을 저장합니다.
더 이상 전체 웹 페이지나 전체 스크린샷 대화를 표시하기 위해 많은 스크린샷을 찍지 않습니다.
5부: Android에서 스크린샷 찍기에 관한 FAQ
내 Android 기기의 기본 스크린샷 폴더를 변경할 수 있나요?
예. 원하는 경우 기본 스크린샷 폴더를 변경할 수 있습니다. 여러분이 해야 할 일은 새 폴더를 생성하거나 Android 휴대폰의 스크린샷을 위한 다른 폴더를 선택하는 것뿐입니다.
하드웨어 버튼이 작동하지 않는 경우 Android 휴대폰에서 스크린샷을 찍는 방법은 무엇입니까?
먼저, Android 휴대폰의 하드웨어 버튼이 작동하지 않는 경우에도 스크린샷을 찍을 수 있는지 궁금하다면 대답은 '예'입니다. 따라서 이와 같은 경우에는 FVC 화면 녹화와 같은 타사 화면 녹화 도구를 사용하는 것이 가장 좋습니다. 이 도구를 사용하면 사용자는 간단히 전화 녹음 기능을 활용하여 Android 휴대폰에서 스크린샷을 찍을 수 있습니다.
내 Android 기기에서 스크린샷에 주석을 달거나 편집할 수 있나요?
예. Android 기기에서 스크린샷과 사진에 주석을 달거나 편집할 수 있습니다. 내장된 편집 기능을 사용하여 스크린샷을 찍은 후 바로 이 작업을 수행할 수 있습니다. 스크린샷에 텍스트, 그림, 화살표, 모양을 추가할 수 있을 뿐만 아니라 자르기, 크기 조정, 필터 적용도 가능합니다.
결론
이제 모두 끝났습니다. 안드로이드에서 스크린샷 찍기는 이제 정말 식은 죽 먹기입니다. 자신의 기기에 잘 맞는 방법만 알면 모든 것이 완벽하게 작동합니다. 그러니 원하는 방법을 골라 오늘 바로 안드로이드에서 소중한 순간들을 캡처해 보세요!
-
 이 기본 가이드를 통해 Mac에서 쉽게 스크린샷을 찍는 방법
 Mac에서 스크린샷을 찍고 싶지만 방법을 모르시나요? 우리는 당신을 잡았습니다! 화면의 이미지를 스크린샷으로 저장하고 저장하는 가장 간단하고 빠른 방법을 보여드리겠습니다.
-
 이 기본 가이드를 통해 Mac에서 쉽게 스크린샷을 찍는 방법
 Mac에서 스크린샷을 찍고 싶지만 방법을 모르시나요? 우리는 당신을 잡았습니다! 화면의 이미지를 스크린샷으로 저장하고 저장하는 가장 간단하고 빠른 방법을 보여드리겠습니다.
-
 이 기본 가이드로 쉽게 비디오 스크린샷을 찍으세요 [2024]
 이러한 간단한 방법으로 동영상에서 스크린샷을 찍는 방법을 쉽게 알아보세요. 지금 저희 가이드를 따라 좋아하는 비디오의 스크린샷을 찍어보세요!