


Cara Menyahkaburkan Imej Menggunakan Aplikasi Paling Berkuasa
Agak mengecewakan apabila mengetahui gambar yang anda ambil menjadi kabur. Foto anda kabur kerana subjek yang anda ambil sedang bergerak, kamera bergegar, atau pencahayaan di tempat tersebut tidak baik. Selain itu, anda juga tidak boleh mengulangi semula detik ketika anda mengambil gambar, yang sangat mengecewakan. Membetulkan gambar itu kelihatan mustahil, tetapi sebenarnya tidak. Mujurlah, terdapat kaedah khusus yang boleh anda gunakan untuk menjernihkan semula gambar yang kabur. Dengan aplikasi pembaikan imej yang terbaik, anda boleh membetulkan gambar kabur anda. Panduan ini akan mengajar anda cara menjernihkan imej yang kabur dengan mudah.

Bahagian 1. Bagaimana Menyahkaburkan Imej Dalam Talian
Orang ramai lebih suka menggunakan aplikasi dalam talian untuk menyahkaburkan imej kerana ia membolehkan mereka menjimatkan ruang pada peranti mereka. Selain itu, apabila menggunakan alat dalam talian, anda hanya perlu mengaksesnya pada penyemak imbas anda. Mudah kan? Oleh itu, kami mencari penaik imej dalam talian yang terbaik untuk membetulkan kekaburan foto anda.
FVC Free Image Upscaler ialah pilihan terbaik jika anda mencari cara untuk menjernihkan imej secara dalam talian. Selain itu, ia percuma dan selamat digunakan. Anda juga boleh mengaksesnya pada semua pelayar web, termasuk Google, Firefox dan Safari. Tambahan pula, anda boleh meningkatkan kualiti imej anda dengan pembesaran 2x, 4x, 6x dan 8x. Ia juga menggunakan teknologi AI (Kecerdasan Buatan) yang secara automatik mengesan bahagian gambar anda yang kabur, kemudian menambah baiknya.
Tambahan pula, FVC Free Image Upscaler membolehkan anda membetulkan piksel yang hilang, tekstur warna dan lebih banyak butiran dengan tepat. Dan walaupun merupakan aplikasi dalam talian, ia mempunyai proses peningkatan yang pantas dan tidak mengandungi sebarang iklan yang mungkin mengganggu perhatian anda. Jadi, jika anda berminat untuk menggunakan penaik imej percuma, ikuti panduan mudah di bawah.
Bagaimana untuk menyahkaburkan imej menggunakan FVC Free Image Upscaler:
Langkah 1. Mula-mula, buka pelayar anda dan taip FVC Free Image Upscaler pada kotak carian. Anda juga boleh klik pautan tersebut terus ke halaman utama. Kemudian, lancarkan aplikasi dengan mengklik butang Upload Photo. Selepas melancarkan aplikasi, teruskan ke langkah seterusnya.
Langkah 2. Pada antara muka pertama, klik butang Upload Photo untuk mengimport imej yang anda mahu jernihkan. Folder komputer anda akan dipaparkan untuk anda mencari foto anda. Klik Open untuk memuat naiknya.
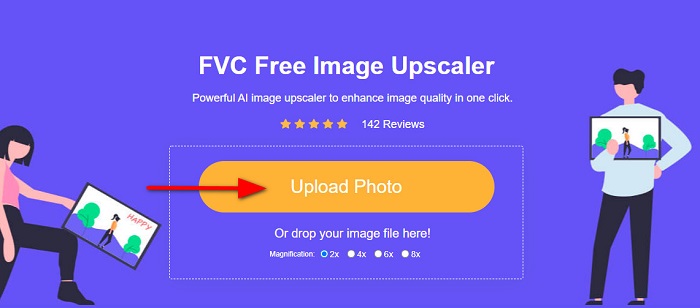
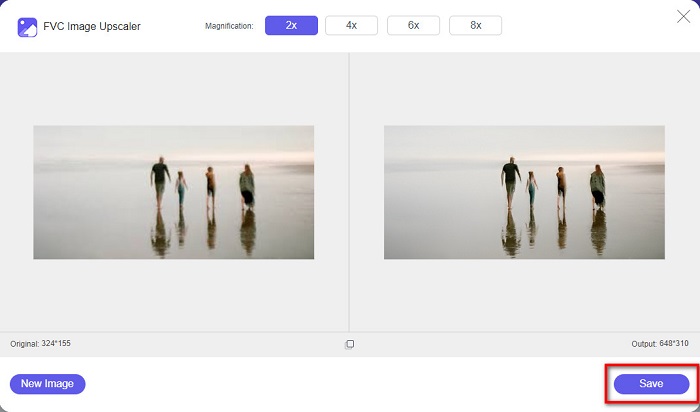
Langkah 3. Selepas memuat naik imej anda, pilih pratetap pembesaran yang anda inginkan untuk imej anda. Anda boleh memilih antara pembesaran 2x, 4x, 6x dan 8x. Kemudian, anda boleh melihat pratonton output di bahagian kanan untuk melihat perbezaannya berbanding fail asal anda.

Langkah 4. Akhir sekali, simpan output anda dengan mengklik butang Save di penjuru kanan bawah antara muka.
Dan itu adalah langkah-langkah bagaimana untuk menyahkaburkan imej dalam talian. Anda akan melihat daripada hasilnya bagaimana penaik tinggi imej percuma ini boleh membantu anda membetulkan kualiti imej anda.
Bahagian 2. Cara Menyahkaburkan Imej Luar Talian pada Desktop
Ramai profesional menggunakan komputer untuk mengedit imej atau video. Selain itu, banyak aplikasi penyuntingan foto hanya tersedia pada desktop. Dan dalam bahagian ini, kami akan mengajar anda kaedah terbaik untuk menyahkaburkan imej di luar talian pada desktop anda.
Nyahkaburkan Imej Menggunakan Photoshop
Adobe Photoshop mungkin merupakan aplikasi penyuntingan imej terbaik yang boleh anda gunakan untuk menjernihkan imej anda. Aplikasi luar talian ini mempunyai banyak ciri dan alat suntingan yang boleh anda gunakan untuk menambah baik imej. Selain itu, anda boleh menambah ketajaman pada foto anda jika kualitinya tidak baik atau jika ia kabur. Dengan menggunakan alat penyuntingan lanjutnya, anda pasti boleh menghasilkan output yang cemerlang. Selain itu, anda boleh membuang orang atau objek daripada imej anda, melukis gambar atau objek menggunakan alat pensel atau pen, memanipulasi warna foto anda dan banyak lagi. Dengan Adobe Photoshop, anda boleh menghasilkan imej hebat yang telah anda sunting. Namun, Adobe Photoshop bukanlah alat yang mesra pengguna. Anda memerlukan pengetahuan mendalam tentang cara menggunakan alatan ini untuk menjernihkan atau menyunting imej anda. Walau bagaimanapun, kami akan menyediakan langkah-langkah untuk anda menggunakan Photoshop bagi menjernihkan imej. Kami juga akan menunjukkan dua cara menggunakan Photoshop untuk mengurangkan kekaburan imej anda.
Proses penyahkaburan imej menggunakan Adobe Photoshop:
Langkah 1. Muat turun Adobe Photoshop pada desktop anda dan pasangkannya. Setelah anda memuat turun dan memasang aplikasi, jalankannya pada peranti anda.
Langkah 2. Kemudian, buka imej yang anda mahu jernihkan pada antara muka utama. Anda juga boleh menekan CTRL + O pada papan kekunci untuk membuka imej anda dengan mudah.
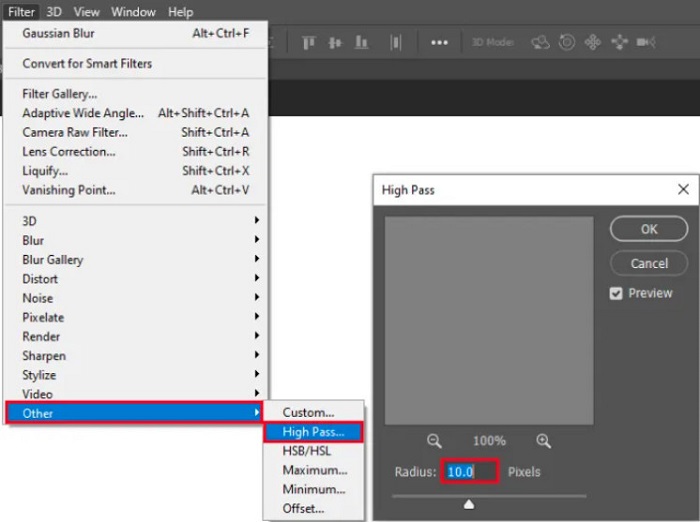
Langkah 3. Seterusnya, gandakan lapisan latar belakang anda dan pilihnya. Kemudian, klik Filter > Other > High Pass. Tetapkan High Pass kepada 10%.
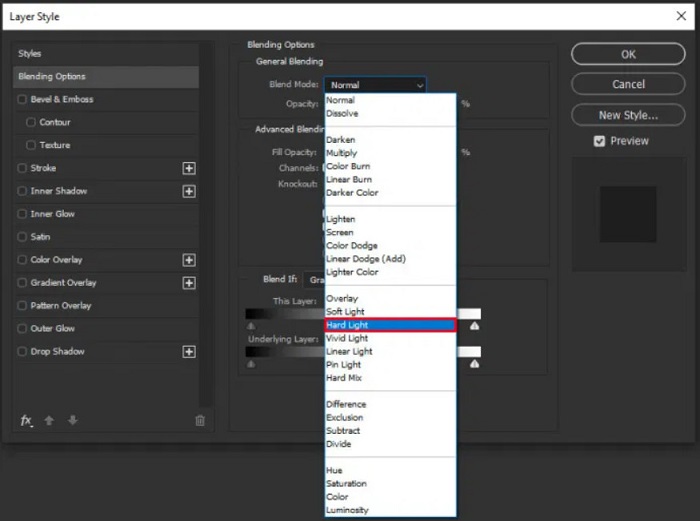
Langkah 4. Dan pada tetingkap Layer Style, tetapkan mod adun daripada normal kepada hard light, kemudian ubah opacity sehingga foto menjadi jelas atau bertambah baik.
Jika anda menggunakan versi Photoshop yang baharu, anda boleh menggunakan pilihan pengurangan gegaran kamera untuk menajamkan imej menggunakan Photoshop.
Langkah 1. Import imej yang anda mahu jernihkan ke dalam Photoshop.
Langkah 2. Kemudian, pergi ke Filter > Sharpen > Shake Reduction.
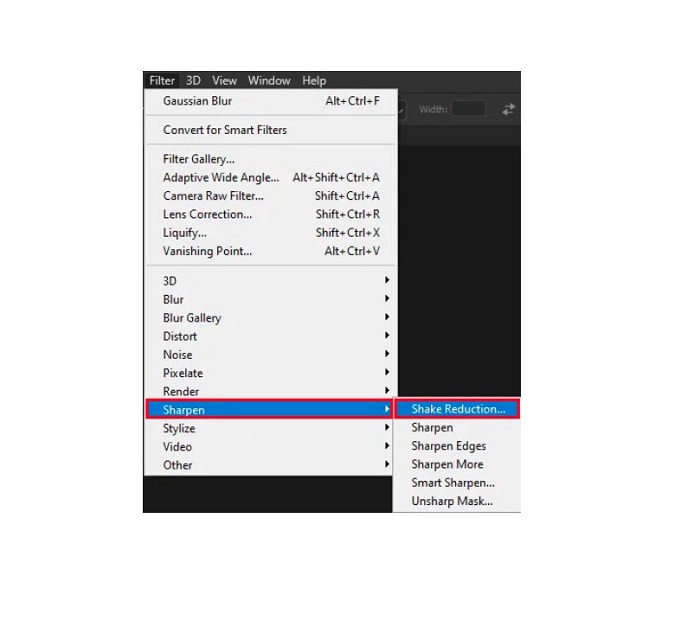
Langkah 3. Selepas itu, Photoshop akan memproses imej anda; kemudian, anda boleh melihat output anda.
Nyahkaburkan Imej Menggunakan Paint.net
Satu lagi perisian penyuntingan foto luar talian percuma yang boleh anda gunakan ialah Paint.net. Salah satu ciri hebat aplikasi ini ialah menajamkan imej. Dengan menggerakkan peluncur, anda boleh melaraskan jumlah ketajaman dalam imej anda, menjadikan imej kelihatan tajam dan jelas serta mengurangkan kekaburan gambar anda. Selain itu, ia lebih mudah digunakan berbanding Adobe Photoshop. Ia juga mempunyai fungsi penyuntingan lain yang boleh anda gunakan untuk menyunting gambar anda. Dan jika anda tidak tahu cara menggunakan aplikasi ini, anda boleh mengakses khidmat rundingan dalam talian dan tutorial cara guna. Selain itu, ia antara aplikasi penyunting imej paling terkenal untuk pengguna Windows kerana mempunyai banyak fungsi pembetulan yang boleh anda gunakan untuk menambah baik foto anda. Sedikit kelemahan Paint.net ialah anda tidak boleh membetulkan teks yang telah dimasukkan selepas menggunakan kesan. Walau bagaimanapun, perisian ini membolehkan anda menghasilkan output penyuntingan imej berbilang peringkat.
Bagaimana untuk menyahkaburkan imej menggunakan Paint.net:
Langkah 1. Untuk bermula, buka imej anda pada Paint.net dengan menekan CTRL + O pada papan kekunci. Anda juga boleh pergi ke File dan cari pilihan Open. Kemudian, fail desktop anda akan muncul dan anda boleh memilih imej anda dan membukanya.
Langkah 2. Seterusnya, klik Effects > Picture, kemudian pilih Sharpen.
Langkah 3. Kemudian, pada panel Sharpen, anda akan melihat peluncur di mana anda boleh melaraskan ketajaman imej anda untuk menjernihkannya. Anda juga boleh menanda butang up/down arrow untuk mengubah jumlah ketajaman foto anda.
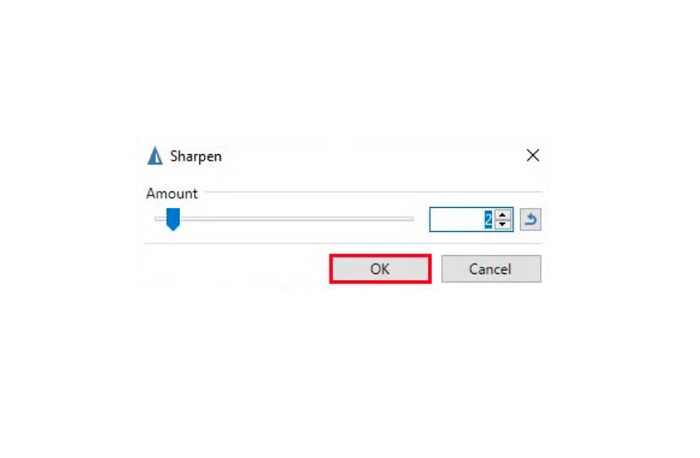
Langkah 4. Tekan butang OK dan simpan output anda.
Bahagian 3. Bagaimana untuk Menyahkaburkan Imej pada iPhone
Jika anda pengguna peranti iPhone, anda juga boleh memuat turun beberapa apl untuk menyahkaburkan imej anda. Anda boleh memilih antara apl daripada App Store anda untuk menyahkaburkan imej anda. Walau bagaimanapun, sesetengah apl boleh dibeli, memerlukan anda membelinya sebelum menggunakannya. Tetapi dalam bahagian ini, kami akan mengajar anda cara untuk menyahkaburkan imej anda pada iPhone anda menggunakan aplikasi percuma dan luar biasa.
Foton ialah salah satu aplikasi menjernihkan imej yang paling banyak digunakan pada iPhone. Anda boleh memuat turun aplikasi ini secara percuma di AppStore. Selain itu, ia mempunyai fungsi penyuntingan lain yang boleh anda gunakan, seperti kolaj, potong (crop), tambah templat, pecah (split) dan banyak lagi. Ia juga mempunyai antara muka yang mudah digunakan, menjadikannya aplikasi yang mesra pengguna. Dengan aplikasi ini, anda boleh menjernihkan imej dengan melaraskan ketajaman imej anda. Dan jika anda ingin menambah kesan lebih tajam pada foto supaya lebih menarik, anda boleh melaraskan kontras, kejelasan, ketepuan dan dehaze pada imej anda. Tambahan pula, ia selamat digunakan, jadi anda tidak perlu risau tentang keselamatan fail imej anda. Kekurangan aplikasi ini ialah anda perlu membeli versi pro untuk menggunakan ciri-ciri lainnya.
Bagaimana untuk menyahkaburkan imej pada iPhone:
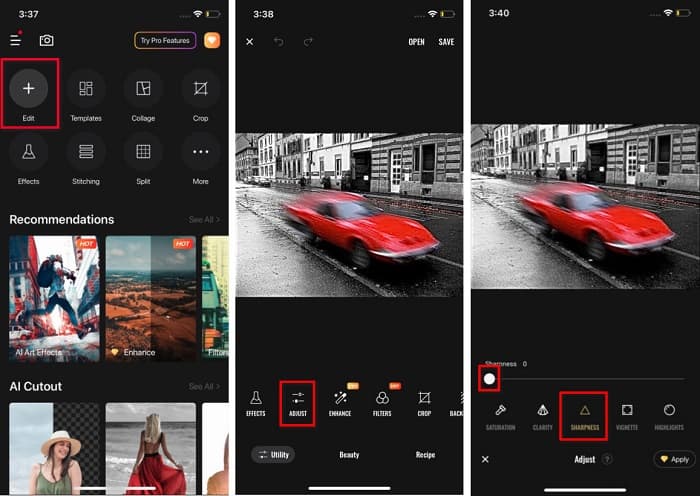
Langkah 1. Buka App Store pada iPhone anda, kemudian cari Foton. Pasangnya pada telefon anda, dan buka selepas pemasangan selesai. Kemudian, pada antara muka utama aplikasi, ketik pilihan Edit.
Langkah 2. Pilih imej yang anda mahu jernihkan; kemudian anda akan dibawa ke antara muka lain. Ketik pilihan Adjust di bawah imej anda, kemudian leret ke kiri untuk mencari ciri Sharpness.
Langkah 3. Pada panel Sharpness, seret peluncur ke tahap ketajaman yang anda inginkan sehingga kekaburan imej anda berkurangan.
Langkah 4. Akhir sekali, ketik butang Save di penjuru kanan atas antara muka untuk menyimpan output anda pada peranti iPhone. Klik di sini untuk belajar cara mengubah saiz imej pada iPhone.
Bahagian 4. Cara Menyahkaburkan Imej pada Telefon Android
Ramai orang juga memiliki peranti Android, dan jika anda turut menggunakannya, anda boleh membaca bahagian ini untuk mengetahui cara menyahkaburkan imej pada Android. Kami mencari apl nyahkabur foto yang paling popular untuk Android dan mencubanya satu demi satu. Nasib baik, kami menemui apl yang terbaik untuk disyorkan.
Snapseed ialah aplikasi terbaik jika anda mahu menjernihkan imej pada peranti Android anda. Dengan menggunakan ciri sharpen dan structure, anda boleh menambah ketajaman pada imej anda untuk menghilangkan bahagian yang kabur. Selain itu, ia mempunyai banyak ciri penyuntingan yang boleh membantu anda menambah baik kualiti imej anda. Dan sama seperti alat lain yang disebutkan di atas, ia mempunyai antara muka pengguna yang ringkas. Jadi, jika anda seorang pemula, anda boleh menggunakan aplikasi ini untuk menjernihkan imej anda. Namun, anda tetap perlu menghidupkan WiFi sebelum menggunakan aplikasi ini.
Cara menyahkaburkan imej pada Android menggunakan Snapseed:
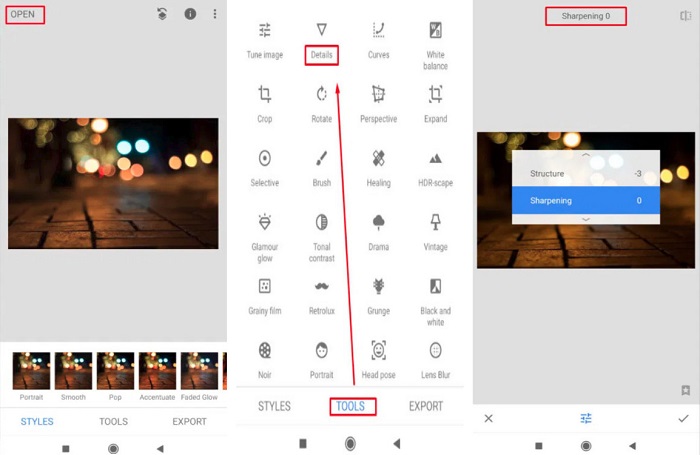
Langkah 1. Muat turun aplikasi pada peranti Android anda, kemudian buka. Selepas membukanya, buka imej anda dalam aplikasi.
Langkah 2. Kemudian, pada panel Tools, pilih pilihan Details.
Langkah 3. Seterusnya, pilih Sharpen atau Structure untuk imej anda bagi menghasilkan perubahan pada imej kabur anda. Dengan melaraskan kedua-dua pilihan ini, anda akan mengurangkan kekaburan imej anda.
Bahagian 5. Soalan Lazim tentang Cara Menyahkaburkan Imej
Adakah saiz fail akan bertambah apabila anda menyahkaburkan imej?
ya. Apabila anda menyahkaburkan imej, PPI imej itu akan meningkat, menyebabkan saiz fail menjadi lebih besar daripada yang asal.
Mengapakah imej saya menjadi kabur apabila saya menjadikannya lebih besar?
Ia mungkin disebabkan oleh masalah mampatan. Apabila anda cuba mengubah saiz imej, anda turut membesarkan piksel foto anda. Jadi, memampatkan imej mungkin menjejaskan kualiti imej anda.
Bolehkah saya menyahkaburkan imej JPG pada Adobe?
Pasti! Anda boleh menggunakan Adobe Photoshop jika anda ingin menyahkaburkan imej JPG. Adobe Photoshop menyokong format imej standard, seperti PNG, JPG dan JPEG
Kesimpulannya
Sekarang setelah anda tahu cara menjernihkan imej menggunakan kaedah paling mudah, anda boleh menjernihkan gambar anda. Semua cara yang kami tunjukkan di atas pasti akan membantu anda mencapai matlamat yang anda inginkan. Tetapi jika anda mahu menjimatkan ruang pada peranti, kami mengesyorkan menggunakan FVC Free Image Upscaler, yang boleh anda akses secara percuma dan dalam talian.
-
 Cara Mengubah Saiz Gambar dalam PowerPoint [Cara Terpantas untuk Menukar Saiz]
 Mempelajari cara mengubah saiz gambar dalam PowerPoint adalah penting terutamanya jika anda ingin menggunakannya dalam pembentangan anda. Baca artikel ini untuk mengetahui cara melakukannya.
-
 Imej 1440p – Semua Maklumat Termasuk yang Anda Perlukan [2022 Dikemas Kini]
 Adakah anda ingin tahu tentang imej 1440p? Atau di mana anda boleh mendapatkannya? Tukar imej anda kepada 1440p? Baca ini untuk mengetahui mereka semua.
-
 Tutorial untuk Menyahpiksel Imej Menggunakan 3 Penyahpiksel Foto Terbaik
 Adakah anda menghadapi masalah mengendalikan imej berpiksel? Hari ini, kami telah menyelesaikan masalah tersebut dan anda boleh menggunakan alatan yang kami tambahkan di sini.