

Nyttig opplegg som angår OBS-lydforsinkelsesdilemma
Du vil spille inn en videopresentasjon slik at du kan vise den i morgen i klassen din eller bruke den i forretningsmøter. For å gjøre dette bruker du OBS Studio for å ta opp og lagre presentasjonen på datamaskinen din. Men når du begynner å redigere videopresentasjonen for å legge til noen detaljer om presentasjonen, merker du at lyden er forsinket og ute av synk. I denne artikkelen får du vite hvorfor lyden i OBS er ute av synk. Og hvis du ikke vet hvordan du blir kvitt dette problemet, gir vi også enkle metoder for å rette opp lydforsinkelsen.

Del 1. Hvorfor er OBS-lyd ute av synkronisering?
Hovedproblemet for de fleste streamere er når lyden deres er ute av synk. Det virker greit de første minuttene, men begynner så å få en lydforsinkelse som ikke samsvarer med leppebevegelsene dine etter en time. I et forsøk på å fikse usikkerheten i strømmen går noen inn i avanserte lydinnstillinger for å justere sync‑forskyvningen, som bare kan legge inn en forsinkelse for lydkilden i en viss tidsperiode, noe som ikke er tilrådelig. Grunnen til at lyden i OBS er ute av synk er i stedet at samplingsfrekvensen ikke stemmer overens.
Del 2. 7 enkle trinn for å fikse OBS-lydforsinkelse
Lydforsinkelsen skjer ved enhver anledning; det kan være i strømmeplattformer, innspilte presentasjoner og til og med direktesendinger. Mesteparten av grunnen til at dette skjer er tilkoblingsproblemer, tekniske problemer og feilprogrammerte applikasjoner. For eksempel bruker du OBS-studioet som en plattform for strømmeaktiviteten din, og det hender at hver videoutgang du streamer har en viss forsinkelse. Bra at det er perfekte måter å forhindre disse situasjonene på ved å bruke samme plattform. Her er trinnene som er enkle å følge:
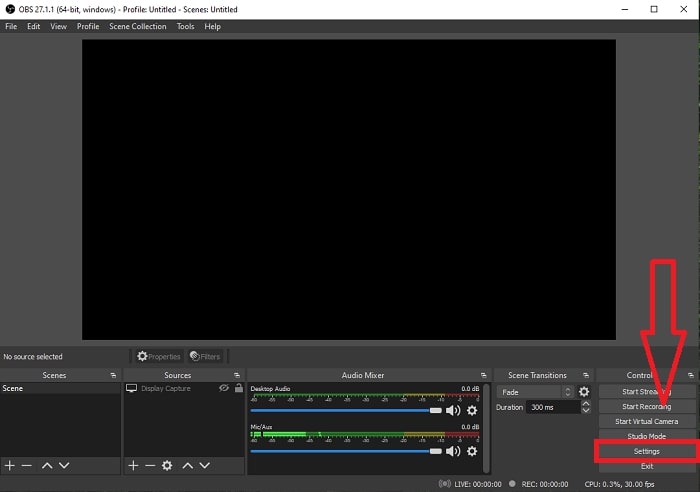
Trinn 1: Finn Innstillinger
Åpne OBS Studio for å fortsette med applikasjonsgrensesnittet og klikk på Innstillinger i nedre høyre hjørne.
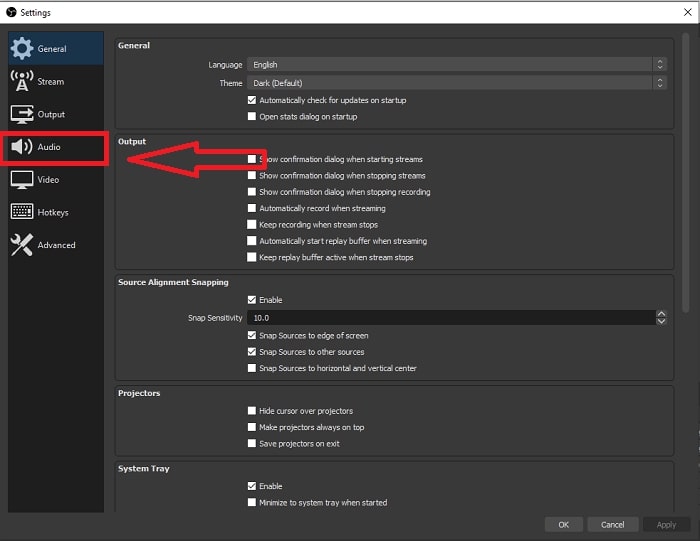
Trinn 2: Gå til Lydinnstillinger
Etter at du har klikket på Innstillinger, vises et nytt vindu på skjermen. Dette vinduet gir deg en oversikt over de generelle innstillingene i OBS Studio. Men for å fortsette med å fikse lydforsinkelsen i OBS Studio, klikker du på Lyd i venstre hjørne av vinduet.
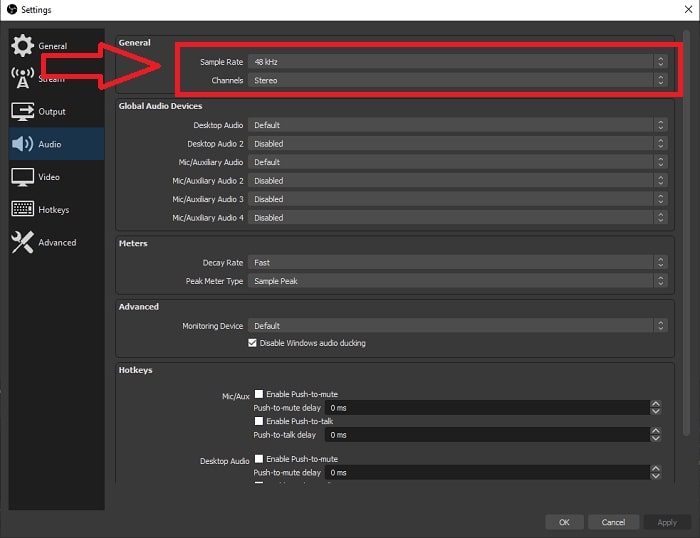
Trinn 3: Velg en passende samplingsfrekvens
Rediger samplingsfrekvensen basert på den foretrukne samplingsfrekvensen til skrivebordet og opptaksenhetene. Anta at opptaksenheten din er litt gammel, og du har et gammelt oppsett. I så fall vil det være bedre å senke samplingsfrekvensen fra standard samplingsfrekvens på 48 kHz og øke justeringen fra 48 kHz hvis du vil observere enhetens foretrukne samplingsfrekvens. For jo høyere videoens samplingsfrekvens øker, jo nærmere vil den gjenskape den originale lyden. Videre kan du bare endre kanalalternativet avhengig av hvilket verktøy du bruker for å spille av videoen.
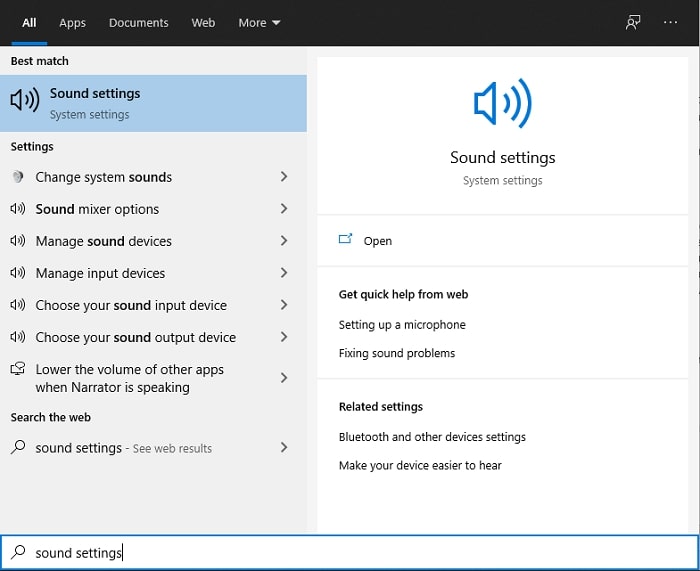
Trinn 4: Åpne lydinnstillingene
Når du har stilt inn ønsket samplingsfrekvens i OBS Studio, skriver du Lydinnstillinger i søkefeltet på oppgavelinjen, finner Lydinnstillinger og klikker på det for å gå videre til skrivebordsinnstillingene.
Trinn 5: Finn Lydkontrollpanel
Klikk på Lydkontrollpanel. Når du åpner det, vises et nytt lydvindu på skjermen – en oversikt over alle tilgjengelige enheter som har med lydutganger å gjøre.
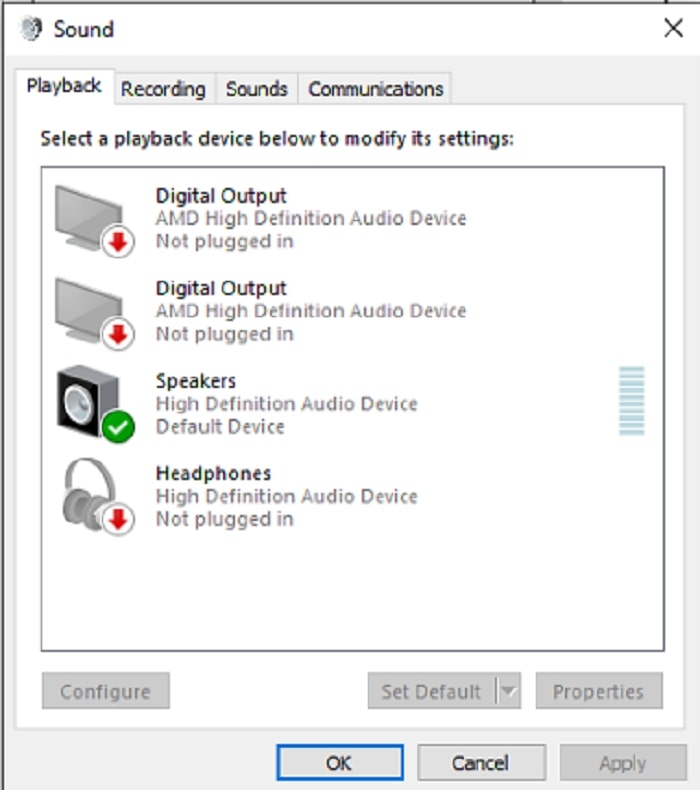
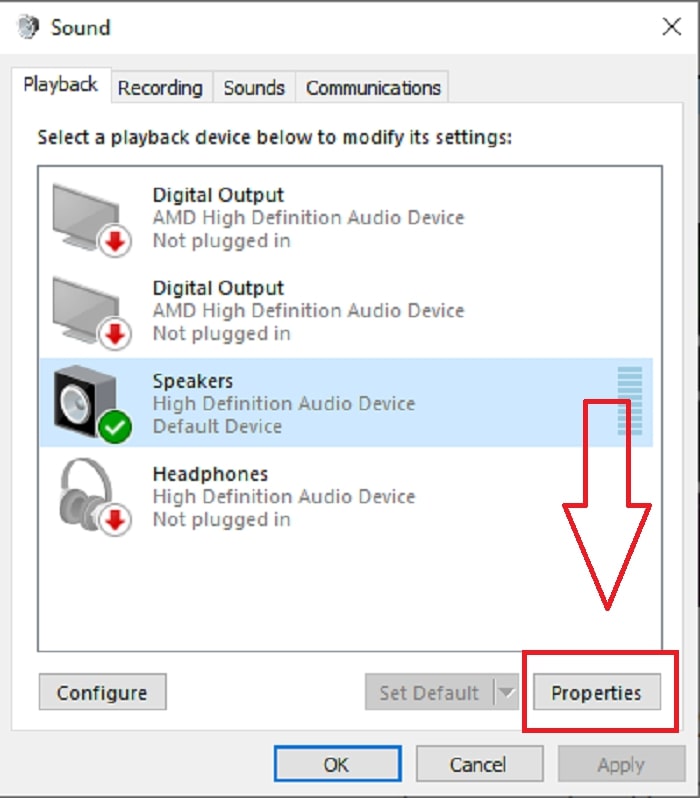
Trinn 6: Velg enhet for lydutgang
Alternativene som finnes er enhetene som er tilgjengelige i opptaksoppsettet ditt, enten det er en høyttaler eller hodetelefoner. Velg hvilken enhet som gjør lyden usynkronisert, og klikk på egenskapene etterpå.
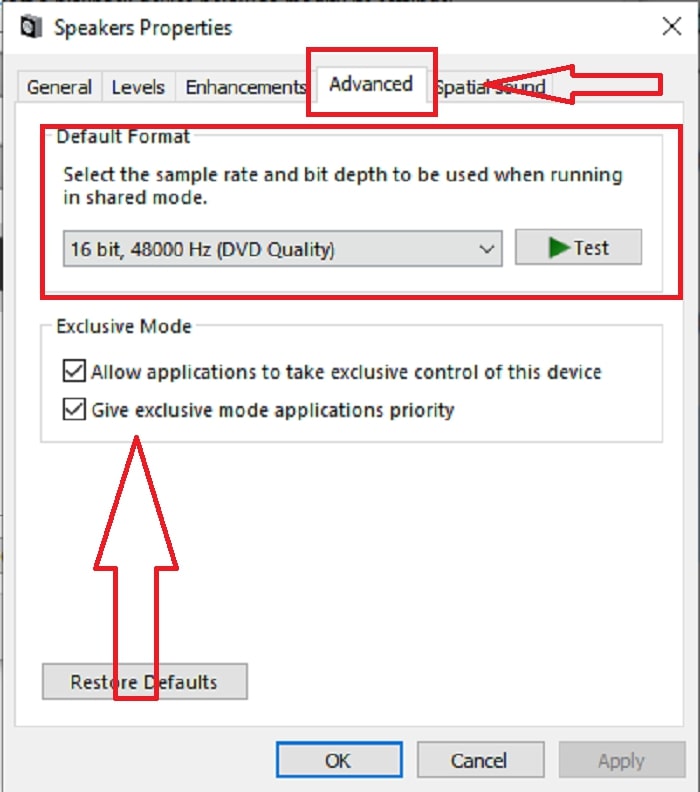
Trinn 7: Fortsett i avanserte innstillinger
Når du deretter har klikket på egenskapene til den ønskede enheten for lydutgang, klikker du på Avansert, og du vil se standardformatet. Test hvert format i alternativene og velg det formatet som ikke gjør at lyden kommer ut av synk.
Del 3. Beste måten å fikse OBS-lydforsinkelse på
Løsningen ovenfor forklarer hvordan du unngår lydforsinkelse når du bruker OBS Studio, men hva om problemet er at det opptaket du vil vise eller laste opp allerede er ute av synk? Bruk FVC Video Converter Ultimate, et program med ulike funksjoner for å forbedre et videoklipp. En av funksjonene som tilbys, kan fikse lydsynkroniseringen i et videoklipp ved å justere forsinkelsen. Følg trinnene nedenfor for å lære hvordan du bruker programmet:
Trinn 1: For å lagre programmet på datamaskinens harddisk klikker du på knappen Gratis nedlasting. Deretter kan du installere programmet og tilpasse innstillingene slik du ønsker.
Gratis nedlastingFor Windows 7 eller nyereSikker nedlasting
Gratis nedlastingFor MacOS 10.7 eller nyereSikker nedlasting
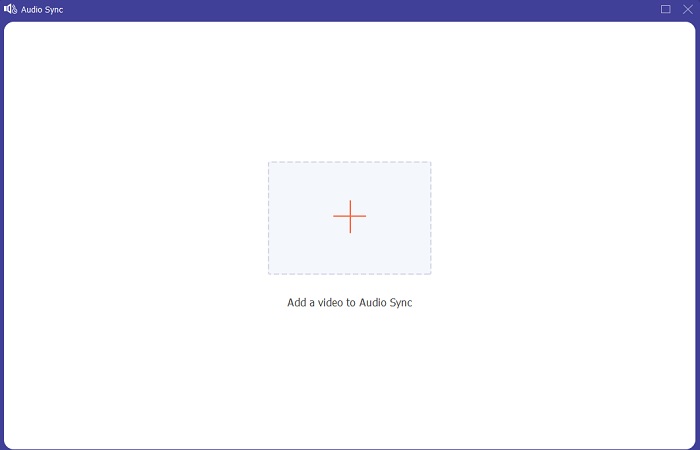
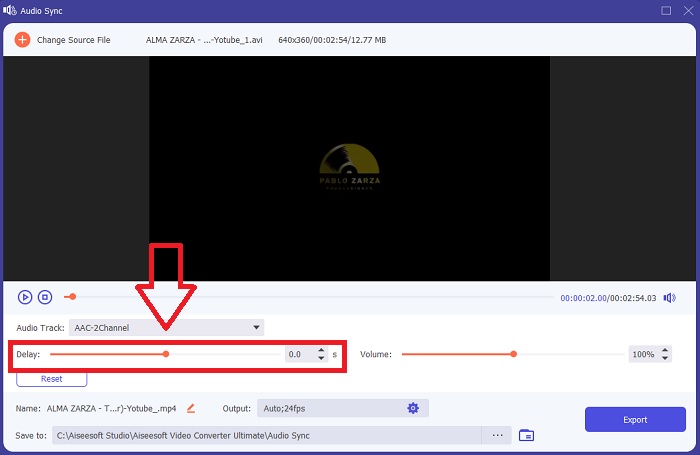
Trinn 2: Klikk på funksjonen Verktøykasse etter at du har startet programmet, og fortsett med å klikke på Audio Sync.

Trinn 3: Klikk på +‑knappen etter at du har klikket på Audio Sync, og begynn å redigere videoklippet.
Trinn 4: Juster glidebryteren for lyden for å synkronisere den med videoklippet. Med dette kan du også endre utdataenhet og begynne å tilpasse volumet på videoklippet.
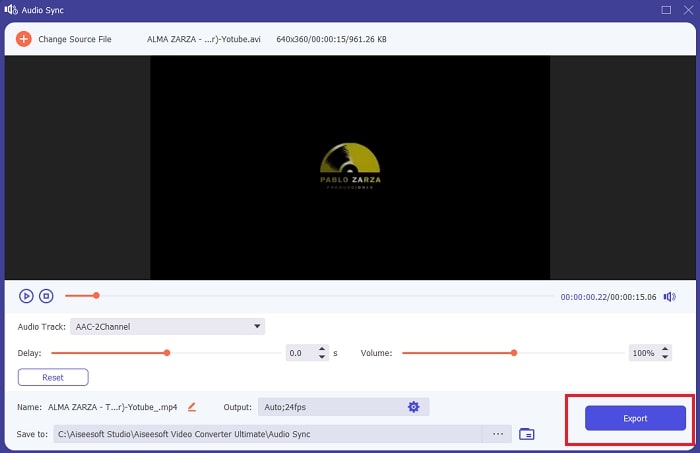
Trinn 5: Klikk på Eksporter og velg hvor du vil lagre filen etter at du er ferdig med å redigere.
Relatert:
Del 4. Vanlige spørsmål om OBS Audio Delay
Hva er et samplingsfrekvensmisforhold?
Lydsamplingshastigheten, uttrykt i kilohertz, er hastigheten som systemet tar disse målingene med. Lydsamplingsfrekvensen bestemmer frekvensområdet du kan fange i digital lyd – samplingsfrekvensen endres i lydpreferansene dine i de fleste DAW-er. Endring av samplingsfrekvensen påvirker kvaliteten på lyden. Imidlertid er samplingsfrekvensmismatch en ulik mottaks- og sendingssamplingsfrekvens for lyd til kilden. Denne hendelsen skjer alltid hvis høyttalerutgangen og hodetelefonutgangen ikke har samme samplingsfrekvens, noe som forårsaker en lydforsinkelse.
Mister jeg kvaliteten på lyden hvis jeg justerer samplingsfrekvensen?
Samplingsfrekvensen endres hvis du vil lytte til lyden i videoklippet ditt og ikke endre det. Når du bruker FVC Video Converter Ultimate, vil du bare endre lydforsinkelsen til videoklippet for å synkronisere lyden. Du vil ikke justere samplingsfrekvensen lenger og være redd for å miste lydkvaliteten.
Hvilken samplingsfrekvens foretrekkes hvis jeg bruker lydutgang av lav kvalitet?
Kvaliteten på lyden avhenger av lydutgangen. Hvis mikrofonen eller høyttaleren din kun støtter en lavfrekvent lydfrekvens, er det bedre å senke standard samplingsfrekvens til 44,1 kHz enn å sette den til 48 Hz. Samplingsfrekvensen kan påvirke lydsynkroniseringsforsinkelsen hvis det ikke er like frekvensflyt til utgang og inngang.
Konklusjon
Oppsummert kan lydforsinkelsen som stadig dukker opp i OBS Studio, løses på flere måter. Vi har snakket om feil samplingsfrekvens og testet ulike lydutganger, men den beste måten å vise en løsning for å få lyden i synk på, er å bruke FVC Video Converter Ultimate. I tillegg til funksjonen som kan fikse lydsynkronisering, har den mange flere verktøy som kan bidra til å forbedre videoklippet ditt.
-
 2 beste løsningene for å løse Windows Media Player som ikke spiller DVDer
 Når du ønsker å spille av DVD-videoer via Windows Media Player, men bare får feilen "Filtypen støttes ikke", kan du lære 3 enkle måter å fikse Windows Media Player som ikke spiller DVDer.
-
 [Løst] Hvordan fikse videoer som ikke spilles av på iPhone med detaljerte trinn
 Lokale videoer på galleriet kan ikke spilles av på iPhone via standard videospiller? Online YouTube -videoer som ikke spilles av på iPhone, skjer alltid? Her er 5 løsninger for å hjelpe deg i denne artikkelen.
-
 Guide for hvordan du reparerer videoer som ikke spilles av på Android -telefoner
 Vil du vite hva som er årsakene til at videoer på Android-enheten din ikke kan spilles av? Og i så fall, er det noen måter å løse problemet på på egen hånd? Fortsett å lese for å vite mer.