


Hvordan krympe videostørrelsen i Premiere Pro? Egnede metoder å bruke
Å komprimere en video har mange fordeler som kan forbedre seeropplevelsen din betraktelig. Det reduserer og komprimerer størrelsen på videofilen, noe som gjør det raskere å laste opp, laste ned og dele. Denne teknikken er viktig hvis du har begrenset lagringsplass eller en treg internettforbindelse. I tillegg kan komprimering av en video forbedre kvaliteten ved å fjerne unødvendige data og forbedre dens klarhet. Denne funksjonen betyr at du kan nyte en seeropplevelse av høyere kvalitet uten å ofre hastighet eller lagringsplass.
En av de mest gjenkjennelige videokompressorene er Adobe Premiere Compress Video. Dette verktøyet gjør det mulig for brukere å komprimere filstørrelsen på videoen sin på den enkleste måten. I denne artikkelen eller innlegget vil vi gjennomgå metodene og alternativene til dette verktøyet når det gjelder å redusere videofiler.

Del 1. Komprimer video med Premiere
Adobe Premiere Pro er en redigeringsprogramvare som er tidslinjebasert og ikke-lineær når du redigerer videofiler. Den har mange videoredigeringsfunksjoner, men siden vi diskuterer komprimering av en video, vil vi fokusere på disse funksjonene og relaterte funksjoner. Adobe Premiere Pro har en innebygd Media Encoder som lar deg komprimere videoene dine uten å ofre kvaliteten. Du kan velge fra en rekke forhåndsinnstillinger eller tilpasse innstillingene dine. Bitrate-kodingsalternativet lar deg spesifisere dataene som brukes per sekund i videoen din. Avhengig av dine behov, kan du velge mellom variabel eller konstant bitrate-koding. Til slutt har Adobe Premiere Pro også en rekke eksportinnstillinger som lar deg tilpasse videokomprimeringen ytterligere. Du kan velge mellom forskjellige filformater, oppløsninger og mer. Sjekk den enkle veiledningen nedenfor for å lære hvordan du komprimerer en video med denne editoren.
Trinn 1. Siden vi skal snakke om å komprimere videofiler i Premiere Pro, hopper vi over noen redigeringsdeler i disse trinnene. Vi antar at du allerede har redigert videoen din og brukt verktøyet til å opprette en fil. Vi kommer til å fokusere på eksportprosessen i denne gjennomgangen.
Trinn 2. Gå til eksportvinduet ved å klikke på File-menyen. I nedtrekksalternativene velger du funksjonen Export. Gå deretter til alternativet Media for å åpne Export-innstillingene.
Trinn 3. Her finnes ulike alternativer som kan redusere videofilens størrelse i Premiere Pro. Du kan bruke effektive kodekformater for å lagre videoen i små filer med bedre videokodeker.
Trinn 4. Alternativt kan du bruke eller stille inn videobitraten til VBR, 2 Pass. Du kan også endre videoens oppløsning og målbitrate for å redusere filstørrelsen. Til slutt klikker du på Export-knappen for å lagre videofilen.

Del 2. Bonus: Hvordan komprimere lyd i Premiere
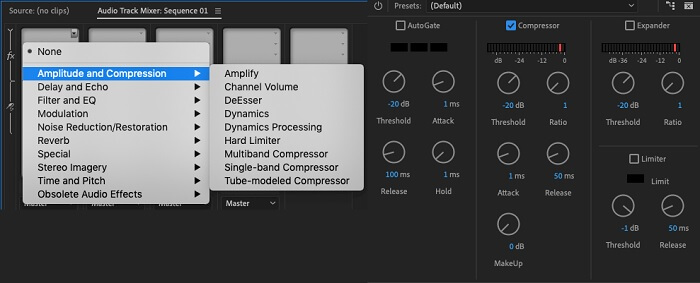
En annen funksjon i Adobe Premiere Pro er å komprimere lydfiler i systemet. Den kommer med en mengde lydmiksere, komprimeringsfunksjoner og kodeker for å redusere filstørrelsen på lydfilen din. Du kan sjekke de oppførte metodene under denne korte beskrivelsen for å lære hvordan du komprimerer Premiere Pro-lyd.
Trinn 1. For å komprimere lyd i Premiere-videoredigering velger du lydklippet i tidslinjepanelet nederst i verktøyet. Gå til fanen eller panelet Effects og søk etter effekten Loudness Radar. Dra og slipp effekten på lydklippet.
Trinn 2. I panelet Effect Controls justerer du Target Loudness til ønsket nivå. Denne funksjonen angir det overordnede volumet på klippet. Et mindre område vil gi mer komprimering, mens et større område vil gi mindre komprimering.
Trinn 3. For å finjustere komprimeringen ytterligere, bruker du kontrollene Threshold og Ratio. Threshold bestemmer punktet der lyden blir komprimert, mens Ratio bestemmer hvor mye komprimering som brukes.
Trinn 4. Når du har justert innstillingene slik du ønsker, forhåndslytter du lydklippet for å sikre at det høres balansert og naturlig ut. Til slutt eksporterer du den komprimerte lyden ved å gå til File-alternativet og velge Export-knappen. Gå deretter til Media-fanen, velg ønskede eksportinnstillinger, og klikk Export for å lagre den komprimerte lydfilen.
Del 3. Beste alternativer til premiere for å komprimere video og lyd
1. Video Converter Ultimate
Når Adobe Premiere Pro ikke klarer å komprimere video- og lydfilen din til ønsket filstørrelse, kan du bruke Video Converter Ultimate. Dette programmet inneholder en betydelig mengde funksjoner som brukere kan benytte for å redusere filstørrelsen på videoklipp. Takket være sin avanserte, akselererte algoritme eller teknologi kan dette verktøyet komprimere videofiler 30 ganger mer enn en vanlig videokompressor. I tillegg har det en glidebryter som brukere kan dra i for å redusere en viss prosent av videofilen.
En annen metode for å redusere lyd- og videofiler i denne applikasjonen er å endre kvalitetsformatet, oppløsningen og bithastigheten til filen. Bonusfunksjonen kommer også med en Metadata-editor der brukere kan gi nytt navn til filen bortsett fra den originale videoen. Vennligst sjekk brukerveiledningen nedenfor.
Trinn 1: Last ned Video Converter Ultimate
Det første trinnet i å komprimere video med Video Converter Ultimate er å installere appen på PC-en. Du kan klikke på ikonet Free Download som vises nedenfor for å få filinstallasjonsprogrammet. Kjør det deretter på PC-en for å installere appen. Start den når den er installert.
Gratis nedlastingFor Windows 7 eller nyereSikker nedlasting
Gratis nedlastingFor macOS 10.7 eller nyereSikker nedlasting
Trinn 2: Gå til Video Compressor
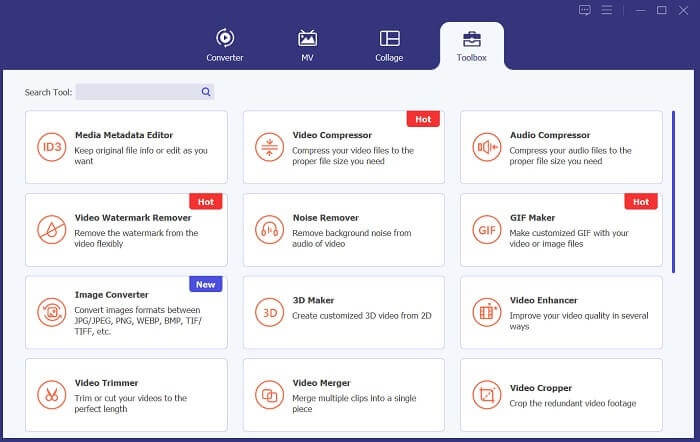
Når du har åpnet Video Converter Ultimate på PC-en, går du til alternativet Toolbox. Finn alternativet Video Compressor og start funksjonen. Importer filene dine ved å klikke på +-ikonet i grensesnittet.
Trinn 3: Komprimer videofiler
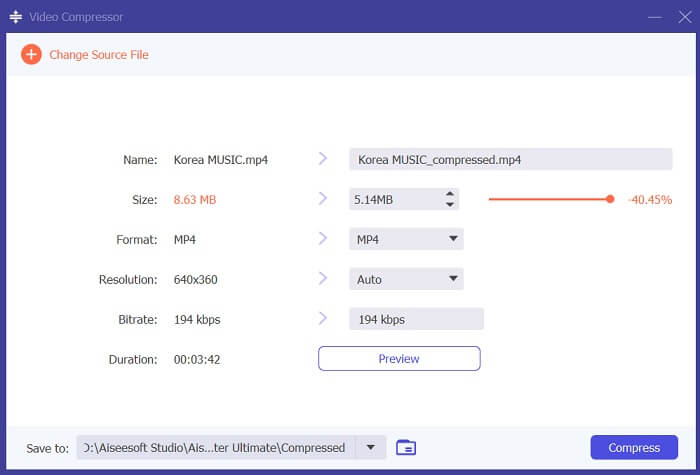
Til slutt justerer og endrer du noen videoparametere for å komprimere videofilen. Flytt glidebryteren på høyre side av filstørrelsen, eller bruk andre metoder som å endre oppløsning, format og bitrate. Klikk på Compress-alternativet for å lagre og redusere videofilens størrelse på PC-en.
2. FVC Video Kompressor Online
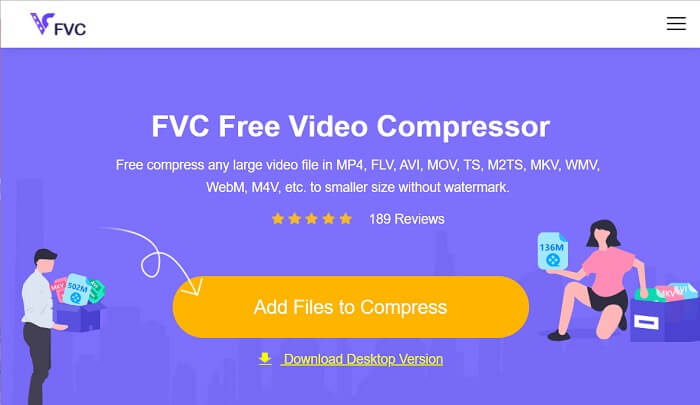
Vi forstår det; noen ganger trenger du ikke omfattende verktøy for å komprimere en videofil. Å installere ulike programmer er kanskje ikke noe for deg; derfor anbefaler vi FVC Video Compressor Online. Denne nettbaserte applikasjonen har en svært enkel prosess for å komprimere videofiler. Den gjør det mulig for brukere å komprimere og redusere videofiler med 4K-kvalitet, HD-oppløsning og mer. Dessuten går det ikke på bekostning av videokvaliteten. Selv om den er i 4K, kan du fortsatt redusere filen. Når det gjelder allsidighet, er dette nettverktøyet dessuten en mester. Du kan komprimere videofiler i ulike formater, inkludert MP4, FLV, MKV, MOV, AVI, WebM, 3GP, RMVB og mange flere. Se den fullstendige veiledningen nedenfor om komprimering av videofiler.
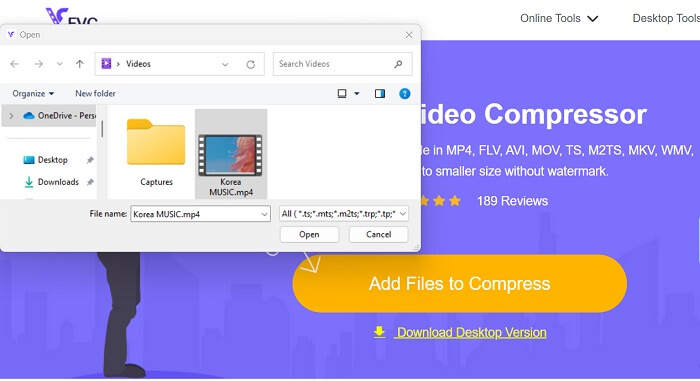
Trinn 1: Gå til verktøyet
Å åpne verktøyet i nettleseren er det første steget for å komprimere video på nett. Du kan bruke Chrome, Firefox, Microsoft Edge, Safari og andre nettlesere for å søke etter verktøyet. Start verktøyet i nettleseren og klikk på Add Files to Compress for å installere startprogrammet. Denne metoden er kun for førstegangsbrukere; hvis du allerede har startprogrammet til nettappen, går du videre til neste trinn.
Trinn 2: Importer filer til appen
Klikk på Add Files to Compress for å åpne enhetsmappen. Finn videoen du trenger å komprimere, og klikk Open for å importere eller legge den til i nettverktøyet. Vent til det nettbaserte verktøyet analyserer filene dine.
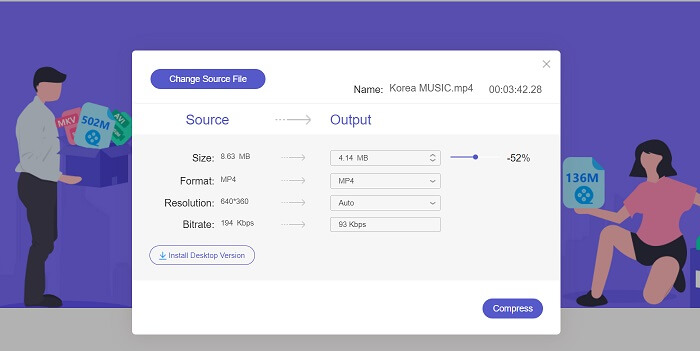
Trinn 3: Komprimer og eksporter filer
Til slutt må du justere og endre ulike videoparametere for å redusere filstørrelsen på enheten din. Du kan også dra i prosentglidebryteren for å redusere en viss prosent av videostørrelsen. Klikk på Compress-knappen for å starte prosessen og eksportere de komprimerte filene.
Mer lesing:
2 måter å komprimere video for YouTube
Dokumenterte metoder for å lage slowmotion-videoer i Adobe Premiere
Del 4. Vanlige spørsmål om Adobe Premiere Pro
Hvordan endrer jeg størrelsen på en video i Premiere Pro?
For å komprimere video i Premiere kan du bruke funksjonen Export Settings. Velg videofilen eller klippet i tidslinjen, og gå deretter til File > Export > Media. Derfra kan du justere innstillingene for å komprimere videoen samtidig som du bevarer kvaliteten. I tillegg, for å endre størrelsen på en video i Premiere Pro, kan du velge klippet i tidslinjepanelet og gå til panelet Effect Controls. Der kan du justere Scale-parameteren for å øke eller redusere videofilens størrelse.
Hva er videokomprimering?
Videokomprimering er prosessen med å redusere eller begrense filstørrelsen til en video samtidig som kvaliteten opprettholdes så mye som mulig. Denne prosessen passer brukere som trenger å dele, laste ned, laste opp og lagre filene sine raskt og enkelt.
Hvorfor komprimere video?
Komprimering av video kan gjøre det enklere å dele og laste opp og spare lagringsplass på enheten din. Denne videoredigeringsfunksjonen er et må-ha-alternativ når du laster ned videoredigeringsprogramvare.
Vil komprimering av video påvirke kvaliteten?
Ja, komprimering av en video kan påvirke kvaliteten. Det er viktig å teste og forhåndsvise endringene før de fullføres for å sikre at videoen fortsatt ser bra ut etter komprimering.
Konklusjon
Komprimering av en video er en prosess de fleste videoentusiaster trenger å lære. Det kan ikke bare spare lagringsplass for filene dine, men også gjøre det enklere å dele, laste opp og laste ned videoen. Det finnes ulike alternativer for å komprimere videofiler. Et av de mest kjente programmene er Adobe Premiere Pro. Løsningene vi har samlet om how to compress audio in Premiere er til stor hjelp for deg når du skal organisere filene dine. Gi oss beskjed hvis du trenger mer informasjon om dette emnet; legg igjen en kommentar nedenfor.
-
 Raske og enkle måter å synkronisere lyd og video i Adobe Premiere Pro
 Vil du vite hvordan du synkroniserer lyd og video i Premiere Pro? Da vil denne artikkelen passe dine behov. Som vi prøver det selv med ekte og enkle trinn.
-
 Hvordan øke hastigheten på video i Premiere Pro og med dens alternativer
 Vil du vite hvordan du bruker premiere pro for å øke hastigheten på en video? Da er du inne i den riktige artikkelen da vi tilbyr trinn og andre rimelige alternativer.
-
 Raskeste måten å fjerne logo fra video i Adobe Premiere Pro
 Prøv disse enkle og raskeste måtene å fjerne logoer fra en video i Adobe Premiere Pro. Denne artikkelen vil gi deg de beste måtene du kan prøve å bruke enheten på.