


Guia definitivo sobre como fazer capturas de tela do FaceTime [2025]
FaceTime is a widely used video chat application that was developed by Apple in order for their users to have real-time video conversations on either iPhone, iPad, or Mac. Now, taking screenshots during FaceTime calls is a great way to save moments with whom we are talking, especially when that person has gone missing for a long time. So, if you want to save precious moments during these calls, this article is for you. Take time to read and learn 3 ways how you can take FaceTime screenshots easily. Let’s get started!

Parte 1: A maneira definitiva de tirar capturas de tela do FaceTime no iPhone/iPad/Mac
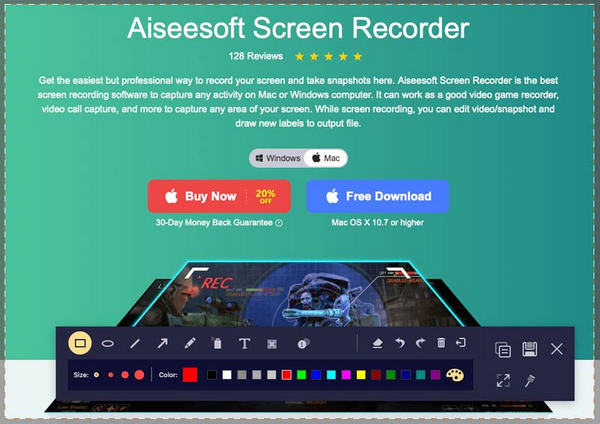
The ultimate way to easily take FaceTime screenshots on Apple devices is by using the FVC Screen Recorder. This third-party screen recording tool is designed perfectly to take screenshots on iPhone, iPad, or Mac. So, if you’re using any of those and you want to take screenshots when you have your FaceTime Video Calls with your families, friends, and loved ones, you will greatly benefit from its snapshot and phone recorder features. Moreover, this tool can easily be navigated by any user because of its user-friendly interface. Lastly, if you want to be creative with your FaceTime screenshots, you’ll surely enjoy its editing features that you can customize.
Método 1: Para Mac
Step 1. First, download and install the FVC Screen Recorder on your Mac. This software supports almost all macOS versions, including the latest macOS 14 Sonoma.
Free DownloadFor Windows 7 or laterSecure Download
Free DownloadFor MacOS 10.7 or laterSecure Download
Step 2. Next, launch the tool.
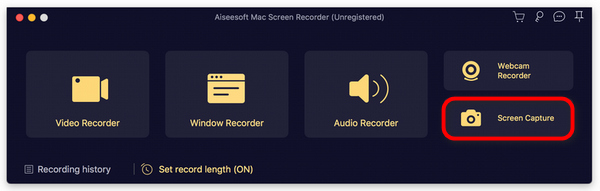
Step 3. Now, while you are having your FaceTime video call on your Mac. Click on the Screen Capture button that can be found on the floating window of the tool’s interface.
Step 4. This is optional, but you can edit your FaceTime Screenshot images by utilizing the multiple editing tools below.
Step 5. Lastly, click Save to save the picture to your Mac.
Método 2: Para iPhone e iPad
Step 1. Download and open FVC Screen Recorder, but this time on your Windows Computer.
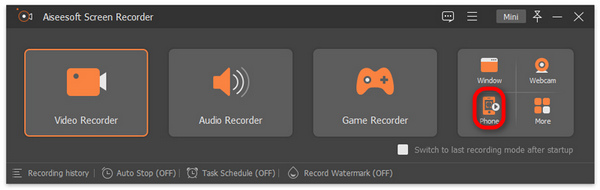
Step 2. Now, after installing the tool, open it and on the right side of the tool’s floating window interface, together with the other 3 options, click on the Phone option.
Step 3. After that, click the iOS Recorder option.
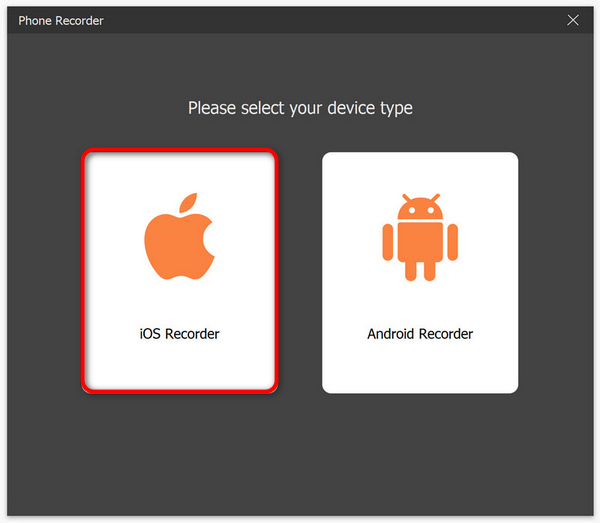
Step 4. Now, a new window will appear containing an on-screen instruction where you will also be asked to choose between Screen Mirroring or Audio Mirroring. In your case, choose Screen Mirroring.
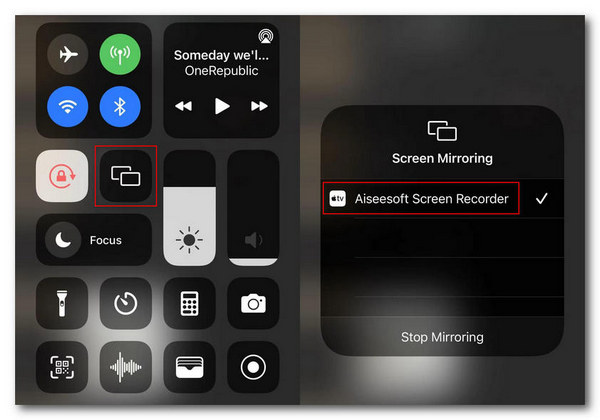
Step 5. Now, on your iPhone or iPad, open your Control Center and click on Screen Mirroring. Then click on Aiseesoft Screen Recorder to connect either your iPhone or your iPad to the computer.
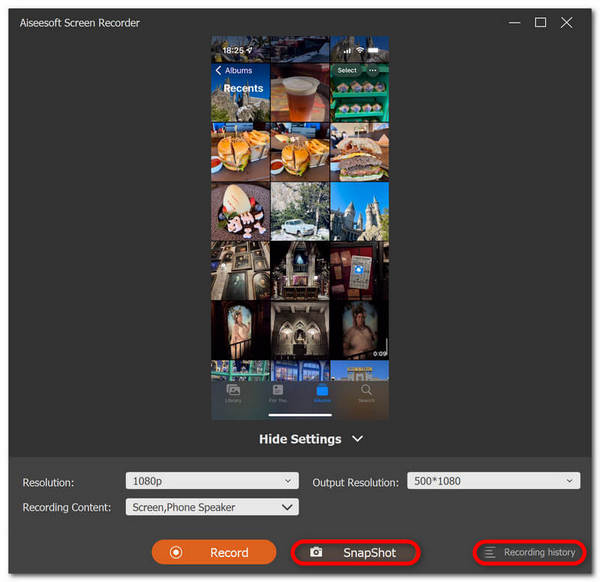
Step 6. Finally, to take a screenshot on your iPhone or iPad, just click on the Snapshot icon.
O FVC Screen Recorder é de fato uma ferramenta versátil quando se trata de tirar capturas de tela. Imagine uma ferramenta que pode suportar vários dispositivos iOS. Bom demais para ser verdade, mas é. Então, independentemente do dispositivo iOS que você estiver usando, tirar capturas de tela do FaceTime durante chamadas de vídeo é possível com esta ferramenta de gravação de tela.
Parte 2: Como tirar uma captura de tela do FaceTime no iPhone/iPad
É possível fazer capturas de tela do FaceTime em um iPhone ou iPad facilmente usando os recursos de captura de tela integrados.
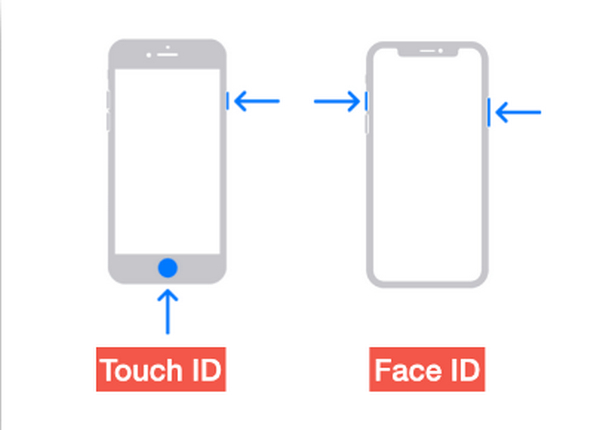
Step 1. Check the iOS or iPasOS device that you’re using during a FaceTime video call.
Step 2. When it has Touch ID, you need to simultaneously press the Home and Power buttons to take a screenshot of a FaceTime video call. Meanwhile, if your iPhone or iPad has a Face ID, you can take a Facetime call screenshot by also simultaneously pressing the Volume Up and Power buttons.
Step 3. Access your screenshot on your Photos app in the Screenshot folder,
Embora tirar capturas de tela do FaceTime seja moleza em um iPhone ou iPad devido aos seus recursos de captura de tela integrados. No entanto, é preciso ter cuidado ao pressionar os botões necessários durante uma chamada ativa do FaceTime, pois isso pode representar um risco de interrupção acidental, como encerrar a chamada ou desligar o volume sem saber.
Parte 3: Como tirar uma captura de tela do FaceTime no Mac
Ao fazer uma videochamada FaceTime no seu Mac, a maneira mais fácil de fazer isso é tirar capturas de tela do FaceTime usando as teclas de atalho.
Step 1. First open your FaceTime video call on Mac.
Step 2. Now, take a FaceTime screenshot using the hotkeys while you are having a video call.
Note: To capture a screenshot of the entire screen of your FaceTime video call, press and hold the Command, Shift, and 3 keys together. Meanwhile, if you just want to capture a partial part of the screen, press the Command, Shift, and 4 keys and hold them together. Lastly, if you want to capture the FaceTime window, press the Command, Shift, 4, and Space bar keys simultaneously.
Step 3. The screenshot will be directly saved on your desktop.
A única coisa sobre usar teclas de atalho durante uma captura de tela do FaceTime no Mac é que você não pode editá-la se quiser personalizar suas imagens de captura de tela. No entanto, se você quiser apenas fazer uma captura de tela, então está tudo bem, mas se quiser ser criativo, você pode usar ferramentas de terceiros, como o FVC Screen Recorder.
Parte 4: Perguntas frequentes sobre como tirar capturas de tela do FaceTime
Para onde vão as capturas de tela do FaceTime?
Você pode acessar suas capturas de tela do FaceTime no aplicativo Fotos do seu dispositivo. Normalmente, depois de tirar uma captura de tela durante uma chamada do FaceTime, ela será salva diretamente nele, especificamente na pasta de capturas de tela desse aplicativo.
O FaceTime avisa quando alguém tira capturas de tela?
Não. O FaceTime não tem um recurso que notifique alguém que tira uma captura de tela durante uma videochamada do FaceTime. Portanto, se alguém tirar uma captura de tela durante sua chamada do FaceTime, você não receberá nenhuma notificação.
As capturas de tela do FaceTime não estão salvando?
Se você estiver tendo problemas com capturas de tela do FaceTime não salvando no seu dispositivo iOS, pode haver vários motivos para isso. Primeiro, você precisa garantir que o armazenamento do seu dispositivo não esteja cheio, pois esse pode ser o principal motivo pelo qual as capturas de tela do FaceTime não estão salvando. Basicamente, isso impede que novas capturas de tela sejam salvas. Além disso, verifique as configurações de privacidade do seu dispositivo, talvez porque o aplicativo Fotos não tenha permissão para salvar capturas de tela. Se o problema persistir, reiniciar o dispositivo ou atualizar o software pode ajudar a resolver o problema.
Conclusão
In conclusion, taking FaceTime screenshots during video calls is the easiest way to save and capture memorable moments with loved ones over the line. Whether using built-in features on iOS devices or third-party tools like FVC Screen Recorder, there are various methods available to capture these moments effortlessly. So, don't hesitate to utilize these tools and features to make the most out of your FaceTime experiences. FaceTime your loved ones now and save that moment by taking a screenshot of it.
-
 Como resolver o problema de captura de tela não funcionar no iPhone [2025]
 Tem problemas para fazer capturas de tela no seu iPhone? Nós pegamos você! Aprenda nosso guia completo para ajudá-lo a corrigir capturas de tela que não funcionam em iPhones de maneira rápida e fácil.
-
 Captura de tela no Windows sem Print Screen [Guia 2025]
 Procurando maneiras de fazer capturas de tela no Windows sem imprimir a tela. Este artigo tornou tudo mais fácil para você. Leia isto agora e capture sua tela sem esforço!
-
 4 maneiras de fazer capturas de tela no Snapchat sem que eles saibam
 Você quer fazer uma captura de tela no Snapchat sem que eles saibam? Este artigo apresenta 4 métodos eficazes feitos sob medida para você. Confira agora e experimente você mesmo!