


Como reduzir o tamanho do vídeo no Premiere Pro? Métodos adequados para usar
A compactação de um vídeo traz vários benefícios que podem melhorar significativamente sua experiência de visualização. Ele reduz e compacta o tamanho do arquivo de vídeo, tornando mais rápido o upload, o download e o compartilhamento. Essa técnica é fundamental se você tiver espaço de armazenamento limitado ou uma conexão lenta à Internet. Além disso, a compactação de um vídeo pode melhorar a qualidade, removendo dados desnecessários e melhorando sua clareza. Esse recurso significa que você pode desfrutar de uma experiência de visualização de alta qualidade sem sacrificar a velocidade ou o espaço de armazenamento.
One of the most recognizable video compressors is Adobe Premiere Compress Video. This tool enables users to compress the file size of their video in the easiest method. In this article or post, we will review the methods and alternatives of this tool when it comes to reducing video files.

Parte 1. Compactar vídeo com Premiere
Adobe Premiere Pro é um software de edição baseado em linha do tempo e não linear ao editar arquivos de vídeo. Ele possui muitos recursos de edição de vídeo, mas como estamos discutindo a compactação de vídeo, nos concentraremos nesses recursos e nas funções relacionadas. Adobe Premiere Pro possui um Media Encoder integrado que permite compactar seus vídeos sem sacrificar a qualidade. Você pode escolher entre uma variedade de predefinições ou personalizar suas configurações. Sua opção de codificação de taxa de bits permite especificar os dados usados por segundo em seu vídeo. Dependendo de suas necessidades, você pode selecionar codificação de taxa de bits variável ou constante. Por último, o Adobe Premiere Pro também possui uma variedade de configurações de exportação que permitem personalizar ainda mais a compactação de vídeo. Você pode escolher entre diferentes formatos de arquivo, resoluções e muito mais. Verifique o guia simples abaixo para aprender como compactar um vídeo com este editor.
Step 1. Since we will talk about compressing video files in Premiere Pro, we will skip some editing parts within these steps. We assume you have already edited your video and used the tool to create a file. We are likely to focus on the export process for this walkthrough.
Step 2. Go to the export window by clicking the File Menu. On its dropdown options, select the Export function. Then, go to the Media option to access the Export Settings.
Step 3. Here, different options can reduce the video file size on Premiere Pro. You can use efficient codec formats to save the video in small files with better video codecs.
Step 4. Alternatively, you can use or set the video's bitrate in VBR, 2 Pass. You can also change the video resolution and target bitrate to lower your file size. Finally, hit or click the Export button to save the video file.

Parte 2. Bônus: como compactar áudio no Premiere
Outro recurso do Adobe Premiere Pro é a compactação de arquivos de áudio em seu sistema. Ele vem com uma infinidade de mixers de áudio, funções de compactação e codecs para diminuir o tamanho do arquivo de áudio. Você pode verificar os métodos listados abaixo desta breve descrição para aprender como compactar o áudio do Premiere Pro.
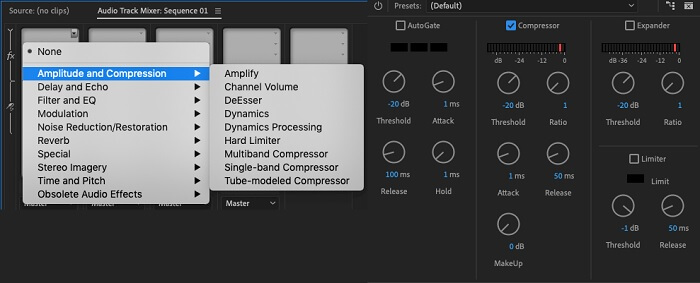
Step 1. To compress audio in Premiere video editor, select the audio clip in the timeline panel located at the tool's lower part. Navigate to the Effects tab or panel and search for the Loudness Radar effect. Drag and drop the effect onto the audio clip.
Step 2. In the Effect Controls panel, adjust the Target Loudness to your desired level. This feature will set the overall volume of the clip. A smaller range will result in more compression, while a more extensive range will result in less compression.
Step 3. To further fine-tune the compression, use the Threshold and Ratio controls. The threshold determines the point at which the audio will be compressed, while the ratio determines the amount of compression applied.
Step 4. Once you have adjusted the settings to your liking, preview the audio clip to ensure it sounds balanced and natural. Finally, export the compressed audio by going to the File option and selecting the Export button. Then, go to the Media tab, choose your desired export settings, and click Export to save the compressed audio file.
Parte 3. Melhores alternativas ao Premiere para compactação de vídeo e áudio
1. Video Converter Ultimate
When Adobe Premiere Pro fails to compress your video and audio file with your desired file size, use Video Converter Ultimate. This application contains a considerable amount of features that users can utilize to reduce file sizes of video clips. Due to its advanced accelerated algorithm or technology, this tool can compress video files 30 times more than a regular video compressor. What is more, it comes with a slider in which users can navigate to reduce a certain percent on the video file.
Outro método para reduzir arquivos de áudio e vídeo neste aplicativo é alterar o formato de qualidade, resolução e taxa de bits do arquivo. O recurso bônus também vem com um editor de metadados no qual os usuários podem renomear o arquivo além do vídeo original. Por favor, verifique o guia do usuário abaixo.
Step 1: Download Video Converter Ultimate
The beginning step in compressing video with Video Converter Ultimate is to get the app installed on your PC. You can hit the Free Download icon presented below to have its file installer. Then, run it on your PC to install the app. Launch it once it is installed.
Free DownloadFor Windows 7 or laterSecure Download
Free DownloadFor MacOS 10.7 or laterSecure Download
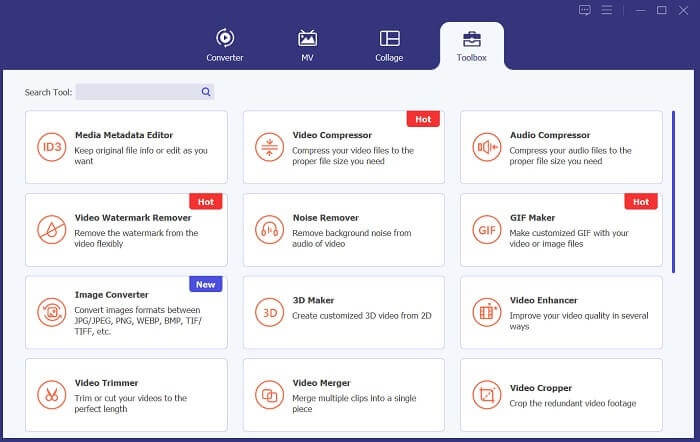
Step 2: Access Video Compressor
Once you have accessed the Video Converter Ultimate on your PC, go to the Toolbox option. Search for the Video Compressor option and launch the function. Import your files by clicking the + icon on its interface.
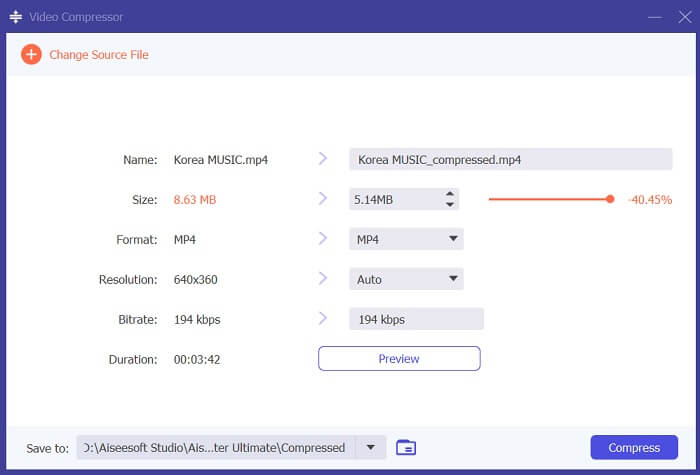
Step 3: Compress Video Files
Lastly, tweak and modify some video parameters to compress your video file. Slide the indicator at the right side of the file size or use other methods like changing resolution, format, and bitrate. Hit the Compress option to save and reduce video file size on your PC.
2. Compressor de vídeo FVC on-line
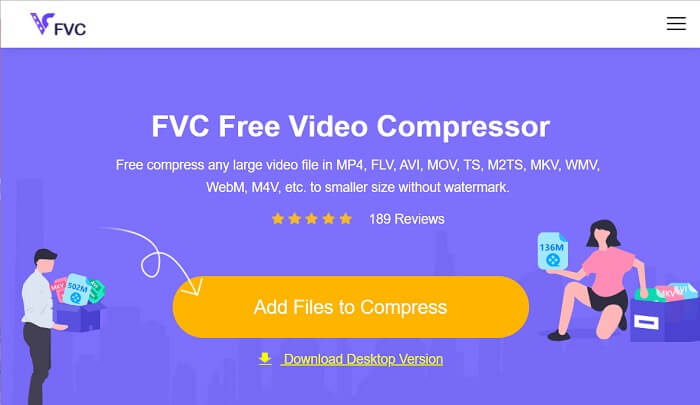
We get it; sometimes, you don't need extensive tools to compress a video file. Installing different software might not be your thing; here's why we recommend FVC Video Compressor Online. This web-based application is equipped with a straightforward process of compressing video files. It enables users to compress and reduce video files with 4K quality, HD resolution, and more. Also, it does not compromise the quality of the video file. Whether it is in 4K, you can still reduce the file. More so, in terms of versatility, this online tool is a master of it. You can compress video files with various formats, including MP4, FLV, MKV, MOV, AVI, WebM, 3GP, RMVB, and many more. See below its complete guide on compressing video files.
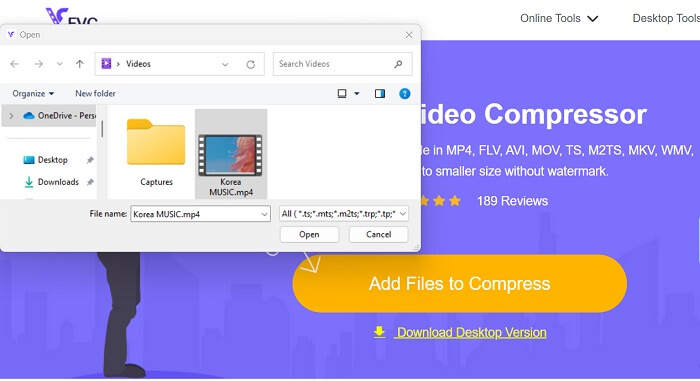
Step 1: Access the Tool
Accessing the tool on your web browser is the initial method to compress video online. You can use Chrome, Firefox, Microsoft Edge, Safari, and other browsers to search for the tool. Launch the tool on your browser and hit Add Files to Compress to install its launcher. This method is for first-time users only; if you already have the launcher of the online app, proceed to the next step.
Step 2: Import Files on the App
Hit the Add Files to Compress to access your device's folder. Please search for the video you need to compress and hit Open to import or add it to the online tool. Please wait until the web-based tool analyzes your files.
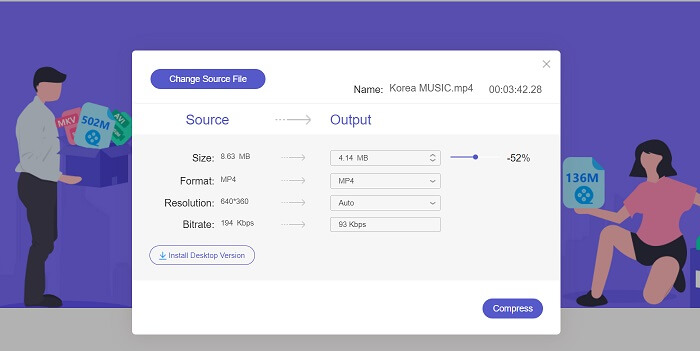
Step 3: Compress and Export Files
Lastly, you need to modify, tweak, and change different video parameters to reduce the file size of your device. Also, you can slide the percent indicator to reduce a certain percentage of the video size. Click the Compress button to instigate the process and export the compressed files.
Further Reading:
2 Ways to Compress Video for YouTube
Proven Approaches to Create Slow-Motion Videos in Adobe Premiere
Parte 4. Perguntas frequentes sobre o Adobe Premiere Pro
Como altero o tamanho de um vídeo no Premiere Pro?
To compress video in Premiere, you can use the Export Settings feature. Select the video file or clip in the timeline, then go to File > Export > Media. From there, you can adjust the settings to compress the video while maintaining quality. In addition, to change the size of a video in Premiere Pro, you can select the clip in the timeline panel and go to the Effect Controls panel. From there, you can adjust the Scale parameter to increase or decrease the video's file size.
O que é compressão de vídeo?
A compactação de vídeo é o processo de reduzir ou limitar o tamanho do arquivo de um vídeo, mantendo ao máximo a qualidade da saída. Este processo é adequado para usuários que precisam compartilhar, baixar, fazer upload e armazenar seus arquivos de forma rápida e conveniente.
Por que compactar vídeo?
A compactação de vídeo pode facilitar o compartilhamento, o upload e a economia de espaço de armazenamento no seu dispositivo. Este recurso de edição de vídeo é uma opção obrigatória ao baixar software de edição de vídeo.
A compactação do vídeo afetará sua qualidade?
Sim, compactar um vídeo pode afetar sua qualidade. Testar e visualizar as alterações antes de finalizá-las é essencial para garantir que o vídeo ainda tenha uma boa aparência após a compactação.
Conclusão
Compressing a video is a process that most video enthusiasts need to learn. Not only can it save you storage on keeping your files, but it can also allow you to share, upload, and download the video easily. There are different options for compressing video files. One of the most well-known apps is Adobe Premiere Pro. The solutions we have collected on how to compress audio in Premiere are an excellent help for you to organize your files. Let us know if you need further information regarding this topic; comment below.
-
 Maneiras rápidas e fáceis de sincronizar áudio e vídeo no Adobe Premiere Pro
 Quer saber como sincronizar áudio e vídeo no Premiere Pro? Então este artigo atenderá às suas necessidades. À medida que tentamos por nós mesmos com passos reais e simples.
-
 Como acelerar o vídeo no Premiere Pro e com suas alternativas
 Quer saber como usar o Premiere Pro para acelerar um vídeo? Então você está no artigo certo, pois fornecemos etapas e outras alternativas acessíveis.
-
 Maneira mais rápida de remover o logotipo do vídeo no Adobe Premiere Pro
 Experimente estas maneiras fáceis e rápidas de remover logotipos de um vídeo no Adobe Premiere Pro. Este artigo oferecerá as melhores maneiras de tentar usar seu dispositivo.