


How to Enhance Video Quality in Premiere Pro: Guide
Video quality can make or break the viewing experience. Now, if you’re working on a personal vlog, a school project, or a professional video production, video quality is one of the top most essential things to consider. That’s where Adobe Premiere Pro comes in.
In this guide, you’ll learn the easiest and most effective ways to enhance video quality in Premiere Pro. From sharpening clips and adjusting effects to choosing the right export settings for the best final output, we will walk you through each step clearly. And if you need something faster and beginner-friendly, we’ll also introduce an AI tool that can enhance video quality with just a few clicks. Let’s get started!

Part 1. How to Enhance Video Quality in Premiere Pro
Adobe Premiere Pro is one of the most powerful and widely used video editing software tools today. From beginners creating social media content to professionals producing films and commercials, Premiere Pro offers advanced editing features that help bring videos to life. It allows users to cut, enhance, and refine footage with precision, making it a top choice for anyone who wants high-quality results.
One of its most essential capabilities is video enhancement, so if you’re dealing with low-light shots, shaky clips, or blurry footage, Premiere Pro provides a range of tools to improve clarity, color, sharpness, and overall visual appeal. With the right techniques, you can transform raw footage into clean, vibrant, and professional-looking videos.
Now, here’s how you can enhance video quality in Premiere Pro:
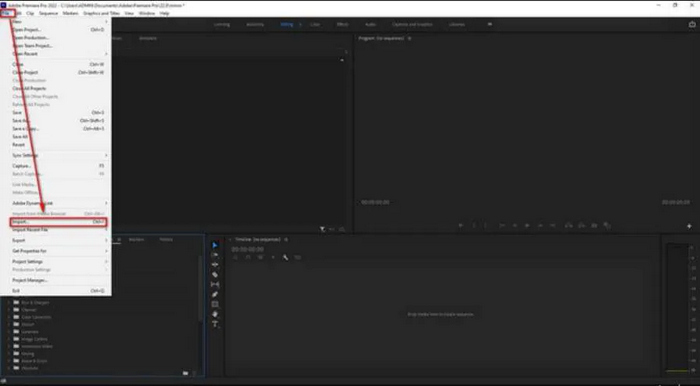
Step 1. Import Your Video in Adobe Premiere Pro
First, you need to open Adobe Premiere Pro on your computer and go to the File menu at the top-left corner. Click Import, then choose the video you want to enhance. Also, you can press Ctrl + I as a shortcut to bring up the import window faster. Once imported, drag your video into the Timeline so you can start editing.
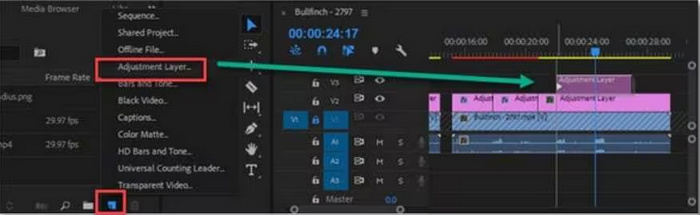
Step 2. Add an Adjustment Layer
To add effects without changing your original video, create an Adjustment Layer. To do this, in the Project panel, click the New Item icon beside the trash bin and select Adjustment Layer. Next, drag the new adjustment layer onto the Timeline and place it above your video track.
Step 3. Cut the Adjustment Layer (Optional)
If you only want to enhance a certain part of the video, you can trim the adjustment layer. To do this, select the Razor Tool or press C on your keyboard to cut it.

Note: If you want the whole video enhanced, just leave the adjustment layer uncut.
Step 4. Apply the Unsharp Mask Effect
Select the adjustment layer, then go to the Effects panel. Search for Unsharp Mask under Video Effects and select Blur & Sharpen. After that, drag and drop the effect onto the adjustment layer.

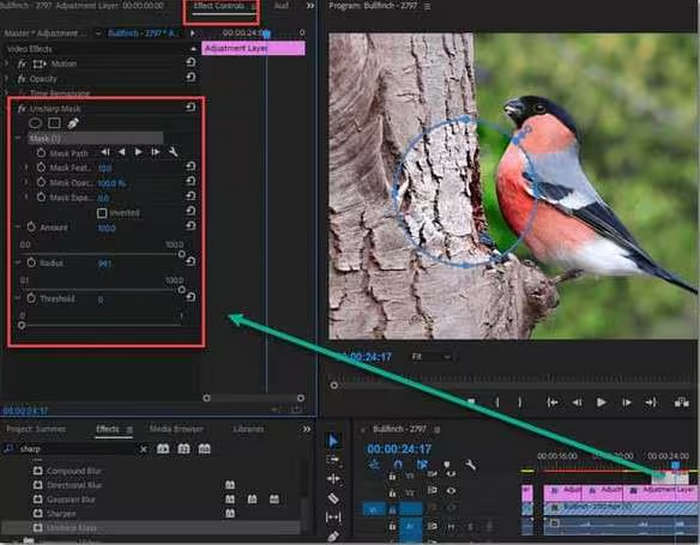
Step 5. Adjust Unsharp Mask Settings
First, open the Effect Controls panel to fine-tune the sharpening:
- • Amount – how strong the sharpening will be
- • Radius – size of the sharpening area
- • Threshold – controls where the sharpening applies
Try adjusting these slowly until you achieve the best result.
If needed, use mask tools like Oval, Rectangle, or Pen to apply sharpening only to specific areas, for example, keeping backgrounds soft while sharpening a subject’s face.
Step 6. Export your Video
When you're satisfied with the enhancement, go to File, select Export, and choose MediaIn the Export Settings window. Once settled, click Export, and Premiere Pro will render your video in high quality.
Part 2. Best Settings for Exporting High-Quality Video in Premiere Pro
To keep your videos sharp and professional after editing, here are the recommended export settings:
- Formato: H.264 (best for MP4 files)
- Preset: Match Source-High Bitrate or YouTube 1080p/4K
- Resolução: Keep your original (1920×1080 for Full HD, 3840×2160 for 4K)
- Bitrate Encoding: VBR, 2-Pass
- Taxa de bits: 10-16 Mbps for 1080p, 35-45 Mbps for 4K
- Render at Maximum Depth: Sobre
- Use Maximum Render Quality: Sobre
These settings preserve sharpness, color, and detail, ensuring your video looks professional on any platform.
Part 3. Best AI Alternative to Premiere Pro to Enhance Video Quality
If you want a faster and easier way to enhance your video quality without diving deep into complex editing software, FVC Video Converter Ultimate is a great AI-powered video enhancer alternative. This tool allows you to upscale videos, improve clarity, and convert formats quickly with just a few clicks, perfect for beginners or anyone looking for a simple solution.
Principais características
- • AI-Powered Video Enhancement: Automatically improves clarity, sharpness, and overall quality.
- • Upscale Video Resolution: Convert 1080p videos to 4K effortlessly.
- • Fast Conversion: Supports batch processing to save time.
- • Wide Format Support: Works with MP4, MOV, AVI, and many other video formats.
- • User-Friendly Interface: Simple and intuitive design, perfect for beginners.
- • Customizable Output Settings: Adjust resolution, format, and quality based on your needs.
Step 1. Download the FVC Video Converter Ultimate on your device.
Free DownloadFor Windows 7 or laterSecure Download
Free DownloadFor MacOS 10.7 or laterSecure Download
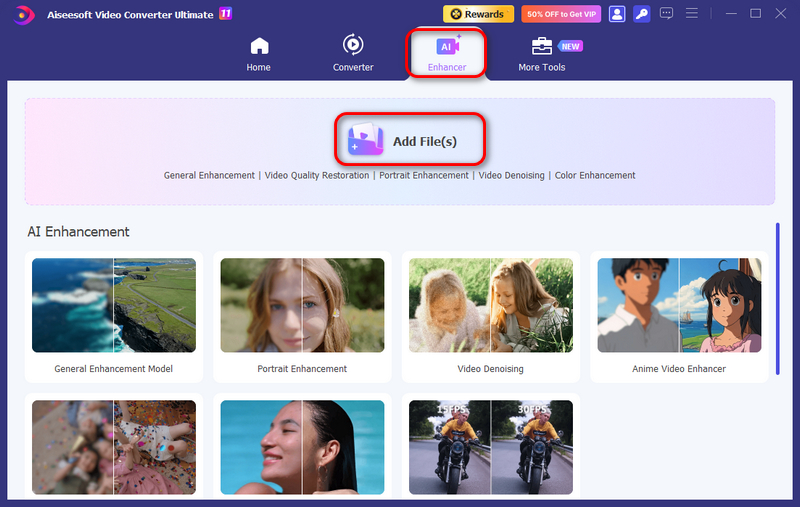
Step 2. Click the Enhancer and Add Files button to add the 1080p video that you want to convert to 4K.
Step 3. Now, click the Output Resolution button and choose 4K.
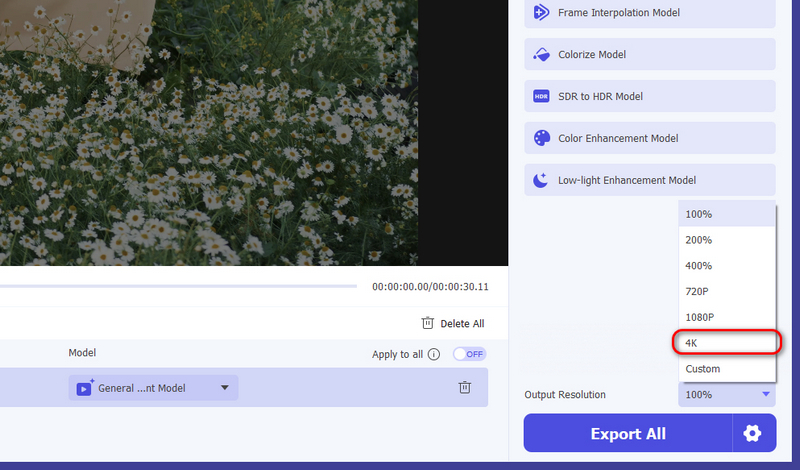
Step 4. If you’re done, click Export All.
What’s great about FVC Video Converter Ultimate as an alternative to enhance video quality in Premiere Pro is that it does not require complex steps. You just need to upload the video you want to enhance the video quality and it will automatically improve it. So, if you find Premiere Pro a little demanding when it comes to learning how to use it, might consider using FVC as an alternative.
Part 4. FAQs about Enhancing Video Quality in Premiere Pro
Can I improve the quality of a blurry video in Premiere Pro?
Yes. Using tools like the Unsharp Mask, color correction, and adjustment layers, you can enhance sharpness, clarity, and overall visual quality. However, extremely low-resolution videos may have limits in how much they can be improved.
Do I need a powerful computer to enhance video quality in Premiere Pro?
While Premiere Pro can run on most computers, enhancing high-resolution videos or applying multiple effects works best on a machine with a fast processor, sufficient RAM, and a dedicated GPU. Using an AI tool like FVC Video Converter Ultimate can reduce strain on your system, as it simplifies the process.
Will enhancing video quality increase the file size?
Yes, applying effects, upscaling resolution, and exporting in high-quality settings can increase your video file size. Using optimized export settings, like H.264 with VBR 2-pass, helps maintain quality while keeping the file manageable.
Conclusão
Enhancing video quality in Premiere Pro is essential because sharp, clear, and vibrant videos capture attention and make your content look professional. By using adjustment layers, sharpening effects, and the right export settings, you can transform ordinary footage into polished, high-quality videos. For a quicker solution, AI tools like FVC Video Converter Ultimate can automatically enhance video quality in just a few clicks.
Nevertheless, no matter which method you choose, taking the time to enhance video quality ensures your videos stand out, impress viewers, and leave a lasting impact.
-
 8 Melhores Ferramentas de IA para Aprimorar a Qualidade de Vídeo em 2026 (Análise Completa)
 Este guia apresenta os melhores softwares de aprimoramento de vídeo com IA. Compare softwares profissionais para computador com ferramentas online gratuitas para transformar vídeos de baixa resolução em obras-primas impressionantes em 4K/8K.
-
 Como aprimorar o vídeo com Topaz Video AI – Guia 2024
 Procurando maneiras de aprimorar seus vídeos? Neste artigo, aprenda como usar o Topaz Video AI para elevar a qualidade de seus vídeos com este guia passo a passo.
-
 Como fazer upgrade de 1080p para 4K [formas on-line e off-line]
 Quer fazer com que seus vídeos pareçam ter sido filmados em resolução 4K? Nós pegamos você! Aprenda como fazer upgrade de 1080p para 4K com este guia passo a passo. Leia para saber mais!