


Como cortar um vídeo no QuickTime para extrair um clipe no Mac
Já aconteceu de você gravar um vídeo incrível de um jogo, uma aula no Zoom ou uma mensagem de aniversário emocionante no seu Mac, só para perceber que os primeiros trinta segundos são só você tossindo sem jeito ou olhando fixamente para a câmera? Não se preocupe, o QuickTime é a solução.
QuickTime Player isn’t just for watching movies; it’s a surprisingly powerful (and free!) tool for basic edits. In this guide, you will learn how to trim video in QuickTime and find solutions to troubleshoot those annoying glitches. Let’s dive in!

Parte 1. Como cortar vídeos no QuickTime
Quando aprendi a cortar vídeos com o QuickTime, fiquei surpreso com a simplicidade. Você não precisa ser um gênio da tecnologia para dominar essa técnica. Seja para encurtar um vídeo do QuickTime para enviar por e-mail ou simplesmente para cortar vídeos no Mac e economizar espaço de armazenamento, aqui está exatamente como eu faço.
Step 1. Find the Trim feature
First things first, find the video you want to edit. Right click the file, then choose Open With and select QuickTime Player.

Once your video is open, look at the top menu bar. Navigate to Edit and then click on Trim.

I’m a huge fan of keyboard shortcuts because they make me feel like a hacker. You can simply press Command + T on your keyboard, and the trimming interface will appear instantly.
Step 2. Adjust the yellow handles
This is where the magic happens. Once you enter "Trim Mode," a yellow frame (the trim bar) will appear over the video timeline at the bottom of the window.
Para cortar um vídeo no QuickTime Player, basta clicar e arrastar a alça amarela à esquerda até o ponto inicial desejado. Em seguida, arraste a alça amarela à direita até o ponto final desejado do vídeo.

Para maior precisão, clique e segure a alça amarela. O QuickTime ampliará os quadros, permitindo que você veja exatamente onde uma cena começa ou termina. Isso é uma mão na roda quando você está tentando cortar uma simples piscada incômoda!
Step 3. Start cutting video
Once you’ve isolated the perfect part of your clip, click the Trim button on the right side of the timeline. Everything outside of those yellow bars will vanish. Don't worry, though, and you haven't lost the original file yet!

Step 4. Exporting your trimmed video
After you trim the video in QuickTime for Mac, you need to save it. Go to File > Save. Give your new, shorter clip a name. I usually add "-trimmed" to the end of the filename so I don't get it confused with the original long version.

If you want to change the quality (such as downgrading from 4K to 1080p to save space), you can go to File > Export As instead. This is how you effectively shorten a QuickTime video while keeping the file size small.
Parte 2. Por que meu botão de aparar está acinzentado? (Motivos e soluções)
Não há nada mais frustrante do que abrir um arquivo e perceber que você não consegue cortar um vídeo no QuickTime porque o botão está desativado. Passei muitas noites em claro encarando uma tela "desativada", me perguntando o que eu tinha feito de errado. Depois de algumas tentativas, descobri os culpados.
Se você está se perguntando "Por que não consigo cortar um vídeo no QuickTime?", aqui estão os motivos mais comuns e como eu os resolvi:
Formatos de arquivo não suportados
O QuickTime é um tanto exigente. Ele suporta arquivos .mov e .mp4, mas se você tentar reproduzir um arquivo .mkv ou um arquivo .avi antigo, ele pode até permitir que você assista ao vídeo, mas não permitirá que você o edite.
The Fix: You’ll need to convert MKV to MP4, a Mac-friendly format first (we'll talk about a tool for that in a bit!).
Arquivos somente leitura
Às vezes, se você baixou um arquivo da internet ou de um serviço de armazenamento em nuvem, ele pode estar "Bloqueado" ou configurado como "Somente leitura".
The Fix: Right-click the file, select Get Info, and ensure the "Locked" checkbox is unchecked, as well as that your permissions are set to "Read & Write."
O arquivo já está sendo usado.
Se outro aplicativo estiver tentando acessar ou carregar esse vídeo, o QuickTime poderá bloquear a edição para evitar a corrupção do arquivo.
The Fix: Close other apps, such as iMovie or your web browser, and try again.
Problemas técnicos do macOS
Às vezes, seu Mac só precisa de uma soneca.
The Fix: Restart QuickTime Player or, if all else fails, restart your Mac. It sounds cliché, but "turning it off and on again" fixes 90% of my tech problems. This fix will also work when QuickTime Player is not working.
Parte 3. A melhor alternativa ao QuickTime para cortar vídeos
While learning how to trim videos on QuickTime Player is great for quick edits, it definitely has its limits. For example, QuickTime can't handle multiple clips simultaneously, and its format support is relatively narrow. That’s when I turned to FVC Video Converter Ultimate. This software is a total powerhouse for Mac users who want more control over their video editing. It’s not just a converter; it’s a full-on video toolkit that allows you to trim, crop, merge, and enhance your videos with just a few clicks. Whether you're dealing with 4K footage or weird file types that QuickTime rejects, FVC handles it all without breaking a sweat.
Se você está pronto para ir além do básico de como editar vídeos no Mac, veja como eu uso o FVC para realizar essa tarefa:
Free DownloadFor Windows 7 or laterSecure Download
Free DownloadFor MacOS 10.7 or laterSecure Download
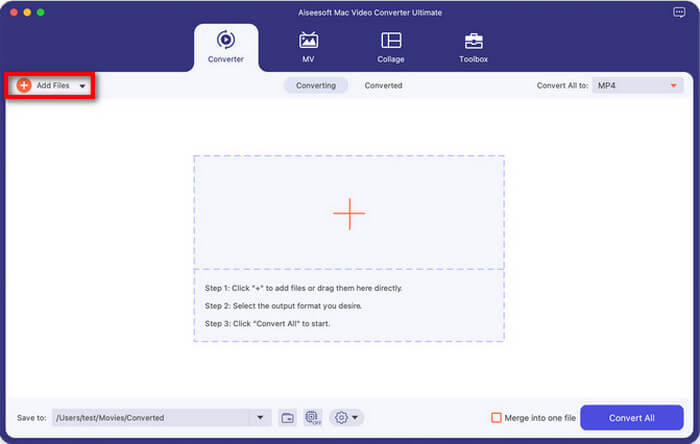
Step 1. Add your video
Open the program and click the large + button or Add Files to import your video. You can even drag and drop multiple videos at once if you're in a hurry.
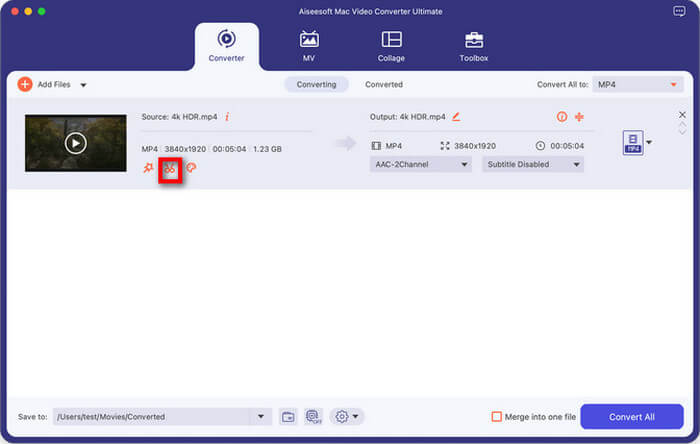
Step 2. Enter the Cut tool
Look for the Cut icon (represented by a pair of scissors) next to the video thumbnail. Click it to open the trimming window.
Step 3. Trim a video
Just as in QuickTime, you can move the sliders to choose where the clip starts and ends. However, FVC allows you to click Add Segment, which means you can cut multiple different parts out of one single video, something QuickTime can't do easily.
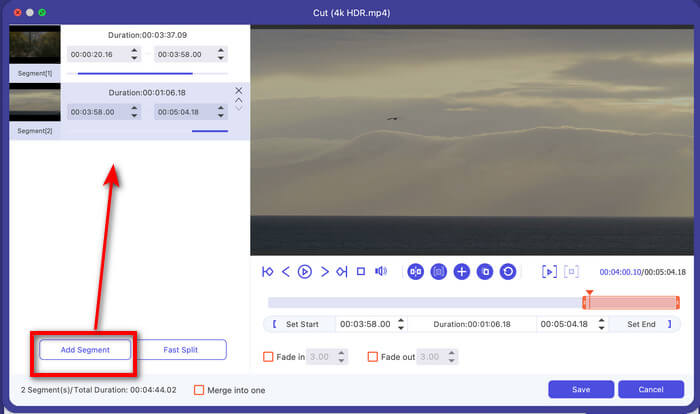
Essa ferramenta também oferece um recurso de divisão rápida, que permite cortar um vídeo longo em vários clipes por tempo médio ou por parte.
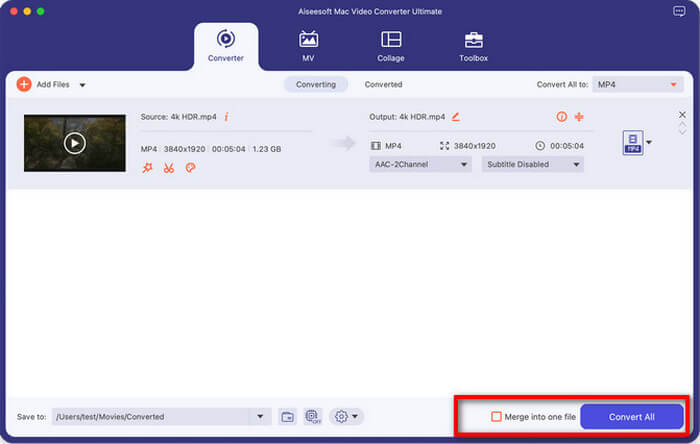
Step 4. Save and convert
Once you’re happy with your clips, click Save. Then, back in the main window, choose your output format (like MP4 or MOV) and hit Convert All.
If you want to combine your cut clips into one, just arrange the order and tick the checkbox of Merge into one file.
O FVC Video Converter Ultimate é significativamente mais rápido que o QuickTime ao processar arquivos de alta resolução. Adoro o fato de não travar quando tento editar arquivos grandes, e a capacidade de "Dividir rapidamente" um vídeo longo em partes iguais é uma verdadeira revolução para minhas postagens em redes sociais. A única desvantagem é que se trata de um aplicativo de terceiros, então você precisa baixá-lo, enquanto o QuickTime já vem instalado no seu Mac. No entanto, para quem faz mais do que edições ocasionais, os recursos extras valem muito a pena.
Parte 4. Perguntas frequentes
Quais formatos de vídeo o QuickTime suporta para corte?
O QuickTime Player funciona melhor com formatos nativos da Apple. Ele é ideal para arquivos MOV, MP4, M4V e alguns arquivos AVI (dependendo do codec). Se você perceber que cortar um vídeo no QuickTime para Mac resulta em perda de qualidade, pode ser porque o formato original não era totalmente compatível. Se você tiver um arquivo MKV ou FLV, provavelmente precisará usar um conversor como o FVC mencionado anteriormente antes de poder editá-lo.
Como cortar várias partes de um vídeo no QuickTime?
This is a "secret" feature! To cut out a middle section of a video:
1.Go to Edit > Split Clip (or hit Command + Y) at the point where you want to start the cut.
2.Move the playhead to the end of the part you want to remove and hit Command + Y again.
3.Now, your video is in three pieces. Click on the middle piece (it will be outlined in yellow) and press the Delete key on your keyboard.
4.Voila! You’ve just removed the middle of a video.
Onde o QuickTime salva os vídeos cortados?
By default, when you click "Trim," QuickTime keeps the edited version in its temporary memory. It becomes a permanent file only after you go to File > Save. At that point, a window will appear, asking you exactly where you want to place it. I usually save mine to the Desktop or Downloads folder so I don't lose them in my messy file system.
Conclusão
Learning how to trim video in QuickTime is a simple Mac skill that can save you a lot of time and hassle. Whether you're a student, a creator, or just someone trying to clean up their family vacation videos, QuickTime is a reliable, easy-to-use tool for the job. However, if you ever find yourself asking, "Why can't I trim a video in QuickTime?" or if you need to take on more advanced editing tasks, such as merging clips or converting formats, don't be afraid to try an alternative like FVC Video Converter Ultimate.
-
 Dicas e truques sobre o VLC Metadata Editor que você deve saber em 2025
 Deseja usar o VLC como editor de metadados? Nesse caso, você pode ler este artigo, pois fornecemos uma revisão imparcial do editor de metadados do VLC.
-
 Velocidade de reprodução do VLC: técnicas secretas para controlar a velocidade do vídeo
 Deseja assistir a um vídeo, mas alterar a velocidade de reprodução do VLC? Vamos ensiná-lo a fazer isso facilmente em ambos os sistemas operacionais.
-
 Como usar o VLC para reparar vídeos. Seu guia definitivo
 Você tem vídeos quebrados presos em seus arquivos? Explore o guia definitivo para reparo de vídeo VLC para reparar seus vídeos e reproduzi-los novamente com facilidade.