


Hur man komprimerar ljud: Topp 4 användbara verktyg du behöver prova
Trots den oumbärliga kvalitet som din ljudfil har finns det inget mer nedslående än när du inte kan skicka den över internet. Dessutom tar stora ljudfiler upp för mycket utrymme på din enhet, vilket leder till att du bara kan lagra några få av dina favoritlåtar och måste radera resten. Lyckligtvis kan dessa hinder enkelt lösas tack vare ljudkompressorer, både online och offline. I den här guiden har vi tagit fram de fyra bästa programmen som låter dig snabbt komprimera ljudfil.

Del 1. Bästa sättet att komprimera ljud
Vi börjar med det bästa sättet att komprimera ljudfiler på bara några klick. Video Converter Ultimate är ett utmärkt alternativ för nybörjare, vanliga användare och proffs, eftersom det erbjuder mer än vad du behöver för att komprimera ljud. Det kan fungera som en konverterare och låter dig omvandla ett format till ett annat. Dessutom har Video Converter Ultimate en verktygslåda där du kan få tillgång till en omfattande lista med funktioner som GIF Maker, Video Enhancer, Audio Cutter med mera.
Förutom detta fantastiska erbjudande låter Video Converter Ultimate dig finjustera ditt projekts detaljer genom att ändra bithastighet, samplingshastighet och kanaler. Se guiden nedan för att minska ljudfilstorleken med verktyget.
Steg 1. Starta den bästa ljudkompressorn
Som en avgörande start, installera programmet på dina enheter genom att välja knappen Gratis nedladdning nedan. Välj höger sida för Windows OS och vänster för Mac-enheter. Dubbelklicka sedan på filen och följ installationsguiden.
Gratis nedladdningFör Windows 7 eller senareSäker nedladdning
Gratis nedladdningFör MacOS 10.7 eller senareSäker nedladdning
Steg 2. Ladda upp ljud
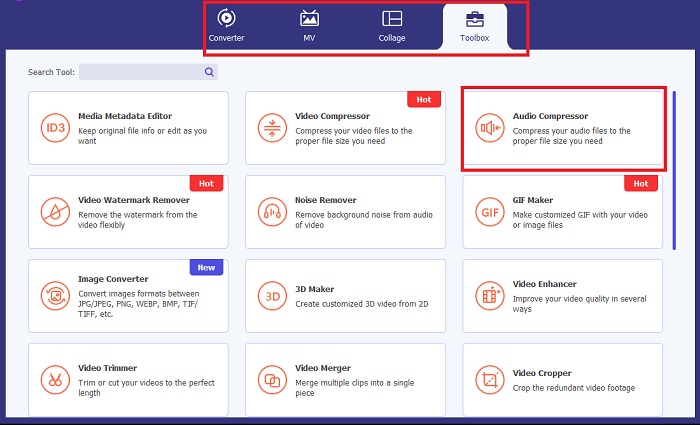
När du har blivit bekant med programmets gränssnitt går du till avsnittet Toolbox i Video Converter Ultimate och väljer Audio Compressor. Därefter visas ett nytt fönster, och du klickar på plustecknet för att importera din ljudfil.
Steg 3. Komprimera ljud
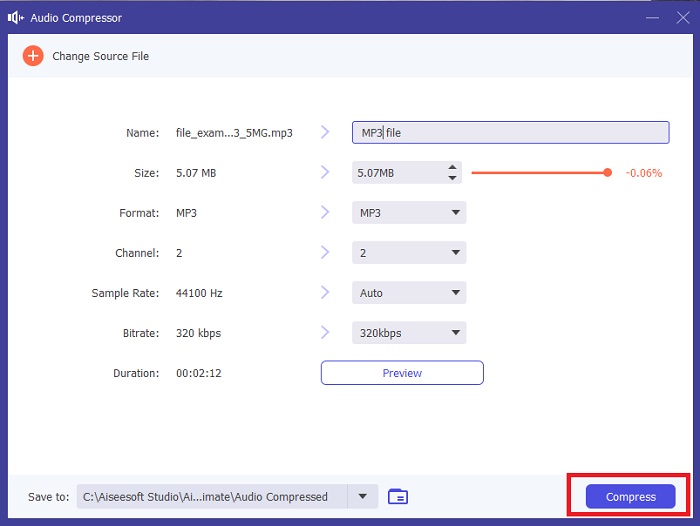
Medan din fil laddas upp komprimerar Video Converter Ultimate automatiskt din ljudfil. Processen kan ta ett tag, beroende på hur lång den är. Å andra sidan kan du flytta reglaget enligt din föredragna komprimeringsnivå.
Steg 4. Spara fil
När komprimeringen är klar kan du också ändra format, kanal och andra krav du behöver. Klicka sedan på knappen Compress för att starta komprimeringsprocessen.

Del 2. Hur man komprimerar ljud i Audacity
Om du är nybörjare i att hantera ljudkomprimering är Audacity ett roligt verktyg att börja med. Det här programmet är ett ljudredigeringsprogram med öppen källkod som låter dig redigera spår och röstinspelningar. Förutom det är Audacity ett plattformsoberoende verktyg - med andra ord, det kommer att fungera perfekt på alla Mac-, Windows- och till och med Linux-enheter.
Innan du komprimerar din dyrbara fil kan det här verktyget hjälpa dig att blanda ljudfiler som speciella ljudeffekter. Den kan också redigera tal, tempo och tonhöjd för din ljudinspelning. Om du vill veta hur man komprimerar ljud i Audacity, följ stegen nedan.
Steg 1. Ladda först in ljudfilen i programmet genom att gå till fliken File och klicka på Import. Därefter visas din dators katalog i ett nytt fönster där du kan välja vad du vill komprimera.
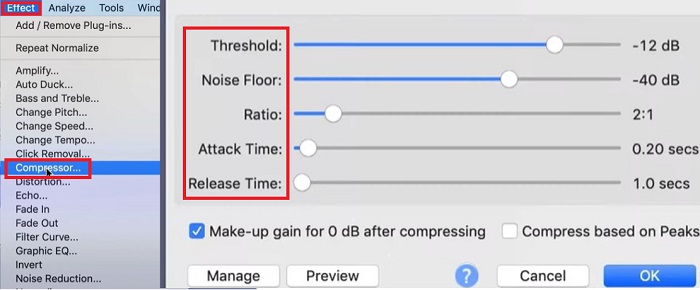
Steg 2. Markera sedan ljudet på tidslinjen för att framhäva det. Fäll därefter ned Effect och gå till Compressor.
Steg 3. När panelen Compressor visas kan du börja justera parametrarna för att komprimera dina ljudfiler, såsom Threshold, Noise Floor, Ratio och Release Time.
Steg 4. Klicka på knappen Preview för att spela upp ditt förväntade resultat och säkerställa hur din slutliga export låter. När du är nöjd med ljudfilen klickar du på OK och exporterar ditt ljud till din lokala mapp.
Del 3. Adobe Audition Komprimera ljud
Medan det senare verktyget är bäst för nybörjare, är Adobe Audition-programvaran lämplig för proffs. Det här programmet kan finjustera ljudspår för att få fram en perfekt utdata. Dessutom erbjuder detta professionella verktyg omfattande funktioner för redigering, mixning och återställning av ljuddetaljer.
Utöver det ger det här verktyget dig utrymme att minska filstorleken på ditt ljud. Nu går vi vidare till sätt att minska storleken på ditt ljud på Adobe Audition med hjälp av enkelbandskomprimering.
Steg 1. När du har startat verktyget på skärmen går du till det övre vänstra hörnet av programmet och klickar på Open. Där laddar du upp den ljudfil som du behöver komprimera. Alternativt kan du använda dra‑och‑släpp‑metoden.
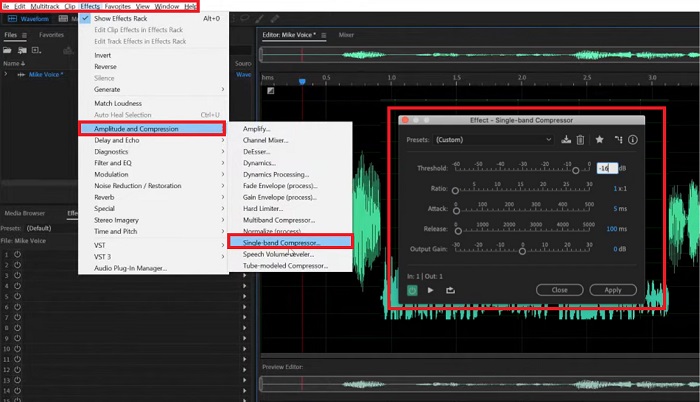
Steg 2. Fäll sedan ut fliken Effect och välj Amplitude and Compression. Välj därefter Single-Band Compressor från listan för att jämna ut ditt ljud.
Steg 3. Justera slutligen Threshold, Attack och Output Gain manuellt utifrån dina ljudbehov. När allt uppfyller dina krav klickar du på Apply.
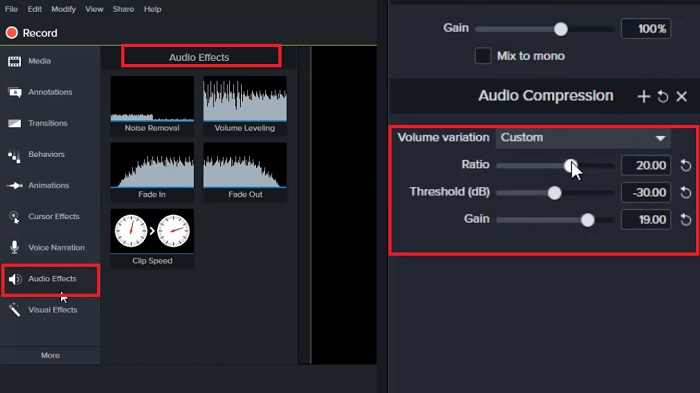
Del 4. Ljudkomprimering i Camtasia
Sist på listan är ett multifunktionellt verktyg som heter Camtasia som uppfyller dina behov av ljud- och videomanipulation. Även om programmet huvudsakligen används för videoredigering och skärminspelning, kan detta program också göra ditt ljud explicit fantastiskt.
När du fixar ljuddata erbjuder Camtasia verktyg som hjälper dig justera volymen, ta bort bakgrundsljud och till och med ändra hastigheten och tempot på din fil. Camtasia fungerar både på Mac- och Windows-enheter. Vi gav en guide nedan om hur ljudkomprimeringen i Camtasia fungerar.
Steg 1. Importera först ljudfilen i programmet genom att klicka på File > Open. När den visas klickar du på ljudet för att markera det. Se till att din markör är placerad vid de första sekunderna av ditt ljud.
Steg 2. Gå sedan till det vänstra hörnet av verktyget och välj Audio Effects. När alternativen under denna flik visas väljer du Compressor. Därefter kommer verktyget automatiskt att jämna ut ditt ljud.
Steg 3. Du kan trycka på knappen Play i förhandsgranskningspanelen för att kontrollera din ljudfil. Om du är nöjd klickar du på Apply.
Steg 4. För att spara ditt resultat i din mapp öppnar du åter fliken File och trycker på Export.
Vidare läsning:
Topp 3 lösningar på hur du åtgärdar problem med ljudfördröjning [2023]
Hur du komprimerar videor gratis/ testa dessa 7 online‑videokompressorer
Del 5. Vanliga frågor om sätt att minska ljudfilstorleken
Kan jag komprimera ljudfilen WAV?
Defenitivt Ja! Waveform Audio File, eller WAV-format för kort, är en förlustfri ljudfil producerad av IBM och Microsoft. Eftersom WAV är okomprimerad, kan du behöva komprimera filer som denna för att tillgodose mer utrymme på din lagring.
Hur komprimerar jag ljud till MP3?
När det gäller att skaffa en standardkvalitet på dina ljudspår är MP3 det bästa valet. För att komprimera en MP3-fil kan du använda ett onlineverktyg eller offlineprogram. För onlineverktyget laddar du upp MP3:n i en onlineljudkompressor. Efteråt kommer verktyget att ge dig ett val av din målfilstorlek och dess motsvarande kvalitet.
Hur kan jag komprimera ljudfiler online?
Många onlineverktyg kan hjälpa till att minska ljudfilstorleken till mindre. Vad du behöver göra är att ladda upp MP3:n till en ljudkompressor online. Efteråt kommer verktyget att använda sina algoritmer för att ge dig ett val av din målfilstorlek och dess motsvarande kvalitet.
Hur skickar jag en ljudfil som är för stor?
Att skicka en stor ljudfil på sociala medieplattformar är bara begränsat till 25 megabyte. I sådana här fall är det bästa du kan göra att skapa en zip-fil för din fil och bifoga den till din e-post. Å andra sidan kan du ha filen på din Google Drive och dela länken med mottagaren.
Är Adobe Audition gratis?
Nej. Adobe Audition kan endast användas när du prenumererar på Creative Cloud. Men professionella redaktörer väljer att ha detta program på sina enheter eftersom dess prestanda är betydligt mer avancerad och heltäckande.
Slutsats
Med de ovan nämnda plattformarna kan du komprimera ljud obegränsat och ändå få en rimlig ljudkvalitet. Med Adobe Premiere Pro, som har en omfattande lista med redigeringsverktyg utöver kompressorn, kan du dessutom finjustera bakgrundsljud. Å andra sidan, om det enbart är komprimering av ljudfiler som är ditt mål, räcker Camtasia och Video Converter Ultimate gott.
-
 Så här lägger du till ljud och musik till video gratis på din dator / telefon
 Den här artikeln visar 4 enkla sätt att lägga till ljud till video gratis. Oavsett vilket ljudspår du vill lägga till i din video kan du få tillfredsställande resultat här.
-
 Handledning för att komprimera GIF och minska filstorleken med hög kvalitet
 Här'är 2 enkla sätt att komprimera GIF. Du kan använda FVC Free Online Video Compressor och Photoshop för att minska GIF-filstorleken i olika aspekter.
-
 Hur man synkroniserar ljud och video i iMovie på iPhone och Mac
 Har du problem eftersom ljud och video inte synkroniseras på iPhone och Mac? Så nu, låt oss gå vidare med hur man använder iMovie genom att läsa den här artikeln.