


วิธีลดขนาดวิดีโอใน Premiere Pro วิธีการใช้ที่เหมาะสม
การบีบอัดวิดีโอมีประโยชน์มากมายซึ่งสามารถปรับปรุงประสบการณ์การรับชมของคุณได้อย่างมาก จะลดและบีบอัดขนาดของไฟล์วิดีโอ ทำให้อัพโหลด ดาวน์โหลด และแชร์ได้รวดเร็วยิ่งขึ้น เทคนิคนี้มีประโยชน์หากคุณมีพื้นที่เก็บข้อมูลจำกัดหรือมีการเชื่อมต่ออินเทอร์เน็ตที่ช้า นอกจากนี้ การบีบอัดวิดีโอสามารถปรับปรุงคุณภาพได้โดยการลบข้อมูลที่ไม่จำเป็นและปรับปรุงความชัดเจน คุณสมบัตินี้หมายความว่าคุณสามารถเพลิดเพลินกับประสบการณ์การรับชมคุณภาพสูงขึ้นโดยไม่กระทบต่อความเร็วหรือพื้นที่จัดเก็บข้อมูล
หนึ่งในเครื่องมือบีบอัดวิดีโอที่เป็นที่รู้จักมากที่สุดคือ Adobe Premiere Compress Video เครื่องมือนี้ช่วยให้ผู้ใช้บีบอัดขนาดไฟล์วิดีโอได้ง่ายที่สุด ในบทความหรือโพสต์นี้ เราจะมาทบทวนวิธีการและทางเลือกอื่น ๆ ของเครื่องมือนี้เมื่อต้องการลดขนาดไฟล์วิดีโอ.

ส่วนที่ 1 บีบอัดวิดีโอด้วย Premiere
Adobe Premiere Pro เป็นซอฟต์แวร์ตัดต่อที่ยึดตามไทม์ไลน์และไม่เชิงเส้นเมื่อทำการแก้ไขไฟล์วิดีโอ มีคุณลักษณะการตัดต่อวิดีโอมากมาย แต่เนื่องจากเรากำลังพูดถึงการบีบอัดวิดีโอ เราจะเน้นไปที่คุณลักษณะเหล่านี้และฟังก์ชันที่เกี่ยวข้อง Adobe Premiere Pro มี Media Encoder ในตัวที่ช่วยให้คุณบีบอัดวิดีโอโดยไม่ลดคุณภาพลง คุณสามารถเลือกหรือเลือกจากค่าที่ตั้งล่วงหน้าที่หลากหลายหรือปรับแต่งการตั้งค่าของคุณ ตัวเลือกการเข้ารหัสบิตเรตช่วยให้คุณระบุข้อมูลที่ใช้ต่อวินาทีในวิดีโอของคุณ คุณสามารถเลือกจากการเข้ารหัสบิตเรตแบบแปรผันหรือคงที่ก็ได้ ขึ้นอยู่กับความจำเป็นของคุณ สุดท้ายนี้ Adobe Premiere Pro ยังมีการตั้งค่าการส่งออกที่หลากหลาย ซึ่งช่วยให้คุณปรับแต่งการบีบอัดวิดีโอเพิ่มเติมได้ คุณสามารถเลือกรูปแบบไฟล์ ความละเอียด และอื่นๆ อีกมากมาย อ่านคำแนะนำที่ตรงไปตรงมาด้านล่างเพื่อเรียนรู้วิธีบีบอัดวิดีโอด้วยโปรแกรมแก้ไขนี้
ขั้นตอนที่ 1. เนื่องจากเราจะพูดถึงการบีบอัดไฟล์วิดีโอใน Premiere Pro เราจะข้ามส่วนการตัดต่อบางส่วนในขั้นตอนเหล่านี้ไป โดยสมมติว่าคุณได้ตัดต่อวิดีโอเสร็จและใช้เครื่องมือสร้างไฟล์เรียบร้อยแล้ว เราจะเน้นไปที่กระบวนการส่งออกไฟล์เป็นหลักในคำแนะนำนี้.
ขั้นตอนที่ 2. ไปที่หน้าต่างส่งออกโดยคลิกที่เมนู File จากตัวเลือกแบบดรอปดาวน์ ให้เลือกฟังก์ชัน Export จากนั้นไปที่ตัวเลือก Media เพื่อเข้าถึงหน้าต่าง Export Settings.
ขั้นตอนที่ 3. ในส่วนนี้จะมีตัวเลือกต่าง ๆ ที่ช่วยลดขนาดไฟล์วิดีโอใน Premiere Pro คุณสามารถใช้รูปแบบโค้ดแผง (codec) ที่มีประสิทธิภาพเพื่อบันทึกวิดีโอให้มีขนาดไฟล์เล็กลงพร้อมกับใช้วิดีโอโค้ดแผงที่ดียิ่งขึ้น.
ขั้นตอนที่ 4. อีกวิธีหนึ่ง คุณสามารถตั้งค่าบิตเรตของวิดีโอเป็นแบบ VBR, 2 Pass ได้ นอกจากนี้คุณยังสามารถเปลี่ยนความละเอียดวิดีโอและบิตเรตเป้าหมายเพื่อลดขนาดไฟล์ของคุณ สุดท้ายให้กดหรือคลิกปุ่ม Export เพื่อบันทึกไฟล์วิดีโอ.

ส่วนที่ 2 โบนัส: วิธีบีบอัดเสียงในรอบปฐมทัศน์
คุณสมบัติอีกอย่างของ Adobe Premiere Pro คือการบีบอัดไฟล์เสียงในระบบ มันมาพร้อมกับเครื่องผสมเสียง ฟังก์ชั่นการบีบอัด และตัวแปลงสัญญาณเพื่อลดขนาดไฟล์ของไฟล์เสียงของคุณ คุณสามารถตรวจสอบวิธีการที่ระบุไว้ใต้คำอธิบายสั้นๆ นี้เพื่อเรียนรู้วิธีการบีบอัดเสียง Premiere Pro
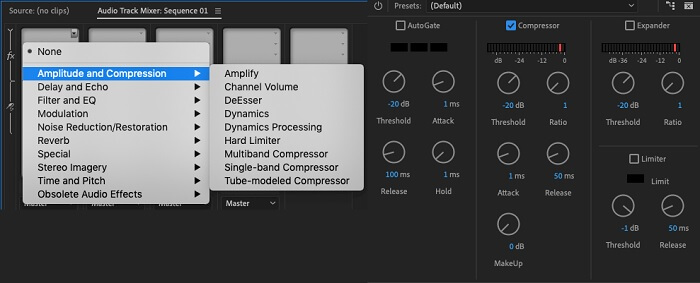
ขั้นตอนที่ 1. เมื่อต้องการบีบอัดเสียงในโปรแกรมตัดต่อวิดีโอ Premiere ให้เลือกคลิปเสียงในพาเนลไทม์ไลน์ที่อยู่ด้านล่างของเครื่องมือ จากนั้นไปที่แท็บหรือพาเนล Effects และค้นหาเอฟเฟ็กต์ Loudness Radar แล้วลากและวางเอฟเฟ็กต์นี้ลงบนคลิปเสียง.
ขั้นตอนที่ 2. ในพาเนล Effect Controls ให้ปรับค่า Target Loudness ไปยังระดับที่คุณต้องการ ฟีเจอร์นี้จะกำหนดระดับความดังโดยรวมของคลิป ช่วงค่าที่แคบลงจะทำให้เกิดการบีบอัดมากขึ้น ในขณะที่ช่วงที่กว้างขึ้นจะทำให้การบีบอัดน้อยลง.
ขั้นตอนที่ 3. เพื่อปรับการบีบอัดให้ละเอียดมากขึ้น ให้ใช้การควบคุม Threshold และ Ratio ค่า Threshold จะกำหนดจุดที่เสียงจะเริ่มถูกบีบอัด ส่วนค่า Ratio จะกำหนดปริมาณการบีบอัดที่ใช้กับเสียง.
ขั้นตอนที่ 4. เมื่อตั้งค่าต่าง ๆ ได้ตามที่คุณต้องการแล้ว ให้ลองพรีวิวคลิปเสียงเพื่อให้แน่ใจว่าเสียงฟังดูสมดุลและเป็นธรรมชาติ สุดท้าย ส่งออกไฟล์เสียงที่ถูกบีบอัดโดยไปที่เมนู File แล้วเลือกปุ่ม Export จากนั้นไปที่แท็บ Media เลือกการตั้งค่าสendออกตามต้องการ แล้วคลิก Export เพื่อบันทึกไฟล์เสียงที่บีบอัดแล้ว.
ส่วนที่ 3 ทางเลือกที่ดีที่สุดสำหรับรอบปฐมทัศน์สำหรับการบีบอัดวิดีโอและเสียง
1. Video Converter Ultimate
เมื่อ Adobe Premiere Pro ไม่สามารถบีบอัดไฟล์วิดีโอและเสียงให้ได้ขนาดตามที่คุณต้องการ ให้ใช้โปรแกรม Video Converter Ultimate แอปพลิเคชันนี้มีฟีเจอร์จำนวนมากที่ผู้ใช้สามารถนำไปใช้เพื่อลดขนาดไฟล์คลิปวิดีโอ ด้วยอัลกอริทึมหรือเทคโนโลยีเร่งความเร็วขั้นสูง เครื่องมือนี้สามารถบีบอัดไฟล์วิดีโอได้มากกว่าตัวบีบอัดวิดีโอทั่วไปถึง 30 เท่า นอกจากนี้ยังมีแถบเลื่อนที่ให้ผู้ใช้เลื่อนเพื่อลดขนาดไฟล์วิดีโอเป็นเปอร์เซ็นต์ตามต้องการได้.
อีกวิธีหนึ่งในการลดไฟล์เสียงและวิดีโอในแอปพลิเคชั่นนี้คือการเปลี่ยนรูปแบบคุณภาพ ความละเอียด และบิตเรตของไฟล์ คุณสมบัติโบนัสยังมาพร้อมกับโปรแกรมแก้ไขข้อมูลเมตาที่ผู้ใช้สามารถเปลี่ยนชื่อไฟล์นอกเหนือจากวิดีโอต้นฉบับ โปรดตรวจสอบคู่มือผู้ใช้ด้านล่าง
ขั้นตอนที่ 1: ดาวน์โหลด Video Converter Ultimate
ขั้นตอนเริ่มต้นในการบีบอัดวิดีโอด้วย Video Converter Ultimate คือการติดตั้งแอปลงในคอมพิวเตอร์ของคุณ คุณสามารถกดไอคอน Free Download ด้านล่างเพื่อดาวน์โหลดไฟล์ติดตั้ง จากนั้นรันไฟล์บนคอมพิวเตอร์เพื่อติดตั้งแอป และเปิดใช้งานเมื่อการติดตั้งเสร็จสิ้น.
ดาวน์โหลดฟรีสำหรับ Windows 7 ขึ้นไปดาวน์โหลดอย่างปลอดภัย
ดาวน์โหลดฟรีสำหรับ MacOS 10.7 หรือใหม่กว่าดาวน์โหลดอย่างปลอดภัย
ขั้นตอนที่ 2: เข้าถึงฟังก์ชัน Video Compressor
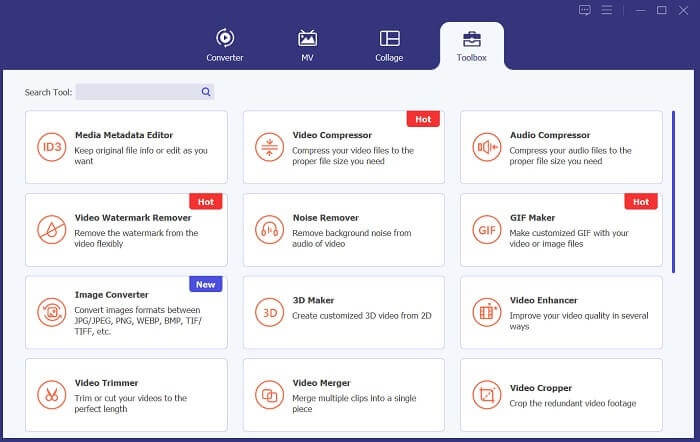
เมื่อคุณเปิดใช้งาน Video Converter Ultimate บนคอมพิวเตอร์แล้ว ให้ไปที่ตัวเลือก Toolbox จากนั้นค้นหาตัวเลือก Video Compressor และเปิดใช้งานฟังก์ชันนี้ นำเข้าไฟล์ของคุณโดยคลิกไอคอน + บนอินเทอร์เฟซ.
ขั้นตอนที่ 3: บีบอัดไฟล์วิดีโอ
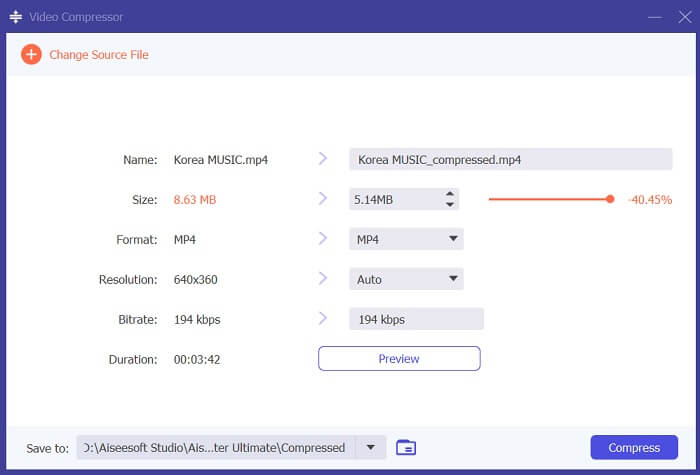
สุดท้าย ให้ปรับแต่งพารามิเตอร์วิดีโอบางอย่างเพื่อบีบอัดไฟล์วิดีโอของคุณ เลื่อนตัวปรับที่อยู่ด้านขวาของขนาดไฟล์ หรือใช้วิธีอื่น ๆ เช่น การเปลี่ยนความละเอียด รูปแบบไฟล์ และบิตเรต จากนั้นกดตัวเลือก Compress เพื่อบันทึกและลดขนาดไฟล์วิดีโอบนคอมพิวเตอร์ของคุณ.
2. โปรแกรมบีบอัดวิดีโอ FVC ออนไลน์
เราเข้าใจว่า บางครั้งคุณอาจไม่ต้องการใช้เครื่องมือที่มีฟังก์ชันมากมายเพื่อแค่บีบอัดไฟล์วิดีโอ การติดตั้งซอฟต์แวร์หลายตัวอาจไม่ใช่แนวทางของคุณ นี่จึงเป็นเหตุผลที่เราแนะนำ FVC Video Compressor Online แอปพลิเคชันบนเว็บนี้มีขั้นตอนการบีบอัดไฟล์วิดีโอที่ตรงไปตรงมา ช่วยให้ผู้ใช้บีบอัดและลดขนาดไฟล์วิดีโอที่มีความละเอียด 4K, HD และอื่น ๆ ได้ โดยไม่ทำให้คุณภาพวิดีโอลดลง ไม่ว่าจะเป็นไฟล์ 4K คุณก็ยังสามารถลดขนาดได้ ยิ่งไปกว่านั้นในแง่ของความยืดหยุ่น เครื่องมือนี้ถือว่าโดดเด่น คุณสามารถบีบอัดวิดีโอได้หลายรูปแบบไฟล์ เช่น MP4, FLV, MKV, MOV, AVI, WebM, 3GP, RMVB และอื่น ๆ อีกมากมาย ดูคู่มือแบบสมบูรณ์เกี่ยวกับการบีบอัดไฟล์วิดีโอตามด้านล่างนี้.
ขั้นตอนที่ 1: เข้าถึงเครื่องมือ
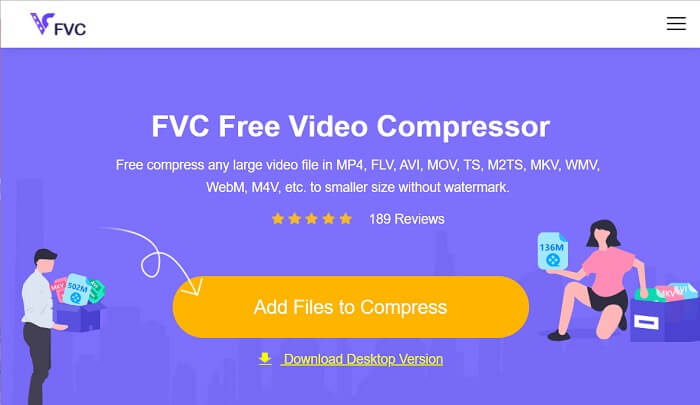
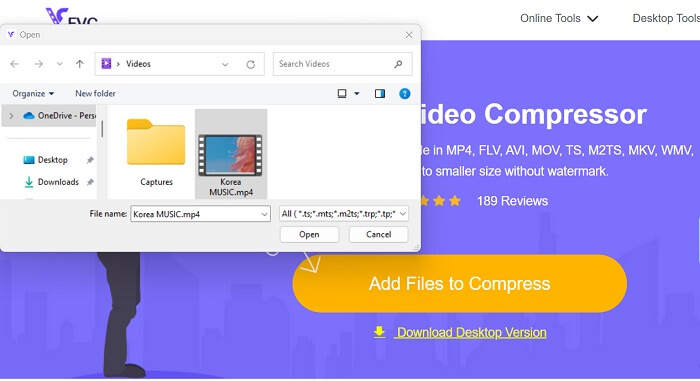
การเข้าถึงเครื่องมือผ่านเว็บเบราว์เซอร์คือวิธีเริ่มต้นในการบีบอัดวิดีโอออนไลน์ คุณสามารถใช้ Chrome, Firefox, Microsoft Edge, Safari และเบราว์เซอร์อื่น ๆ เพื่อค้นหาเครื่องมือนี้ เปิดใช้งานเครื่องมือบนเบราว์เซอร์ของคุณ แล้วกด Add Files to Compress เพื่อติดตั้งตัวเรียกใช้งาน (launcher) ขั้นตอนนี้สำหรับผู้ใช้ครั้งแรกเท่านั้น หากคุณมีตัวเรียกใช้งานของแอปออนไลน์แล้ว ให้ข้ามไปขั้นตอนถัดไป.
ขั้นตอนที่ 2: นำเข้าไฟล์ลงในแอป
กด Add Files to Compress เพื่อเปิดโฟลเดอร์บนอุปกรณ์ของคุณ จากนั้นค้นหาวิดีโอที่ต้องการบีบอัดและกด Open เพื่อนำเข้าไฟล์เข้ามายังเครื่องมือออนไลน์ กรุณารอจนกว่าเครื่องมือบนเว็บจะวิเคราะห์ไฟล์ของคุณเสร็จ.
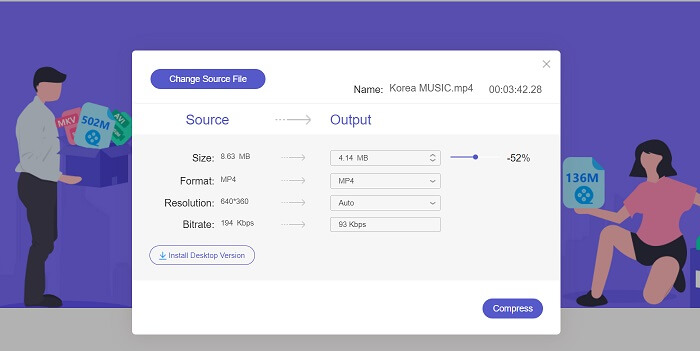
ขั้นตอนที่ 3: บีบอัดและส่งออกไฟล์
สุดท้าย คุณจำเป็นต้องปรับ แก้ไข และเปลี่ยนพารามิเตอร์วิดีโอต่าง ๆ เพื่อให้ขนาดไฟล์ในอุปกรณ์ของคุณลดลง นอกจากนี้คุณยังสามารถเลื่อนตัวปรับเปอร์เซ็นต์เพื่อลดขนาดวิดีโอตามเปอร์เซ็นต์ที่ต้องการ คลิกปุ่ม Compress เพื่อเริ่มกระบวนการและส่งออกไฟล์ที่ถูกบีบอัดแล้ว.
อ่านเพิ่มเติม:
2 วิธีบีบอัดวิดีโอสำหรับ YouTube
วิธีที่พิสูจน์แล้วสำหรับการสร้างวิดีโอสโลว์โมชั่นใน Adobe Premiere
ส่วนที่ 4. คำถามที่พบบ่อยเกี่ยวกับ Adobe Premiere Pro
ฉันจะเปลี่ยนขนาดของวิดีโอใน Premiere Pro ได้อย่างไร
เพื่อบีบอัดวิดีโอใน Premiere คุณสามารถใช้ฟีเจอร์ Export Settings ได้ ให้เลือกไฟล์หรือตัดวิดีโอในไทม์ไลน์ แล้วไปที่ File > Export > Media จากนั้นคุณสามารถปรับการตั้งค่าต่าง ๆ เพื่อบีบอัดวิดีโอโดยยังคงคุณภาพไว้ได้ นอกจากนี้ หากต้องการเปลี่ยนขนาดของวิดีโอใน Premiere Pro ให้เลือกคลิปในพาเนลไทม์ไลน์ แล้วไปที่พาเนล Effect Controls จากนั้นปรับพารามิเตอร์ Scale เพื่อเพิ่มหรือลดขนาดไฟล์วิดีโอ.
การบีบอัดวิดีโอคืออะไร?
การบีบอัดวิดีโอเป็นกระบวนการลดหรือจำกัดขนาดไฟล์ของวิดีโอโดยยังคงรักษาคุณภาพเอาต์พุตไว้ให้มากที่สุด กระบวนการนี้เหมาะกับผู้ใช้ที่ต้องการแชร์ ดาวน์โหลด อัพโหลด และจัดเก็บไฟล์ได้อย่างรวดเร็วและสะดวก
ทำไมต้องบีบอัดวิดีโอ?
การบีบอัดวิดีโอช่วยให้แชร์และอัปโหลดได้ง่ายขึ้น รวมถึงประหยัดพื้นที่จัดเก็บข้อมูลบนอุปกรณ์ของคุณ คุณสมบัติการตัดต่อวิดีโอนี้เป็นตัวเลือกที่ต้องมีเมื่อดาวน์โหลดซอฟต์แวร์ตัดต่อวิดีโอ
การบีบอัดวิดีโอจะส่งผลต่อคุณภาพหรือไม่
ใช่ การบีบอัดวิดีโออาจส่งผลต่อคุณภาพของวิดีโอ การทดสอบและดูตัวอย่างการเปลี่ยนแปลงก่อนที่จะสรุปผลถือเป็นสิ่งสำคัญเพื่อให้แน่ใจว่าวิดีโอยังคงดูดีหลังจากการบีบอัด
สรุป
การบีบอัดวิดีโอเป็นกระบวนการที่ผู้ที่ชื่นชอบงานวิดีโอส่วนใหญ่ควรเรียนรู้ ไม่เพียงแต่ช่วยประหยัดพื้นที่จัดเก็บไฟล์ของคุณเท่านั้น แต่ยังช่วยให้คุณแชร์ อัปโหลด และดาวน์โหลดวิดีโอได้ง่ายขึ้นด้วย มีตัวเลือกที่หลากหลายสำหรับการบีบอัดไฟล์วิดีโอ หนึ่งในแอปที่เป็นที่รู้จักมากที่สุดคือ Adobe Premiere Pro วิธีแก้ปัญหาที่เราได้รวบรวมเกี่ยวกับ วิธีบีบอัดเสียงใน Premiere จะช่วยคุณจัดการไฟล์ได้อย่างดี หากคุณต้องการข้อมูลเพิ่มเติมเกี่ยวกับหัวข้อนี้ โปรดแสดงความคิดเห็นด้านล่าง.
-
 วิธีที่รวดเร็วและง่ายดายในการซิงค์เสียงและวิดีโอใน Adobe Premiere Pro
 ต้องการทราบวิธีซิงค์เสียงและวิดีโอใน Premiere Pro หรือไม่? บทความนี้จะเหมาะกับความต้องการของคุณ ขณะที่เราลองด้วยตัวเองด้วยขั้นตอนจริงและเรียบง่าย
-
 วิธีเพิ่มความเร็ววิดีโอใน Premiere Pro และทางเลือกอื่น
 คุณต้องการทราบวิธีใช้ Premiere Pro เพื่อเพิ่มความเร็ววิดีโอหรือไม่? ถ้าอย่างนั้นคุณก็มาถูกบทความแล้ว เพราะเรามีขั้นตอนและทางเลือกอื่นๆ ในราคาที่เอื้อมถึง
-
 วิธีที่เร็วที่สุดในการลบโลโก้ออกจากวิดีโอใน Adobe Premiere Pro
 ลองใช้วิธีที่ง่ายและรวดเร็วที่สุดในการลบโลโก้ออกจากวิดีโอใน Adobe Premiere Pro บทความนี้จะเสนอวิธีที่ดีที่สุดที่คุณสามารถลองใช้อุปกรณ์ได้