


วิธีการตัดแต่งเสียงใน iMovie: บทช่วยสอนสำหรับ iPhone และ Mac
iMovie เป็นซอฟต์แวร์ตัดต่อวิดีโอและเสียงฟรีสำหรับ iPhone และ Mac ที่พัฒนาโดย Apple ช่วยให้ผู้ใช้ตัดต่อและสร้างโปรเจกต์มีเดียได้อย่างต่อเนื่อง เมื่อต้องการวิธีการตัด ตัดส่วนเกิน และตัดออกเฉพาะบางช่วงของไฟล์เสียง iMovie ก็เป็นซอฟต์แวร์ที่เหมาะสำหรับผู้ใช้ Apple หลายคนอาจยังไม่รู้ว่า iMovie สามารถใช้ตัดและครอบตัดเสียงได้ด้วย ดังนั้นการทำตามคู่มือนี้จะช่วยให้ผู้ใช้เช่นคุณสามารถใช้งานฟีเจอร์ การตัดเสียงใน iMovie ได้อย่างราบรื่นและมีประสิทธิภาพ.

ส่วนที่ 1. วิธีการตัดเสียงใน iMovie
ไอโฟน
การตัดแต่งเพลงใน iMovie โดยใช้ iPhone นั้นง่ายกว่าการใช้ Mac iMovie เวอร์ชันมือถือมีน้ำหนักเบาและใช้งานง่าย ช่วยให้กระบวนการตัดไฟล์เสียงทำได้อย่างราบรื่นด้วยการแตะเพียงไม่กี่ครั้งในแอปมือถือ แม้ว่าจะใช้งานง่ายกว่าเวอร์ชัน Mac แต่ก็มีฟีเจอร์ที่จำกัดในการตัดต่อวิดีโอและเสียง
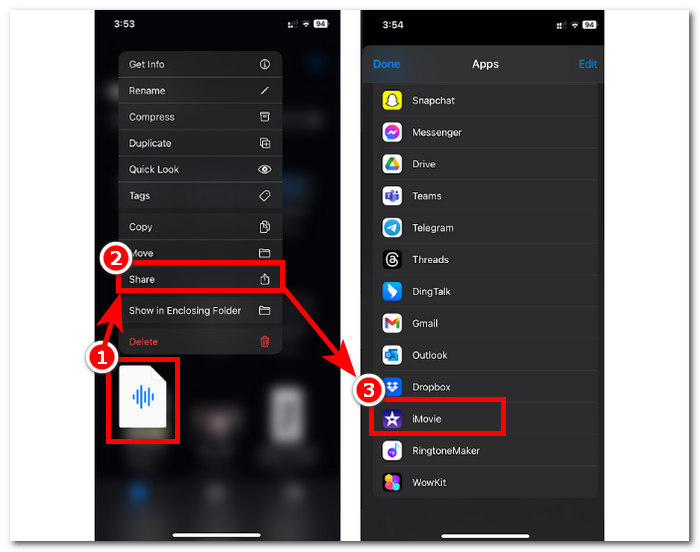
ขั้นตอนที่ 1 ไปที่แอป ไฟล์ (Files) กดค้างที่ไฟล์เสียงที่คุณต้องการตัด เลือก แชร์ (Share) แล้วเปิดไฟล์นั้นด้วยแอป iMovie หากคุณต้องการตัดเสียงจากการอัด ให้บันทึกเสียงใน iMovie ก่อน.

ขั้นตอนที่ 2 เมื่อต้องการครอบตัดไฟล์เสียงของคุณ ให้ไปที่จุดเริ่มต้นและจุดสิ้นสุดของไฟล์เสียงในไทม์ไลน์ คุณจะเห็นแถบสำหรับการครอบตัดอยู่ทั้งสองด้าน เพียงลากแถบครอบตัดไปทางซ้ายและขวาจนกว่าคุณจะพอใจกับช่วงเสียงที่ต้องการเก็บไว้ เสร็จแล้วให้แตะปุ่ม เสร็จสิ้น (Done) ด้านบนเพื่อดำเนินการต่อ.
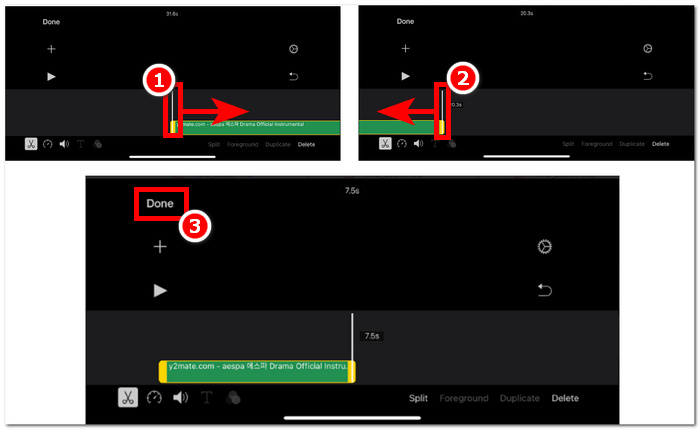
ขั้นตอนที่ 3 สุดท้ายแตะไอคอน แชร์ (Share) ที่บริเวณกึ่งกลางด้านล่างของแอป แล้วดำเนินการบันทึกไฟล์.

Mac
วิธีการตัดแต่งเพลงใน iMovie? ผู้ใช้มีตัวเลือกในการตัดแต่งคลิปเสียงโดยใช้ iMovie บนอุปกรณ์ Mac ของตน การใช้ iMovie เวอร์ชัน Mac เพื่อตัดแต่งไฟล์เสียงช่วยให้ผู้ใช้สามารถเข้าถึงคุณสมบัติการแก้ไขเสียงต่างๆ ได้ เช่น การใช้โปรแกรมตัดแต่งคลิป ซึ่งไม่มีให้ในเวอร์ชันมือถือ โปรแกรมตัดแต่งคลิปนี้ช่วยให้ลากแถบตัดแต่งจากด้านซ้ายและขวาได้อย่างราบรื่นเพื่อสร้างการตัดแต่งทันที หากต้องการทำอย่างมีประสิทธิภาพ คุณต้องทำตามขั้นตอนต่อไปนี้
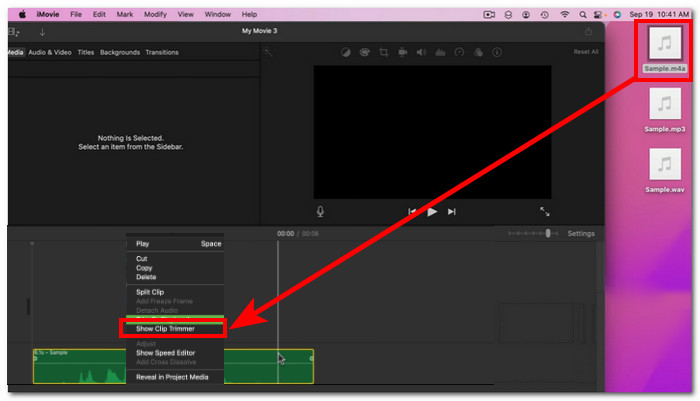
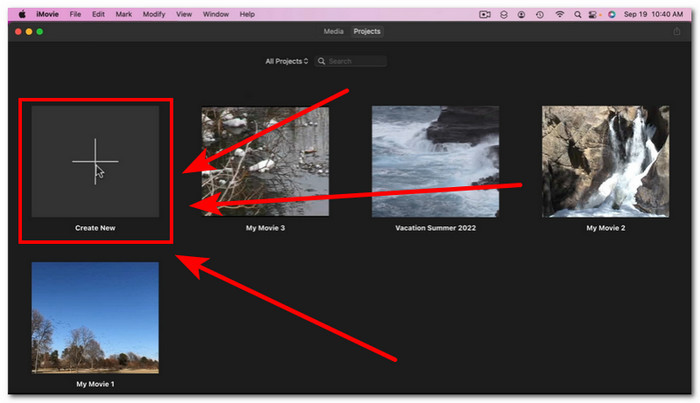
ขั้นตอนที่ 1 เปิดซอฟต์แวร์ iMovie บน Mac ของคุณ แล้วเพิ่มไฟล์เสียง หรือลากไฟล์เสียงลงไปยังไทม์ไลน์ของโปรแกรม.

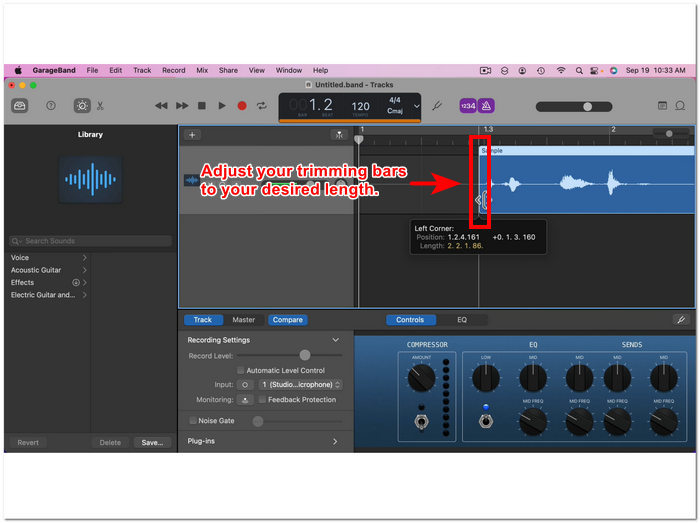
ขั้นตอนที่ 2 เมื่อไฟล์ถูกโหลดเข้าในโปรแกรมแล้ว ให้คลิกขวาที่ไฟล์เสียงของคุณ จากนั้นคลิกเมนู Show Clip Trimmer.
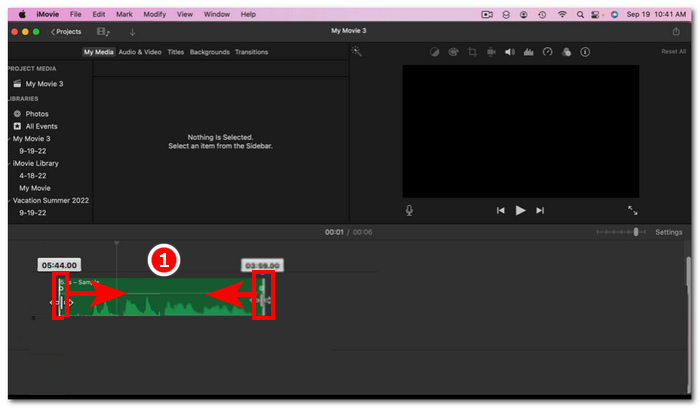
ขั้นตอนที่ 3 เมื่อคลิกแล้ว ให้ลากแถบครอบตัดที่อยู่ปลายทั้งสองด้านของไฟล์เสียง เพื่อครอบตัดเสียงตามต้องการ.
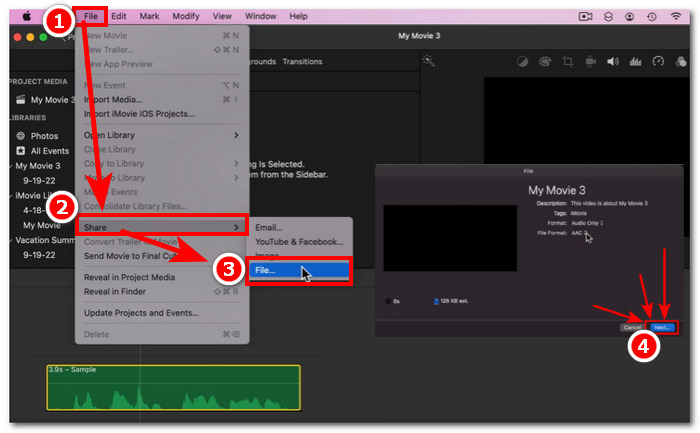
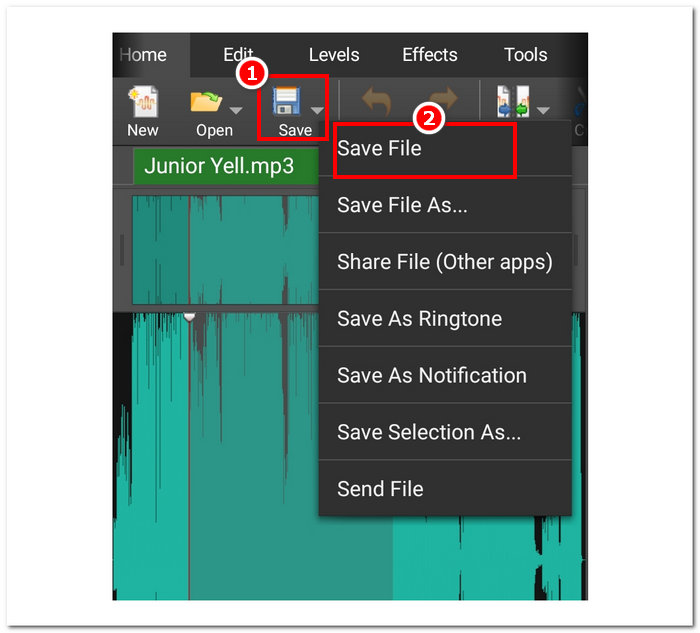
ขั้นตอนที่ 4 เมื่อครอบตัดเรียบร้อยแล้ว คุณสามารถบันทึกไฟล์ได้โดยคลิกที่เมนู File บริเวณมุมซ้ายบนของโปรแกรม แล้วทำตามเส้นทางนี้: File > Share > File > Next เพื่อบันทึกลงใน Mac ของคุณ iMovie ใช้งานได้เฉพาะบนคอมพิวเตอร์ Mac เท่านั้น.
หากคุณต้องการใช้ iMovie บน Windows ที่มีฟีเจอร์ตัดและครอบตัดแบบนี้ด้วย สามารถตรวจสอบได้ที่นี่.
ส่วนที่ 2 วิธีการตัดส่วนเสียงออกใน iMovie
ไอโฟน
คุณจะตัดเพลงใน iMovie ได้อย่างไร? ในการตัดส่วนใดส่วนหนึ่งในเพลงหรือเสียงโดยใช้ iMovie บน iPhone ทำได้โดยไปที่ส่วนที่ต้องการลบหรือตัดออกในไทม์ไลน์ จากนั้นลบส่วนนั้นโดยใช้ปุ่มลบเฉพาะเพื่อลบส่วนต่างๆ ในไทม์ไลน์ได้อย่างง่ายดาย
ขั้นตอนที่ 1 เมื่อต้องการครอบตัดไฟล์เสียง ให้กดค้างบนไฟล์ในแอป ไฟล์ (Files) จากนั้นแตะปุ่ม แชร์ (Share) แล้วเลือกแอป iMovie เพื่อเปิดไฟล์ในแอป.
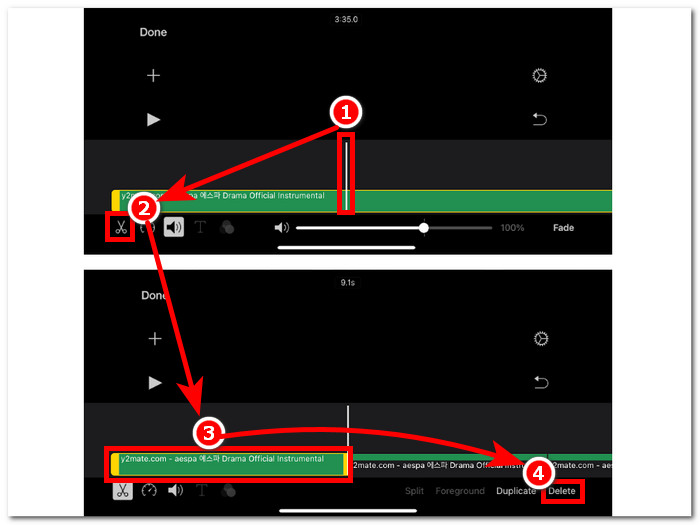
ขั้นตอนที่ 2 ไปยังส่วนที่คุณต้องการตัดไฟล์เสียง จากนั้นแตะไอคอนกรรไกรบริเวณมุมล่างซ้ายของหน้าจอเพื่อแยกไฟล์ออกเป็นสองส่วน ตอนนี้คุณจะมีสองคลิปอยู่ในไทม์ไลน์ เลือกส่วนที่คุณไม่ต้องการ แล้วแตะปุ่ม ลบ (Delete) เพื่อตัดส่วนนั้นออก.
ขั้นตอนที่ 3 เมื่อคุณลบทุกส่วนที่ไม่ต้องการออกจากไฟล์เสียงแล้ว ให้แตะปุ่ม เสร็จสิ้น (Done) ที่มุมซ้ายบนของหน้าจอ.
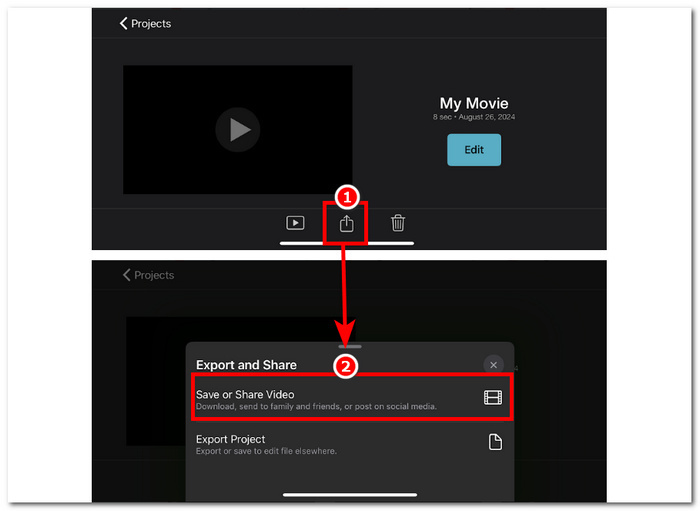
ขั้นตอนที่ 4 บันทึกไฟล์ของคุณโดยแตะไอคอน แชร์ (Share) จากนั้นแตะ Save or Share Video.
Mac
การตัดบางส่วนของไฟล์เสียงออกโดยใช้ iMovie นั้นง่ายมาก เนื่องจากต้องอาศัยฟังก์ชันพื้นฐานของเครื่องมือ ได้แก่ การรวมฟีเจอร์ Split Clip เข้ากับการลบ ด้านล่างนี้เป็นวิธีที่ง่ายที่สุดในการดำเนินการ
ขั้นตอนที่ 1 เปิด iMovie บน Mac ของคุณ แล้วคลิกปุ่ม + เพื่อเปิดไฟล์เสียงที่คุณต้องการตัดบางส่วนออก.
ขั้นตอนที่ 2 เมื่อไฟล์เสียงของคุณอยู่ในโปรแกรมแล้ว ให้ไปยังส่วนของเสียงที่คุณต้องการตัด คลิกขวา แล้วเลือก Split Clip.
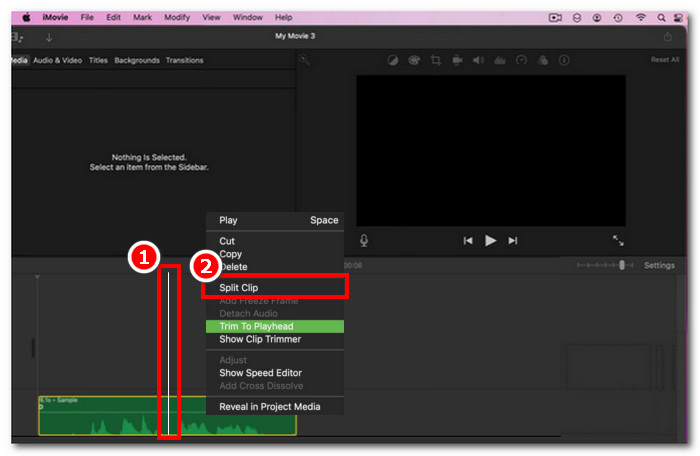
ขั้นตอนที่ 3 เมื่อไฟล์เสียงถูกแยกออกจากกันแล้ว ให้ลบหรือตัดส่วนที่คุณไม่ต้องการ โดยคลิกขวาที่คลิปส่วนนั้นแล้วเลือก Delete.
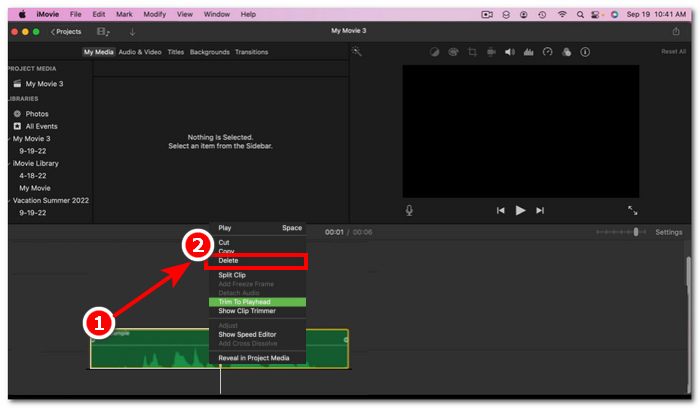
ขั้นตอนที่ 4 จากนั้นเมื่อคุณได้ตัดส่วนที่ไม่ต้องการออกจากเสียงเรียบร้อยแล้ว ให้บันทึกไฟล์โดยคลิกที่ File > Share > File แล้วคลิก Next เพื่อบันทึกลงใน Mac ของคุณ.
ส่วนที่ 3. ทางเลือก iMovie ที่ดีที่สุดสำหรับการตัดเสียง
แม้ว่า iMovie จะใช้งานได้ดีสำหรับการตัดหรือครอบตัดไฟล์เสียง แต่เรายังมีซอฟต์แวร์ทางเลือกที่ดีกว่าในกรณีที่คุณพบปัญหา บั๊ก หรือ iMovie ใช้งานไม่ได้ FVC ได้คัดเลือก Video Converter Ultimate มาเป็นเครื่องมือที่เหมาะสม ไม่เพียงใช้เป็นตัวตัดหรือตัวครอบตัดเสียงเท่านั้น แต่ยังตัดต่อวิดีโอได้เช่นเดียวกับ iMovie นอกจากนี้ยังมีฟีเจอร์การตัดต่อ ปรับแต่งเสียง และเลือกปรับรูปแบบไฟล์เอาต์พุตได้ ดังนั้นจึงทำได้มากกว่าการตัดหรือตัดต่อเสียงพื้นฐานเหมือนซอฟต์แวร์อื่น ๆ เพราะมีความเร็วในการประมวลผลที่เหนือกว่า พร้อมรักษาคุณภาพเสียงแบบไม่สูญเสียรายละเอียด.
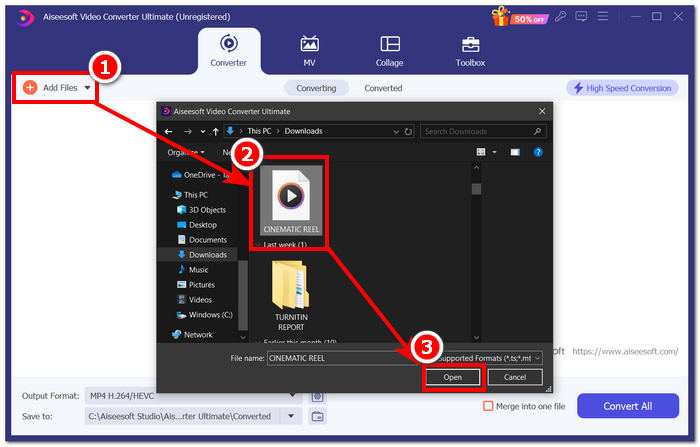
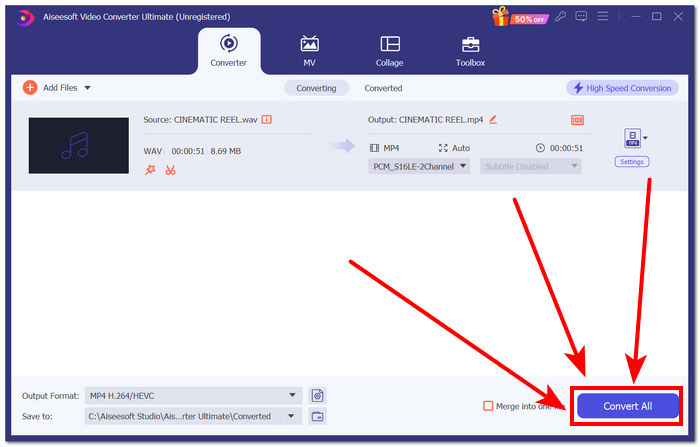
ขั้นตอนที่ 1 บนคอมพิวเตอร์ของคุณ ให้ดาวน์โหลดและเปิดซอฟต์แวร์ Video Converter Ultimate ที่คัดเลือกโดย FVC บนหน้าอินเทอร์เฟซของโปรแกรม คลิก เพิ่มไฟล์ (Add Files) เพื่อโหลดไฟล์เสียงที่คุณต้องการตัดหรือครอบตัดบางส่วน.
ดาวน์โหลดฟรีสำหรับ Windows 7 หรือใหม่กว่าดาวน์โหลดอย่างปลอดภัย
ดาวน์โหลดฟรีสำหรับ MacOS 10.7 หรือใหม่กว่าดาวน์โหลดอย่างปลอดภัย
ขั้นตอนที่ 2 คลิกไอคอน กรรไกร เพื่อเข้าสู่ฟีเจอร์ตัดและครอบตัดของโปรแกรม.
ขั้นตอนที่ 3 เมื่อต้องการตัดหรือครอบตัดไฟล์เสียงโดยใช้ฟีเจอร์ของโปรแกรม เพียงเลื่อนแถบครอบตัดไปยังส่วนที่คุณต้องการเก็บไว้.
ชิ้นส่วนที่อยู่นอกแถบตัดแต่งคือชิ้นส่วนที่คุณจะต้องถอดออกเพื่อตัดไฟล์เสียงให้สั้นลง
ขั้นตอนที่ 4 สุดท้ายเมื่อต้องการบันทึกไฟล์เสียงใหม่ที่สั้นลง ให้คลิกปุ่ม Convert All เพื่อบันทึกการเปลี่ยนแปลง และให้ไฟล์ถูกบันทึกลงในโฟลเดอร์ที่กำหนดบนคอมพิวเตอร์ของคุณ.
ส่วนที่ 4 คำถามที่พบบ่อยเกี่ยวกับวิธีการตัดเสียงใน iMovie
คุณเลือกส่วนเสียงใน iMovie ได้อย่างไร?
เมื่อคุณแบ่งไฟล์เสียงออกเป็นหลายส่วนแล้ว คุณสามารถเลือกส่วนที่ต้องการได้โดยการแตะหรือคลิกที่ส่วนที่ต้องการของเสียงที่อยู่ในไทม์ไลน์ของคุณ เมื่อส่วนที่คุณเลือกมีขอบสีเหลืองล้อมรอบ แสดงว่าคุณได้เลือกส่วนนั้นแล้ว
เหตุใด iMovie จึงตัดเสียงของฉัน?
หาก iMovie ตัดส่วนหนึ่งของวิดีโอของคุณออกอย่างกะทันหัน นั่นอาจบ่งบอกว่าความยาวของเสียงของคุณเกินความยาวสูงสุดของ iMovie ในขณะที่เขียนคู่มือนี้ ความยาวสูงสุดของเสียงที่ผู้ใช้สามารถนำเข้าในซอฟต์แวร์ iMovie ได้คือ 1 ชั่วโมง 10 นาที
คุณสามารถตัดแต่งเสียงใน Quicktime ได้หรือไม่?
ใช่ ผู้ใช้สามารถตัดแต่งไฟล์เสียงโดยใช้ QuickTime โดยการโหลดไฟล์เสียงลงในเครื่องเล่น คลิกที่เมนูแก้ไขในส่วนบนของอินเทอร์เฟซเครื่องเล่น และดำเนินการต่อด้วยส่วนตัดแต่ง
สรุป
การสร้างการตัดแต่งและตัดส่วนต่างๆ ในไฟล์เสียงนั้นทำได้ง่ายและสะดวกด้วยซอฟต์แวร์ iMovie ของ Apple แม้ว่าจะรู้จักกันดีในด้านซอฟต์แวร์ตัดต่อวิดีโอ แต่ก็สามารถจัดการงานตัดต่อเสียง เช่น การตัดแต่งและตัดวิดีโอได้โดยไม่มีปัญหา แน่นอนว่าผู้ใช้ iOS และ macOS สามารถทราบวิธีใช้ประโยชน์จากฟีเจอร์ต่างๆ ของ iMovie ในงานตัดต่อเสียงได้อย่างเต็มที่ อย่างไรก็ตาม ควรทราบว่าหากซอฟต์แวร์มีปัญหาในอนาคต อย่าลืมใช้ Video Converter Ultimate ที่ FVC เลือกใช้
-
 วิธีบีบอัดไฟล์ MPEG-4 ออนไลน์ - ไม่ต้องดาวน์โหลดไม่มีลายน้ำ
 มีพื้นที่จัดเก็บไฟล์ไม่เพียงพอที่จะเก็บไฟล์ MPEG-4 ทั้งหมดของคุณใช่หรือไม่ ต่อไปนี้คือวิธีแก้ปัญหาบางอย่างที่สามารถช่วยให้คุณทำให้ไฟล์วิดีโอของคุณเล็กลงได้
-
 วิธีบีบอัดไฟล์ VOB ออนไลน์และฟรี [ไม่ดาวน์โหลด]
 คุณกำลังมองหาวิธีการบีบอัดไฟล์ VOB หรือไม่? เรียนรู้วิธีที่ดีที่สุดในการทำให้ขนาดไฟล์ VOB เล็กลงในบทความนี้
-
 วิธีบีบอัดไฟล์ OGV โดยไม่สูญเสียคุณภาพ
 ไม่สามารถส่งไฟล์ OGV ขนาดใหญ่ให้ผู้อื่นได้หรือไม่ บทความนี้จะแนะนำ 2 วิธีง่ายๆ ที่จะช่วยให้คุณบีบอัดไฟล์ OGV ได้อย่างง่ายดาย