


4 วิธีในการเฟดเพลงใน Audacity: คู่มือฉบับสมบูรณ์สำหรับผู้เริ่มต้น
Audacity เป็นเครื่องมือแก้ไขเสียงโอเพ่นซอร์สที่ยอดเยี่ยม โดยเฉพาะอย่างยิ่งหากคุณเป็นผู้ใช้ Windows, macOS หรือ Linux เครื่องมือนี้ช่วยให้ผู้ใช้สามารถเล่นเสียงของตนเองได้โดยการแก้ไข เพิ่มเอฟเฟกต์ และอื่นๆ หนึ่งในคุณสมบัติที่ดีที่สุดของเครื่องมือนี้คือความสามารถในการเฟดเพลงออก โดยผู้ใช้สามารถเฟดเสียงได้ 3 วิธี
ดังนั้น หากคุณเป็นคนหนึ่งที่สงสัยเรื่องนี้และอยากรู้ว่า Audacity ทำการเฟดเพลงให้เบาลงอย่างไร ลองอ่านบทความนี้ให้จบ คู่มือแบบครบถ้วนนี้จะสอนคุณเกี่ยวกับวิธีเฟดเข้า/เฟดออก 3 รูปแบบ และอีก 1 วิธีทางเลือก เพื่อช่วยให้คุณหาวิธีที่เหมาะที่สุดในการเพิ่มประสิทธิภาพงานเสียงของคุณได้.

ตอนที่ 1. เอฟเฟกต์ Fade-in และ Out ใน Audacity คืออะไร
Audacity มีวิธีเฟดเอาต์อยู่ 3 วิธี ได้แก่ Linear Fades, Studio Fades และ Crossfades แต่ละวิธีมีคุณลักษณะเฉพาะที่แตกต่างกันและเหมาะกับสถานการณ์การแก้ไขเสียงที่แตกต่างกัน
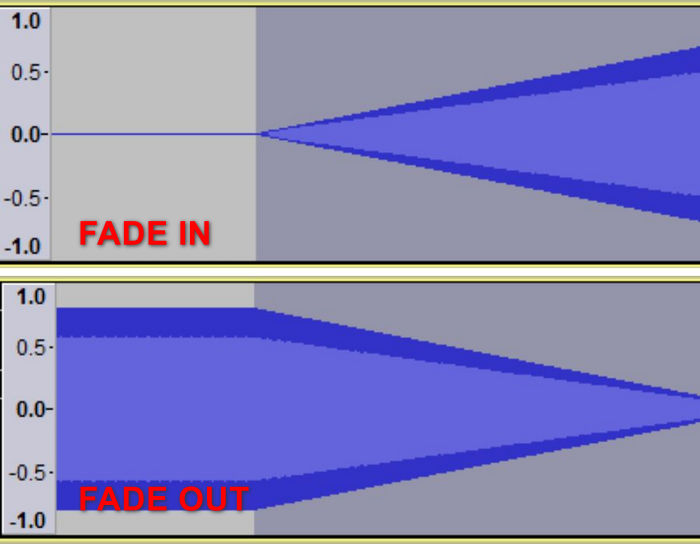
เฟดเชิงเส้น (Linear Fade)
วิธีการเฟดแบบเชิงเส้นจะเฟดเสียงจากความเงียบสนิทลงสู่ระดับเสียงเดิม หรือจากระดับเสียงเดิมลงสู่ระดับเสียงเงียบสนิท เมื่อดูในโหมดดูคลื่นเชิงเส้น การเฟดนี้จะปรากฏเป็นเส้นตรง ซึ่งบ่งชี้ความเร็วการเฟดคงที่ตลอดความยาวที่เลือก
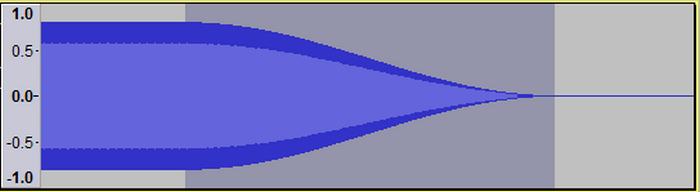
สตูดิโอเฟดเอาท์ (Studio Fade Out)
การเฟดเอาต์ในสตูดิโอจะสร้างการเฟดแบบนุ่มนวลและไพเราะจากระดับเสียงเดิมไปสู่ความเงียบโดยใช้เส้นโค้งรูปตัว S วิธีการนี้จะเฟดเอาต์ความถี่สูงได้เร็วกว่าความถี่ต่ำเล็กน้อย ทำให้เสียงมีเอฟเฟกต์ที่เป็นธรรมชาติและค่อยๆ ห่างออกไป ราวกับว่าเสียงกำลังเคลื่อนตัวออกไปในระยะไกล
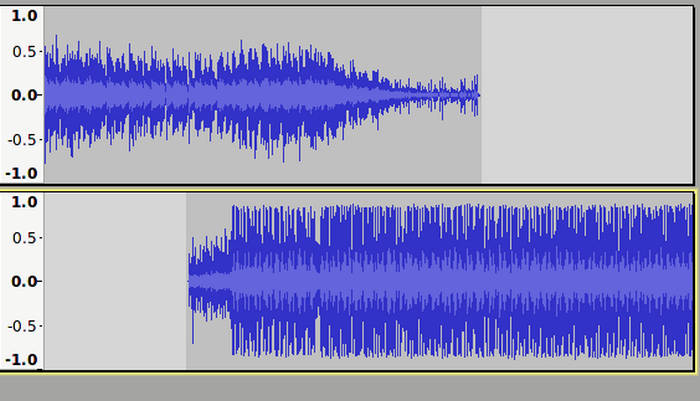
ครอสเฟด (Crossfade)
การเฟดแบบไขว้จะสร้างการเปลี่ยนผ่านที่ราบรื่นระหว่างส่วนเสียงสองส่วนด้วยการซ้อนทับกัน ส่วนหนึ่งจะเฟดออก ในขณะที่อีกส่วนจะเฟดเข้า ส่งผลให้การผสมผสานเป็นไปอย่างราบรื่นโดยไม่มีการเปลี่ยนแปลงกะทันหัน
ส่วนที่ 2. การเฟดเข้า/เฟดเสียงใน Audacity
การเฟดเสียงเข้าหรือออกอาจเกิดขึ้นได้ในหลายสถานการณ์ และอาจต้องใช้วิธีการที่แตกต่างกันเพื่อให้ได้เอฟเฟกต์ที่ต้องการ ไม่ว่าคุณจะต้องการการเปลี่ยนผ่านที่ราบรื่น การเฟดเสียงระดับมืออาชีพ หรือการปรับระดับเสียงแบบง่ายๆ Audacity ก็มีเทคนิคต่างๆ มากมายที่ตอบสนองความต้องการเฉพาะของคุณได้ ต่อไปนี้เป็น 3 วิธีในการเฟดเสียงเข้าหรือออกใน Audacity
เฟดเชิงเส้น
ขั้นตอนที่ 1 ก่อนอื่น คุณต้องคลิกเลือกแทร็กที่ต้องการทำเฟดเข้า/เฟดออก.
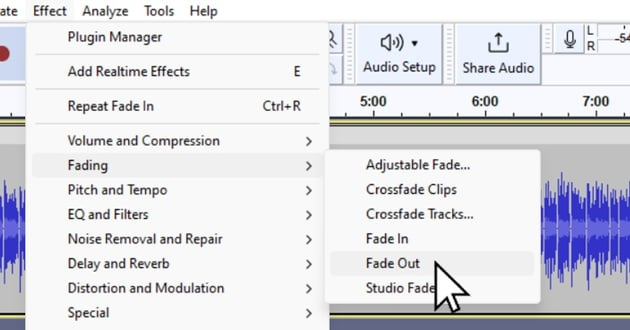
ขั้นตอนที่ 2 ไปที่เมนู Effect แล้วเลือก Fading.
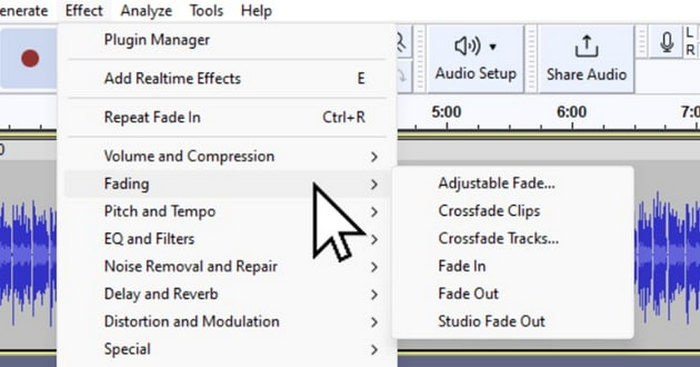
ขั้นตอนที่ 3 หากต้องการเฟดเข้าเสียงของคุณ ให้เลือก Fade In จากตัวเลือกการเฟด.
ขั้นตอนที่ 4 ในทางกลับกัน หากคุณต้องการเฟดออกเสียงของคุณ ให้เลือก Fade Out.
วิธีนี้ใช้สำหรับการเลือกเสียงสั้นๆ โดยทั่วไปจะใช้เวลาไม่เกินหนึ่งวินาที เพื่อให้เสียงต่างๆ ไหลลื่นขึ้น หากต้องการเอฟเฟกต์ที่เป็นดนตรีมากขึ้น ให้ใช้การเฟดเชิงเส้นหลายๆ ครั้งกับการเลือกเดียวกันเพื่อให้การเฟดแบบเอ็กซ์โพเนนเชียลใกล้เคียงกัน และสำหรับการเลือกที่ยาวนานขึ้น ให้ใช้การเฟดแบบค่อยเป็นค่อยไปและสม่ำเสมอจนถึงช่วงเงียบ
ครอสเฟด
ขั้นตอนที่ 1 ก่อนอื่น คุณต้องจัดแนวให้สองแทร็กตรงกัน.
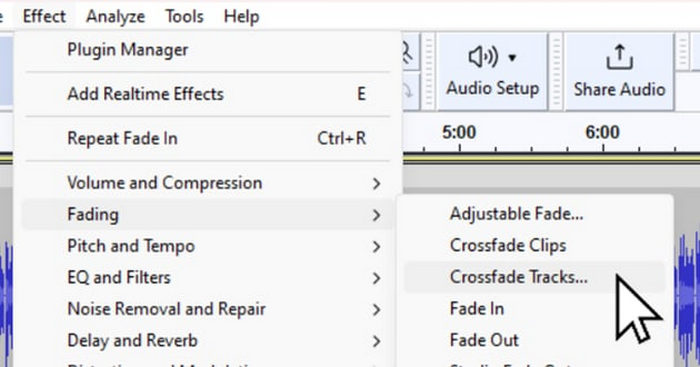
ขั้นตอนที่ 2 จากนั้นใช้เครื่องมือ Selection เพื่อเลือกบริเวณที่จะทำครอสเฟด คลิก Effect แล้วเลือก Crossfade Tracks ระบบจะทำการเฟดออกแทร็กด้านบนและเฟดเข้าแทร็กด้านล่างโดยอัตโนมัติในส่วนที่ซ้อนทับกัน.
วิธีนี้เหมาะอย่างยิ่งสำหรับการผสมผสานแทร็กเสียงต่างๆ ในโปรเจ็กต์ เพื่อให้มั่นใจถึงประสบการณ์การฟังที่ราบรื่นและต่อเนื่อง
สตูดิโอเฟด
ขั้นตอนที่ 1 เช่นเดียวกับการเฟดแบบเชิงเส้น ให้คลิกแทร็กที่คุณต้องการเฟดออก.
ขั้นตอนที่ 2 สุดท้ายไปที่เมนู Effect แล้วเลือก Studio Fade Out เพื่อใช้เอฟเฟ็กต์นี้.
โดยทั่วไปวิธีนี้จะใช้โดยสตูดิโออัดเสียงระดับมืออาชีพสำหรับแทร็กซีดีและแผ่นเสียงไวนิล โดยช่วยให้แทร็กมีความสมบูรณ์และเป็นธรรมชาติ
ส่วนที่ 3. การเฟดเสียงด้วยทางเลือกของ Audacity
หากคุณกำลังมองหาเครื่องมือทางเลือก เพราะรู้สึกว่าฟังก์ชันเฟดเอาท์ของ Audacity ใช้งานค่อนข้างซับซ้อนและต้องการระบบปฏิบัติการที่ทรงพลังแล้วละก็ Video Converter Ultimate ที่คัดสรรโดย FVC คือทางเลือกที่ดีที่สุด โปรแกรมแปลงวิดีโอและเสียงแบบครบวงจรนี้มีอินเทอร์เฟซที่ใช้งานง่ายและเป็นมิตรต่อผู้ใช้ ทำให้การทำเฟดเข้าและเฟดออกเสียงเป็นเรื่องสะดวกและมีประสิทธิภาพ นอกจากนี้ เครื่องมือนี้ยังรองรับรูปแบบเสียงหลากหลายประเภท ทำให้ปัญหาความเข้ากันได้ลดลงอย่างมาก.
วิธีใช้ทางเลือกของ Audacity เพื่อลดเสียง:
ขั้นตอนที่ 1 ให้ติดตั้งโปรแกรม Video Converter Ultimate บนอุปกรณ์คอมพิวเตอร์ของคุณ.
ดาวน์โหลดฟรีสำหรับ Windows 7 หรือใหม่กว่าดาวน์โหลดอย่างปลอดภัย
ดาวน์โหลดฟรีสำหรับ MacOS 10.7 หรือใหม่กว่าดาวน์โหลดอย่างปลอดภัย
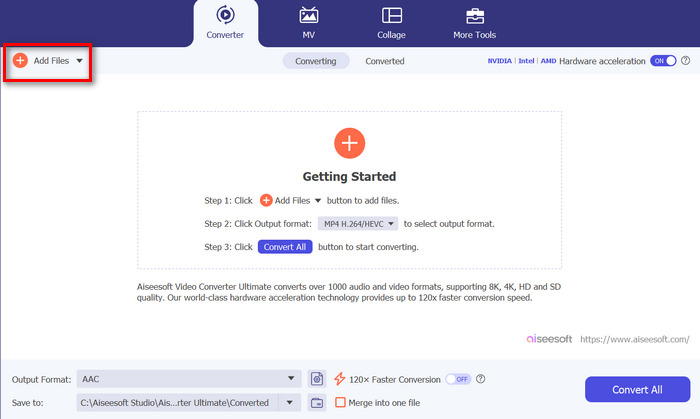
ขั้นตอนที่ 2 จากนั้นเพื่อเพิ่มไฟล์เสียงที่คุณต้องการแก้ไข ให้คลิกปุ่ม Add Files.
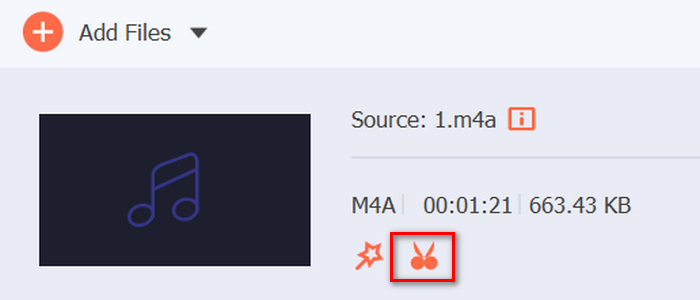
ขั้นตอนที่ 3 ตอนนี้ให้คลิกปุ่ม Cut ระบบจะพาคุณไปยังหน้าต่างอีกบานหนึ่งซึ่งคุณสามารถตั้งค่าเฟดเข้าและเฟดออกของไฟล์เสียงได้.
ขั้นตอนที่ 4 ทำเครื่องหมายในช่องตัวเลือก Fade In และ Fade Out แล้วตั้งค่าระยะเวลาของเอฟเฟ็กต์แต่ละแบบตามความต้องการของคุณ.
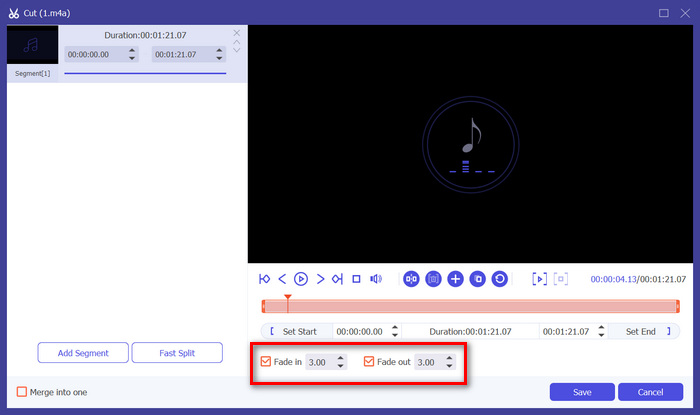
ขั้นตอนที่ 5 เมื่อตั้งค่าเรียบร้อยแล้ว คุณสามารถพรีวิวเสียงโดยการเล่นเพื่อเช็กว่าการเปลี่ยนแปลงที่ทำไปถูกต้องและตรงตามต้องการหรือไม่.
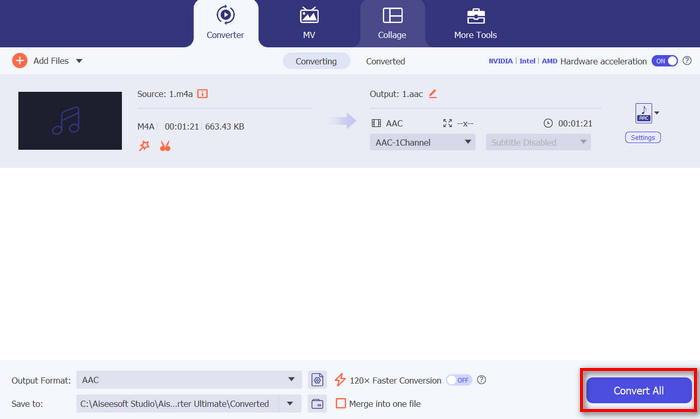
ขั้นตอนที่ 6 สุดท้ายคลิกปุ่ม Save ระบบจะพาคุณกลับไปยังหน้าหลัก จากนั้นคลิกปุ่ม Convert All เพื่อส่งออกไฟล์เสียง.
สิ่งที่ทำให้ Video Converter Ultimate ที่ FVC เลือกนี้เป็นทางเลือกที่ดีที่สุดสำหรับ Audacity ในการเฟดเอาต์หรือเฟดอินเสียงก็คือความง่ายในการใช้งานและประสิทธิภาพ ช่วยให้ผู้ใช้สามารถสร้างทรานซิชันเสียงที่ราบรื่นและเป็นมืออาชีพได้อย่างรวดเร็วโดยไม่ต้องใช้ซอฟต์แวร์ขั้นสูงที่ซับซ้อน ซึ่งทำให้เป็นตัวเลือกที่เชื่อถือได้และเป็นมิตรต่อผู้ใช้สำหรับใครก็ตามที่ต้องการปรับปรุงกระบวนการแก้ไขเสียงของตน นอกจากนี้ ก่อนการส่งออก คุณยังสามารถปรับปรุงไฟล์เสียงที่เฟดเอาต์ได้โดยใช้คุณสมบัติการแก้ไข เช่น การบีบอัด การตัด การเร่งความเร็วเสียง และอื่นๆ
ส่วนที่ 4. คำถามที่พบบ่อยเกี่ยวกับการเฟดเพลงใน Audacity
คุณเฟดระหว่างคลิปใน Audacity ได้อย่างไร?
หากต้องการเฟดระหว่างคลิปใน Audacity ให้ใช้ฟีเจอร์ Crossfade จัดตำแหน่งแทร็กทั้งสองที่คุณต้องการเฟด เลือกพื้นที่ทับซ้อนด้วยเครื่องมือ Selection จากนั้นไปที่เมนู Effect และเลือก Crossfade Tracks วิธีนี้จะเปลี่ยนเสียงจากแทร็กหนึ่งไปยังอีกแทร็กหนึ่งอย่างราบรื่น โดยเฟดแทร็กบนออกในขณะที่เฟดแทร็กล่างออก
Crossfade ใน Audacity หมายถึงอะไร
ใน Audacity ครอสเฟดคือการเปลี่ยนผ่านอย่างลื่นไหลระหว่างช่วงเสียงสองช่วง เอฟเฟ็กต์นี้จะทำให้สองช่วงเสียงซ้อนทับกัน โดยในขณะที่แทร็กหนึ่งกำลังเฟดออก อีกแทร็กหนึ่งจะเฟดเข้า เทคนิคนี้เหมาะอย่างยิ่งสำหรับการสร้างจังหวะเปลี่ยนผ่านที่นุ่มนวลไม่สะดุด และมักถูกใช้ในการมิกซ์เพลงและการผลิตพอดแคสต์.
ระดับเสียงที่เหมาะสมที่สุดสำหรับ Audacity คือเท่าไร?
ระดับความดังที่เหมาะสมสำหรับโปรเจ็กต์ของคุณใน Audacity ขึ้นอยู่กับบริบทและการนำไปใช้โดยเฉพาะ โดยทั่วไปควรตั้งค่าระดับพีคไว้ที่ประมาณ -1 dB ถึง -3 dB เพื่อป้องกันการคลิปขณะยังคงความใสของเสียง หากคุณรู้สึกว่าความดังของเสียงยังไม่เป็นที่น่าพอใจ ให้ใช้ Audacity เพื่อเพิ่มระดับความดัง.
สรุป
การเรียนรู้วิธีเฟดออกเสียงใน Audacity ถือเป็นทักษะที่มีคุณค่าอย่างแท้จริง โดยเฉพาะอย่างยิ่งหากคุณชื่นชอบการตัดต่อเสียง ตอนนี้คุณมีพื้นฐานเพียงพอในการเลือกใช้วิธีเฟดเข้า/เฟดออกที่เหมาะสมเมื่อต้องการเพิ่มเอฟเฟ็กต์เฟดให้กับเสียงของคุณ นอกจากนี้ สำหรับผู้ที่ต้องการทางเลือกอื่นนอกเหนือจาก Audacity โปรแกรม Video Converter Ultimate ที่คัดสรรโดย FVC ก็มีอินเทอร์เฟซที่เข้าใจง่ายและเป็นมิตรต่อผู้ใช้สำหรับการสร้างเอฟเฟ็กต์เฟดเสียงคุณภาพสูง พร้อมจะยกระดับทักษะการตัดต่อเสียงของคุณแล้วหรือยัง ลองฝึกใช้เทคนิคเฟดเหล่านี้ใน Audacity หรือ Video Converter Ultimate ได้เลยวันนี้!
-
 สุดยอดคอมเพรสเซอร์ GIF 10 อันดับสำหรับผู้ใช้เดสก์ท็อปและออนไลน์
 ในโพสต์นี้ คุณจะได้เรียนรู้เกี่ยวกับโปรแกรมบีบอัด GIF ที่ดีที่สุดเพื่อช่วยคุณแก้ไขปัญหาเกี่ยวกับไฟล์ GIF ขนาดใหญ่ ลองตรวจสอบและรับข้อมูลเชิงลึกที่ดีที่สุด
-
 5 แอพบันทึกเสียงที่เลือกมากที่สุดบน Android และ iOS [อัปเดต 2024]
 ไม่ทราบว่าคุณควรใช้แอปบันทึกเสียงอะไร? ถ้าใช่ บทความนี้จะช่วยคุณเลือกว่าแอปใดจะช่วยคุณในการบันทึกเสียง
-
 เครื่องมือแปลง MP4 เป็น MP3 ที่ยอดเยี่ยมที่คุณควรพิจารณาใช้
 ปลดล็อกพลังแห่งความเก่งกาจด้านเสียงด้วยตัวแปลง MP4 เป็น MP3 ที่ได้รับความนิยมสูงสุดของเรา สัมผัสประสบการณ์การแปลงที่ไร้รอยต่อ คุณภาพเสียงที่ยอดเยี่ยม และการประมวลผลที่รวดเร็วปานสายฟ้าแลบ