


So trimmen Sie Audio in iMovie: Tutorial für iPhone und Mac
iMovie ist eine kostenlose Video-/Audio-Bearbeitungssoftware für iPhone und Mac, die von Apple entwickelt wurde und es Nutzerinnen und Nutzern ermöglicht, Medienprojekte nahtlos zu bearbeiten und zu produzieren. Wenn Apple‑User nach Möglichkeiten suchen, bestimmte Audiodateien zu bearbeiten, zu kürzen und Teile herauszuschneiden, ist es genau richtig, dafür eine solche Software zu verwenden. Viele wissen jedoch nicht, dass iMovie auch für Aufgaben wie das Schneiden und Trimmen von Audio verwendet werden kann. Wenn Sie dieser Anleitung folgen, können Nutzer wie Sie den Prozess des Audioschneidens in iMovie effektiv und reibungslos bewältigen.

Teil 1. So schneiden Sie Audio in iMovie
iPhone
Das Trimmen von Musik in iMovie ist mit einem iPhone einfacher als mit einem Mac. Die mobile Version von iMovie ist leicht und unkompliziert und ermöglicht einen nahtlosen Prozess, mit dem Benutzer ihre Audiodateien mit wenigen Fingertipps in der mobilen App trimmen können. So unkompliziert sie im Vergleich zur Mac-Version auch ist, verfügt sie über eingeschränkte Funktionen zur Video- und Audiobearbeitung.
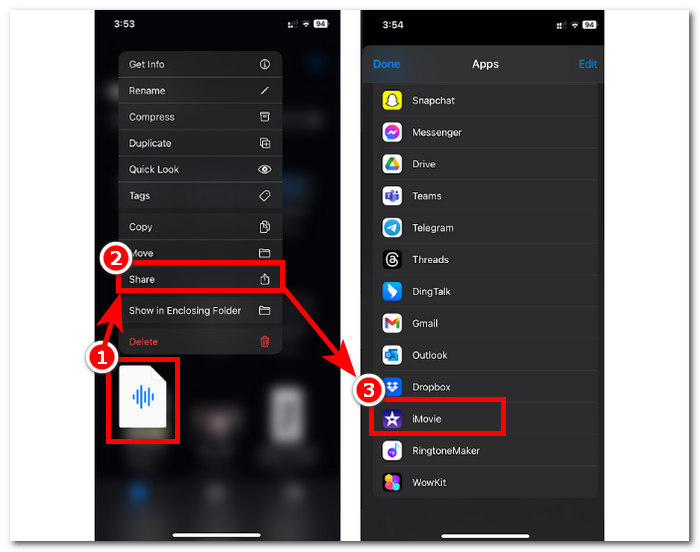
Schritt 1. Öffnen Sie die App Dateien, halten Sie die Audiodatei, die Sie trimmen möchten, lange gedrückt, tippen Sie auf 'Teilen' und öffnen Sie sie in der iMovie‑App. Wenn Sie eine Aufnahme schneiden möchten, nehmen Sie die Audiodatei zuerst in iMovie auf.

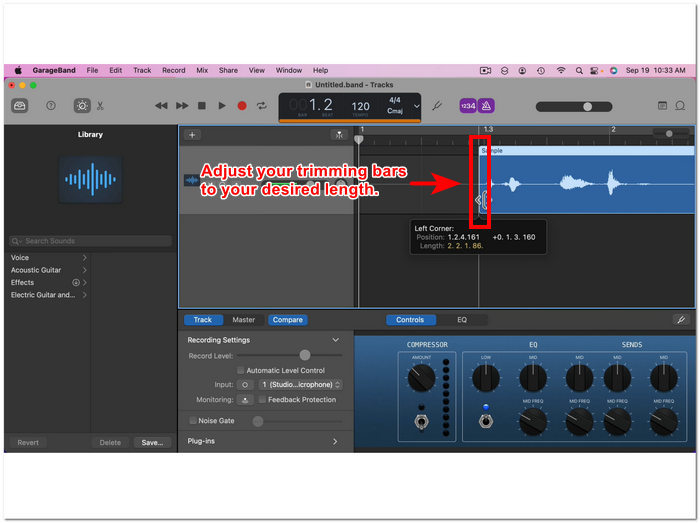
Schritt 2. Um Ihre Audiodatei zu trimmen, gehen Sie zum Anfangs- und Endpunkt Ihrer Audiodatei in der Zeitleiste; dort sehen Sie an beiden Seiten Trimm‑Regler. Ziehen Sie die Trimm‑Leisten einfach nach links und rechts, bis Sie mit dem Zuschnitt Ihrer Audiodatei zufrieden sind. Klicken Sie anschließend oben auf die Schaltfläche Fertig, um fortzufahren.
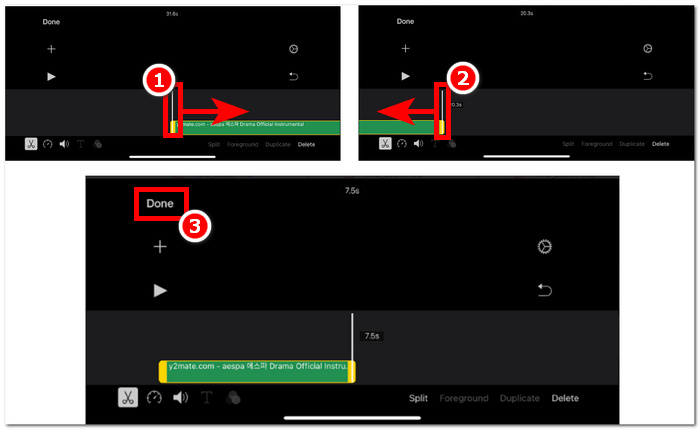
Schritt 3. Tippen Sie abschließend in der unteren Mitte der App auf das Teilen-Symbol und fahren Sie mit dem Speichern fort.

Mac
Wie schneidet man Musik mit iMovie? Benutzer haben die Möglichkeit, Audioclips mit iMovie auf ihrem Mac-Gerät zu schneiden. Wenn Benutzer die Mac-Version von iMovie zum Schneiden einer Audiodatei verwenden, haben sie Zugriff auf eine Vielzahl von Audiobearbeitungsfunktionen, in diesem Fall auf einen Clip-Trimmer, der in der mobilen Version nicht verfügbar ist. Dieser Clip-Trimmer ermöglicht das nahtlose Ziehen der Trimmerleisten von links und rechts, um einen sofortigen Schnitt zu erstellen. Um dies effektiv durchzuführen, müssen Sie die folgenden Schritte ausführen.
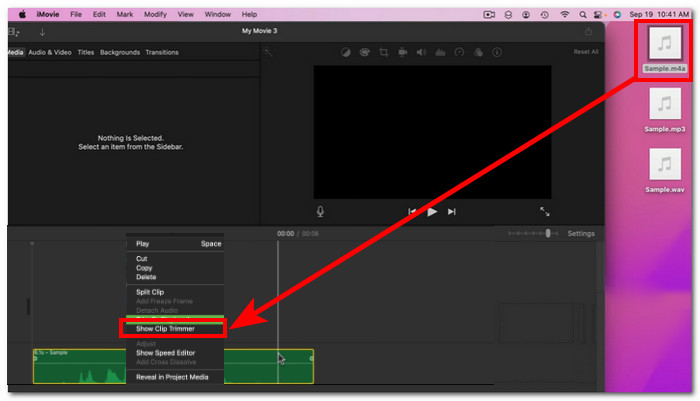
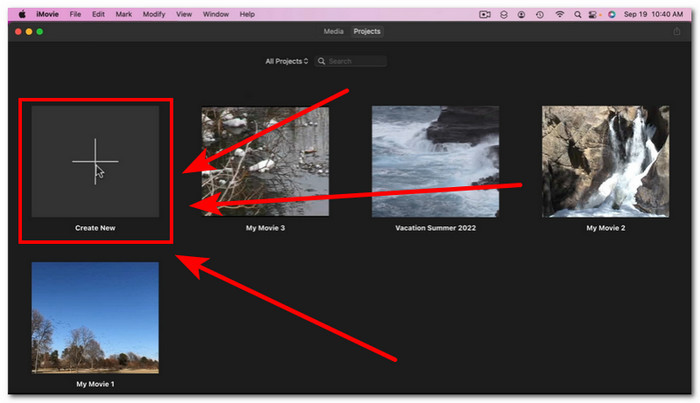
Schritt 1. Öffnen Sie die Software iMovie auf Ihrem Mac und fügen Sie Ihre Audiodatei hinzu oder ziehen Sie sie direkt auf die Zeitleiste der Software.

Schritt 2. Sobald die Datei in der Software geladen ist, klicken Sie mit der rechten Maustaste auf Ihre Audiodatei und wählen Sie im Menü Clip-Trimmer einblenden.
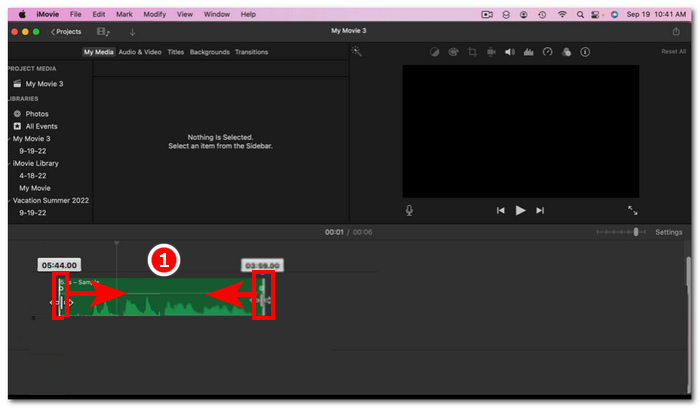
Schritt 3. Nachdem Sie darauf geklickt haben, ziehen Sie die an beiden Enden Ihrer Audiodatei befindlichen Trimm‑Leisten, um Ihre Audiodatei zu kürzen.
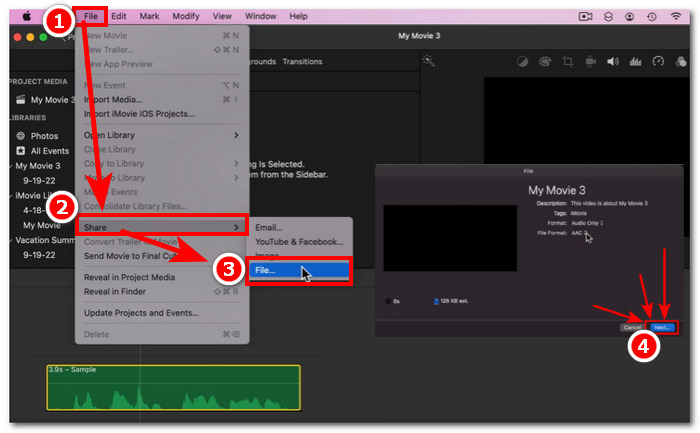
Schritt 4. Wenn Sie das Trimmen abgeschlossen haben, können Sie die Datei speichern, indem Sie oben links im Programm im Menü „Ablage“ folgende Navigation wählen: Ablage > Teilen > Datei > Weiter, um sie auf Ihrem Mac zu speichern. iMovie ist nur für Mac‑Computer verfügbar.
Wenn Sie iMovie für Windows mit einer solchen Trimm‑Funktion benötigen, können Sie es hier ansehen.
Teil 2. So schneiden Sie Audioteile in iMovie aus
iPhone
Wie schneidet man Musik in einem iMovie? Um mit iMovie auf dem iPhone bestimmte Teile in Musik oder Audio zu schneiden, gehen Sie zu bestimmten Teilen in Ihrer Timeline, die Sie entfernen oder ausschneiden möchten. Löschen Sie sie dann mit der speziellen Löschtaste, um Teile in der Timeline einfach zu entfernen.
Schritt 1. Um eine Audiodatei zu trimmen, halten Sie sie in der App Dateien lange gedrückt. Tippen Sie dann auf die „Teilen“-Schaltfläche und wählen Sie die iMovie‑App, um die Datei darin zu öffnen.
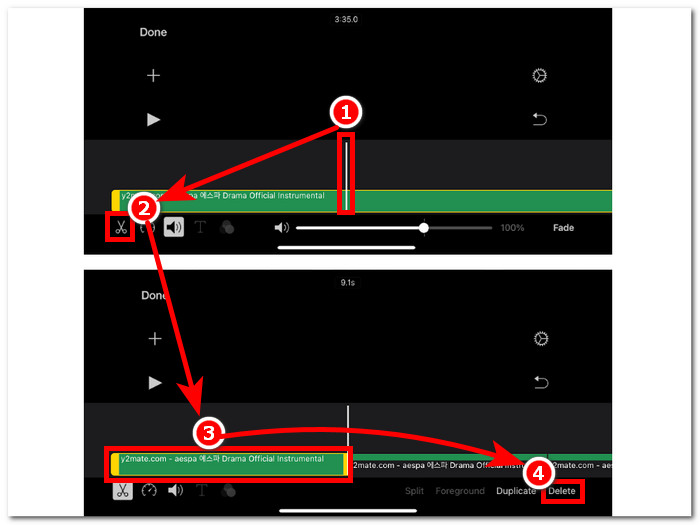
Schritt 2. Gehen Sie zu dem Teil, an dem Sie Ihre Audiodatei schneiden möchten, und tippen Sie dann unten links auf Ihrem Bildschirm auf das Scherensymbol, um sie in zwei Teile zu teilen. In Ihrer Zeitleiste befinden sich nun zwei Teile. Wählen Sie den Teil aus, den Sie nicht benötigen, und tippen Sie auf die Schaltfläche Löschen, um ihn herauszuschneiden.
Schritt 3. Nachdem Sie alle unnötigen Teile aus Ihrer Audiodatei entfernt haben, tippen Sie oben links auf Ihrem Bildschirm auf die Schaltfläche Fertig.
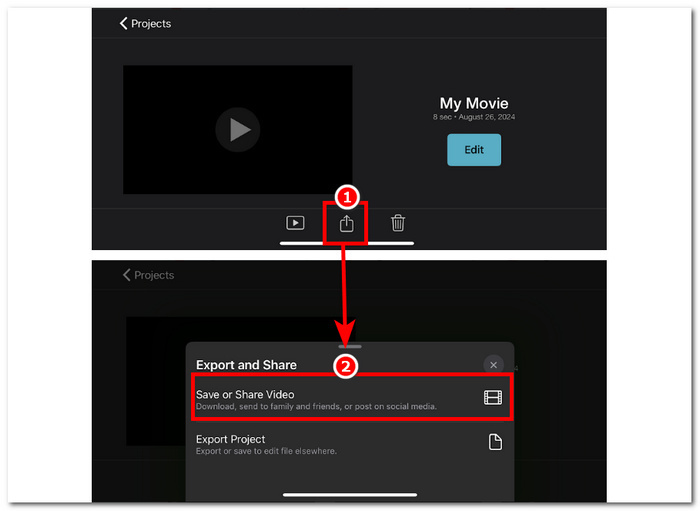
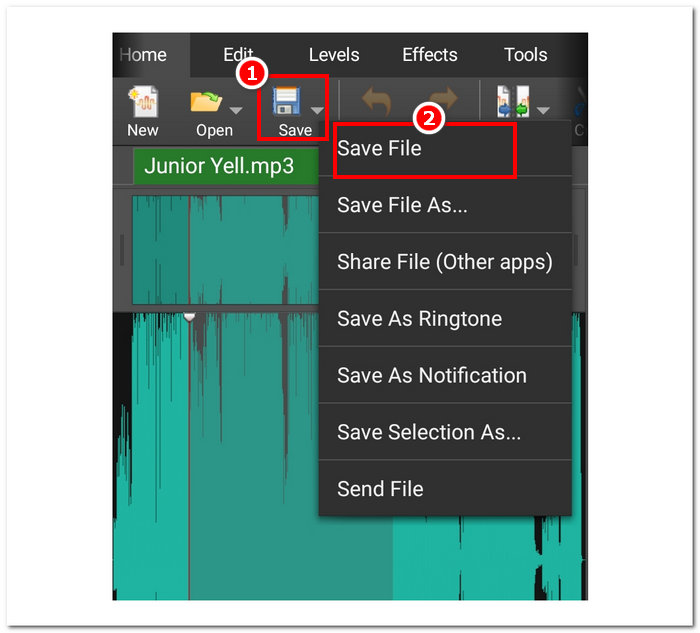
Schritt 4. Speichern Sie Ihre Datei, indem Sie auf das Teilen‑Symbol tippen und anschließend Video sichern oder teilen auswählen.
Mac
Das Ausschneiden bestimmter Teile Ihrer Audiodatei mit iMovie ist einfach, da es auf den Grundfunktionen des Tools basiert: Kombination der Funktion „Clip teilen“ und Löschen. Im Folgenden finden Sie die einfachsten Möglichkeiten dazu.
Schritt 1. Öffnen Sie iMovie auf Ihrem Mac und klicken Sie auf die +‑Schaltfläche, um die Audiodatei zu öffnen, aus der Sie Teile herausschneiden möchten.
Schritt 2. Sobald sich Ihre Audiodatei in der Software befindet, gehen Sie zu dem Teil der Audiodatei, den Sie herausschneiden möchten, klicken Sie mit der rechten Maustaste und wählen Sie Clip teilen.
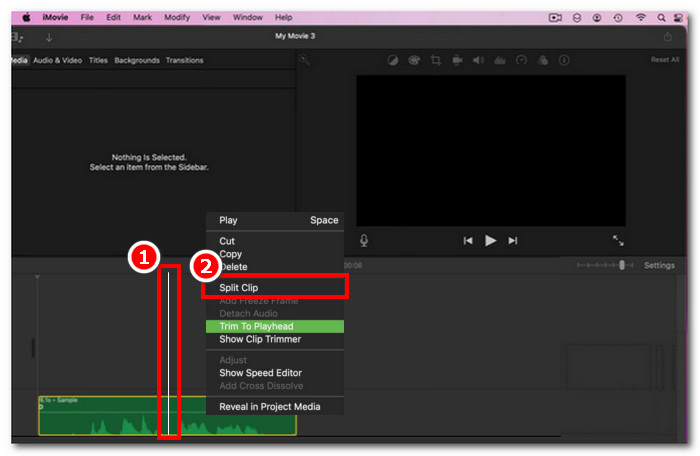
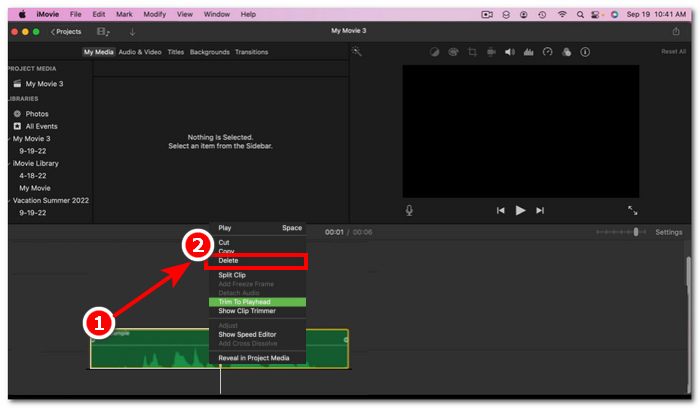
Schritt 3. Nachdem die Audiodatei aufgeteilt wurde, löschen oder schneiden Sie die Teile, die Sie nicht mehr benötigen, indem Sie mit der rechten Maustaste darauf klicken und dann Löschen wählen.
Schritt 4. Nachdem Sie den Teil, den Sie in Ihrer Audiodatei nicht möchten, entfernt haben, speichern Sie Ihre Datei, indem Sie auf Ablage > Teilen > Datei klicken und dann auf „Weiter“, um sie auf Ihrem Mac zu sichern.
Teil 3. Beste iMovie-Alternative zum Schneiden von Audio
Auch wenn iMovie zum Schneiden oder Trimmen von Audiodateien gut funktioniert, haben wir die beste alternative Software gefunden, falls Sie auf Fehler stoßen oder iMovie aus irgendeinem Grund nicht mehr funktioniert. Das von FVC empfohlene Video Converter Ultimate ist das perfekte Tool, das nicht nur als Audio‑Cutter oder -Trimmer, sondern auch für Videos ähnlich wie iMovie eingesetzt werden kann. Darüber hinaus bietet es ein Bearbeitungswerkzeug, mit dem Sie Audio schneiden und das Ausgabeformat anpassen können. Damit geht es weit über das einfache Trimmen oder Schneiden von Audio wie andere Tools hinaus, da es eine unschlagbare Verarbeitungsgeschwindigkeit bietet und gleichzeitig eine verlustfreie Audioqualität sicherstellt.
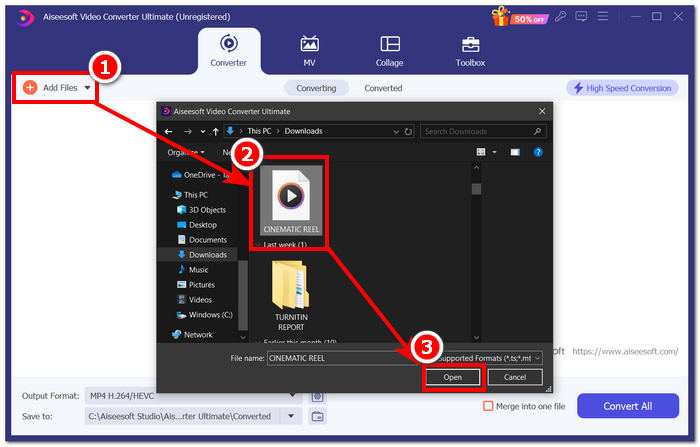
Schritt 1. Laden Sie auf Ihrem Computer die von FVC empfohlene Software Video Converter Ultimate herunter und öffnen Sie sie. Klicken Sie in der Softwareoberfläche auf Dateien hinzufügen, um die Audiodatei zu laden, in der Sie bestimmte Teile trimmen oder herausschneiden möchten.
Gratis DownloadFür Windows 7 oder neuerSicherer Download
Gratis DownloadFür MacOS 10.7 oder neuerSicherer Download
Schritt 2. Klicken Sie auf das Scherensymbol, um auf die Schneid- und Trimm‑Funktionen der Software zuzugreifen.
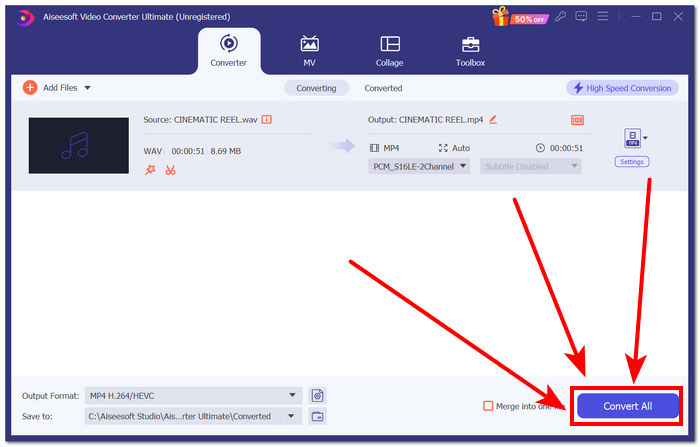
Schritt 3. Um die Audiodatei mithilfe der Softwarefunktionen zu schneiden oder zu trimmen, verschieben Sie einfach die Trimm‑Leisten auf die Teile, die Sie beibehalten möchten.
Die Teile außerhalb der Trimmbalken müssen Sie entfernen, um Ihre Audiodatei zu kürzen.
Schritt 4. Um Ihre neue, kürzere Audiodatei schließlich zu speichern, klicken Sie auf die Schaltfläche Alle konvertieren, um die Änderungen zu sichern und die Datei im vorgesehenen Ordner auf Ihrem Computer zu speichern.
Teil 4. Häufig gestellte Fragen zum Schneiden von Audio in iMovie
Wie wählt man einen Teil des Audios in iMovie aus?
Sobald Sie Ihre Audiodatei in mehrere Teile aufgeteilt haben, können Sie einen Teil auswählen, indem Sie einfach auf die entsprechenden Teile der Audiodatei in Ihrer Zeitleiste tippen oder klicken. Sobald der ausgewählte Teil rundherum einen gelben Rahmen hat, bedeutet dies, dass Sie diesen Teil ausgewählt haben.
Warum schneidet iMovie meinen Ton ab?
Wenn iMovie einen Teil Ihres Videos abrupt abschneidet, kann das ein Hinweis darauf sein, dass die Länge Ihres Audios die maximale Audiolänge von iMovie überschreitet. Zum Zeitpunkt des Schreibens dieses Handbuchs beträgt die maximale Audiolänge, die ein Benutzer in die iMovie-Software importieren kann, eine Stunde und zehn Minuten.
Können Sie den Ton in Quicktime zuschneiden?
Ja, Benutzer können Audiodateien mit QuickTime zuschneiden, indem sie ihre Audiodatei in den Player laden, auf das Menü „Bearbeiten“ im oberen Teil der Player-Oberfläche klicken und mit dem Abschnitt „Zuschneiden“ fortfahren.
Fazit
Dank Apples eigener Software iMovie ist es ganz einfach, eine Audiodatei zu trimmen und bestimmte Teile herauszuschneiden. Obwohl diese Software als Videobearbeitungssoftware bekannt ist, kann sie auch Audiobearbeitungsaufgaben wie Trimmen und Schneiden problemlos erledigen. iOS- und macOS-Benutzer können die Funktionen von iMovie bei Audiobearbeitungsaufgaben natürlich optimal nutzen. Es ist jedoch zu beachten, dass Sie bei zukünftigen Problemen mit der Software unbedingt den von FVC ausgewählten All-in-One-Videokonverter Ultimate verwenden sollten.
-
 So komprimieren Sie MPEG-4-Dateien online - kein Download, kein Wasserzeichen
 Sie haben nicht genügend Dateispeicher, um alle Ihre MPEG-4-Dateien aufzubewahren? Hier sind einige Lösungen, mit denen Sie Ihre Videodateien verkleinern können.
-
 So komprimieren Sie VOB-Dateien online und kostenlos [kein Download]
 Suchen Sie nach Methoden zum Komprimieren von VOB-Dateien? In diesem Artikel erfahren Sie, wie Sie die Größe von VOB-Dateien am besten verringern können.
-
 So komprimieren Sie eine OGV-Datei, ohne an Qualität zu verlieren
 Sie können keine großen OGV-Dateien an andere senden? In diesem Artikel werden Ihnen 2 einfache Möglichkeiten vorgestellt, mit denen Sie OGV-Dateien einfach komprimieren können.