


نحوه رفع محو کردن تصاویر با استفاده از قدرتمندترین برنامه ها
دانستن اینکه عکسی که گرفتهاید تار شده، واقعاً آزاردهنده است. عکس شما ممکن است به این دلیل تار شده باشد که سوژه در حال حرکت است، دوربین میلرزد، یا نور محیط مناسب نیست. علاوه بر این، شما نمیتوانید لحظه گرفتن عکس را برگردانید، که بسیار ناامیدکننده است. درست کردن چنین عکسی غیرممکن به نظر میرسد، اما اینطور نیست. خوشبختانه روشهای مشخصی وجود دارد که با آنها میتوانید یک تصویر تار را شفاف کنید. با بهترین برنامههای ترمیم تصویر، میتوانید عکس تار خود را اصلاح کنید. این راهنما به شما آموزش میدهد که چگونه یک تصویر تار را شفاف کنید، آن هم بدون دردسر.

قسمت 1. چگونه یک تصویر را به صورت آنلاین از بین ببریم
مردم ترجیح می دهند از یک برنامه آنلاین برای رفع محو کردن تصاویر استفاده کنند، زیرا به آنها اجازه می دهد فضا را در دستگاه خود ذخیره کنند. همچنین، هنگام استفاده از یک ابزار آنلاین، فقط باید در مرورگر خود به آن دسترسی داشته باشید. راحت درسته؟ بنابراین، ما به دنبال بهترین ارتقا دهنده تصویر آنلاین برای رفع تاری عکس شما هستیم.
اگر بهدنبال روشی برای شفافکردن تصویر بهصورت آنلاین هستید، FVC Free Image Upscaler بهترین انتخاب است. علاوه بر این، استفاده از آن رایگان و ایمن است. میتوانید در همه مرورگرهای وب از جمله گوگل کروم، فایرفاکس و سافاری به آن دسترسی داشته باشید. همچنین میتوانید کیفیت تصویر خود را با بزرگنمایی 2، 4، 6 و 8 برابری افزایش دهید. افزون بر این، از فناوری هوش مصنوعی (AI) استفاده میکند که بهطور خودکار بخشهای تار تصویر شما را تشخیص داده و آنها را بهبود میدهد.
علاوه بر این، FVC Free Image Upscaler شما را قادر میسازد تا پیکسلهای از دست رفته، بافتهای رنگی و جزئیات بیشتر را دقیقاً اصلاح کنید. و علیرغم اینکه یک برنامه آنلاین است، فرآیند ارتقاء سریعی دارد و حاوی تبلیغاتی نیست که ممکن است حواس شما را پرت کند. بنابراین، اگر علاقه مند به استفاده از ارتقا دهنده تصویر رایگان هستید، راهنمای ساده زیر را دنبال کنید.
نحوه رفع محو کردن تصاویر با استفاده از FVC Free Image Upscaler:
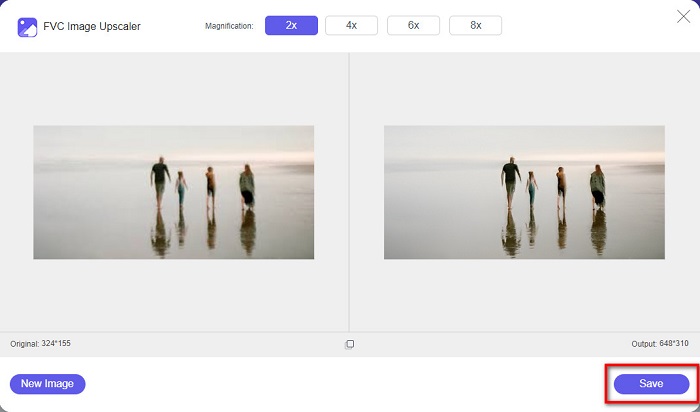
مرحله 1. ابتدا مرورگر خود را باز کرده و در نوار جستجو عبارت FVC Free Image Upscaler را تایپ کنید. همچنین میتوانید مستقیماً روی لینک صفحه اصلی کلیک کنید. سپس با کلیک روی دکمه Upload Photo برنامه را اجرا کنید. بعد از راهاندازی برنامه، به مرحله بعد بروید.
مرحله 2. در رابط نخست، روی دکمه Upload Photo کلیک کنید تا تصویری را که میخواهید شفاف کنید وارد نمایید. پوشههای کامپیوتر شما باز میشود و در آنجا عکس خود را پیدا میکنید. برای بارگذاری، روی Open کلیک کنید.

مرحله 3. پس از بارگذاری تصویر، پیشتنظیم بزرگنمایی موردنظر خود را برای عکس انتخاب کنید. میتوانید بین بزرگنمایی 2x، 4x، 6x و 8x یکی را برگزینید. سپس، پیشنمایش خروجی را در سمت راست خواهید دید تا تفاوت آن را با فایل اصلی مقایسه کنید.

مرحله 4. در نهایت با کلیک روی دکمه Save در پایینِ گوشه راست رابط، خروجی خود را ذخیره کنید.
و این مراحل نحوه رفع محو کردن یک تصویر آنلاین است. از نتیجه خواهید دید که چگونه این ارتقا دهنده تصویر رایگان می تواند به شما در رفع کیفیت تصویر کمک کند.
قسمت 2. چگونه یک تصویر را در حالت آفلاین در دسکتاپ از بین ببریم
بسیاری از متخصصان از رایانه برای ویرایش تصاویر یا فیلم ها استفاده می کنند. همچنین، بسیاری از برنامههای ویرایش عکس فقط در رایانههای رومیزی در دسترس هستند. و در این قسمت بهترین روش ها برای رفع محو کردن تصویر به صورت آفلاین در دسکتاپ را به شما آموزش می دهیم.
رفع محو کردن تصویر با استفاده از فتوشاپ
برنامه Adobe Photoshop احتمالاً بهترین نرمافزار ویرایش تصویر برای شفافکردن عکسهای شما است. این برنامه آفلاین امکانات و ابزارهای ویرایشی فراوانی دارد که میتوانید برای بهبود یک تصویر از آنها استفاده کنید. علاوه بر این، اگر کیفیت عکس خوب نباشد یا تار باشد، میتوانید به آن وضوح و شارپنس اضافه کنید. با استفاده از ابزارهای پیشرفته ویرایش در این برنامه، قطعاً میتوانید خروجیهای بسیار عالی تولید کنید. همچنین میتوانید افراد یا اشیاء را از عکس حذف کنید، با ابزار مداد یا قلم، شکل یا تصویری بکشید، رنگ عکس خود را دستکاری کنید و امکانات دیگر. با Adobe Photoshop میتوانید تصاویر شگفتانگیزی بسازید که خودتان ویرایش کردهاید. با این حال، Adobe Photoshop ابزار کاربرپسندی نیست. برای شفافکردن یا ویرایش تصویر، باید دانش عمیقی از نحوه استفاده از ابزارهای آن داشته باشید. با این وجود، ما مراحل استفاده از فتوشاپ برای شفافکردن تصاویر را در اختیارتان قرار میدهیم. همچنین دو روش مختلف برای کاهش تاری عکس در Photoshop به شما نشان خواهیم داد.
فرآیند رفع تاری تصویر با استفاده از Adobe Photoshop:
مرحله 1. برنامه Adobe Photoshop را روی دسکتاپ خود دانلود و نصب کنید. پس از دانلود و نصب برنامه، آن را روی دستگاه خود اجرا کنید.
مرحله 2. سپس، تصویر موردنظر برای شفافسازی را در رابط اصلی باز کنید. همچنین میتوانید برای بازکردن سریع عکس، روی صفحهکلید خود CTRL + O را فشار دهید.
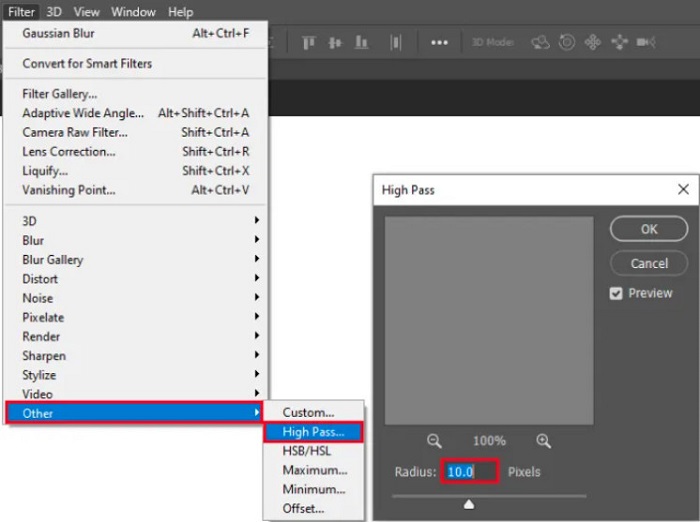
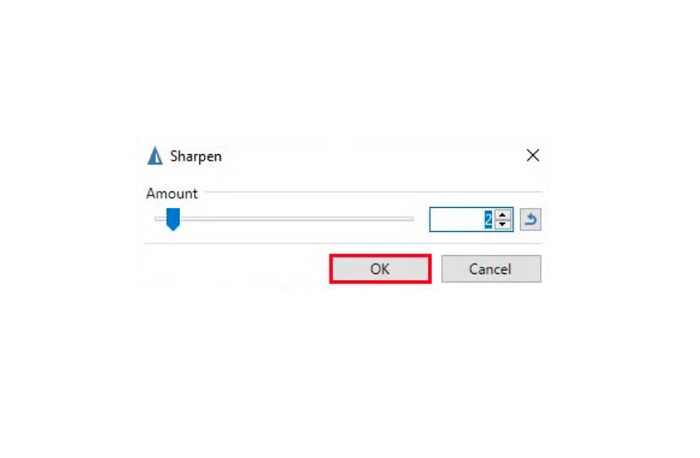
مرحله 3. در مرحله بعد، لایه پسزمینه را کپی کرده و همان لایه کپیشده را انتخاب کنید. سپس روی Filter > Other > High Pass کلیک کنید. مقدار High Pass را روی 10% تنظیم کنید.
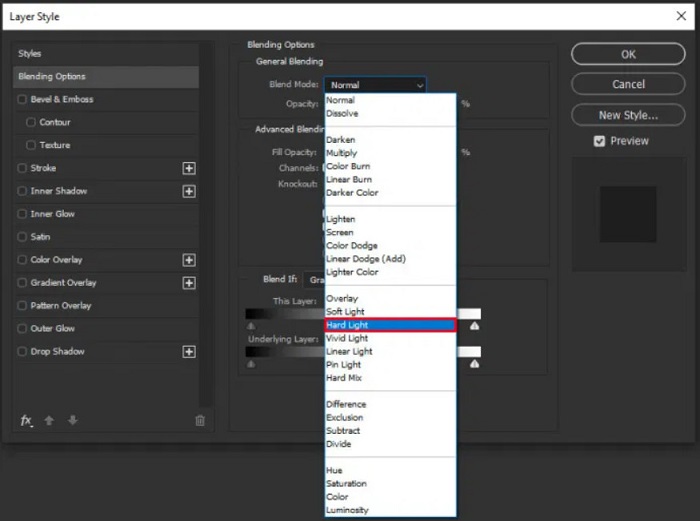
مرحله 4. در پنجره Layer Style، حالت ترکیب (Blend Mode) را از حالت عادی (Normal) به Hard Light تغییر دهید، سپس Opacity را آنقدر تنظیم کنید تا عکس واضح یا بهبودیافته بهنظر برسد.
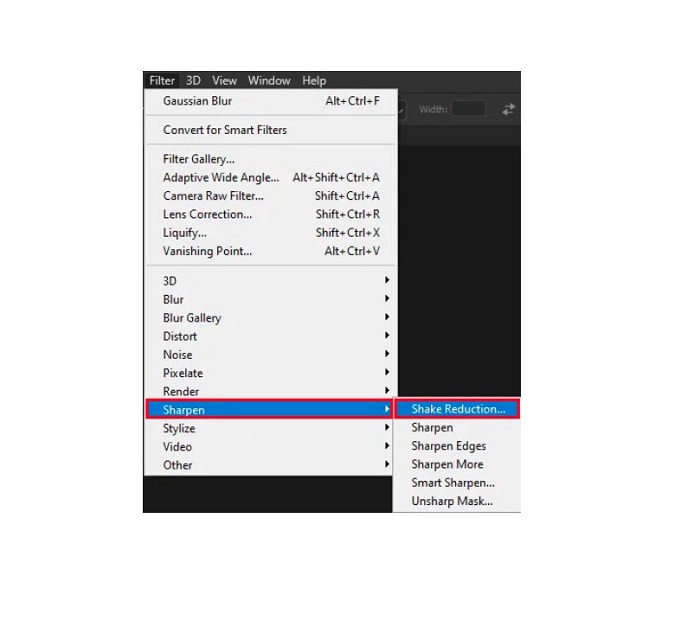
اگر از نسخه جدید Photoshop استفاده میکنید، میتوانید برای شارپکردن تصویر با فتوشاپ از گزینه کاهش لرزش دوربین (Camera Shake Reduction) استفاده کنید.
مرحله 1. تصویری را که میخواهید شفاف کنید در فتوشاپ وارد کنید.
مرحله 2. سپس به مسیر Filter > Sharpen > Shake Reduction بروید.
مرحله 3. بعد از آن، Photoshop روی تصویر شما پردازش انجام میدهد و سپس میتوانید خروجی خود را مشاهده کنید.
رفع محو کردن تصویر با استفاده از Paint.net
یکی دیگر از نرمافزارهای رایگان و آفلاین ویرایش عکس که میتوانید از آن استفاده کنید Paint.net است. یکی از قابلیتهای قدرتمند این برنامه، شارپکردن تصویر است. با جابهجا کردن نوار لغزنده (اسلایدر)، میتوانید میزان وضوح تصویر خود را تنظیم کنید؛ به این ترتیب، تصویر شفاف و واضح شده و تاری آن از بین میرود. علاوه بر آن، استفاده از آن نسبت به Adobe Photoshop آسانتر است. همچنین این برنامه دارای سایر قابلیتهای ویرایشی است که میتوانید برای ویرایش عکسها به کار ببرید. اگر کار با برنامه را بلد نیستید، میتوانید از مشاوره آنلاین و آموزشهای گامبهگام آن استفاده کنید. افزون بر این، این برنامه یکی از مشهورترین ویرایشگرهای تصویر برای کاربران ویندوز است، زیرا امکانات اصلاح متعددی دارد که میتوانید برای بهبود عکس از آنها بهره ببرید. یک نقطهضعف Paint.net این است که پس از اعمال افکتها، دیگر نمیتوانید متن واردشده را ویرایش کنید. با این حال، این نرمافزار امکان ایجاد خروجیهای ویرایشی چندلایه (چند سطحی) را برای شما فراهم میکند.
نحوه رفع تاری تصویر با استفاده از Paint.net:
مرحله 1. برای شروع، تصویر خود را با فشردن CTRL + O روی صفحهکلید در Paint.net باز کنید. همچنین میتوانید به منوی File بروید و گزینه Open را پیدا کنید. سپس فایلهای دسکتاپ شما نمایش داده میشود و در آنجا تصویر خود را انتخاب کرده و Open را میزنید.
مرحله 2. سپس روی Effects > Picture کلیک کرده، و بعد گزینه Sharpen را انتخاب کنید.
مرحله 3. در پنل Sharpen، نوار لغزندهای خواهید دید که با استفاده از آن میزان وضوح (Sharpness) تصویر را برای از بین بردن تاری تنظیم میکنید. همچنین میتوانید برای تغییر میزان وضوح عکس، روی دکمه up/down arrow کلیک کنید.
مرحله 4. دکمه OK را فشار دهید و خروجی خود را ذخیره کنید.
قسمت 3. چگونه یک تصویر را در آیفون از بین ببریم
اگر کاربر دستگاه آیفون هستید، میتوانید برخی از برنامهها را نیز دانلود کنید تا تصویر خود را محو کنید. می توانید از بین برنامه های App Store خود انتخاب کنید تا تصویر خود را رفع کنید. با این حال، برخی از برنامهها قابل خرید هستند و باید قبل از استفاده از آنها، آنها را خریداری کنید. اما در این قسمت به شما آموزش می دهیم که چگونه با استفاده از یک اپلیکیشن رایگان و قابل توجه تصویر خود را در آیفون خود رفع تار کنید.
برنامه Foton یکی از پرکاربردترین اپهای شفافکردن تصویر در آیفون است. میتوانید این برنامه را بهصورت رایگان از اپاستور دانلود کنید. علاوه بر این، امکانات ویرایشی دیگری مانند ساخت کلاژ، برش (Crop)، افزودن قالب (Template)، تقسیمبندی و موارد دیگر نیز دارد. رابط کاربری آن ساده است و همین باعث میشود برنامهای کاربرپسند باشد. با این اپ، میتوانید با تنظیم میزان وضوح (Sharpness)، تصویر خود را از حالت تار خارج کنید. همچنین اگر میخواهید به عکس خود تیزی و جلوه بیشتری بدهید، میتوانید کنتراست، وضوح (Clarity)، اشباع رنگ (Saturation) و Dehaze تصویرتان را تنظیم کنید. افزون بر آن، استفاده از این برنامه ایمن است، بنابراین نیازی نیست نگران امنیت فایلهای تصویری خود باشید. نقطهضعف این اپ آن است که برای استفاده از سایر امکانات آن باید نسخه حرفهای (Pro) را خریداری کنید.
نحوه رفع تاری تصویر در آیفون:
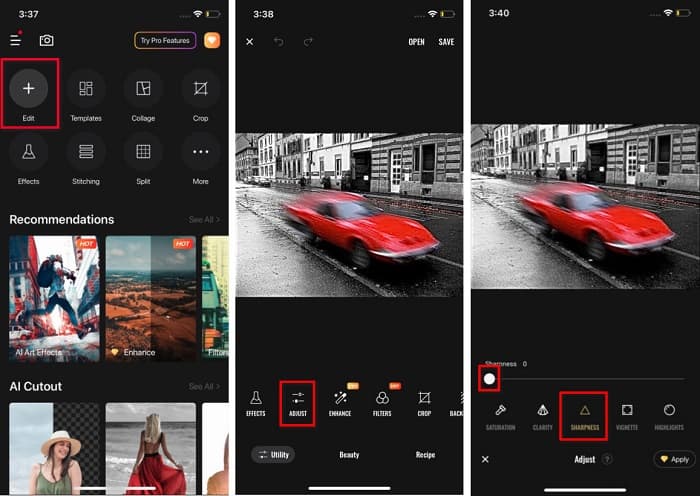
مرحله 1. اپاستور را در آیفون خود باز کرده و Foton را جستجو کنید. آن را روی گوشی خود نصب کرده و پس از نصب، برنامه را باز کنید. سپس در رابط اصلی برنامه، روی گزینه Edit ضربه بزنید.
مرحله 2. تصویر مورد نظر برای شفافسازی را انتخاب کنید؛ سپس به رابط دیگری هدایت میشوید. روی گزینه Adjust در زیر تصویر ضربه بزنید و سپس به سمت چپ بکشید تا قابلیت Sharpness را پیدا کنید.
مرحله 3. در پنل Sharpness، نوار لغزنده را آنقدر بکشید تا وضوح مورد نظر به دست آید و تاری تصویر شما کاهش یابد.
مرحله 4. در نهایت، برای ذخیره خروجی روی دستگاه آیفون خود، روی دکمه Save در گوشه بالای سمت راست رابط ضربه بزنید. برای یادگیری نحوه تغییر اندازه تصویر در آیفون اینجا کلیک کنید.
قسمت 4. چگونه یک تصویر را در تلفن اندروید از بین ببریم
بسیاری از افراد نیز دارای دستگاههای اندرویدی هستند و اگر شما نیز از آن استفاده میکنید، میتوانید این قسمت را بخوانید تا نحوه رفع محو کردن تصویر در اندروید را بیاموزید. ما محبوبترین برنامههای رفع محو کردن عکس را برای اندروید جستجو کردیم و آنها را یکی یکی امتحان کردیم. خوشبختانه، ما برنامه ای را پیدا کردیم که بهترین توصیه برای آن است.
برنامه Snapseed بهترین گزینه است اگر میخواهید روی دستگاه اندروید خود عکس تار را شفاف کنید. با استفاده از قابلیت Sharpen و Structure میتوانید به تصویر خود وضوح بدهید و بخشهای تار را از بین ببرید. علاوه بر این، امکانات ویرایشی فراوانی دارد که میتواند در بهبود کیفیت عکس به شما کمک کند. و مانند ابزارهایی که در بالا ذکر شد، رابط کاربری سادهای دارد. بنابراین اگر مبتدی هستید، میتوانید برای شفافکردن تصویر خود از این اپ استفاده کنید. با این حال، پیش از استفاده از این برنامه باید اتصال وایفای خود را روشن کنید.
نحوه محو کردن تصویر در اندروید با استفاده از Snapseed:
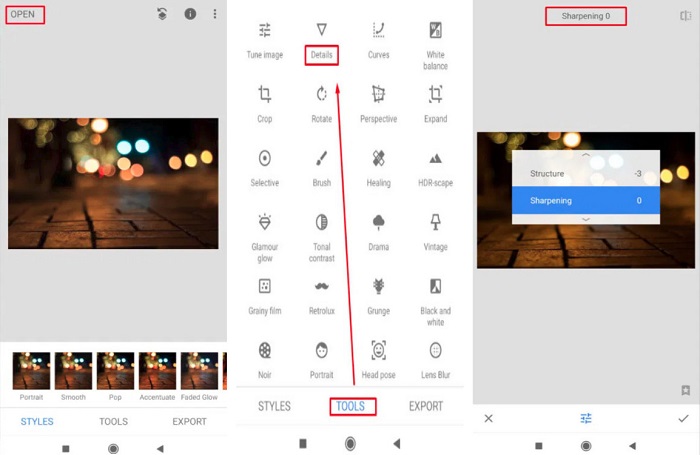
مرحله 1. برنامه را روی دستگاه اندروید خود دانلود کرده و آن را باز کنید. پس از باز کردن برنامه، تصویر خود را در آن باز کنید.
مرحله 2. سپس در پنل Tools، گزینه Details را انتخاب کنید.
مرحله 3. در مرحله بعد، برای ایجاد تغییر در تصویر تار خود، گزینه Sharpen یا Structure را انتخاب کنید. با تنظیم این دو گزینه، تاری عکس شما برطرف خواهد شد.
بخش 5. سؤالات متداول در مورد چگونگی رفع محو کردن یک تصویر
آیا اندازه فایل با رفع محو کردن تصویر افزایش می یابد؟
آره. وقتی تصویری را رفع میکنید، PPI آن افزایش مییابد و باعث میشود اندازه فایل بزرگتر از تصویر اصلی باشد.
چرا وقتی تصویر من بزرگتر می شود تار می شود؟
احتمالاً به دلیل مشکل فشرده سازی است. هنگامی که سعی می کنید اندازه یک تصویر را تغییر دهید، پیکسل های عکس خود را نیز بزرگ می کنید. بنابراین، فشرده سازی یک تصویر ممکن است بر کیفیت تصویر شما تأثیر بگذارد.
آیا می توانم یک تصویر JPG را در Adobe برطرف کنم؟
قطعا! اگر می خواهید یک تصویر JPG را رفع کنید، می توانید از Adobe Photoshop استفاده کنید. Adobe Photoshop از فرمت های استاندارد تصویر مانند PNG، JPG و JPEG پشتیبانی می کند
نتیجه
اکنون که میدانید با سادهترین روشها چگونه یک تصویر تار را شفاف کنید، میتوانید عکسهای خود را از حالت تاری خارج کنید. تمام روشهایی که در بالا نشان دادیم قطعاً به شما کمک میکنند به هدفی که دارید برسید. اما اگر میخواهید در دستگاه خود فضای ذخیرهسازی را حفظ کنید، پیشنهاد میکنیم از FVC Free Image Upscaler استفاده کنید که میتوانید بهصورت آنلاین و رایگان به آن دسترسی داشته باشید.
-
 نحوه تغییر اندازه عکس در پاورپوینت [سریعترین راه برای تغییر اندازه]
 یادگیری نحوه تغییر اندازه تصاویر در پاورپوینت ضروری است به خصوص اگر می خواهید از آن در ارائه خود استفاده کنید. این مقاله را بخوانید تا بدانید چگونه این کار را انجام دهید.
-
 تصویر 1440p – اطلاعات جامعی که به آن نیاز دارید [به روز رسانی 2022]
 آیا می خواهید در مورد تصاویر 1440p بدانید؟ یا از کجا می توانید آن را تهیه کنید؟ تصویر خود را به 1440p تبدیل کنید؟ این را بخوانید تا همه آنها را بشناسید.
-
 آموزش Unpixel کردن یک تصویر با استفاده از 3 بهترین عکس Unpixelator
 آیا در مدیریت تصاویر پیکسلی مشکل دارید؟ امروز مشکل را حل کرده ایم و می توانید از ابزارهایی که در اینجا اضافه می کنیم استفاده کنید.