


Kuinka poistaa kuvien epäterävyyttä tehokkaimmilla sovelluksilla
On melko turhauttavaa huomata, että ottamasi kuva on sumea. Kuvasi on sumea, koska kuvauskohde liikkuu, kamera tärisee tai kuvauspaikan valaistus on huono. Lisäksi et voi saada takaisin hetkeä, jolloin otit kuvan, mikä on hyvin pettymys. Tuntuu lähes mahdottomalta korjata tuota kuvaa, mutta se ei ole mahdotonta. Onneksi on olemassa tiettyjä menetelmiä, joilla voit tehdä sumeasta kuvasta terävämmän. Parhaiden kuvankorjaussovellusten avulla voit korjata sumean kuvasi. Tämä opas näyttää, kuinka tehdä sumeasta kuvasta terävä vaivattomasti.

Osa 1. Kuinka poistaa kuvan epäterävyyttä verkossa
Ihmiset käyttävät mieluummin verkkosovellusta kuvien epäterävyyden poistamiseen, koska sen avulla he voivat säästää tilaa laitteissaan. Lisäksi, kun käytät online-työkalua, sinun tarvitsee vain käyttää sitä selaimessasi. Kätevää eikö? Siksi etsimme parasta verkkokuvan parannustyökalua valokuvasi epätarkkuuden korjaamiseksi.
FVC Free Image Upscaler on paras valinta, jos etsit tapaa terävöittää kuvaa verkossa. Lisäksi se on ilmainen ja turvallinen käyttää. Voit käyttää sitä kaikilla verkkoselaimilla, kuten Google Chromella, Firefoxilla ja Safarilla. Voit myös parantaa kuvasi laatua 2x-, 4x-, 6x- ja 8x-suurennoksella. Se hyödyntää myös tekoälyä (AI, Artificial Intelligence), joka tunnistaa automaattisesti kuvasi sumuiset kohdat ja parantaa niitä.
Lisäksi FVC Free Image Upscaler mahdollistaa kadonneiden pikselien, värikuvioiden ja muiden yksityiskohtien tarkan korjaamisen. Ja vaikka se on online-sovellus, siinä on nopea skaalausprosessi, eikä se sisällä mainoksia, jotka voisivat häiritä sinua. Joten jos olet kiinnostunut ilmaisen kuvan parannustyökalun käyttämisestä, seuraa alla olevaa yksinkertaista ohjetta.
Kuvien epäterävyyden poistaminen FVC Free Image Upscaler -toiminnolla:
Vaihe 1. Avaa ensin selaimesi ja kirjoita hakukenttään FVC Free Image Upscaler. Voit myös siirtyä suoraan etusivulle napsauttamalla linkkiä. Käynnistä sitten sovellus napsauttamalla Upload Photo -painiketta. Kun sovellus on käynnistetty, siirry seuraavaan vaiheeseen.
Vaihe 2. Ensimmäisessä näkymässä napsauta Upload Photo -painiketta tuodaksesi kuvan, josta haluat poistaa sumeuden. Tietokoneesi kansiot avautuvat, ja voit etsiä niistä kuvan. Napsauta Open ladataksesi sen.

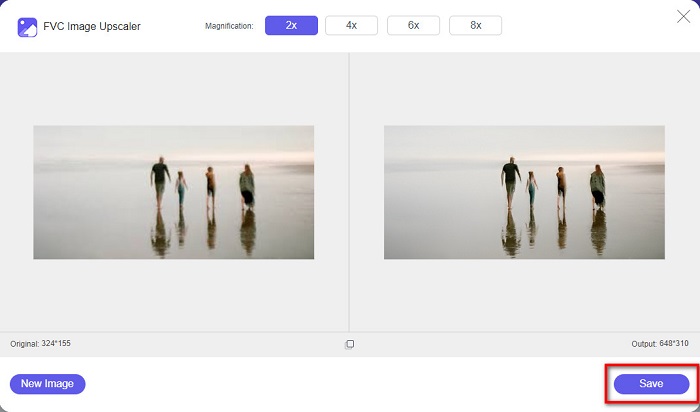
Vaihe 3. Kun kuva on ladattu, valitse kuvallesi haluamasi suurennusasetelma. Voit valita 2x, 4x, 6x ja 8x suurennoksen välillä. Näet sitten tuloksen esikatselun oikealla puolella ja voit verrata sitä alkuperäiseen tiedostoosi.

Vaihe 4. Tallenna lopuksi tuloksesi napsauttamalla Save-painiketta käyttöliittymän oikeassa alakulmassa.
Ja nämä ovat vaiheet kuvan epätarkkuuden poistamiseksi verkossa. Näet tuloksesta, kuinka tämä ilmainen kuvanparannus voi auttaa sinua korjaamaan kuvasi laadun.
Osa 2. Kuvan epätarkkuuden poistaminen offline-tilassa työpöydällä
Monet ammattilaiset käyttävät tietokonetta kuvien tai videoiden muokkaamiseen. Lisäksi monet valokuvankäsittelysovellukset ovat saatavilla vain pöytätietokoneissa. Ja tässä osassa opetamme sinulle parhaat tavat poistaa kuvan epätarkkuudesta offline-tilassa työpöydälläsi.
Poista kuvan sumennus Photoshopilla
Adobe Photoshop on luultavasti paras kuvanmuokkausohjelma, jolla voit terävöittää sumeita kuviasi. Tässä offline-sovelluksessa on monia muokkausominaisuuksia ja työkaluja, joiden avulla voit parantaa kuvaa. Voit muun muassa lisätä kuvaan terävyyttä, jos laatu on huono tai kuva on sumea. Sen kehittyneiden muokkaustyökalujen avulla saat varmasti erinomaisia lopputuloksia. Lisäksi voit poistaa ihmisiä tai esineitä kuvasta, piirtää kuvan tai objektin kynä- tai kynätyökalulla, muokata kuvasi värejä ja paljon muuta. Adobe Photoshopilla voit luoda upeita, itse muokkaamiasi kuvia. Photoshop ei kuitenkaan ole kovin helppokäyttöinen työkalu. Tarvitset melko syvällistä tietoa sen työkaluista, jotta osaat poistaa sumeuden tai muokata kuvaa. Annamme kuitenkin vaiheet, joiden avulla voit käyttää Photoshopia sumeiden kuvien terävöittämiseen. Näytämme myös kaksi tapaa vähentää kuvasi sumeutta Photoshopissa.
Kuvan hämärtymisprosessi Adobe Photoshopilla:
Vaihe 1. Lataa Adobe Photoshop tietokoneellesi ja asenna se. Kun olet ladannut ja asentanut sovelluksen, käynnistä se laitteellasi.
Vaihe 2. Avaa sitten pääikkunassa kuva, josta haluat poistaa sumeuden. Voit myös painaa näppäinyhdistelmää CTRL + O avataksesi kuvasi helposti.
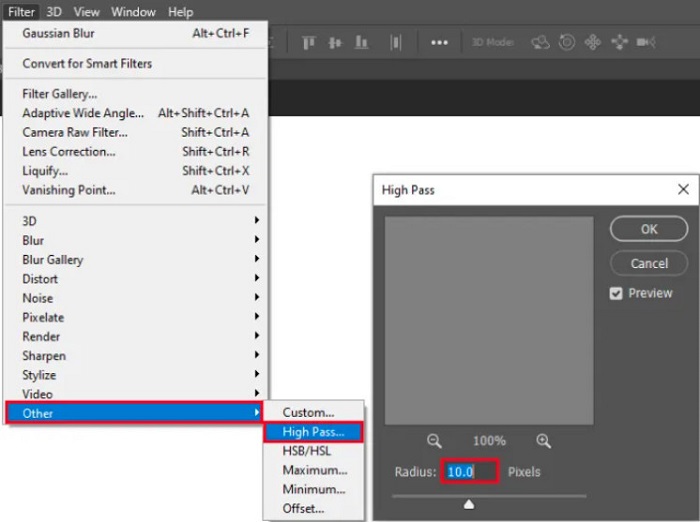
Vaihe 3. Seuraavaksi monista taustakerros ja valitse se. Napsauta sitten Filter > Other > High Pass. Aseta High Pass arvoon 10%.
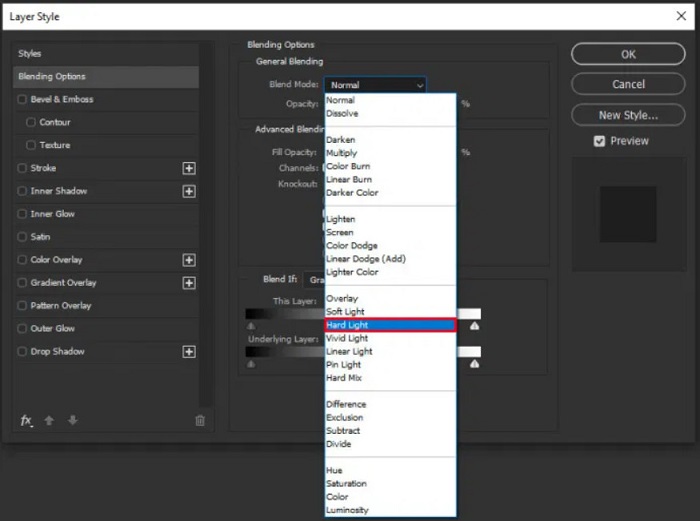
Vaihe 4. Layer Style -ikkunassa vaihda sekoitustila normaalista tilaan Hard Light ja muuta sitten opacity-arvoa, kunnes kuva on selkeämpi tai parannettu.
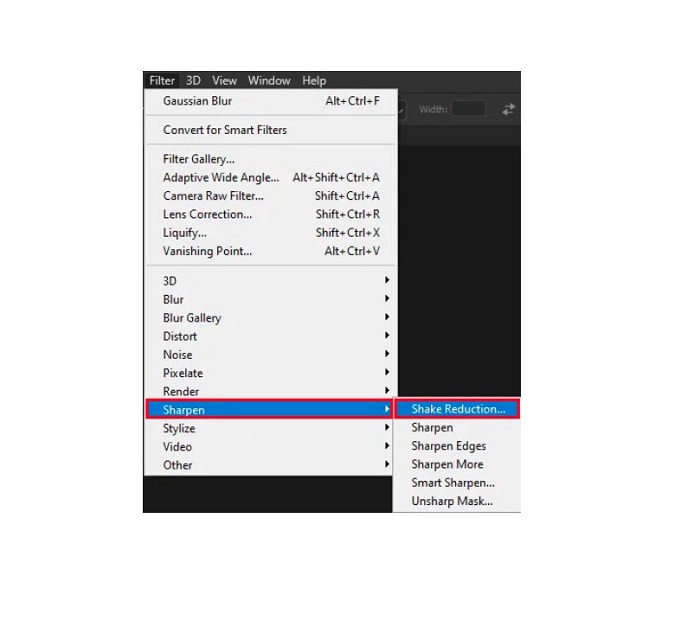
Jos käytät Photoshopin uutta versiota, voit käyttää kameran tärähdyksen vähennys -vaihtoehtoa terävöittääksesi kuvaa Photoshopissa.
Vaihe 1. Tuo kuva, josta haluat poistaa sumeuden, Photoshopiin.
Vaihe 2. Siirry sitten valikkoon Filter > Sharpen > Shake Reduction.
Vaihe 3. Sen jälkeen Photoshop käsittelee kuvasi, minkä jälkeen voit tarkastella lopputulosta.
Poista kuvan epäterävyys Paint.netillä
Toinen ilmainen offline-kuvankäsittelyohjelma, jota voit käyttää, on Paint.net. Yksi tämän sovelluksen tehokkaista ominaisuuksista on kuvan terävöittäminen. Siirtämällä liukusäädintä voit säätää kuvasi terävyyden määrää, jolloin kuvasta tulee terävä ja tarkka ja sumeus vähenee. Lisäksi sitä on helpompi käyttää kuin Adobe Photoshopia. Siinä on myös muita muokkaustoimintoja, joilla voit käsitellä kuvia. Jos et osaa käyttää tätä sovellusta, voit hyödyntää sen verkkoneuvontaa ja ohjevideoita. Lisäksi se on yksi Windows-käyttäjien tunnetuimmista kuvankäsittelyohjelmista, koska siinä on monia korjaustoimintoja, joilla voi parantaa kuvia. Pieni miinus Paint.netissä on, että et voi enää muokata kirjoittamaasi tekstiä sen jälkeen, kun olet soveltanut tehosteita. Siitä huolimatta ohjelmalla voi tehdä monitasoisia kuvankäsittelyprojekteja.
Kuvan sumennus poistaminen Paint.net:n avulla:
Vaihe 1. Aloita avaamalla kuvasi Paint.netissä painamalla näppäinyhdistelmää CTRL + O. Voit myös mennä kohtaan File ja valita sieltä Open. Tämän jälkeen näet tietokoneesi tiedostot, joista valitset kuvan ja avaat sen.
Vaihe 2. Napsauta sitten Effects > Picture ja valitse Sharpen.
Vaihe 3. Sharpen-paneelissa näet liukusäätimen, jolla säädät kuvasi terävyyttä poistaaksesi sumeutta. Voit myös käyttää ylös/alas-nuoli -painikkeita muuttaaksesi terävyyden määrää.
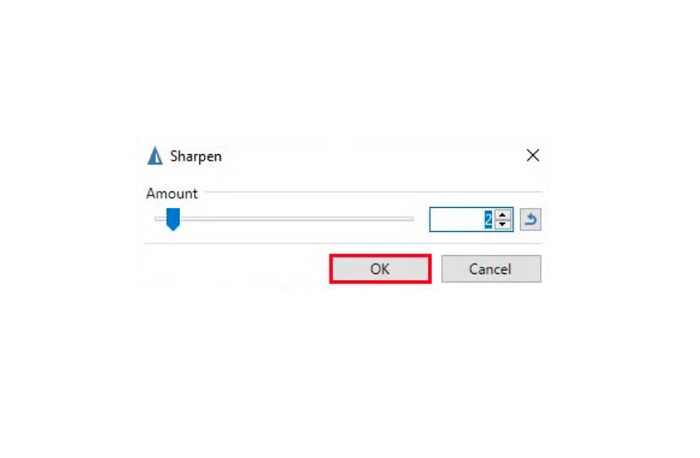
Vaihe 4. Paina OK-painiketta ja tallenna lopputuloksesi.
Osa 3. Kuinka poistaa kuvan sumennus iPhonessa
Jos käytät iPhone-laitetta, voit myös ladata joitain sovelluksia kuvan epätarkkuuden poistamiseksi. Voit valita App Storen sovelluksista poistaaksesi kuvan epäterävyyden. Jotkut sovellukset ovat kuitenkin ostettavia, joten sinun on ostettava ne ennen käyttöä. Mutta tässä osassa opetamme sinulle kuinka poistat kuvan epäterävyydestä iPhonessasi käyttämällä ilmaista ja merkittävää sovellusta.
Foton on yksi käytetyimmistä sumeudenpoistosovelluksista iPhonessa. Voit ladata tämän sovelluksen ilmaiseksi App Storesta. Lisäksi siinä on muita muokkaustoimintoja, kuten kollaasi, rajaus, mallipohjien lisääminen, jakaminen ja paljon muuta. Sen käyttöliittymä on myös helppokäyttöinen, mikä tekee siitä käyttäjäystävällisen sovelluksen. Tällä sovelluksella voit poistaa kuvasta sumeutta säätämällä kuvan terävyyttä. Jos haluat lisätä kuvaan vieläkin enemmän tarkkuutta, voit säätää kuvan kontrastia, selkeyttä (clarity), kylläisyyttä ja dehaze-arvoa. Lisäksi sovellus on turvallinen käyttää, joten sinun ei tarvitse huolehtia kuvatiedostojesi tietoturvasta. Sovelluksen haittapuolena on, että sinun täytyy ostaa Pro-versio käyttääksesi sen muita ominaisuuksia.
Kuinka poistaa kuvan sumennus iPhonessa:
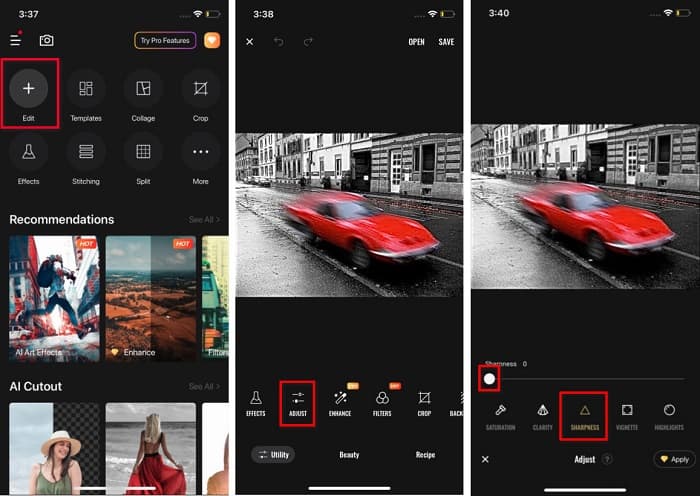
Vaihe 1. Avaa App Store iPhonessasi ja etsi Foton. Asenna se puhelimeesi ja avaa sovellus asennuksen jälkeen. Napauta sitten sovelluksen päävalikossa Edit-vaihtoehtoa.
Vaihe 2. Valitse kuva, josta haluat poistaa sumeuden; sinut ohjataan uuteen näkymään. Napauta kuvan alapuolella olevaa Adjust-vaihtoehtoa ja pyyhkäise vasemmalle, kunnes löydät Sharpness-ominaisuuden.
Vaihe 3. Sharpness-paneelissa siirrä liukusäädintä haluamaasi terävyyteen, kunnes kuvasi sumeus on vähentynyt.
Vaihe 4. Napauta lopuksi Save-painiketta käyttöliittymän oikeassa yläkulmassa tallentaaksesi tuloksen iPhone-laitteellesi. Napsauta tästä, jos haluat oppia, miten voit muuttaa kuvan kokoa iPhonessa.
Osa 4. Kuvan epätarkkuuden poistaminen Android-puhelimessa
Monet ihmiset omistavat myös Android-laitteita, ja jos käytät myös sellaista, voit lukea tämän osan oppiaksesi poistamaan kuvan sumennuksen Androidissa. Etsimme suosituimpia valokuvien häivytyssovelluksia Androidille ja kokeilimme niitä yksitellen. Onneksi löysimme sovelluksen, jota on parasta suositella.
Snapseed on paras sovellus, jos haluat poistaa kuviesi sumeutta Android-laitteella. Sen Sharpen- ja Structure-toimintojen avulla voit lisätä kuvaan terävyyttä ja poistaa sumeita kohtia. Lisäksi siinä on monia muokkausominaisuuksia, joiden avulla voit parantaa kuvasi laatua. Ja kuten muissakin edellä mainituissa työkaluissa, siinä on yksinkertainen käyttöliittymä. Jos olet aloittelija, voit käyttää tätä sovellusta kuviesi terävöittämiseen. Huomaa kuitenkin, että sinun on kytkettävä WiFi päälle ennen sovelluksen käyttöä.
Kuvan hämärtäminen Androidissa Snapseedin avulla:
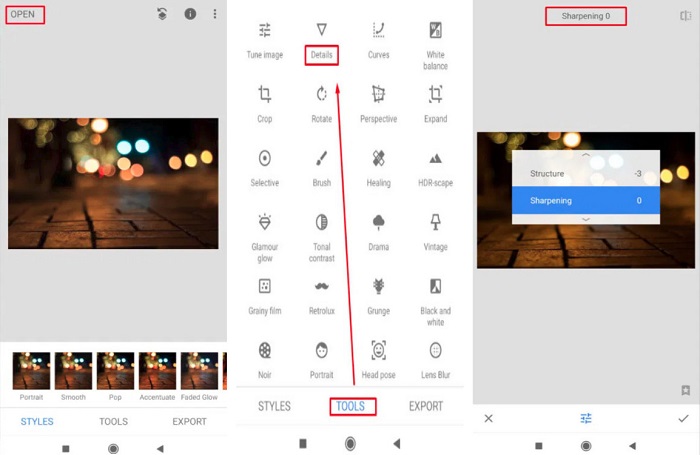
Vaihe 1. Lataa sovellus Android-laitteellesi ja avaa se. Avaa sen jälkeen kuva sovelluksessa.
Vaihe 2. Valitse sitten Tools-paneelista Details-vaihtoehto.
Vaihe 3. Valitse seuraavaksi kuvallesi joko Sharpen tai Structure muuttaaksesi sumeaa kuvaasi. Säätämällä näitä kahta asetusta poistat kuvasi sumeutta.
Osa 5. Usein kysyttyä kuvan sumennuksen poistamisesta
Kasvaako tiedostokoko, kun poistat kuvan sumennusta?
Joo. Kun poistat kuvan sumennusta, sen PPI kasvaa, jolloin tiedostokoko on suurempi kuin alkuperäinen.
Miksi kuvasta tulee epäselvä, kun suuren sen?
Todennäköisesti se johtuu pakkausongelmasta. Kun yrität muuttaa kuvan kokoa, suurennat myös valokuvasi pikseleitä. Joten kuvan pakkaaminen saattaa vaikuttaa kuvan laatuun.
Voinko poistaa JPG-kuvan sumennusta Adobella?
Ehdottomasti! Voit käyttää Adobe Photoshopia, jos haluat poistaa sumennusta JPG-kuvasta. Adobe Photoshop tukee tavallisia kuvamuotoja, kuten PNG, JPG ja JPEG
Johtopäätös
Nyt kun tiedät, kuinka tehdä sumeasta kuvasta terävä helpoimmilla menetelmillä, voit terävöittää kuviasi. Kaikki edellä esitellyt tavat auttavat sinua varmasti saavuttamaan haluamasi lopputuloksen. Jos kuitenkin haluat säästää tilaa laitteellasi, suosittelemme käyttämään FVC Free Image Upscaler -työkalua, jota voit käyttää ilmaiseksi verkossa ilman asennusta.
-
 Kuvan koon muuttaminen PowerPointissa [nopein tapa muuttaa kokoa]
 Kuvien koon muuttamisen oppiminen PowerPointissa on välttämätöntä, varsinkin jos haluat käyttää sitä esityksessäsi. Lue tämä artikkeli saadaksesi tietää, miten se tehdään.
-
 1440p-kuva – kaikki tarvitsemasi tiedot [2022 päivitetty]
 Haluatko tietää 1440p-kuvista? Tai mistä sen saa? Muutetaanko kuva 1440p:ksi? Lue tämä tietääksesi ne kaikki.
-
 Opastus kuvan poistamiseen 3 parhaan valokuvan pikselöinnin avulla
 Onko sinulla ongelmia pikselöityjen kuvien käsittelyssä? Tänään olemme ratkaisseet ongelman, ja voit käyttää tähän lisäämiämme työkaluja.