


Comment changer facilement HEIC en JPG sur iPhone à l'aide d'applications
Unlike JPEG, the HEIC doesn't get a lot of support, and because of that, converting it became necessary before transferring the file. But selecting a converter on your device might be challenging because not all of them perform very well in converting the image file. So, if you want to know the techniques to change the format to a JPEG on your device, you must follow this article. There are three different methods to shift HEIC to JPG on iPhone and desktop easily without losing the quality of the raw HEIC file.

Partie 1. Comment convertir HEIC en JPG sur iPhone à l'aide de l'application Fichiers
With a file manager like the File App you can easily convert HEIC to JPG on iPhone without downloading additional files. Besides the storing features, the tool supports locally on your iPhone; it also supports other cloud storage apps, which became one reason why this feature became popular on every iPhone user. If you like to try using this file manager built-in app on iOS devices, then follow the steps below to do it effectively.
Étapes pour convertir HEIC en JPG à l'aide de File App :
Step 1. Open the Library of the HEIC image you want to copy.
Step 2. Then open the File App and select On My iPhone. While using it, you can also access Google Drive or another iCloud drive to upload the HEIC file if the HEIC file isn't available on your local drive, but you will need to have an internet connection to do it.
Step 3. After you've opened the app, you must now create a folder, paste the file, and the format will automatically be saved in JPEG format.
Partie 2. Comment convertir HEIC en JPG à l'aide d'une application tierce sur iPhone
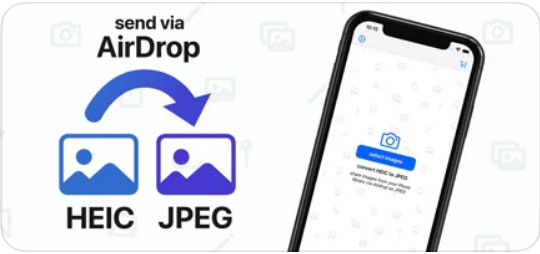
One of the best free apps you can use to change the format of your HEIC is the HEIC to JPEG. This app is open-source, which means you can download it for free on any iOS device. If you want to know how to convert HEIC to JPG on iPhone, you can follow the steps below.
Étapes pour convertir HEIC en JPG à l'aide de HEIC en JPEG :
Step 1. Search the HEIC to JPEG on the App Store, and click the download button to install the app on your iOS device.
Step 2. After the installation, tap the app to open it. By tapping the Select Image, you can directly access the Photos of your iOS and select the HEIC image you want to convert.
Step 3. If you have uploaded the HEIC file in the app, you must check them out by tapping them individually. After you tap the HEIC file you want to convert, tap the Share as JPEG located at the upper right corner of your screen.
Step 4. In this area, tap the Save Image, and the HEIC photo will convert into a JPEG.
Partie 3. Comment convertir HEIC en JPEG et transférer les photos vers Windows et Mac
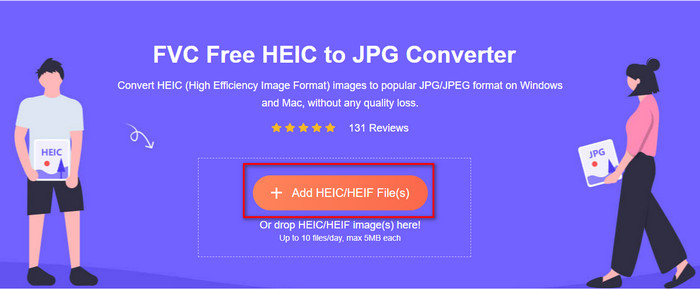
Suppose the third-party iOS app and the built-in file manager didn't work based on your need, then what should you do? No need to worry because we got your back. FVC Free HEIC to JPG Converter is a web-based tool that allows its users to convert the HEIC file automatically into a JPEG. With it, you can use the tool and finish the task of converting in three easy steps. Here are the steps to convert HEIC to JPEG if you don't have an iPhone to use.
Étapes pour convertir HEIC en JPG à l'aide du convertisseur gratuit HEIC en JPG de FVC :
Step 1. Click this link to open the official website of the web tool on your favorite browser.
Step 2. Then click Add HEIC/HEIF File(s), locate the HEIC image you want to change the format, and click Open to upload the file successfully.
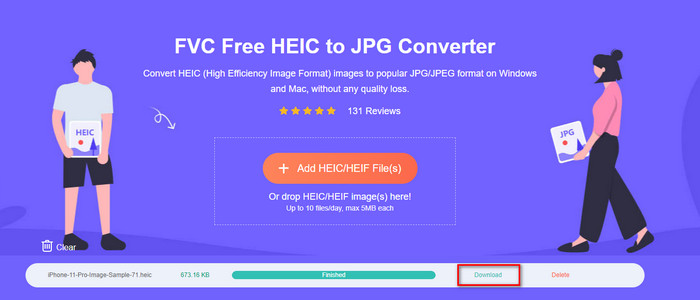
Step 3. Converting the format into JPEG will start soon, and after the procedure, click Download to save the image file on your drive with a JPEG format. As we promised, you will only go to read three easy steps to successfully change the format of the image you have into a JPEG. So if the app on iPhone didn't work well, then this is the tool you must use as a substitute for them.
Partie 4. FAQ sur la conversion de HEIC en JPEG sur iPhone
Dois-je convertir le fichier HEIC en JPEG avant de le transférer sur iPhone ?
It depends on the version of the iOS device of the receiver; if the receiver uses an iOS 11 or up, then converting the format to JPEG isn't necessary because you can open the file here as it is natively supported. But if the receiver's version is lower than the iOS 11, that is the time you will need to convert HEIC into a JPEG.
Le transfert de HEIC vers un autre appareil prend-il du temps ?
Pas à cause de la compression de ce format, il est donc facile de transférer l'image dans ce format. Cependant, si vous l'envoyez en bloc à l'autre appareil, vous devrez attendre que le processus soit terminé. Si vous le transférez à l'aide d'une connexion Internet, vous aurez besoin d'une connexion rapide pour le traiter rapidement.
Après la conversion de HEIC en JPEG, la haute qualité de l'image restera-t-elle ?
HEIC et JPEG peuvent stocker des images de haute qualité, donc en convertissant le HEIC en JPEG, vous ne rencontrerez pas de perte de qualité lors de la conversion. Pourtant, certains convertisseurs réduisent la qualité de l'image pour les traiter rapidement. Pour éviter d'avoir une mauvaise qualité sur le fichier HEIC brut, vous devez choisir le meilleur convertisseur pour changer facilement le format en JPEG sans perdre la qualité d'origine.
Conclusion
We have now learned how to change the HEIC to JPG on iPhone without worrying about the quality lost. Despite having trouble handling the HEIC format with this article, you have lessened the burden you carry because you now have ways to convert it. So, if you want to try the two methods we mentioned above on your iPhone, go and follow them accordingly. But if you think that it will not suffice your needs, you must choose the online converter we mentioned. There are guidelines on how to use the converter on the web. Follow it to get the whole idea of how to use it. We hope that you like reading this article, visit our website as we gathered also other ways to solve your daily task on video and audio problems.
-
 Convertir HEIC en PDF en utilisant les 4 meilleures méthodes améliorées en 2022
 Pour en savoir plus sur le meilleur convertisseur HEIC en PDF, vous pouvez télécharger ce 2022. Vous pouvez lire cet article car nous avons fourni une critique à leur sujet.
-
 5 des meilleurs convertisseurs HEIC en JPG choisis en 2022
 Avec le convertisseur HEIC en JPC, vous pouvez facilement changer le format d'image en un JPG portable. Vous voulez savoir quels sont ces 5 outils ? Lisez cet article.
-
 Meilleur convertisseur HEIC gratuit et payant que vous devez connaître [Mise à jour 2022]
 Voulez-vous savoir ce qu'est le convertisseur HEIC ? Si tel est le cas, nous incluons les 5 meilleurs convertisseurs HEIC gratuits et payants que vous pouvez utiliser pour changer le format HEIC.