


ビデオのPicsartFilter透かしを効果的に削除する完全な方法
今日では、Picsart のようにデスクトップで頼りにできるビジュアルメディア編集ソフトを持っていることが、必須の「武器」となっています。これさえあれば、いくつかのオプションを調整するだけで、普通の画像を誰も見たことのないような写真作品に仕上げることができます。自分で作成した目を引く画像によって、より多くの顧客やオーディエンスを獲得することもできるでしょう。ただし、Picsart を使う際には 1 つ問題があります。それは、書き出し後に追加されるウォーターマークです。このウォーターマークはかなり煩わしく、消さないとビジュアル面で邪魔になりかねません。もしあなたがこのソフトと、Picsart のフィルターのウォーターマークを消す方法のチュートリアルを探しているなら、この記事を読み進めて、詳しく学んでください。

パート1。デスクトップ上の無料ソフトウェアを使用してPicsartフィルター透かしを削除する方法
FVC VideoConverterUltimate-WindowsおよびMacでナンバーワンのウォーターマークリムーバー
まずは、Picsart のウォーターマークを消す方法をサポートし、教えてくれる、私たち一押しのソフトウェアから紹介していきます。FVC Video Converter Ultimate は、手持ちの武器の中でも欠かせない一本であり、動画のウォーターマークを簡単に消しつつ、プロ仕様の出力を実現してくれます。その性能と比類のない多機能さから、多くのユーザーがすでに試しており、そのツールは期待を裏切りませんでした。動画からウォーターマークを消したいと考えているなら、以下に示す手順を真似て、実際に操作してみてください。
ステップ 1. 下の適切なダウンロードボタンをクリックして、この究極ソフトをデバイスに入手します。その後、パソコンにインストールし、「今すぐ開始」をクリックしてソフトを起動します。
無料ダウンロードWindows 7 以降に対応安全なダウンロード
無料ダウンロードMacOS 10.7 以降に対応安全なダウンロード
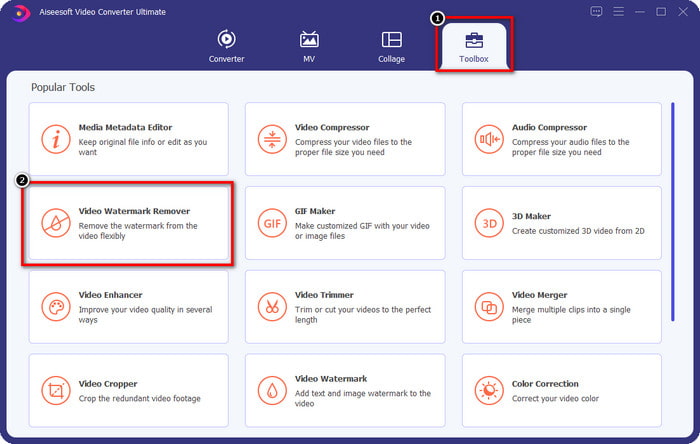
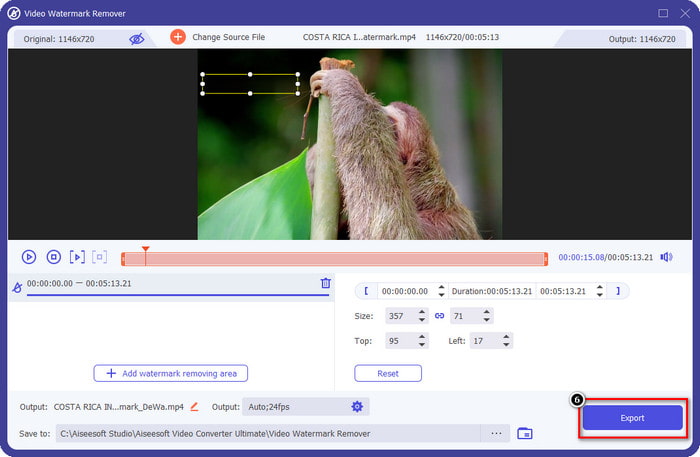
ステップ 2. ツールボックス セクションには、動画に華やかな仕上げを加えるのに役立つ、さまざまな機能が表示されます。今回は、その中から Video Watermark Remover(動画ウォーターマーク除去)をクリックします。
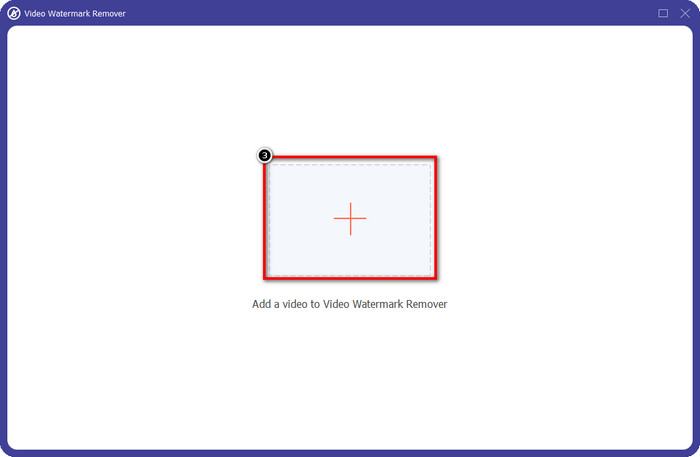
ステップ 3. + アイコンをクリックして、Picsart で編集した動画をアップロードします。画面に表示されたフォルダから該当ファイルを探し、「開く」をクリックします。
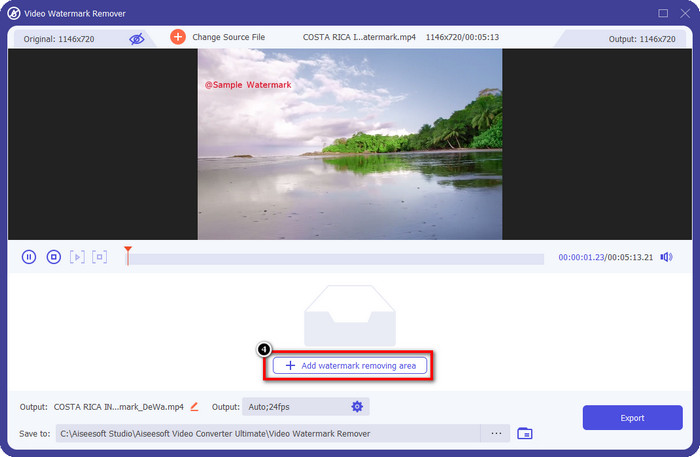
ステップ 4. 「Add Watermark Removing Area」(ウォーターマーク削除エリアを追加)を押して、アップロードした動画に埋め込まれているウォーターマークを消します。
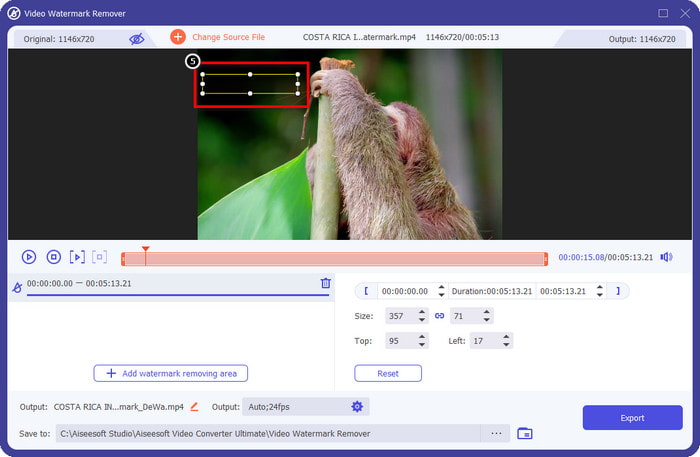
ステップ 5. 選択ボックスをドラッグしてウォーターマークの位置に合わせ、完全に覆うように配置します。好みに応じてボックスを拡大・縮小してください。
ステップ 6. 選択ボックスでウォーターマークを覆い終えたら、「Export」(エクスポート)をクリックして、完成した動画をローカルドライブに保存します。
Windowsの写真-3Dデザインで透かしをカバー
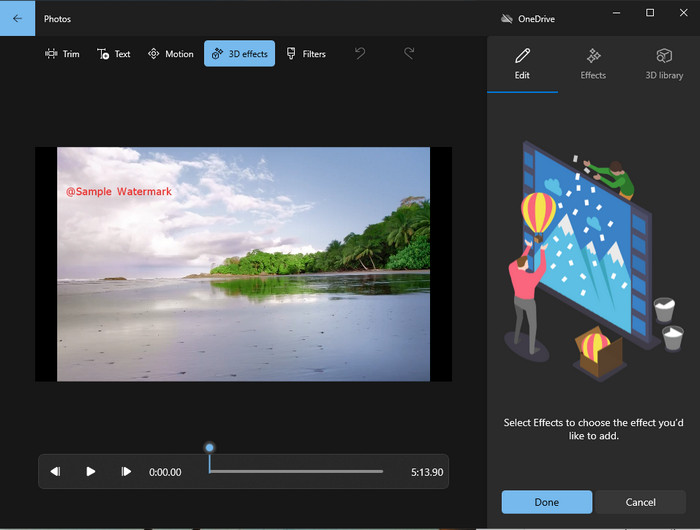
ソフトをダウンロードするのが得意ではなく、なおかつ Windows ユーザーであれば、フォト アプリを使って動画上のウォーターマークを編集する方法をぜひ試してみてください。このツールを使えば、アプリのダウンロードという手間がないぶん、Picsart のウォーターマークを消す作業をより素早く進められます。このツール自体にはウォーターマークを削除する機能はありませんが、3D デザインを重ねることでウォーターマークを隠すことができます。それでも、この標準搭載のビジュアルメディアビューア兼エディターの実力は十分です。半信半疑ですか? それなら、以下の手順を読んで、実際に試してみてください。
ステップ 1. タスクバーの Windows ボタンをクリックし、「フォト」と入力して検索し、アプリを開きます。
ステップ 2. 内蔵エディターを開いたら、+ アイコンをクリックして、ここで編集したい動画をアップロードします。
ステップ 3. 3D 効果 に進み、3D ライブラリ をクリックして、ウォーターマークを隠すために使いたいデザインを検索します。選んだデザインを、ウォーターマークがある部分に配置します。
ステップ 4. 「ビデオの完了」を押して、最終的な動画を Windows のローカルドライブに保存します。
PickFrom Blur Video Online
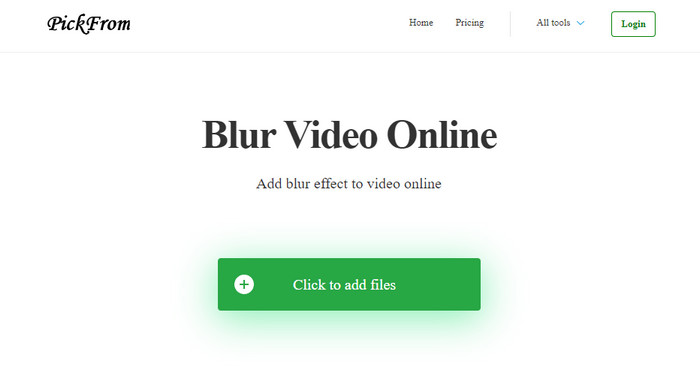
PickFrom Blur Video Online は、Web 上にある動画の PicsArt ウォーターマークを消したいときに役立つオンラインツールです。このツールはあまり知られていませんが、ここで紹介しておきます。アップロードした動画からウォーターマークを消す効率が高いことから、今回取り上げました。インターフェース(GUI)はシンプルでわかりやすく、このソフトを初めて使う人でも迷うことはないでしょう。ウォーターマークを消したいなら、以下の手順に進みましょう。
ステップ 1. Web ブラウザを開き、ツール名を検索して、検索結果の一番上に表示されたウォーターマークリムーバーのページを開きます。
ステップ 2. 「Click to Add File」をクリックして、ここに動画をアップロードします。
ステップ 3. 「Blur Part of the Video」(動画の一部をぼかす)にチェックを入れ、選択ボックスをウォーターマークの位置に合わせます。
ステップ 4. 「Start」を押して、ウォーターマークが目立たなくなった動画をダウンロードします。
パート2。プレミアムバージョンを購入してPicsart透かしを削除する方法
Picsartゴールド透かしの削除で問題が発生したくない場合は、ソフトウェアを購入する必要があります。使用する前に料金を支払ってから、透かしを埋め込まずにビデオをエクスポートする必要があるため、一定の費用がかかります。したがって、Picsartの購入に関するステップバイステップのチュートリアルが必要な場合は、追加する次のチュートリアルに従う必要があります。
ステップ 1. Picsart の公式サイトを開き、ここで自分のアカウントにログインします。アカウントを持っていない場合は、「サインアップ」して新規作成してください。
ステップ 2. メインページで「Pricing(料金)」をクリックし、利用可能な各プランの価格を確認します。
ステップ 3. 月額か年額か、希望のプランを選択し、「Go to Payment」(支払いに進む)をクリックします。
ステップ 4. 必要事項を入力して請求情報を登録し、「Purchase Now」(今すぐ購入)をクリックします。
関連記事:
パート3。Picsart透かしを削除する方法に関するFAQ
Picsart Goldを恒久的に購入できますか?
1回限りの支払いベースまたはプランはサポートされていないため、Picsart Goldを使用する場合は、月額または年額のプランを利用する必要があります。公式サイトにアクセスして、各プランの料金を確認してください。
Picsartでカスタマイズされたサブスクリプションを作成できますか?
はい、Picsartでチームのサブスクリプションを作成できます。アプリを使用する人数を設定できます。
Picsartにはどこからアクセスできますか?
Picsartは、Windows、Android、およびiOSにダウンロードできます。残念ながら、このアプリには現在Macバージョンがありませんが、システムで利用可能な他のメディア編集ソフトウェアを使用できるので、悲しいことではありません。
結論
以前に教えたチュートリアルでは、PicsArtを使用して透かしを削除する方法と、使用できる最高の透かし除去機能について説明します。これで、Picsartで編集したビデオを、最終出力に追加される製品の透かしを気にせずに楽しむことができます。したがって、私たちが提示するツールにまだ確信が持てない場合は、最初にそれらを試す必要があります。特にFVC VideoConverterUltimateを試してみてください。ダウンロードボタンをクリックして、WindowsとMacに無料でインストールし、それが提供する機能を利用してお楽しみください。
-
 究極のツールを使用してPond5透かしを削除する方法
 以下の簡単な手順に従って、Pond5透かしを削除する方法を学びます。これらの印象的なツールを使用して、画像のPond5透かしを簡単に削除できます。
-
 Dxtory透かしを削除する方法に関する2つの強力な方法
 2つの最良の方法に従って、Dxtory透かしを削除する方法を学びます。 Dxtory透かしを削除するための最適なツールを探している場合は、こちらをお読みください。
-
 見逃してはならない優れたArnoldMayaウォーターマークリムーバー
 多くの透かしリムーバーは、ArnoldMaya透かしを削除できます。ただし、Arnold Mayaの透かし除去機能として最適なものを知りたい場合は、このページをお読みください。