


Slik endrer du HEIC til JPG på iPhone enkelt ved å bruke apper
I motsetning til JPEG får ikke HEIC mye støtte, og derfor ble det nødvendig å konvertere filen før overføring. Men det kan være utfordrende å velge en omformer på enheten din, siden ikke alle fungerer like godt til å konvertere bildefiler. Hvis du vil lære teknikkene for å endre formatet til JPEG på enheten, bør du følge denne artikkelen. Det finnes tre ulike metoder for enkelt å gjøre om HEIC til JPG på iPhone og datamaskin uten å miste kvaliteten på den originale HEIC-filen.

Del 1. Hvordan konvertere HEIC til JPG på iPhone ved hjelp av appen Filer
Med en filbehandler som Filer-appen kan du enkelt konvertere HEIC til JPG på iPhone uten å laste ned ekstra filer. I tillegg til lagringsfunksjonene verktøyet støtter lokalt på iPhonen din, støtter det også andre skylagringsapper, noe som er en av grunnene til at denne funksjonen har blitt populær blant alle iPhone-brukere. Hvis du vil prøve å bruke denne innebygde filbehandleren på iOS-enheter, følger du trinnene nedenfor for å gjøre det effektivt.
Trinn for hvordan du konverterer HEIC til JPG ved hjelp av filappen:
Trinn 1. Åpne biblioteket som inneholder HEIC-bildet du vil kopiere.
Trinn 2. Åpne deretter Filer-appen og velg På min iPhone. Når du bruker den, kan du også få tilgang til Google Disk eller en annen iCloud-disk for å laste opp HEIC-filen hvis den ikke er tilgjengelig på den lokale enheten, men da trenger du internettforbindelse for å gjøre det.
Trinn 3. Når du har åpnet appen, må du opprette en mappe, lime inn filen, og formatet vil automatisk bli lagret som JPEG.
Del 2. Hvordan konvertere HEIC til JPG ved hjelp av en tredjepartsapp på iPhone
En av de beste gratisappene du kan bruke til å endre formatet på HEIC-filen din, er HEIC to JPEG. Denne appen er åpen kildekode, noe som betyr at du kan laste den ned gratis på alle iOS-enheter. Hvis du vil vite hvordan du konverterer HEIC til JPG på iPhone, kan du følge trinnene nedenfor.
Trinn for hvordan du konverterer HEIC til JPG ved å bruke HEIC til JPEG:
Trinn 1. Søk etter HEIC to JPEG i App Store, og trykk på nedlastingsknappen for å installere appen på iOS-enheten din.
Trinn 2. Etter installasjonen trykker du på appen for å åpne den. Ved å trykke på Select Image får du direkte tilgang til Bilder på iOS-enheten og kan velge HEIC-bildet du vil konvertere.
Trinn 3. Hvis du har lastet opp HEIC-filen i appen, må du sjekke dem ved å trykke på hver enkelt. Etter at du har trykket på HEIC-filen du vil konvertere, trykker du på Share as JPEG øverst til høyre på skjermen.
Trinn 4. På dette stedet trykker du på Save Image, og HEIC-bildet blir konvertert til en JPEG.
Del 3. Hvordan konvertere HEIC til JPEG og overføre bildene til Windows og Mac
Hvis tredjeparts iOS-apper og den innebygde filbehandleren ikke fungerer slik du ønsker, hva skal du da gjøre? Det er ingen grunn til bekymring, for vi har en løsning. FVC Free HEIC to JPG Converter er et nettbasert verktøy som lar brukerne automatisk konvertere HEIC-filer til JPEG. Med dette verktøyet kan du utføre konverteringen i tre enkle trinn. Her er trinnene for å konvertere HEIC til JPEG hvis du ikke har en iPhone å bruke.
Trinn for hvordan du konverterer HEIC til JPG ved å bruke FVC Free HEIC til JPG Converter:
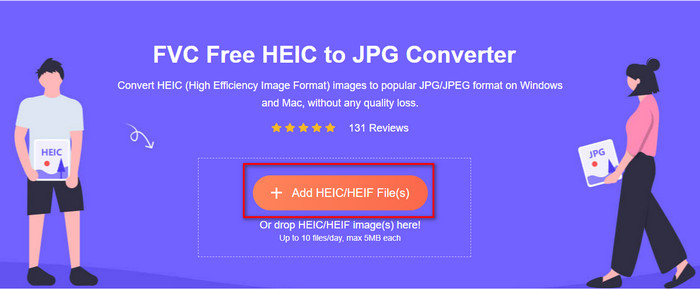
Trinn 1. Klikk på denne lenken for å åpne det offisielle nettstedet til nettverktøyet i favorittnettleseren din.
Trinn 2. Klikk deretter på Add HEIC/HEIF File(s), finn HEIC-bildet du vil endre format på, og klikk Open for å laste opp filen.
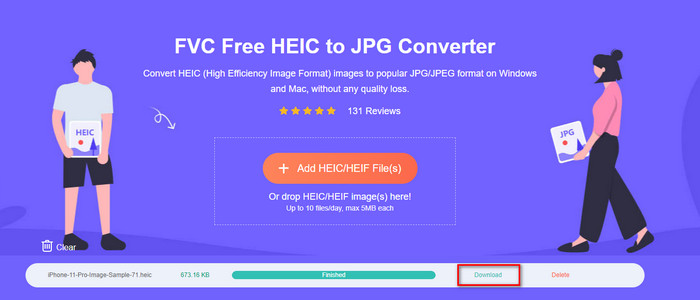
Trinn 3. Konverteringen til JPEG-format vil starte snart, og etter prosessen klikker du på Download for å lagre bildefilen på disken din i JPEG-format. Som lovet trenger du bare å følge tre enkle trinn for å endre bildeformatet til JPEG. Hvis appene på iPhone ikke fungerer som de skal, er dette verktøyet det du bør bruke som erstatning.
Del 4. Vanlige spørsmål om konvertering av HEIC til JPEG på iPhone
Må jeg konvertere HEIC-filen til JPEG før jeg overfører den til iPhone?
Det kommer an på hvilken versjon av iOS-enhet mottakeren har. Hvis mottakeren bruker iOS 11 eller nyere, er det ikke nødvendig å konvertere formatet til JPEG, fordi filen kan åpnes direkte siden den støttes som standard. Men hvis mottakerens versjon er lavere enn iOS 11, er det da du må konvertere HEIC til JPEG.
Tar det tid å overføre HEIC til en annen enhet?
Ikke på grunn av komprimeringen dette formatet har, så det er enkelt å overføre bildet i dette formatet. Men hvis du sender den i bulk til den andre enheten, må du vente til prosessen er ferdig. Hvis du overfører den ved hjelp av en internettforbindelse, trenger du en rask for å behandle den raskt.
Etter å ha konvertert HEIC til JPEG, vil den høye kvaliteten på bildet forbli?
HEIC og JPEG kan lagre bilder av høy kvalitet, så ved å konvertere HEIC til en JPEG, vil du ikke oppleve et kvalitetstap under konverteringen. Likevel reduserer noen omformere kvaliteten på bildet for å behandle dem raskt. For å unngå å oppleve å ha dårlig kvalitet på den rå HEIC-filen, må du velge den beste konverteren for å endre formatet til JPEG enkelt uten å miste den opprinnelige kvaliteten.
Konklusjon
Vi har nå lært hvordan vi kan endre HEIC til JPG på iPhone uten å bekymre oss for kvalitetstap. Selv om HEIC-formatet kan være vanskelig å håndtere, har du med denne artikkelen redusert belastningen fordi du nå har flere måter å konvertere det på. Hvis du vil prøve de to metodene vi nevnte ovenfor på iPhonen din, er det bare å følge dem steg for steg. Men hvis du mener at de ikke dekker behovene dine, bør du velge den nettbaserte omformeren vi har nevnt. Der finner du retningslinjer for hvordan du bruker omformeren på nettet. Følg dem for å få full oversikt over hvordan den brukes. Vi håper du likte denne artikkelen; besøk nettstedet vårt, der vi også har samlet andre løsninger på daglige oppgaver knyttet til video- og lydproblemer.
-
 Konverter HEIC til PDF ved å bruke topp 4 forbedrede måter i 2022
 For å vite mer informasjon om den beste HEIC til PDF-konverteren kan du laste ned denne 2022. Du kan lese denne artikkelen ettersom vi ga en anmeldelse av dem.
-
 5 av de beste HEIC til JPG-konvertererne velger denne 2022
 Med HEIC til JPC-konverteren kan du enkelt endre bildeformatet til en bærbar JPG. Vil du vite hva disse 5 verktøyene er? Les denne artikkelen.
-
 Beste gratis og betalte HEIC-konverterer du må kjenne til [Oppdatert 2022]
 Vil du vite hva HEIC-omformeren er? I så fall inkluderer vi de 5 beste gratis og betalte HEIC-konvertererne du kan bruke til å endre HEIC-formatet.