


Hvordan gjøre en video mørkere for prosjektvideoene dine
Når det gjelder videoproduksjon, er en ofte brukt teknikk å gjøre bestemte områder av opptaket mørkere. Denne prosessen kan gjøres av flere grunner, for eksempel for å skape en stemning eller atmosfære, rette oppmerksomheten mot en bestemt del av skjermen eller bidra til å skjule ujevnheter. En av hovedgrunnene til å gjøre en video mørkere er å legge til drama og spenning i en scene. Ved å redusere eksponeringen og øke kontrasten blir skyggene forsterket og høylysene dempet, noe som gir opptaket en mer dyster og urovekkende følelse. Denne prosessen kan være spesielt effektiv i skrekkfilmer eller thrillere, der publikum skal føle seg urolig. For prosjektvideoen din må du lære denne teknikken ved å følge de detaljerte veiledningene nedenfor.

Del 1. Hvordan mørkere video offline
1. Video Converter Ultimate
Video Converter Ultimate er et kraftig program og et videoredigeringsverktøy som kan gi deg det du trenger. Trenger du hjelp til å redusere lysstyrken på prosjektvideoen din? Dette verktøyet tilbyr en praktisk måte å dempe lysstyrken i utseendet på videoen din. Det leveres med et avansert videoverktøy, en Video Enhancer, som automatisk justerer lysstyrken og kontrasten i prosjektvideoen. Det analyserer filen internt og justerer kontrasten for å gi bedre lyssetting i filen, som om den var tatt opp i et miljø eller en innstilling med lite lys. Du kan sjekke retningslinjene nedenfor for å lære den detaljerte veiledningen for hvordan du bruker denne appen.
Trinn 1. Last ned appen
Begynn å forbedre og redigere videofilen din ved å laste ned programvaren på PC-en. Klikk på Gratis nedlasting som vises under dette trinnet. Hent installasjonsfilen og kjør den på datamaskinen.
Gratis nedlastingFor Windows 7 eller nyereSikker nedlasting
Gratis nedlastingFor macOS 10.7 eller nyereSikker nedlasting
Trinn 2. Importer video
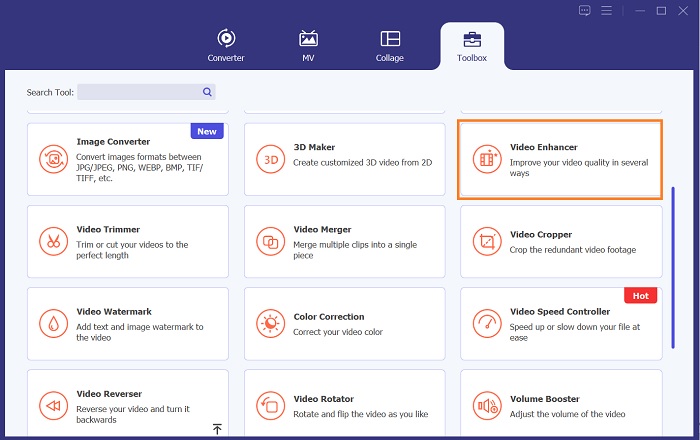
Det neste trinnet er å starte appen og legge til videoen du trenger å forbedre. Gå til alternativet Verktøykasse, der alle avanserte funksjoner ligger. Velg funksjonen Video Enhancer for å åpne dialogboksen. Importer filen ved å trykke på +-ikonet.
Trinn 3. Fullfør prosessen
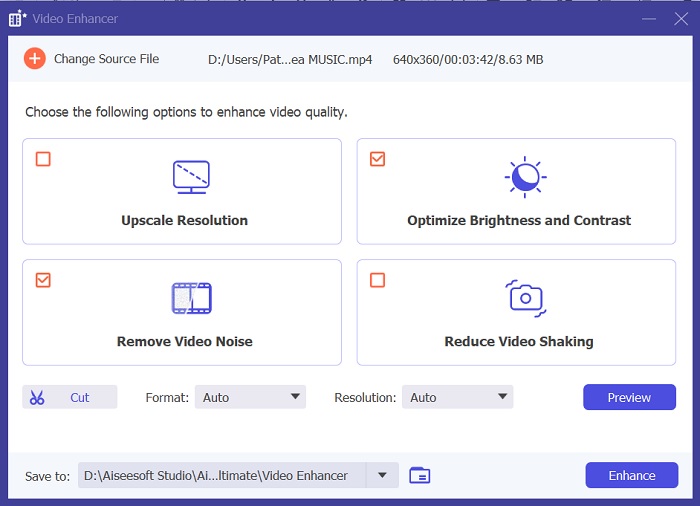
Når den valgte videoen er importert, vil fire alternativer vises på skjermen. Velg menyen Optimized Brightness and Contrast for å behandle videoen automatisk. Deretter blir videoen eksportert til den angitte utdatamappen. Finn filen og spill den av for å kontrollere kontrasten i prosjektvideoen.
2. Adobe Premiere Pro
Premiere Pro er en nyskapende videoverktøyprogramvare som har blitt det beste valget for mange profesjonelle videoredigerere, med sitt intuitive grensesnitt, sømløse integrasjon med andre Adobe-produkter og robuste funksjoner. En av de kritiske fordelene med Premiere Pro er dens evne til å behandle et bredt spekter av videoformater, fra SD til HD til 4K og utover. Denne funksjonen gjør det enkelt å jobbe med opptak fra ulike kilder, inkludert kameraer, mobile enheter og droner. Hvis det er behov for å justere belysningen til videoen din, er Adobe Premiere Pro til stor hjelp med Lumetri Color Panel-funksjonen, som kan justere kontrasten og lysstyrken til en fil. I tillegg tilbyr Premiere Pro avanserte fargekorrigeringsverktøy, lydredigeringsmuligheter, visuelle effekter og mer.
Trinn 1. For å redigere lysstyrke i Premiere Pro må du laste ned appen på PC-en. Du kan søke etter installasjonsfilen på hovednettsiden og laste ned programvaren for å installere appen. Start verktøyet og importer videofilen ved å trykke på knappen Import.
Trinn 2. Åpne Lumetri Color-panelet ved å klikke på fanen Color øverst til venstre på skjermen. I Lumetri Color-panelet vil du se ulike alternativer for fargekorrigering. For å justere lysstyrken går du til delen Basic Correction. Her kan du bruke Exposure-glidebryteren til å endre klippets lysstyrke. Dra glidebryteren mot høyre for å øke lysstyrken eller mot venstre for å redusere lysstyrken.
Trinn 3. Til slutt klikker du på Export-knappen for å lagre filen. Vent til videoen er ferdig rendret og finn den i verktøyets utdatamappe. Spill av og forhåndsvis endringene i prosjektvideoen og se om de passer dine preferanser.
3. Adobe After Effects
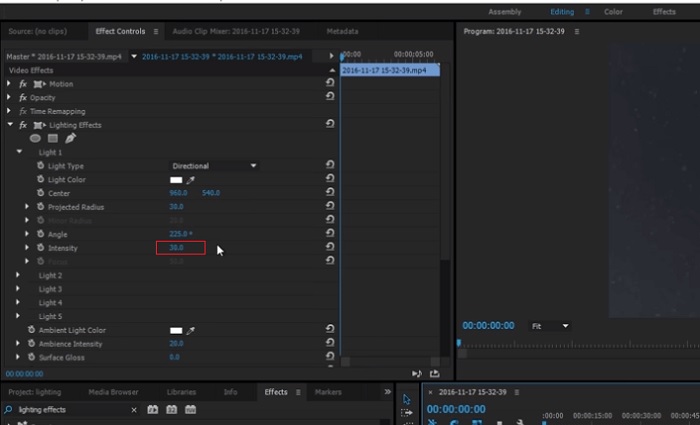
Når du justerer lysstyrken i After Effects, kommer flere funksjoner godt med. For det første kan Levels-effekten brukes til å justere lysstyrke og kontrast. Denne effekten lar deg angi svart-hvitt-punkter, noe som bidrar til å sikre at bildet ditt ikke blir for utvasket eller for mørkt. Du kan også bruke Kurver-effekten til å justere lysstyrken og kontrasten til spesifikke videodeler. Denne funksjonen kan få frem detaljer i skyggene eller høylysene. En annen nyttig funksjon er eksponeringseffekten, som lar deg endre lysstyrken og kontrasten til hele bildet. Denne effekten inkluderer også alternativer for å justere gamma og offset, som kan hjelpe deg med å finjustere utseendet til bildet ditt.
Trinn 1. Det første trinnet for å redigere videoens utseende i After Effects er å skaffe programvaren og installere den på PC-en. Du kan laste den ned fra Adobes offisielle nettsted og kjøre installasjonsfilen. Start deretter appen og bli kjent med funksjonene.
Trinn 2. Deretter importerer du videoen ved å gå til alternativet File og klikke på Import. Finn videoen din og trykk på den for å legge den til i videoredigeringen. Deretter går du til fanen Windows og klikker på Effects and Presets. Det vil komme opp en søkeboks der du kan søke etter Levels-alternativet.
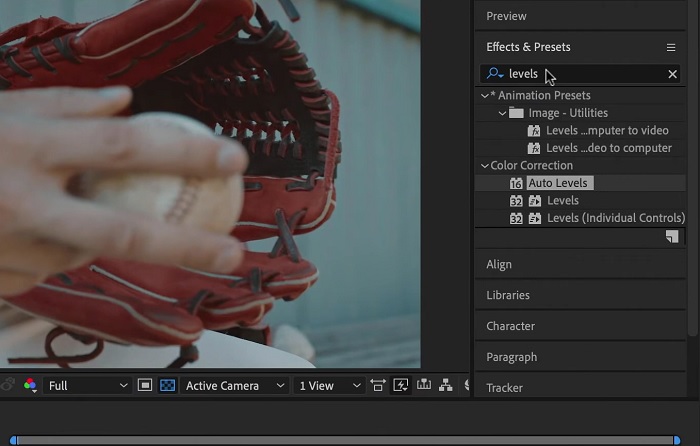
Trinn 3. Til slutt klikker du på Auto Level og drar og slipper det på videoen du trenger å redusere lysstyrken på i prosjektklippet. Trykk på Export-alternativet for å lagre endringene. Du kan også bruke ulike forhåndsinnstillinger til å justere lysstyrken på filen. Gå til utdatamappen for å forhåndsvise og kontrollere den redigerte prosjektvideoen.
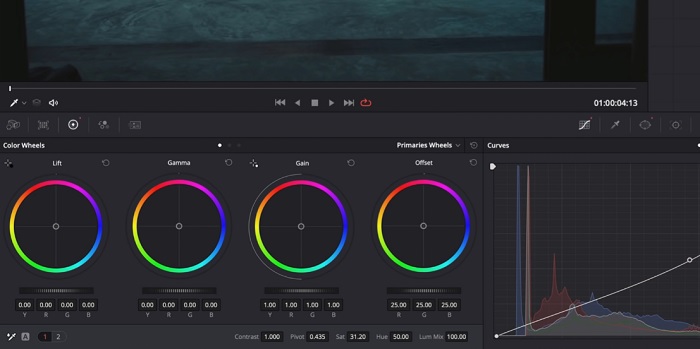
4. DaVinci Resolve
Når det gjelder videomodifisering, er Davinci Resolve et kraftig programvare- og videoverktøy som tilbyr en rekke redigeringsfunksjoner for å forbedre kvaliteten på opptakene dine. En av de vanligste redigeringsteknikkene er å gjøre en video mørkere, noe som kan påvirke bildene dine dramatisk. En av brukerens favorittfunksjoner i denne videoredigeringsprogramvaren er muligheten til å enkelt fargegradere opptak. Programvaren har et bredt spekter av fargegraderingsverktøy som autoriserer brukere til å revidere utseendet og følelsen av opptakene for å matche en kunstnerisk visjon. Den kommer også med et tidslinjepanel der brukere kan gi en bedre redigeringsprosess. Davinci Resolve gjør denne prosessen enkel og effektiv med sine avanserte verktøy.
Trinn 1. Den første veiledningen for å justere eksponeringen til en video med DaVinci Resolve er å installere verktøyet på PC-en. Last ned appen fra det offisielle nettstedet og kjør installasjonsfilen. Start deretter videoredigeringsappen og se gjennom funksjonene for å bli kjent med redigeringsverktøyene.
Trinn 2. For å gjøre en video mørkere med DaVinci Resolve importerer du videoen ved å klikke på File-alternativet og deretter på knappen Import file. Deretter kan du bruke programmets fargegraderingsverktøy. Velg klippet du vil gjøre mørkere på tidslinjen, og åpne deretter siden Color.
Trinn 3. Derfra kan du bruke kontrollene Lift, Gamma og Gain til å justere lysstyrken og kontrasten i klippet. Deretter klikker du på Export-knappen for å lagre endringene som er gjort i videoprosjektet. Gå til utdatamappen for å forhåndsvise filen.
Del 2. Hvordan mørkere video på nett
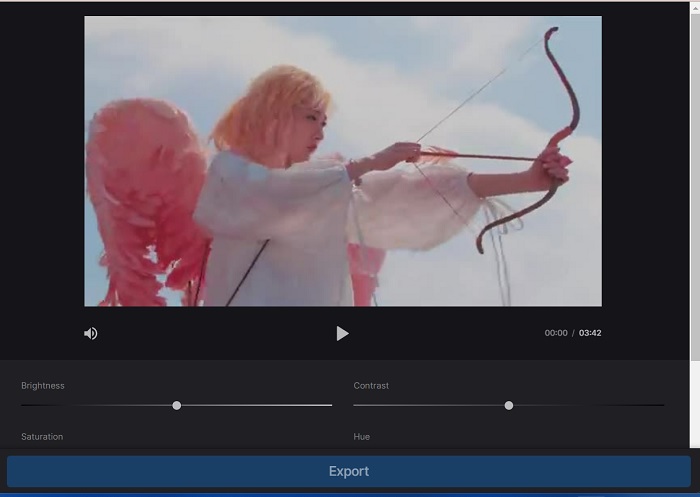
Er du lei av å bruke større videoredigeringsprogramvare for å justere et enkelt videoklipp på PC-en? Vel, Clideo kan være til stor hjelp som et alternativ til videoredigering, siden det bruker mye plass på datamaskinen. Dette nettbaserte verktøyet lar brukere enkelt få tilgang til tidslinjepanelet og importere videoer til API-en uten å måtte installere eller logge på en konto. Brukere kan direkte laste opp videofilen de trenger for å redigere, og nettverktøyet vil analysere og gi redigeringsfunksjoner for å finpusse og forbedre utseendet til prosjektklippet. Du kan sjekke den detaljerte veiledningen nedenfor om hvordan du bruker denne nettappen grundig.
Trinn 1. For å justere lysstyrken i Clideo åpner du appen i nettleseren. Start hovedgrensesnittet og begynn å laste opp videoklippet ditt til plattformen ved å klikke på Choose File. Velg videoen du vil redigere og importer den til nettverktøyet.
Trinn 2. Deretter velger du alternativet Adjust fra menyen under videospilleren. Denne metoden bruker flere redigeringsverktøy, inkludert et alternativ for å justere lysstyrken. Dra brightness slider til venstre eller høyre for å henholdsvis redusere eller øke lysstyrken.
Trinn 3. Du kan også bruke knappen for automatisk justering til å justere lysstyrken automatisk. Når du er fornøyd med lysstyrkenivået, klikker du på ikonet eller knappen Apply for å lagre endringene. Til slutt laster du ned den redigerte videoen ved å klikke på Export-alternativet.
Mer lesing:
Videoeffekter: Forbedre videoen din med filtre og effekter på datamaskin
5 fantastiske YouTube-filmprodusenter | Lag fremragende filminnhold
Del 3. Vanlige spørsmål om Darken Video
Hvordan gjøre en video mørkere på en iPhone?
Det er forskjellig programvare du kan bruke og installere på mobilenheten din som kan justere eksponeringen av prosjektklippet ditt. Du kan også bruke et nettbasert verktøy som kan hjelpe deg med å justere videoer direkte på smarttelefonen. Clideo anbefales da det er tilgjengelig i nettlesere, inkludert Safari og andre som er kompatible med Apple-enheter.
Hvordan gjør du en video mørkere på iMovie?
Juster innstillingene for lysstyrke og kontrast for å gjøre en video mørkere på iMovie. Du kan også legge til et mørkt overlegg eller filter til videoen for å få den til å virke mørkere. Et annet alternativ er å justere eksponeringsnivåene for å gjøre videoen mørkere. Eksperimenter med disse innstillingene til du oppnår ønsket utseende for videoen din.
Hvorfor vil du gjøre en video mørkere på en iPhone?
Å gjøre en video mørkere kan være nyttig i mange scenarier, for eksempel å forbedre den generelle videokvaliteten, forbedre kontrasten eller skape en bestemt stemning eller atmosfære.
Konklusjon
Etter å ha prøvd ulike metoder har denne artikkelen funnet ut at det kan være ganske enkelt å gjøre en video mørkere på en PC. Du må bruke videoredigeringsprogramvare som Video Converter Ultimate, Adobe Premiere Pro, DaVinci Resolve og After Effects for å få til dette. Når du har installert programvaren, kan du enkelt endre eksponeringen i videoen for å oppnå ønsket mørkere effekt. Det er imidlertid avgjørende å sørge for at videoen ikke blir så mørk at det blir vanskelig å se detaljene. Med disse tipsene om hvordan du fikser en video som er for lys kan du lykkes med å gjøre videoen mørkere og skape et visuelt tiltalende sluttresultat.
-
 Ultimate guide for å endre videooppløsning tilgjengelig på tvers av plattformer
 Trenger du å endre videooppløsningen til videoen? I så fall kan du lære de forskjellige måtene du enkelt kan gjøre for å endre videooppløsningen til videoen du ser på.
-
 Hva er vannmerke på en video og hvordan du legger til eller fjerner det
 Vil du vite hva som er et vannmerke, hvilke forskjellige typer og grunnen til at fotografer legger til et? Vel, alt du trenger å gjøre er å lese denne artikkelen.
-
 Hvordan beskjære MP4-fil uten å miste kvaliteten på videoen [2023]
 Lær hvordan du beskjærer MP4 med enkle trinn gitt for deg. Så hold opp tempoet fordi vi presenterer for deg det beste av de beste beskjæringsverktøyene du kan bruke.