


 Video Converter Ultimate
 Gravador de ecrã
 Reparo de vídeo
 Secure Download
How to Separate Mic, Game, and Discord Audio Tracks in OBS
I will always remember my very first attempt at editing a gameplay video. At first, it looked like everything had been done perfectly, but then I checked the sound timeline. My microphone, the sounds of the game, and even Discord conversations were all mixed into one single track. I had no idea how to lower the volume of the teammates without lowering the game audio, and when I tried to remove the background noise from my mic, I ended up changing the whole recording. That's when I understood that it is really crucial to keep each sound source separate right from the beginning. If the question of how to record audio separately is on your mind, then this is for you. Here, I'll show you various methods to separate your mic, game audio, and voice chat into different tracks so that editing in post-production becomes a lot smoother, quicker, and more flexible.

Part 1. How to Record Audio Separately in OBS
Recording each sound source separately will let you have an enormous amount of control during the editing process. Think of it: if you don't record your microphone, game audio, and voice chat separately, tweaking your mic levels after recording would also affect the game audio and vice versa. So, if you want to know how to record audio separately from video using OBS or just want isolated audio tracks at the time of post-production, the methods will be your guide in setting up OBS Studio properly.
Method 1. Use OBS Native "Application Audio Capture" (Easiest)
If you want the easiest method of how to record separate audio tracks in OBS, then using the default Application Audio Capture source is probably your best bet. This feature, introduced in the recent versions of OBS Studio, makes it possible to record audio from only selected applications without installing any third-party audio recorder apps. That means it is most suitable for isolating game audio, music, or other programs.
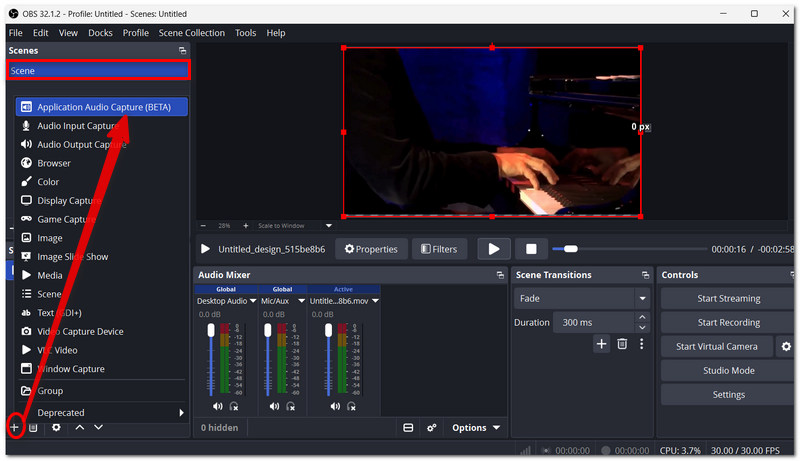
Step 1. Launch OBS Studio and either make a new scene or pick the one you are going to record. In the Sources box, hit the + symbol and pick Application Audio Capture (BETA) from the list.
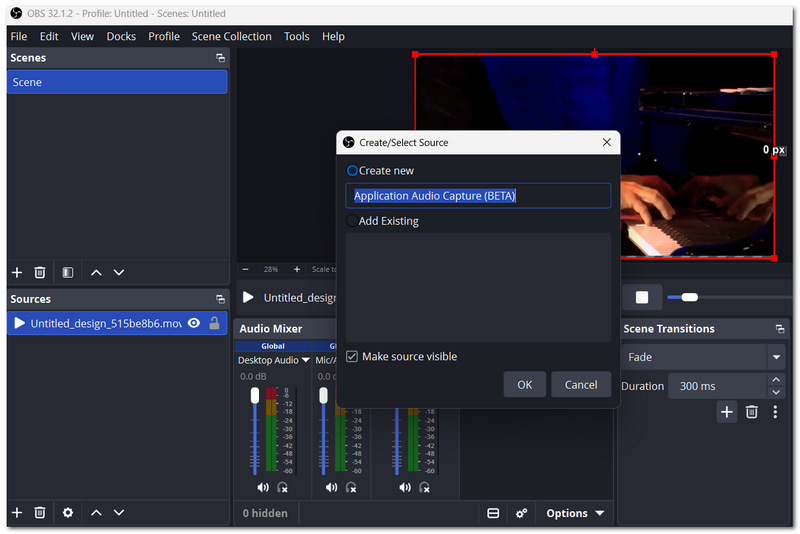
Step 2. Type a name for the new source and press the OK button. Find the program you want to capture the sound in the Windows dropdown list.
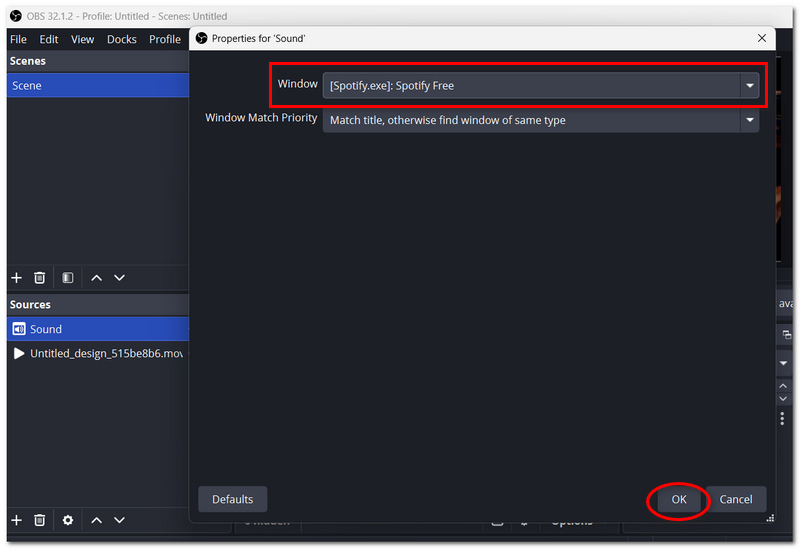
Step 3. Click OK to confirm the new source in your scene. If you want separate audio tracks for different applications, just repeat the steps.
Step 4. Go to Edit > Advanced Audio Properties and check if all audio sources are listed separately.
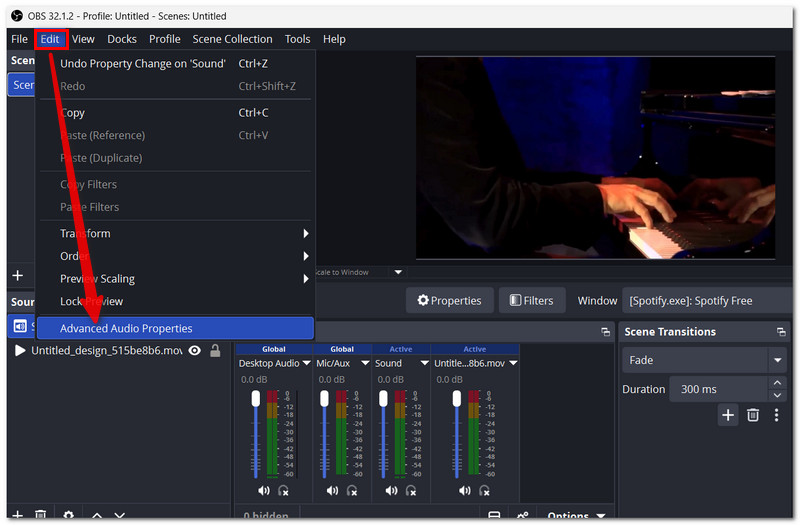
Step 5. For each audio source, select the recording track(s) on which you want it to be recorded by ticking the boxes. Hit record and check if each application's audio is being recorded separately.
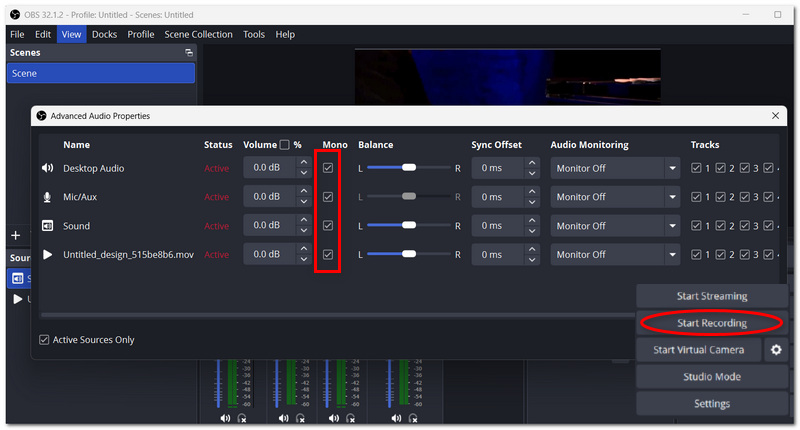
Once you have recorded, you will have isolated the chosen application audio, which means that during the editing stage, you will have a lot of freedom to work on different sound sources.
Method 2. Map Audio to Multiple Tracks in OBS Settings (MKV/MP4 Outputs)
If you want to have full command of your recordings when learning how to record different audio tracks in OBS, you can assign different audio sources to different recording tracks in OBS screen recorder. This is mostly handy for recording microphone, game sound, music, and voice chat separately.
Step 1. Open OBS Studio and click Settings. Navigate to the Output tab and set Output Mode to Advanced.
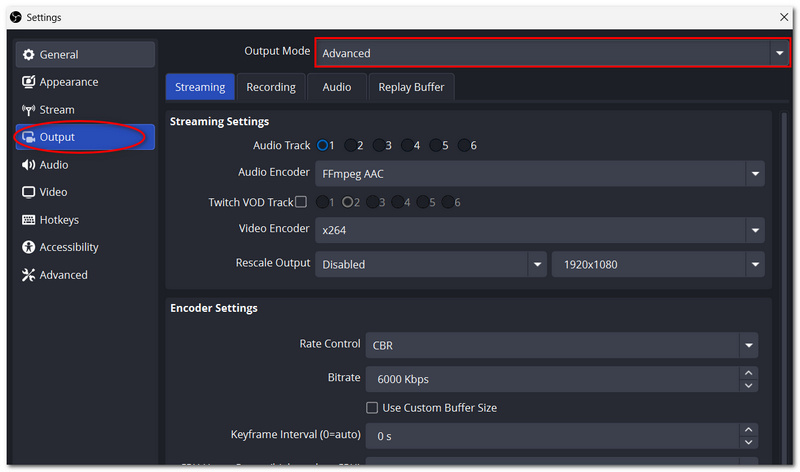
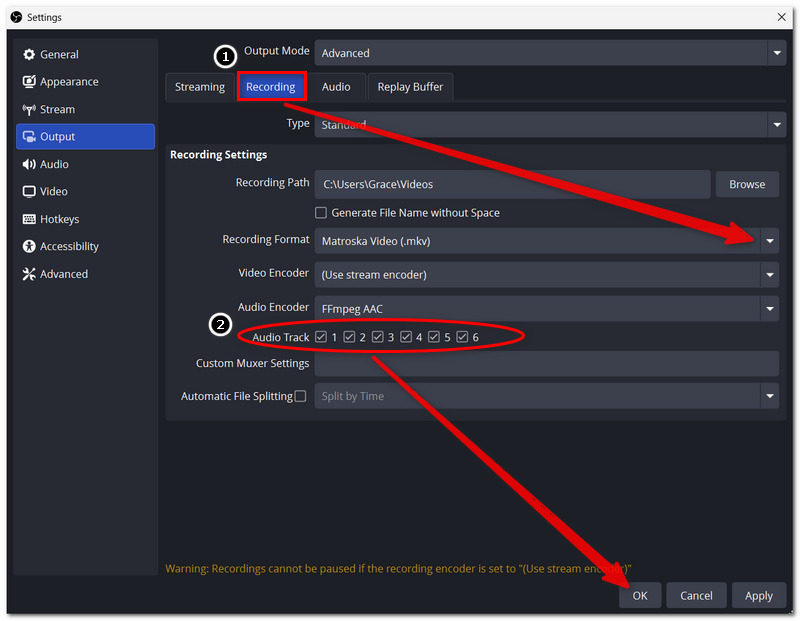
Step 2. On the Recording tab, there are several recording formats to choose from, including MKV or MP4.
Step 3. Open the audio tracks to record by ticking the checkbox beside Track 1, Track 2, Track 3, etc. Click Apply and then OK.
Step 4. From the main OBS window, click on Edit > Advanced Audio Properties.
Step 5. Assign each audio source (Microphone, Desktop Audio, Application Audio Capture, etc. ) to one or more recording tracks by ticking the corresponding boxes.
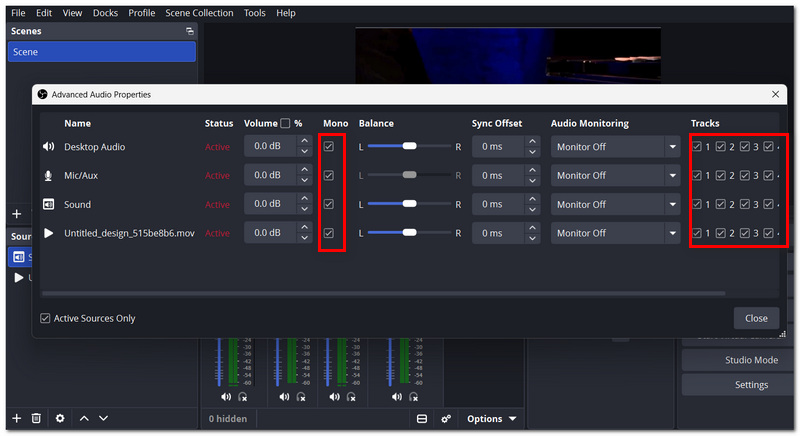
Step 6. Click Close to confirm your configurations. Record your video and verify that every audio source is properly routed to its track.
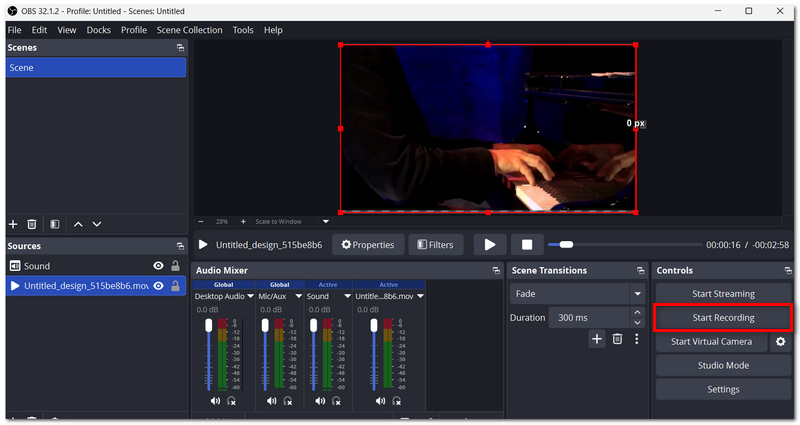
With this configuration, your final video file will have multiple audio tracks, so you'll be able to separate, mute, or edit individual audio sources easily in any compatible video editing software.
Method 3. Using SteelSeries Sonar for Easy Splitting
For a clean, more elegant audio setup, SteelSeries Sonar is fantastic. It creates virtual audio devices for your game, microphone chat, media, and other apps, simplifying the process of getting each source to a separate OBS track. It is ideal if you're a gamer or streamer who constantly uses Discord during a recording session.
Step 1. Download SteelSeries GG and install it on your device. Launch the app afterwards. Head to the Sonar tab and turn the feature on.
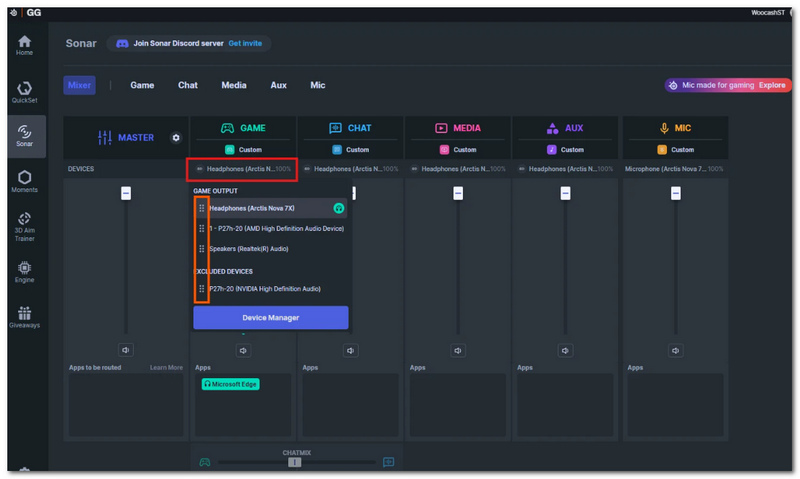
Step 2. Ensure you select the right playback and recording devices in Sonar. Within the Windows Sound Settings, choose the applications you want and assign them to their respective Sonar virtual devices.
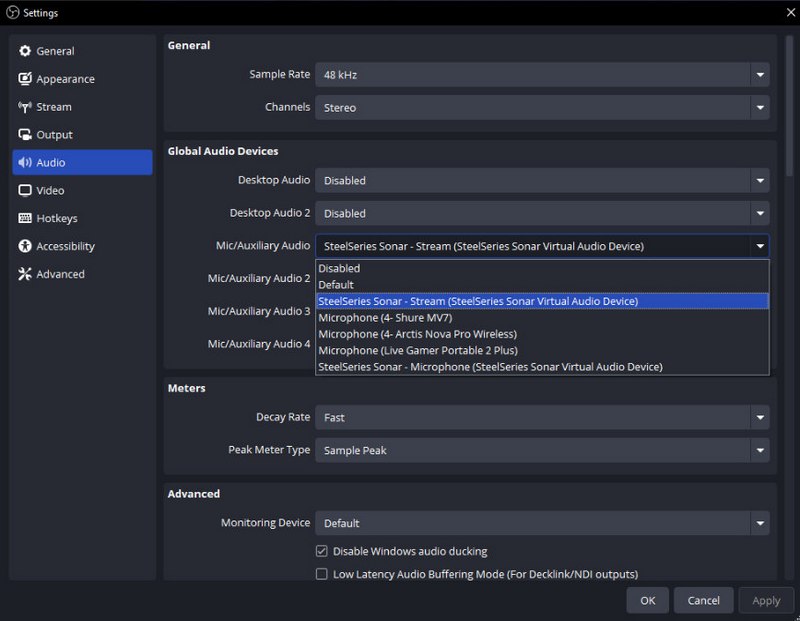
Step 3. Launch OBS Studio and incorporate the required audio sources via Audio under Global Audio Devices.
Step 4. Visit Edit > Advanced Audio Properties. Map every Sonar audio source to its own recording track.
Step 5. Make a quick test recording and check if each audio source is stored separately. After that, record your session once you have verified that the audio routing is functioning properly.
Your post-production phase becomes more versatile as game audio, microphone, Discord chat, and other sound sources are all separated into different tracks.
Method 4. Advanced Routing with Voicemeeter Banana
If you want to have complete control over your audio setup, Voicemeeter Banana is definitely among the most powerful routing software. It is a virtual audio mixer through which you can direct your microphone, game audio, Discord chat, music, and other sound sources to different outputs separately before recording them in OBS. Even though the installation takes a higher level of skill, it is an excellent option for streamers and content creators who have complicated audio setups.
Step 1. First, you need to download & install Voicemeeter Banana. If it asks, give your PC a reboot.
Step 2. Now, open Voicemeeter Banana and assign your physical microphone to the first hardware input. Next, set your stereo speakers/headphones to play from Hardware Output (A1).
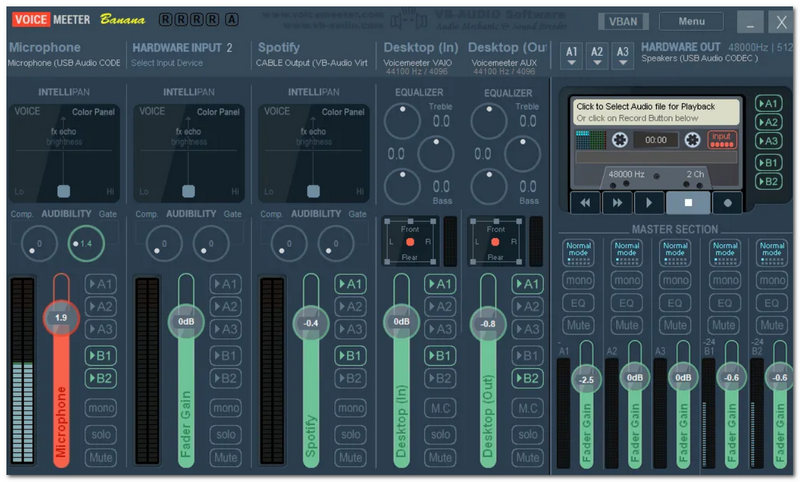
Step 3. In Windows Sound Settings, assign your applications to the appropriate Voicemeeter virtual inputs.
Step 4. Open OBS Studio and add separate Audio Input Capture or Audio Output Capture sources for each VoiceMeeter virtual device.
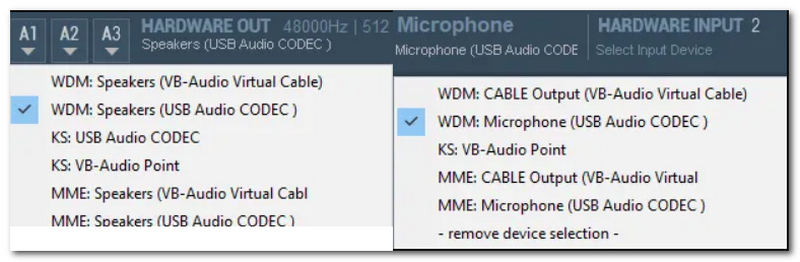
Step 5. Go to Edit > Advanced Audio Properties in OBS. Assign each Voicemeeter input to its own recording track by checking different track numbers.
Step 6. Record a short sample to confirm that each audio source is being captured independently. Once everything is working correctly, start your recording session.
With Voicemeeter Banana properly configured, you'll have complete control over your audio routing, making it easy to edit, adjust, or mute individual sound sources during post-production.
Part 2. Best OBS Alternative to Record Audio Separately
Are you finding OBS too complex to set up? FVC Screen Recorder might be a perfect choice for you if separate recording of screen and audio is the feature you want. It has separate controls for the system sound and microphone, which is very helpful when you need to capture different audio sources and also want to retain high recording quality. Thanks to its simple and friendly layout, even a newbie could make a recording in a few mouse clicks without having to learn complicated audio routing the first time.
Steps to Record Audio Separately with FVC Screen Recorder
Step 1. You need to get the latest FVC Screen Recorder version from the official site and install it on your PC or Mac without any bugs.
Free DownloadFor Windows 7 or laterSecure Download
Free DownloadFor MacOS 10.7 or laterSecure Download
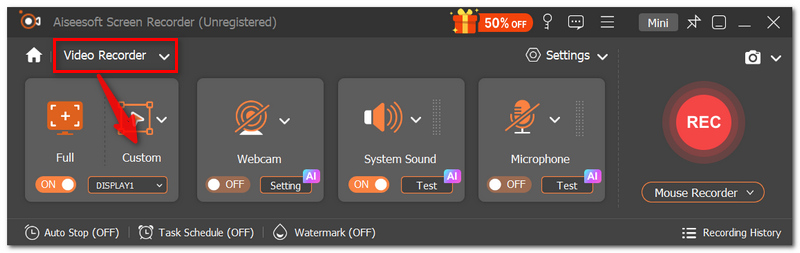
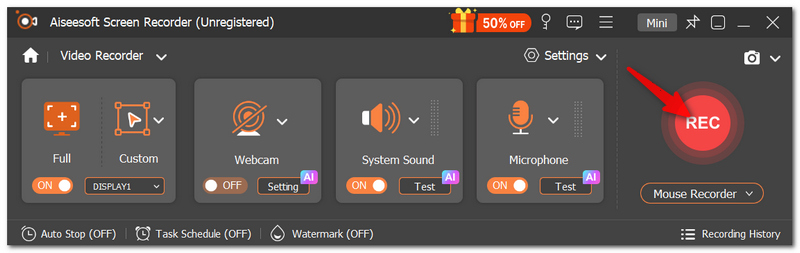
Step 2. Open the software and, in the main interface, hit Video Recorder. Then select one of the recording area size options: Full, Custom, or a window of the application currently running.
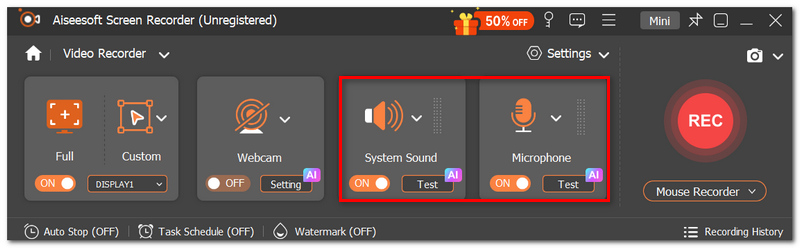
Step 3. If you want to record the sound of the game or the desktop, switch on the System Sound. Turn on the microphone in case you want to record your voice separately as well.
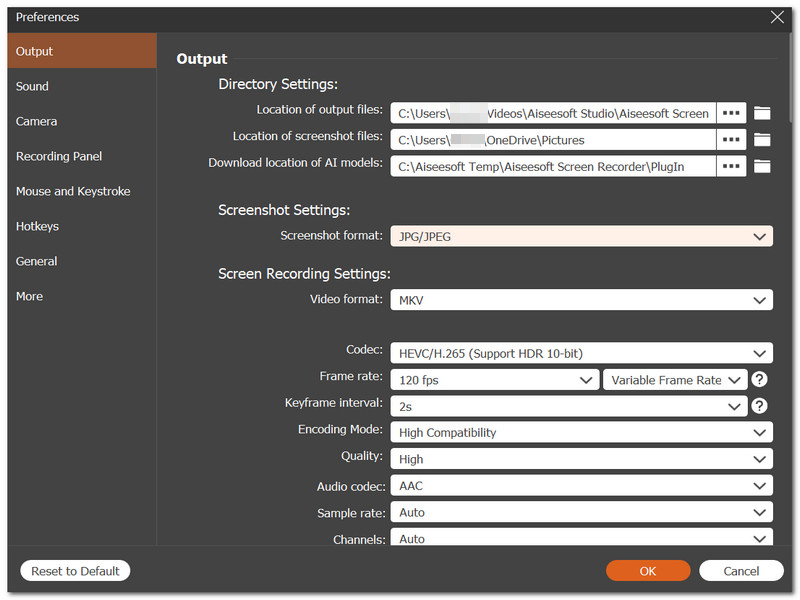
Step 4. Tap the Settings (gear) button and decide on the Output or Recording preferences. Set the desired audio quality, output format, and other recording parameters.
Step 5. Click REC to begin recording your screen and sound. When you are done, hit the Stop button and watch the recording.
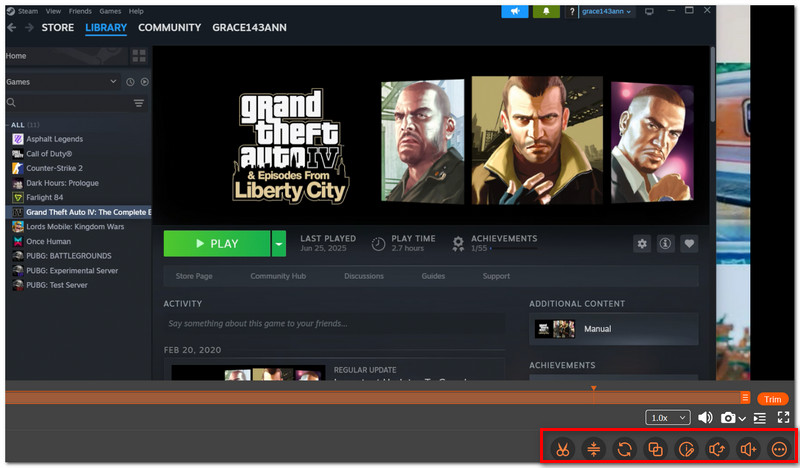
Step 6. If necessary, trim the recording and then hit Save to download the final video and audio.
When the recording is done, you will get a very good quality video with audio sources controlled independently. It will be much easier to separate your narration and system audio for post-production editing.
Part 3. FAQs on How to Record Audio Separately in OBS
Is it possible to rename my audio tracks inside OBS?
Definitely, renaming your audio sources in the Audio Mixer is a great way to make the tracks more distinguishable during recording.
Is it possible to record game audio separately and not have Discord in the recording?
Yes. If you assign Discord to a separate audio source or track, you can decide to include or exclude it.
Is it possible to mute one audio track without changing the others after recording?
Yes. Video editors that support multi-track audio offer the feature to adjust or mute any track individually.
Conclusão
Learning how to record audio separately from video in OBS lets you have a great deal of control over your recordings. When you separate your mic, game sounds, and voice chat into different tracks, you can choose to work on each one separately, resulting in cleaner and more professional content. Setting up separate audio tracks is pretty straightforward if you rely on OBS only or if you decide to use an alternative recording tool, and it will definitely make your post-production process a lot more convenient.
-
 Como obter qualidade 4K no OBS: descrição mais detalhada
 Se você joga um jogo de alta resolução e quer gravar suas ações com a maior nitidez possível, leia este guia. Ensinaremos como obter qualidade 4K no OBS.
-
 How to Fix OBS Jagged After Screen Recording [Guide]
 Se você está se perguntando por que o vídeo gravado da sua tela no OBS ficou pixelado, descubra as possíveis causas neste artigo e aprenda como corrigir facilmente a pixelização no OBS.
-
 OGA para MP3: conversão de áudio para compatibilidade de dispositivos
 Diga adeus às barreiras de formatação com assistentes de conversão de OGA para MP3! Converta instantaneamente seus arquivos OGA em MP3s universalmente compatíveis, prontos para serem reproduzidos em qualquer dispositivo.
