

แก้ไขที่ง่ายและรวดเร็ว- วิธีครอบตัดรูปภาพใน Photoshop
ความซับซ้อนของการใช้ Photoshop สำหรับมือใหม่ถือว่าเป็นความท้าทายอย่างมาก และยังมีฟีเจอร์ที่มีประโยชน์อีกมากมายที่พวกเขาควรรู้ไว้ การครอปรูปภาพไม่ใช่เรื่องเล็กน้อย การเรียนรู้วิธีครอปมีความสำคัญอย่างยิ่งต่อการปรับปรุงองค์ประกอบภาพ การเน้นตัวแบบ การปรับอัตราส่วนภาพ การเพิ่มประสิทธิภาพความละเอียด การแสดงความคิดสร้างสรรค์ การเสริมการเล่าเรื่อง การแก้ไขข้อผิดพลาด และการปรับภาพให้เหมาะสมกับแพลตฟอร์มต่าง ๆ ดังนั้น หากคุณกำลังสงสัยว่าควรครอปรูปใน Photoshop อย่างไร? คุณมาถูกที่แล้ว คู่มือนี้ถูกออกแบบมาเพื่ออธิบายแบบทีละขั้นตอนเกี่ยวกับวิธีครอปใน Photoshop ไม่ว่าคุณจะเป็นมือใหม่ที่ต้องการคู่มือแบบง่าย ๆ หรือเป็นคนที่อยากลองเทคนิคขั้นสูงเพิ่มเติม ที่นี่มีครบทุกอย่าง มาร่วมเปลี่ยนภาพของคุณและทำให้ไอเดียสร้างสรรค์มีชีวิตขึ้นมาด้วยพลังของการครอปอย่างแม่นยำใน Photoshop กันเถอะ.

ส่วนที่ 1. วิธีการครอบตัดรูปภาพใน Photoshop
ด้านล่างนี้เป็นคำแนะนำทีละขั้นตอนเกี่ยวกับวิธีการครอบตัดรูปภาพใน Photoshop
ขั้นตอนที่ 1. เปิด Photoshop และนำเข้ารูปภาพที่คุณต้องการครอปโดยไปที่แท็บ File.

ขั้นตอนที่ 2. ใช้ Crop Tool จากแถบเครื่องมือด้านซ้ายมือ.
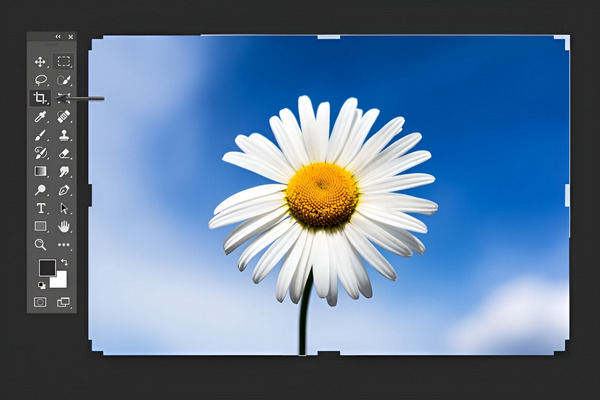
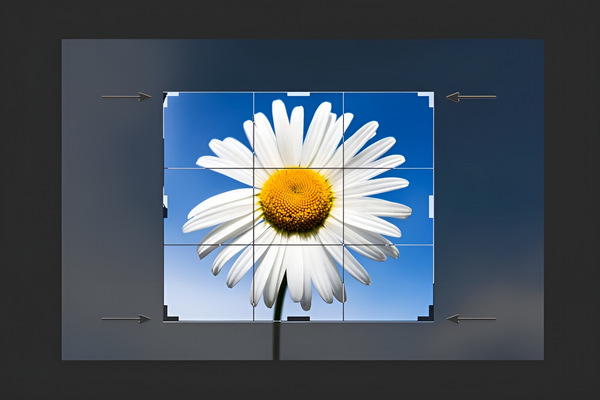
ขั้นตอนที่ 3. จากนั้นให้วาดกรอบสำหรับครอป หรือคลิกแล้วลากที่มุมและขอบของกรอบเพื่อกำหนดขอบเขตการครอปในรูปของคุณ หรืออีกทางหนึ่ง ที่ด้านบนของหน้าจอจะมีตัวเลือกสำหรับ Crop Tool คุณสามารถใส่ขนาดหรืออัตราส่วนภาพที่ต้องการได้หากจำเป็น.
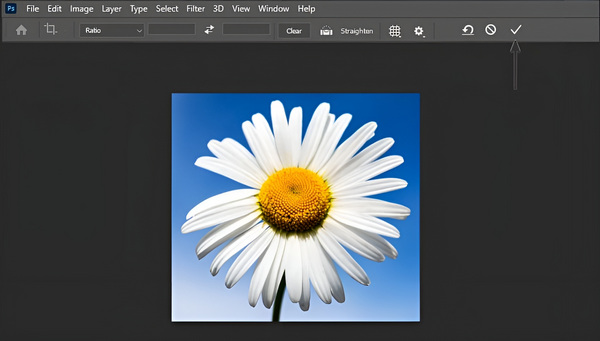
ขั้นตอนที่ 4. หากได้ผลลัพธ์ตามที่ต้องการแล้ว ให้คลิกปุ่ม Check และบันทึกรูปที่ครอปแล้วโดยไปที่ File แล้วคลิกตัวเลือก Save as เพื่อบันทึกรูปภาพที่ครอปแล้ว.
โปรดจำไว้ว่า การครอบตัดของ Photoshop จะไม่ทำลาย ดังนั้นคุณจึงสามารถย้อนกลับและปรับการครอบตัดใหม่หรือเปลี่ยนกลับเป็นภาพต้นฉบับได้ตลอดเวลา เพียงเลือกเครื่องมือครอบตัดอีกครั้งและแก้ไขตามต้องการ นอกจากนี้ Photoshop ยังให้คุณปรับขนาดและบีบอัดรูปภาพเมื่อคุณพยายามส่งออก
ส่วนที่ 2 เหตุใดการครอบตัดจึงเป็นสีเทาใน Photoshop - เหตุผลและแนวทางแก้ไข
เครื่องมือครอบตัดใน Photoshop อาจเป็นสีเทาด้วยเหตุผลบางประการ หากคุณไม่ได้เลือกเลเยอร์ในแผงเลเยอร์หรือหากรูปภาพของคุณเป็นเลเยอร์พื้นหลัง เครื่องมือครอบตัดอาจไม่ทำงานและอื่นๆ ตารางด้านล่างแสดงสาเหตุที่เป็นไปได้ว่าทำไมการครอบตัดจึงเป็นสีเทา รวมถึงวิธีแก้ไขปัญหาที่เป็นไปได้
| สาเหตุที่เป็นไปได้สำหรับเครื่องมือครอบตัดสีเทาใน Photoshop | โซลูชั่น |
| 1. ไม่มีเลเยอร์ที่ใช้งานอยู่ | ตรวจสอบให้แน่ใจว่าได้เลือกเลเยอร์ในแผงเลเยอร์เพื่อเปิดใช้งานเครื่องมือครอบตัด |
| 2. เลเยอร์พื้นหลัง | หากต้องการปลดล็อกการครอบตัด ให้ดับเบิลคลิกที่เลเยอร์พื้นหลังแล้วแปลงเป็นเลเยอร์ปกติ |
| 3. เลือกเลเยอร์ข้อความหรือรูปร่างแล้ว | เพื่อให้เครื่องมือครอบตัดทำงานได้ ให้เลือกเลเยอร์แบบพิกเซลแทนเลเยอร์ข้อความหรือรูปร่าง |
| 4. เลเยอร์ที่ถูกล็อค | ตรวจสอบและปลดล็อคเลเยอร์ในแผงเลเยอร์เพื่อเปิดใช้งานเครื่องมือครอบตัด |
| 5. รูปภาพเป็นวัตถุอัจฉริยะ | หากต้องการเปิดใช้งานการครอบตัด ให้ดับเบิลคลิกบนวัตถุอัจฉริยะ ทำการเปลี่ยนแปลงที่จำเป็น และบันทึก |
| 6. เลเยอร์ว่างหรือซ่อนอยู่ | ตรวจสอบให้แน่ใจว่าเลเยอร์มีเนื้อหาที่มองเห็นได้และไม่ได้ซ่อนไว้เพื่อเปิดใช้งานเครื่องมือครอบตัด |
| 7. ล็อคเลเยอร์พื้นหลังในบางโหมด | ปรับโหมดการผสมของเลเยอร์พื้นหลังเพื่อปลดล็อกเครื่องมือครอบตัด |
ส่วนที่ 3 เคล็ดลับในการทำให้รูปภาพเล็กลงโดยไม่ต้องครอบตัดทางออนไลน์
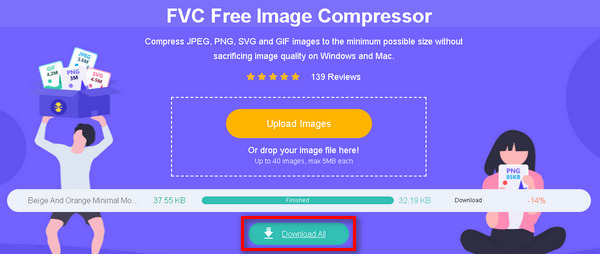
หากต้องการทำให้รูปภาพมีขนาดไฟล์เล็กลงโดยไม่ต้องครอป คุณต้องใช้เครื่องมือบีบอัดรูปออนไลน์หรือเครื่องมือปรับขนาดรูป หนึ่งในเครื่องมือบีบอัดรูปที่ดีที่สุดที่ใคร ๆ ก็ใช้ได้ในตอนนี้คือ FVC Free Image Compressor เครื่องมือนี้ใช้งานง่ายมาก ออกแบบมาเพื่อลดขนาดไฟล์รูป JPEG, PNG, SVG และ GIF โดยไม่ทำให้คุณภาพลดลง นอกจากนี้ เครื่องมือนี้ยังใช้เทคโนโลยีการปรับให้เหมาะสมและอัลกอริธึมการบีบอัดขั้นสูงเพื่อให้ได้อัตราการบีบอัดที่ดีที่สุด.
คุณสมบัติหลัก:
การบีบอัดแบบหลายไฟล์ (Batch Compression): ผู้ใช้สามารถบีบอัดรูปภาพหลายไฟล์ได้พร้อมกัน รองรับสูงสุด 40 รูป โดยแต่ละรูปมีขนาดไม่เกิน 5MB เครื่องมือนี้ช่วยบีบอัดได้อย่างมีประสิทธิภาพโดยไม่ทำให้คุณภาพลดลงอย่างเห็นได้ชัด.
การบีบอัดอัตโนมัติ (Automatic Compression): รูปภาพทุกไฟล์ที่อัปโหลดจะถูกบีบอัดโดยอัตโนมัติ ทำให้ขั้นตอนรวดเร็วและมีประสิทธิภาพ ผู้ใช้เพียงอัปโหลด บีบอัด และดาวน์โหลดรูปของตนได้เลยโดยไม่ต้องตั้งค่าเอง.
รองรับหลากหลายรูปแบบไฟล์ (Wide Compatibility): FVC Free Image Compressor รองรับไฟล์รูปหลายประเภท เช่น JPEG, PNG, SVG และ GIF โดยไฟล์ที่ส่งออกจะเป็น PNG หากต้องการดูวิธีบีบอัดไฟล์ GIF สามารถเช็กได้ที่บทความนี้.
ไม่ต้องสมัครสมาชิก (No Account Required): ต่างจากบางเครื่องมือ FVC Free Image Compressor ไม่ต้องให้ผู้ใช้ลงทะเบียน ล็อกอิน หรือสร้างบัญชีใด ๆ เป็นเครื่องมือฟรี 100% ใช้งานได้โดยไม่มีค่าธรรมเนียมแอบแฝง.
การปกป้องความเป็นส่วนตัว (Privacy Protection): ผู้ใช้สามารถมั่นใจได้ว่ารูปภาพที่อัปโหลดจะได้รับการปกป้อง เครื่องมือนี้ให้ความสำคัญกับความเป็นส่วนตัว โดยป้องกันไม่ให้บุคคลที่ไม่ได้รับอนุญาตเข้าถึงรูปที่อัปโหลด.
รีวิวจากผู้ใช้ (Customer Reviews): ผู้ใช้ต่างชื่นชมเครื่องมือนี้ในด้านความเร็วในการบีบอัดที่ยอดเยี่ยม อินเทอร์เฟซที่ใช้งานง่าย และประสิทธิภาพในการลดขนาดไฟล์โดยยังคงคุณภาพของรูปภาพไว้ได้อย่างดี.
คำแนะนำทีละขั้นตอนในการครอบตัดรูปภาพออนไลน์:
ขั้นตอนที่ 1. ก่อนอื่น ให้เข้าไปที่เว็บไซต์ทางการของพวกเขา.
ขั้นตอนที่ 2. จากนั้นให้นำเข้ารูปภาพของคุณโดยคลิกปุ่ม Upload Images.

ขั้นตอนที่ 3. กรุณารอจนกระบวนการประมวลผลเสร็จสมบูรณ์ เมื่อเสร็จแล้วคุณจะได้รับการแจ้งเตือนพร้อมแถบสถานะที่แสดงความคืบหน้าและรายละเอียดของขนาดไฟล์รูปที่ถูกบีบอัดใหม่ กดปุ่ม Download เพื่อบันทึกรูปภาพของคุณ.
FVC Free Image Compressor เป็นโซลูชั่นที่เชื่อถือได้สำหรับผู้ที่ต้องการปรับขนาดภาพให้เหมาะสมเพื่อวัตถุประสงค์ต่างๆ รวมถึงการเพิ่มความเร็วเว็บไซต์ การแชร์ภาพ และประหยัดพื้นที่จัดเก็บข้อมูล มันโดดเด่นด้วยอินเทอร์เฟซที่ใช้งานง่าย การบีบอัดอัตโนมัติ และความมุ่งมั่นในการรักษาผลลัพธ์คุณภาพสูง
ส่วนที่ 4. คำถามที่พบบ่อยเกี่ยวกับการครอบตัดรูปภาพใน Photoshop
เครื่องมือครอบตัดใน Photoshop CC อยู่ที่ไหน
ใน Photoshop CC คุณจะพบเครื่องมือครอบตัดในแถบเครื่องมือทางด้านซ้ายของหน้าจอ จะแสดงด้วยไอคอนที่ดูเหมือนกรอบการครอบตัด หากคุณหาไม่พบ ให้กดปุ่ม C บนแป้นพิมพ์เพื่อเปิดใช้งานเครื่องมือครอบตัด
ฉันจะครอบตัดใน Photoshop ด้วย Quick Selection Tool ได้อย่างไร
เครื่องมือ Quick Selection ใช้สำหรับสร้างพื้นที่เลือก (Selection) เป็นหลัก ไม่ได้ออกแบบมาเพื่อครอปโดยตรง หากต้องการครอปด้วยเครื่องมือนี้ ให้ทำตามขั้นตอนต่อไปนี้:
1. ก่อนอื่น ใช้เครื่องมือ Quick Selection เพื่อเลือกพื้นที่ที่คุณต้องการ
2. หลังจากเลือกเสร็จ ให้ไปที่เมนู Select แล้วเลือก “Inverse” เพื่อสลับการเลือกกลับด้าน
3. กด Ctrl + Shift + I สำหรับ Windows หรือ Cmd + Shift + I สำหรับ Mac เพื่อเลือกส่วนกลับด้าน
4. จากนั้นไปที่เมนู Image เลือก Crop แล้วภาพของคุณจะถูกครอปโดยอัตโนมัติตามพื้นที่ที่เลือกไว้.
ฉันจะตัดและย้ายส่วนที่เลือกใน Photoshop ได้อย่างไร
หากต้องการตัด (Cut) และย้ายส่วนที่เลือกใน Photoshop ให้ทำตามขั้นตอนต่อไปนี้:
1. สร้างพื้นที่เลือกด้วยเครื่องมือเลือกใดก็ได้ เช่น Rectangular Marquee หรือ Lasso
2. กด Ctrl + X สำหรับ Windows หรือ Cmd + X สำหรับ Mac เพื่อตัดพื้นที่ที่เลือก
3. ย้ายเคอร์เซอร์ไปยังตำแหน่งที่คุณต้องการในภาพ
4. กด Ctrl + V สำหรับ Windows หรือ Cmd + V สำหรับ Mac เพื่อวางส่วนที่ตัดไปยังตำแหน่งใหม่.
ฉันสามารถครอบตัดรูปภาพหลายภาพพร้อมกันใน Photoshop ได้หรือไม่
Photoshop ไม่มีฟีเจอร์ในตัวสำหรับครอบตัดรูปภาพหลายรูปพร้อมกัน อย่างไรก็ตาม คุณสามารถสร้างการดำเนินการเพื่อทำให้กระบวนการครอบตัดสำหรับรูปภาพชุดหนึ่งเป็นแบบอัตโนมัติได้ บันทึกการดำเนินการครอบตัดบนรูปภาพหนึ่งภาพ จากนั้นนำไปใช้กับโฟลเดอร์ของรูปภาพโดยใช้คำสั่ง Batch ใต้เมนู File
มีวิธีครอบตัดรูปภาพโดยไม่สูญเสียความละเอียดดั้งเดิมใน Photoshop หรือไม่?
ได้ ใน Photoshop คุณสามารถใช้ฟีเจอร์ Content-Aware Crop เพื่อขยายแคนวาสโดยยังคงความละเอียดดั้งเดิมไว้ได้ ซึ่งจะทำให้คุณสามารถครอบตัดรูปภาพได้โดยไม่ต้องละทิ้งพิกเซลใดๆ อย่างถาวร ทำให้คุณมีความยืดหยุ่นในการปรับครอบตัดในภายหลังโดยไม่สูญเสียคุณภาพ
สรุป
ตอนนี้คุณมีความรู้เกี่ยวกับวิธีครอปใน Photoshopแล้ว ไม่ว่าคุณจะเป็นมือใหม่หรือมือโปร คู่มือนี้ได้ครอบคลุมตั้งแต่พื้นฐานไปจนถึงการแก้ปัญหา และยังมีทิปเกี่ยวกับการปรับขนาดรูปโดยไม่ทำให้คุณภาพลดลง พร้อมที่จะปลดปล่อยความคิดสร้างสรรค์ของคุณแล้วหรือยัง? ลองลงมือและสำรวจศักยภาพของ Photoshop กันได้เลย.
-
 วิธีครอบตัดไฟล์ MP4 โดยไม่สูญเสียคุณภาพของวิดีโอ [2025]
 เรียนรู้วิธีครอบตัด MP4 ด้วยขั้นตอนง่ายๆ ที่จัดไว้ให้สำหรับคุณโดยเฉพาะ ดังนั้นก้าวให้ทันเพราะเราขอนำเสนอเครื่องมือครอบตัดที่ดีที่สุดที่คุณอาจใช้
-
 คำแนะนำทีละขั้นตอนในการตัดรูปภาพใน Photoshop
 คุณใช้โฟโต้ชอปหรือเปล่า? บทความนี้อาจเหมาะสำหรับคุณ เรียนรู้วิธีตัดภาพใน Photoshop อย่างรวดเร็วและง่ายดาย อ่านตอนนี้และค้นพบบางสิ่งบางอย่าง
-
 วิธีลบลายน้ำออกจากภาพถ่ายใน Photoshop [ขั้นตอน]
 Photoshop เป็นหนึ่งในเครื่องมือแก้ไขยอดนิยม รับคำแนะนำฟรีที่นี่โดยใช้ Photoshop เพื่อลบลายน้ำออกจากรูปภาพ ค้นพบวิธีอื่นด้วย