

4 روش برای محو کردن عکس ها در آیفون برای نتایج Pro-Like
در دنیای پرشتاب عکاسی با گوشیهای هوشمند، آیفون بهعنوان یک قدرت بیرقیب شناخته میشود که مجموعهای گسترده از قابلیتها را برای ثبت لحظات خاطرهانگیز با سهولتی بینظیر در اختیار کاربران قرار میدهد. یکی از جواهرات کمتر شناختهشده در جعبهابزار ویرایش عکس آیفون، قابلیت تار کردن (بلور کردن) تصاویر است. این تکنیک میتواند عمق، جذابیت و لمس حرفهای به عکسهای شما اضافه کند. در این مقاله، گامبهگام روند تار کردن عکسها در آیفون را مرور میکنیم تا دنیایی از امکانات خلاقانه را از طریق حالت پرتره، ابزارهای آنلاین و اپلیکیشنهای شخص ثالث در نوک انگشتان شما آزاد کنیم.

قسمت 1. چگونه عکس ها را در آیفون تار کنیم
حالت پرتره
حالت پرتره در آیفون یک ویژگی تخصصی است که برای عمق بخشیدن به کیفیت عکس ها طراحی شده است. این عمق میدان کم را ایجاد می کند که به سوژه اجازه می دهد از پس زمینه خود متمایز شود. سوالاتی مانند آیا میتوانید پسزمینه عکس را در آیفون تار کنید معمولاً توسط شخصی که تازه وارد اکوسیستم اپل شده است میپرسد. محو کردن عکسهای شما در آیفون امکانپذیر است زیرا iOS حالت پرتره را در مدل ۷ پلاس خود تا آخرین نسخه معرفی کرده است که مراحل انجام آن در زیر آمده است.
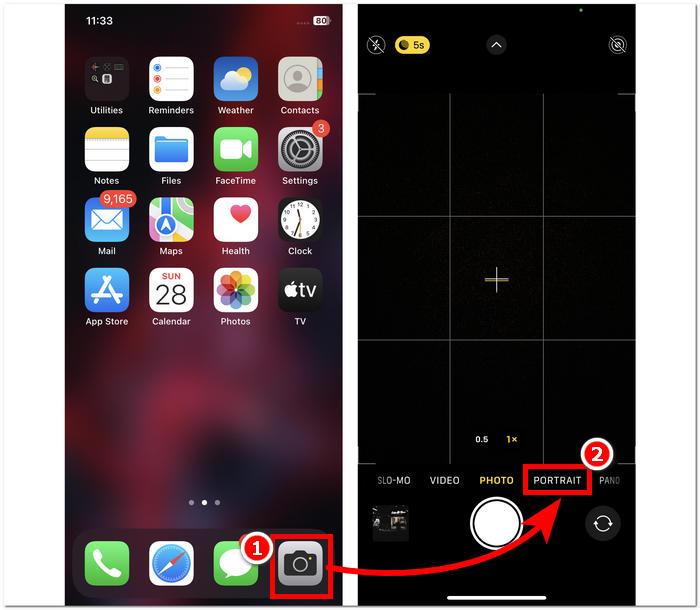
مرحله ۱. روی آیفون خود، برنامه دوربین (Camera) را باز کنید.
مرحله ۲. در تنظیمات دوربین، روی بخش پرتره (Portrait) ضربه بزنید.
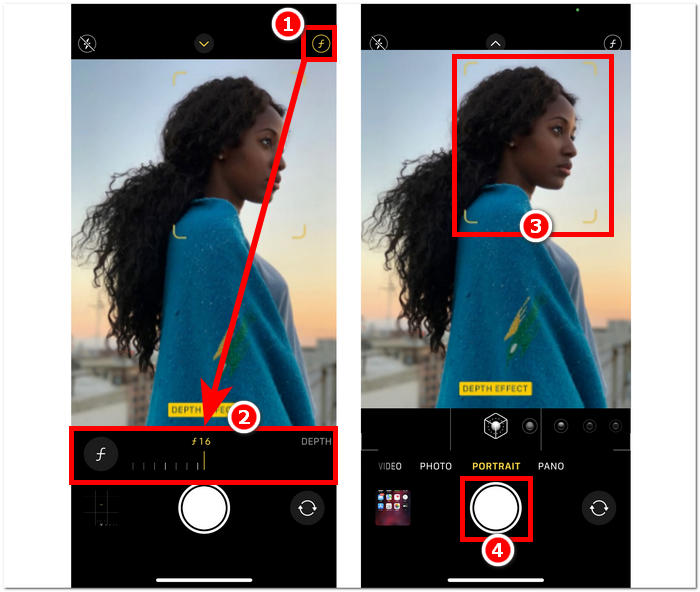
مرحله ۳. روی صفحه، روی آیکون f که در گوشه بالا سمت راست قرار دارد ضربه بزنید و میزان عمقی را که میخواهید در عکسهایتان داشته باشید تنظیم کنید.
مرحله ۴. وقتی از میزان عمق راضی بودید، روی سوژه خود ضربه بزنید تا روی آن فوکوس شود و در نهایت برای ثبت عکسها روی دکمه Shutter ضربه بزنید.
استفاده از حالت پرتره در آیفون وقتی تأثیر عمق میدان را روی عکسهایتان درک کنید و بتوانید در رابط کاربری دوربین بهخوبی جابهجا شوید، بسیار ساده است. همچنین اگر از این کار پشیمان شدید، میتوانید بهراحتی تارشدگی تصاویر را برطرف کنید.
بدون حالت پرتره
چگونه یک عکس را در آیفون بدون حالت پرتره محو کنیم؟ تار کردن عکسها با استفاده از آیفون شما زمانی که حالت پرتره ندارد، میتواند چالش برانگیز باشد زیرا حالت پرتره در مدل ۷ پلاس و بالاتر آنها معرفی شده است. از این رو، ما راه هایی را برای کاربرانی که حالت پرتره را در آیفون خود ندارند، پیدا می کنیم. این بیشتر شبیه یک نکته یا هک است و به کار دستی کاربر نیاز دارد. اگر این کار به طور موثر انجام شود، می توانید به نتایج مشابهی با حالت پرتره دست پیدا کنید.
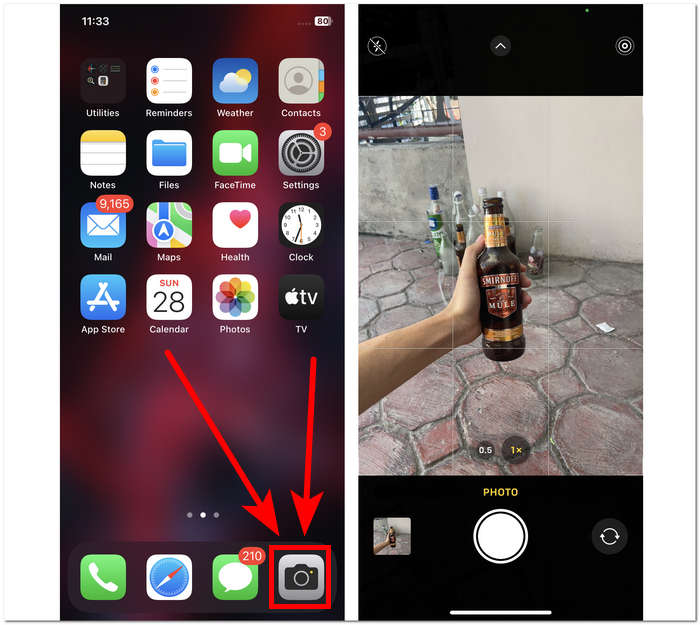
مرحله ۱. روی آیفون خود، برنامه دوربین (Camera) را باز کنید.
مرحله ۲. در رابط اصلی، خودتان و سوژه را با عقب رفتن از پسزمینه دور کنید تا فاصله بیشتری ایجاد شود.
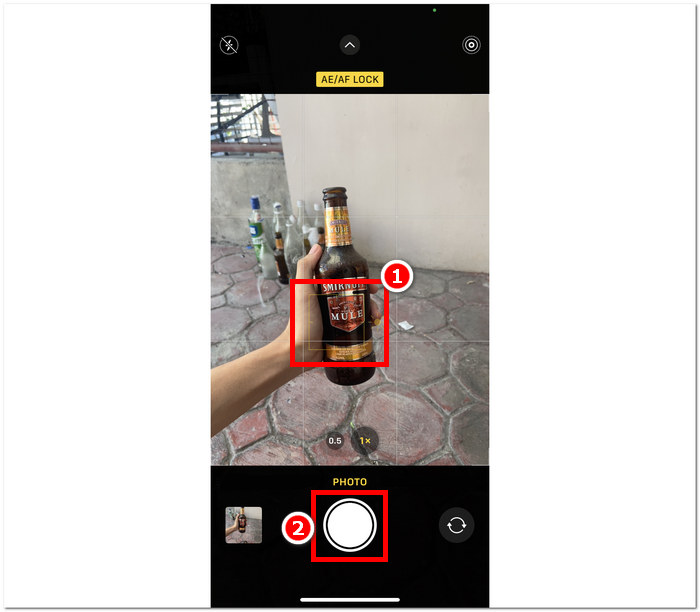
مرحله ۳. روی سوژه، فشار طولانی دهید تا پیام AE/AF LOCK در بالای صفحه ظاهر شود. این کار باعث میشود سوژه در مرکز فوکوس دوربین قرار بگیرد و پسزمینه تار شود.
مرحله ۴. هنگامی که سوژه بهخوبی از پسزمینه تار جدا و برجسته شد، آماده ثبت عکس هستید. کافی است روی دکمه Shutter ضربه بزنید تا عکس خود را بگیرید.
حتی بدون ویژگی های حالت پرتره در تنظیمات دوربین، با ایجاد فاصله دستی بین سوژه و پس زمینه آن و همچنین فوکوس درست، می توان عکس ها را در آیفون تار کرد. این مرحله نه تنها برای کاربران iOS بلکه برای کاربران اندرویدی که حالت پرتره را در تنظیمات دوربین خود ندارند نیز اعمال می شود.
برنامه شخص ثالث: Snapseed
Snapseed یکی از برنامه های قدرتمند و حرفه ای ویرایش عکس است که توسط گوگل توسعه یافته است. این برنامه مملو از ویژگی ها و ابزارهایی است که یک کاربر برای هر کار ویرایش عکس نیاز دارد و از جمله آنها می توان به محو کردن عکس های شما فقط با استفاده از آیفون اشاره کرد. استفاده از یک برنامه شخص ثالث همچنین میتواند به شما کمک کند تا نگرانیهای خود را در مورد نحوه محو کردن چهره افراد در عکسهای آیفون برطرف کنید، زیرا این برنامه به شما امکان میدهد تصمیم بگیرید کدام قسمت را تار کنید، برخلاف حالت پرتره، که فقط میتوانید انتخاب کنید یا برای تمرکز روی سوژه ها ضربه بزنید.
مرحله ۱. برنامه Snapseed را از اپ استور روی آیفون خود دانلود و اجرا کنید.
مرحله ۲. وقتی وارد رابط برنامه شدید، روی صفحه ضربه بزنید و عکسی را که میخواهید در آن افکت تارشدگی ایجاد کنید، اضافه کنید.
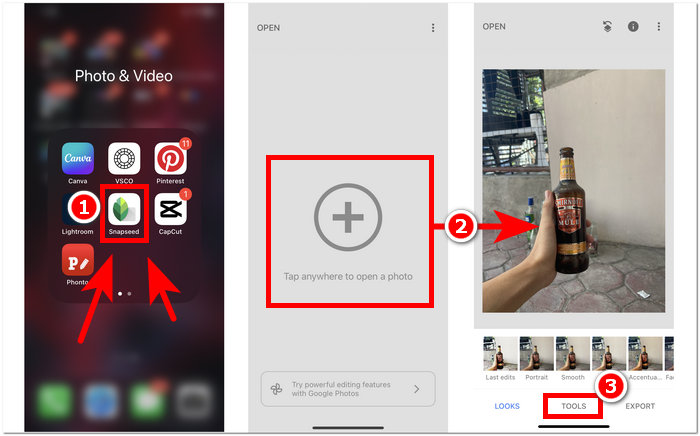
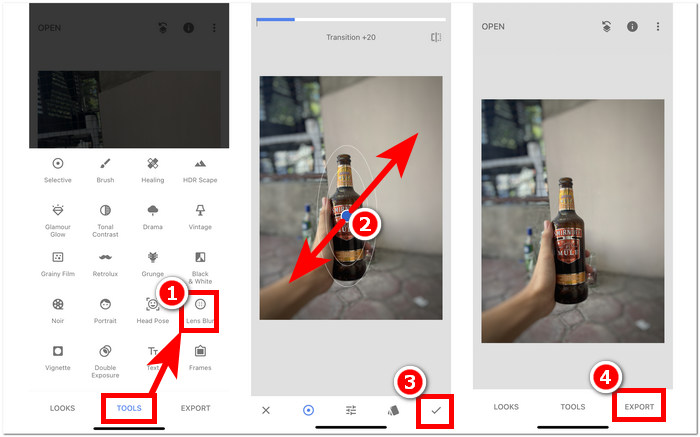
مرحله ۳. در بخش TOOLS، گزینه Lens Blur را پیدا کرده و روی آن ضربه بزنید. سپس عکس شما با یک قاب دایرهای ظاهر میشود؛ این دایره نمایانگر ناحیه فوکوس است و بخشهای اطراف آن تار خواهند شد.
مرحله ۴. برای تنظیم اندازه دایره، دو انگشت خود را روی صفحه به هم نزدیک کنید یا از هم دور کنید. به یاد داشته باشید که اندازه دایره را بر اساس سوژه خود تنظیم کنید و پس از رضایت از ویرایش، روی دکمه تیک بزنید و سپس روی EXPORT کلیک کنید تا تغییرات در عکس شما ذخیره شود.
تطبیق پذیری Snapseed به کارهای مختلف ویرایش عکس، از جمله افزودن یکپارچه تاری به تصاویر شما گسترش می یابد. این برنامه نه تنها در آیفونها قابل دسترسی است، بلکه در دستگاههای دیگر نیز موجود است، و آن را به ابزاری ایدهآل و مناسب برای کاربرانی که به دنبال تجربه ویرایش جامع هستند، تبدیل میکند. با رابط کاربر پسند Snapseed و سازگاری بین دستگاهها، دستیابی به جلوه تاری مطلوب بر روی عکسهای شما هرگز به این اندازه در دسترس نبوده است.
قسمت 2. چگونه یک شی را از عکس آیفون خود بدون تار شدن حذف کنیم
دستیابی به یک افکت تارشدگی بینقص در عکسهای آیفون میتواند دشوار باشد؛ مشکلاتی مانند تار شدن کلی تصویر یا نامشخص شدن برخی اجزا ممکن است پیش بیاید. وقتی با عناصری روبهرو میشوید که با تار کردن درست نمیشوند، بهترین کار حذف آنهاست. خوشبختانه، FVC Free Watermark Remover به کاربران iOS و حتی کاربران سایر دستگاههای غیرموبایل کمک میکند تا اشیای ناخواسته و تار، و حتی واترمارکها را بهصورت رایگان از عکسهای خود حذف کنند. FVC یک ابزار تحت وب است که در انواع مرورگرها و روی دستگاههای متعدد قابل دسترسی است. این سرویس استفاده رایگان را برای همه کاربران، بدون نیاز به نصب و اشتراک، فراهم میکند. تنها با دنبال کردن مراحل زیر، میتوانید بدون تار کردن تصویر، نتیجهای تمیز و حرفهای به دست آورید.
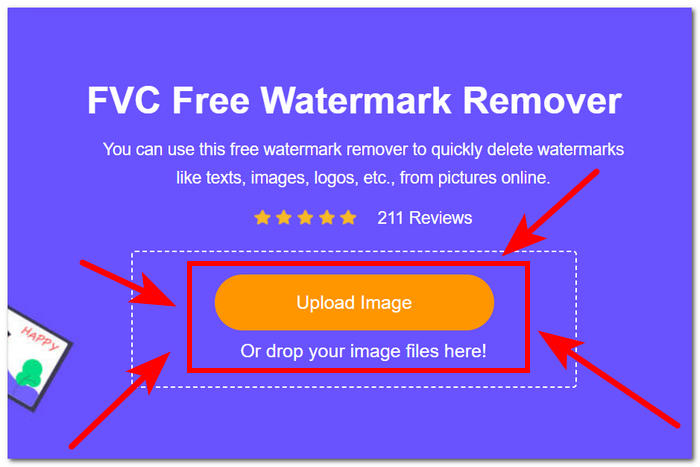
مرحله ۱. از طریق مرورگر گوشی موبایل یا دسکتاپ خود به FVC Free Watermark Remover سر بزنید و با کلیک روی گزینه Upload Image تصویر خود را بارگذاری کنید.
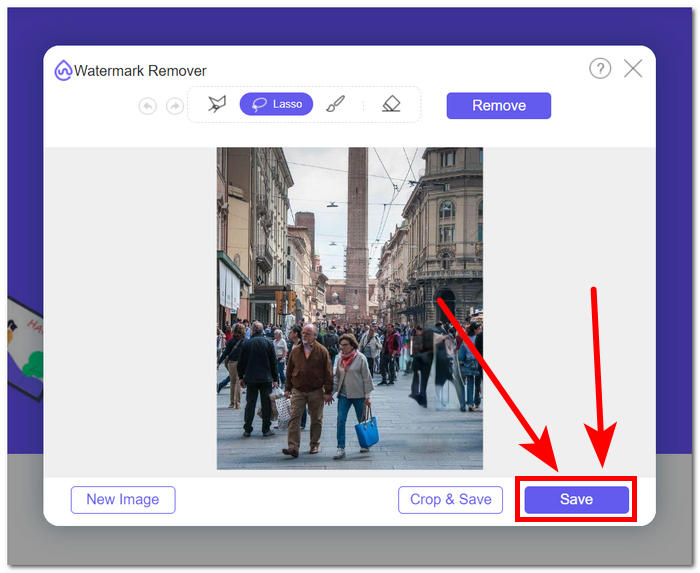
مرحله ۲. پس از ظاهر شدن عکس در رابط برنامه، روی Lasso tool در بالا کلیک کرده و آن را در اطراف شیء یا متن تار و ناخواسته بکشید، سپس روی دکمه Remove کلیک کنید تا آنها از عکس شما حذف شوند.
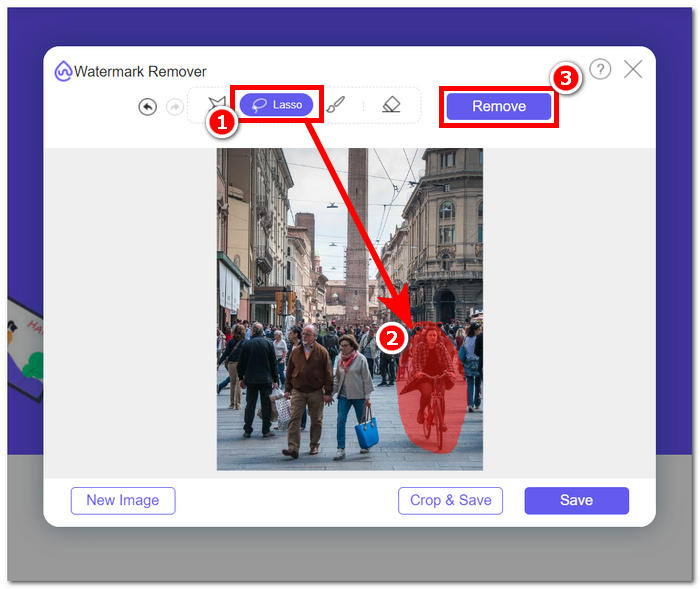
مرحله ۳. پس از پایان پردازش تصویر، پیشنمایش عکس ویرایششده جدید خود را خواهید دید و هر زمان از حذف سوژه ناخواسته راضی بودید، روی دکمه Save کلیک کنید تا عکس را دانلود کنید.
FVC Free Watermark Remover توانایی خود را در حذف اشیاء بدون ایجاد هرگونه تارشدگی در عکسهای شما نشان داده است. میتوان با اطمینان گفت چه زمانی که عکسهای خود را با حالت پرتره تار میکنید و چه با یک برنامه شخص ثالث، این ابزار گزینهای عالی برای کمک به شما در حل هرگونه مشکل احتمالی در این مسیر است. همچنین این ابزار در ابتدا برای حذف واترمارک از تصاویر JPG، PNG و فرمتهای دیگر طراحی شده است.
بخش 3. سوالات متداول در مورد نحوه محو کردن عکس ها در آیفون
چگونه می توان یک عکس را در آیفون بدون برنامه تار کرد؟
برای محو کردن تصویر در آیفون بدون استفاده از برنامه، میتوانید از ویژگیهای ویرایش داخلی استفاده کنید. برنامه Photos را باز کنید، عکسی را که می خواهید ویرایش کنید انتخاب کنید، روی Edit ضربه بزنید، نماد سه نقطه را انتخاب کنید و علامت گذاری را انتخاب کنید. از آنجا، می توانید از ابزار قلم برای ترسیم مناطقی که می خواهید محو کنید استفاده کنید.
آیا برنامه iPhone Photo ابزار محو کردن دارد؟
برنامه iPhone Photo ابزار اختصاصی محو کردن ندارد. با این حال، گزینههای ویرایش مختلفی از جمله ابزار Depth برای تنظیم تاری پسزمینه در عکسهای حالت پرتره را ارائه میدهد. برنامه Photo را باز کنید، یک عکس در حالت پرتره انتخاب کنید، روی Edit ضربه بزنید و از نوار لغزنده Depth برای کنترل تاری پس زمینه استفاده کنید.
آیا همه آیفون ها حالت پرتره دارند و پس زمینه را محو می کنند؟
همه آیفونها حالت پرتره و قابلیت محو کردن پسزمینه را ندارند. حالت پرتره در آیفون 7 پلاس و بالاتر موجود بود. برای بررسی اینکه آیا آیفون شما حالت پرتره دارد یا خیر، اپلیکیشن Camera را باز کنید و ببینید آیا Portrait به عنوان یک گزینه ظاهر می شود یا خیر.
چگونه پسزمینه آیفون را بعد از گرفتن عکس محو کنیم؟
برای محو کردن پسزمینه آیفون پس از گرفتن عکس، در صورتی که آیفون شما از آن پشتیبانی میکند، میتوانید از قابلیت Portrait Mode استفاده کنید. برنامه Photos را باز کنید، عکس را انتخاب کنید، روی Edit ضربه بزنید و سپس با استفاده از نوار لغزنده Depth، تاری پس زمینه را تنظیم کنید. به خاطر داشته باشید که این ویژگی در مدل های خاص آیفون موجود است.
چگونه قسمتی از عکس را در آیفون محو کنیم؟
تار کردن بخشی از عکس در آیفون را می توان با استفاده از ابزار Markup در برنامه Photos انجام داد. برنامه Photos را باز کنید، عکس را انتخاب کنید، روی Edit ضربه بزنید، نماد سه نقطه را انتخاب کنید و علامت گذاری را انتخاب کنید. از ابزار قلم برای ترسیم ناحیه ای که می خواهید محو شود استفاده کنید و شدت آن را در صورت نیاز تنظیم کنید.
نتیجه
در پایان، تار کردن عکسها در آیفون امکانات بیپایانی ایجاد میکند و به کاربران اجازه میدهد تصاویر خود را با عمق، جذابیت و جلوهای حرفهای ارتقا دهند. از استفاده از حالت پرتره داخلی گرفته تا بهرهگیری از اپلیکیشنهای شخص ثالثی مانند Snapseed، این روند انعطافپذیری زیادی هم برای تازهکارها و هم عکاسان حرفهای فراهم میکند. علاوه بر این، ابزارهایی مانند FVC Free Watermark Remover نگرانیها درباره اشیای ناخواسته در عکسها را بدون کاهش وضوح تصویر برطرف میکنند. با ادامه اکتشاف این تکنیکها و ابزارها توسط کاربران آیفون، سفر به دنیای جذاب تار کردن عکسها، به تجربهای هیجانانگیز و در دسترس تبدیل میشود. پس آیفون خود را بردارید، این روشها را امتحان کنید و عکاسی خود را به سطحی نزدیک به نتایج حرفهای برسانید!
-
 نحوه حذف پس زمینه از تصویر با استفاده از GIMP
 با GIMP و فرآیند گام به گام حذف پس زمینه از تصاویر شروع کنید. امروز روش های کارآمد برای ایجاد تصاویر شفاف با استفاده از GIMP را کشف کنید!
-
 چگونه اندازه تصویر را به صورت آنلاین و آفلاین افزایش دهیم
 ساده ترین راه برای افزایش اندازه تصویر بدون از دست دادن کیفیت را کشف کنید. ابزارها و نرم افزارهای تغییر اندازه ما را برای اطمینان از کیفیت مطلوب برای تصاویر خود ببینید.
-
 چگونه PPT تصویر پس زمینه را حذف می کند؟ راهنمای جامع
 آمادهاید که ارائهتان را به سطح بعدی ببرید؟ در این مقاله، کشف کنید که چگونه PPT تصاویر پس زمینه را حذف می کند و ارائه های پاورپوینت برجسته را به راحتی ایجاد می کند.