


Guide simple sur la façon de créer efficacement une partie d'une vidéo au ralenti
La plupart des cinéastes utilisent la prise de vue en sur‑cadence pour obtenir une lecture au ralenti, mais elle est surtout utilisée dans le sport pour les ralentis instantanés. En raison de l’effet artistique qu’elle apporte, tout le monde modifie la vitesse de la vidéo selon le rythme souhaité. En d’autres termes, la demande d’outils de montage pour créer des ralentis s’est largement répandue sur l’ensemble d’internet, et le besoin d’un contrôleur de vitesse vidéo parfait n’a cessé de croître. Pour répondre à vos attentes en matière de meilleur contrôleur de vitesse, nous allons passer en revue les 3 meilleurs contrôleurs de vitesse que nous avons trouvés sur le marché, qui offrent une excellente qualité pour modifier la vitesse d’une vidéo. De plus, nous inclurons un tutoriel sur comment mettre une partie d’une vidéo au ralenti dans chacun des outils que nous avons sélectionnés pour vous.

Partie 1. Meilleure façon de faire une partie d'une vidéo au ralenti [Hautement suggéré]
Avec la forte demande d’avoir le meilleur contrôleur de vitesse pour ralentir un clip, FVC Video Converter Ultimate fournit l’assistance dont vous aurez besoin pour mener cette tâche à bien. Ce convertisseur ultime offre une fonction unique pour ralentir votre vidéo ou la faire jouer à très grande vitesse, puis appliquer l’effet en quelques clics seulement. Vous ne pouvez pas vous tromper avec ce logiciel : c’est l’un des plus faciles à comprendre que vous puissiez avoir, et son interface claire rend tout plus compréhensible et organisé.
En plus de son contrôleur de vitesse, vous pouvez également utiliser ce logiciel pour diviser et fusionner plusieurs vidéos à la fois. De nombreux utilisateurs ont été ravis de ce logiciel en raison des fonctionnalités et fonctions multifonctionnelles qu'il vous offre. Alors, supposons que vous vouliez faire partie de la communauté ravie et être impressionné par ce logiciel. Dans ce cas, vous pouvez lire le tutoriel ci-dessous sur la façon de ralentir une partie d'une vidéo, mais vous devrez d'abord télécharger et installer le logiciel, puis l'ouvrir pour commencer.
Téléchargement gratuit pour Windows 7 ou version ultérieure Téléchargement sécurisé
Téléchargement gratuit pour macOS 10.7 ou version ultérieure - Téléchargement sécurisé
1. Découpez la partie de la vidéo que vous souhaitez ralentir
Étape 1. Après avoir lancé le logiciel, allez dans la Boîte à outils et cherchez Coupeur de vidéo (Video Trimmer).
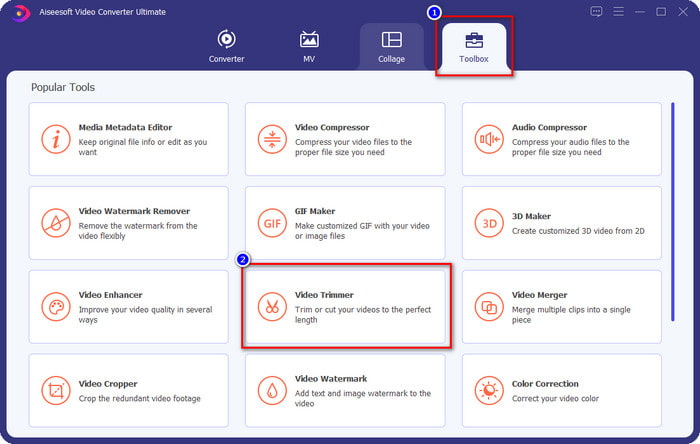
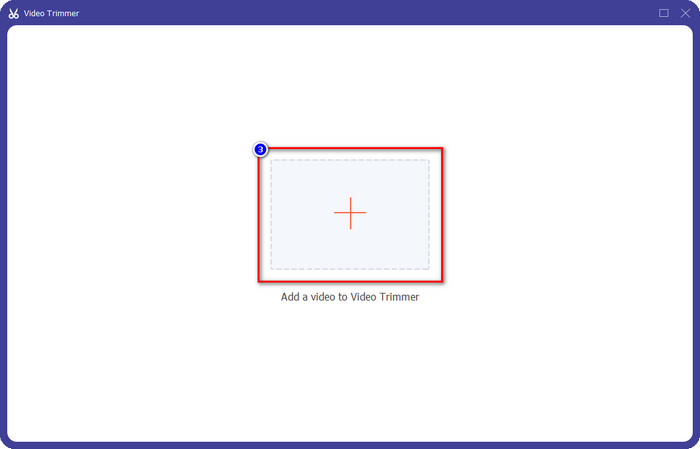
Étape 2. Appuyez sur l’icône + pour ajouter la vidéo que vous voulez découper, cherchez-la dans votre dossier puis cliquez sur Ouvrir.
Étape 3. Dans l’outil de découpe, cliquez sur Découpage rapide (Fast Split) pour couper la vidéo ajoutée en segments et définissez le nombre de segments selon vos besoins. Une fois les segments définis, cliquez sur Diviser (Split).
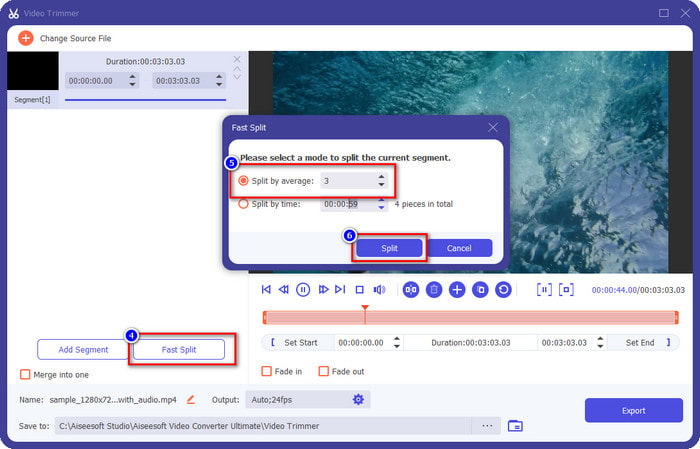
Étape 4. Cliquez sur chaque vidéo pour vérifier qu’il s’agit bien des segments que vous voulez mettre au ralenti, puis cliquez sur Exporter pour enregistrer la vidéo sur votre disque.

2. Modifiez la vitesse du segment que vous avez exporté
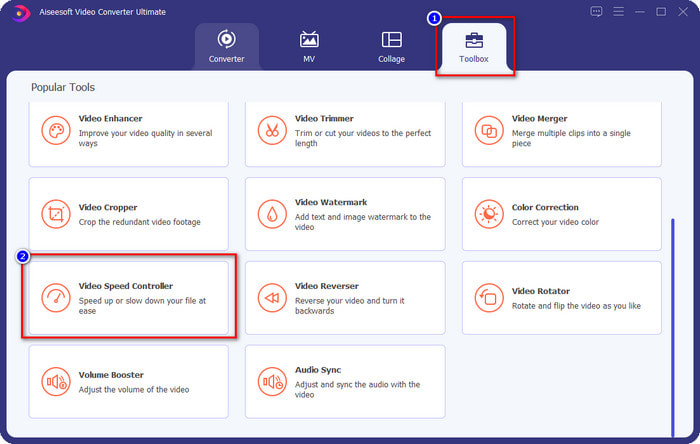
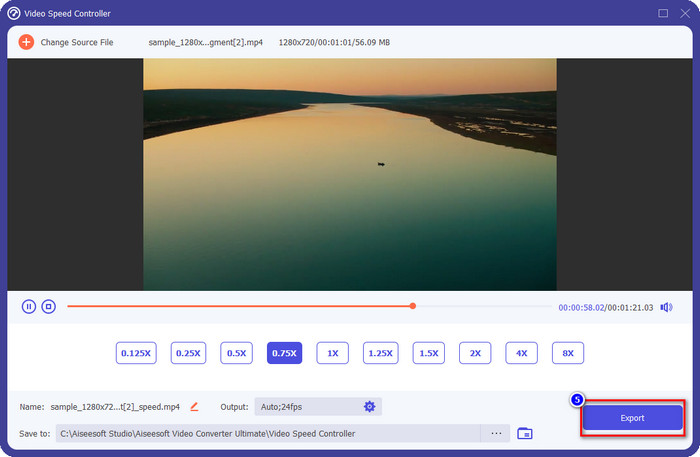
Étape 1. Recherchez le Contrôleur de vitesse vidéo (Video Speed Controller) dans la Boîte à outils afin de ralentir le segment que vous avez découpé précédemment.
Étape 2. Appuyez sur le bouton + pour ajouter un fichier vidéo, localisez le fichier vidéo que vous avez découpé et que vous souhaitez ralentir, puis cliquez sur Ouvrir pour le télécharger dans le programme.

Étape 3. Après avoir inséré la vidéo, choisissez l’effet de ralenti que vous voulez appliquer au segment découpé. Plusieurs options de vitesse apparaîtront à l’écran. Essayez‑les toutes pour voir laquelle correspond au ralenti que vous souhaitez obtenir.
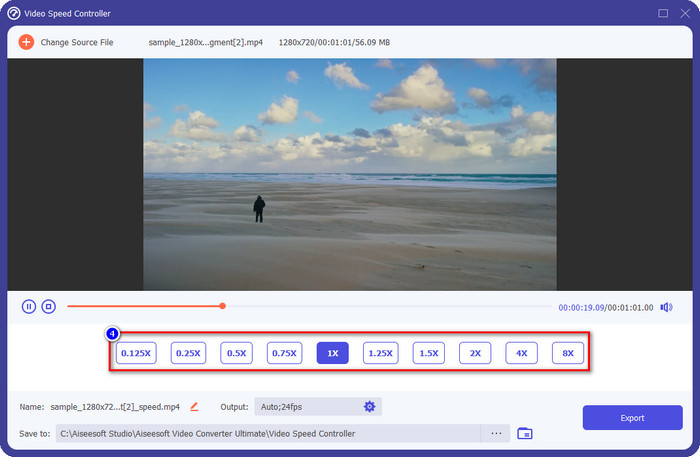
Étape 4. Pour enregistrer la vidéo que vous avez ralentie, cliquez sur Exporter.
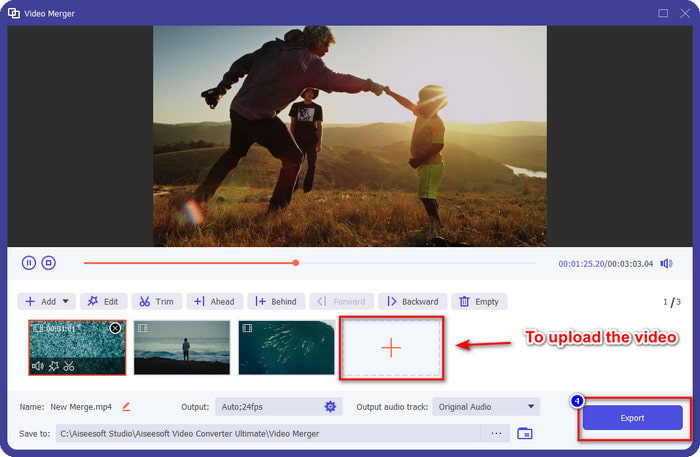
3. Fusionnez la vidéo que vous avez coupée plus tôt avec le ralenti
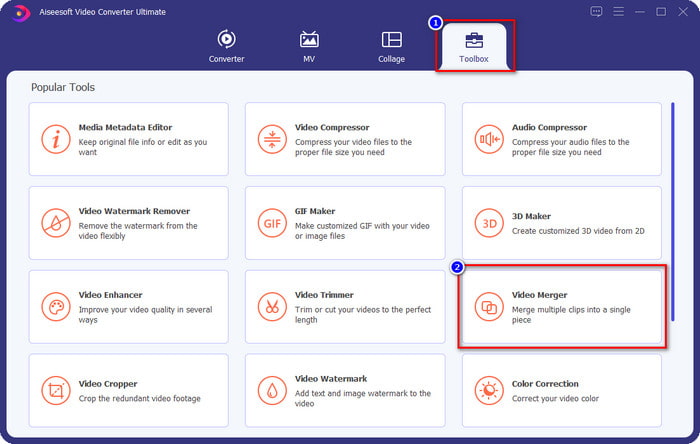
Étape 1. Après avoir découpé la vidéo et appliqué l’effet de ralenti, cliquez sur Fusionneur de vidéos (Video Merger) pour combiner toutes les vidéos ; vous le trouverez dans la Boîte à outils.
Étape 2. En cliquant sur le bouton +, un dossier apparaîtra à l’écran ; cliquez sur le fichier que vous voulez ajouter, puis appuyez sur Ouvrir.
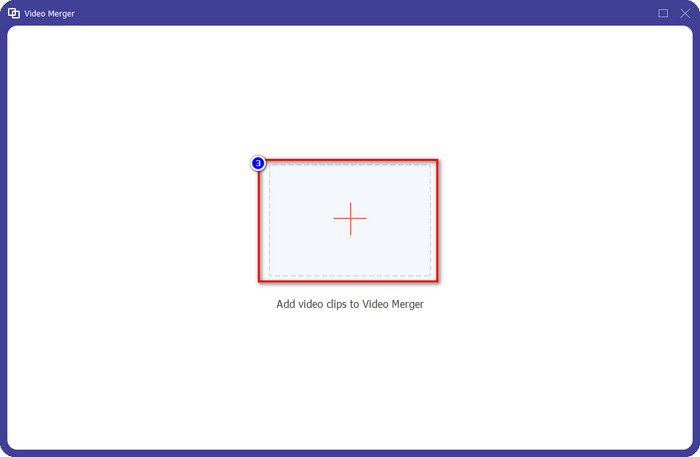
Étape 3. Pour ajouter les autres segments que vous avez découpés, cliquez de nouveau sur le bouton + pour tous les importer. Réorganisez-les correctement en les faisant glisser un par un, puis, lorsque tout est en place, cliquez sur Exporter pour enregistrer la vidéo dont une partie est au ralenti.
Partie 2. Autres logiciels en ligne et hors ligne que vous pouvez utiliser pour changer la vitesse de la vidéo en ralenti
Découpeur vidéo en ligne - Contrôleur de vitesse
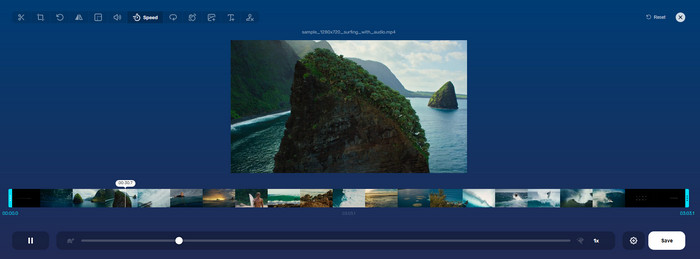
Online Video Cutter – Speed Controller n’est pas un outil que vous devez installer, car il fonctionne directement en ligne. Avec un contrôleur de vitesse vidéo comme celui‑ci sur le web, vous pouvez l’utiliser immédiatement, sans télécharger de ressources ou de fichiers supplémentaires pour lancer le logiciel. De plus, cet outil en ligne prend en charge les fonctions de montage de base dont vous pouvez avoir besoin. Même s’il n’est pas aussi professionnel que l’éditeur mentionné plus haut, il reste très pratique pour ralentir une vidéo. Pour apprendre comment mettre une partie d’une vidéo au ralenti, vous pouvez suivre les étapes ci‑dessous.
Étape 1. Pour accéder à l’outil en ligne, recherchez‑le dans le navigateur de votre choix.
Étape 2. Cliquez sur Open File et importez la vidéo ou le segment que vous voulez passer au ralenti.
Étape 3. Faites glisser le curseur vers la gauche pour ralentir la vidéo, puis cliquez sur Save.
Vidéo de vitesse gratuite
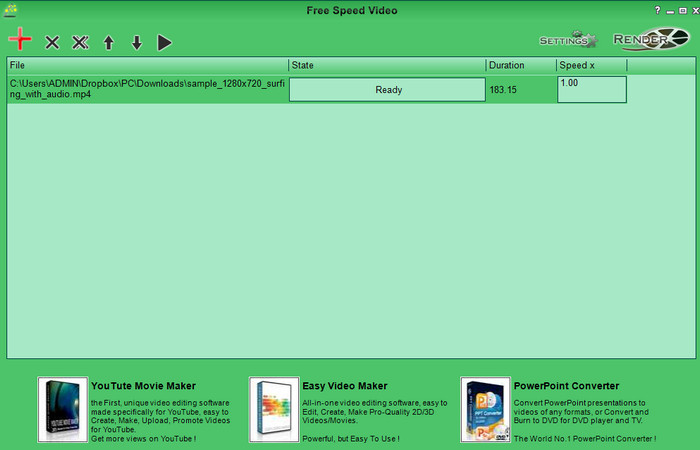
Un autre contrôleur de vitesse que vous pouvez télécharger sur votre ordinateur de bureau est Free Speed Video. Cet outil est très simple, donc l’apprendre ne représente aucun stress. Bien qu’il dispose d’une interface basique, il aurait besoin d’une mise à jour pour un meilleur design et pour aider l’utilisateur à repérer plus clairement les options disponibles. Si l’apparence de l’interface ne vous dérange pas, vous pouvez utiliser ce logiciel pour ajuster gratuitement la vitesse de la vidéo selon vos besoins. Pour vous aider à ralentir la vidéo, les étapes ci‑dessous expliquent comment ralentir une partie d’une vidéo.
Étape 1. Téléchargez‑le puis suivez le processus d’installation pour l’avoir sur votre ordinateur.
Étape 2. Cliquez sur le bouton + pour ajouter la vidéo que vous voulez ralentir.
Étape 3. Sous Speed x, tapez la valeur de vitesse que vous souhaitez appliquer.
Étape 4. Cliquez sur Render pour enregistrer le résultat final sur votre ordinateur.
Partie 3. FAQ sur la création d'une partie d'une vidéo au ralenti
Pourquoi la partie de la vidéo au ralenti se fige-t-elle ?
La transition entre la vidéo au ralenti et la vidéo à vitesse normale se fige en raison des vitesses différentes des deux vidéos. Vous ne devez pas vivre une transition glaciale et lente malgré les différences si vous utilisez plutôt l'outil ultime.
Qu'est-ce qui rend la transition vidéo du ralenti à la vitesse normale plus fluide ?
Il n'y a pas de réponse particulière, mais il est préférable de ralentir une partie vidéo si l'outil dont vous disposez peut accélérer la vitesse. Pour une transition plus fluide entre la vidéo à une vitesse normale et au ralenti, vous devez essayer de fusionner la vidéo comme ce que nous avons fait avec le logiciel ultime.
Est-il difficile d'appliquer un effet de ralentissement sur la partie vidéo ?
Il se peut surtout que tous les logiciels que vous pouvez utiliser ne puissent modifier une certaine partie de la vitesse de la vidéo. La plupart des contrôleurs de vitesse ajustent la vitesse de toute la vidéo au lieu de la partie spécifique. Donc, si vous souhaitez modifier la partie de la vitesse de lecture des clips, lisez la partie 1 pour tout savoir.
Conclusion
Enfin, nous avons désormais une bonne idée de la façon de mettre une partie d’une vidéo au ralenti grâce aux étapes fournies et à votre persévérance jusqu’à la fin de cet article. Même si les logiciels peuvent modifier la vitesse d’une vidéo, cela reste compliqué si vous ne voulez en changer qu’une partie. Ainsi, pour transformer seulement un extrait du clip en version ralentie et ajouter du style à votre vidéo, vous devez utiliser FVC Video Converter Ultimate. Vous pouvez obtenir ce logiciel en le téléchargeant et en l’installant sur votre ordinateur, puis en suivant les étapes que nous avons données plus haut pour ne modifier que la vitesse d’une partie du clip et non de la vidéo entière.
-
 Des preuves solides pour faire des vidéos au ralenti avec After Effects
 Toutes les pensées ou sentiments peuvent être générés ou améliorés en regardant quelque chose au ralenti. Lisez cet article pour savoir comment créer un ralenti dans After Effects.
-
 Approches éprouvées pour créer des vidéos au ralenti dans Adobe Premiere
 L'un des meilleurs logiciels d'Adobe est Premiere ; il fonctionne davantage sur l'amélioration des vidéos au niveau supérieur, comme la création de vidéos au ralenti. Lisez cet article pour en savoir plus sur Adobe Premiere et ses fonctionnalités utiles.
-
 Un moyen facile de faire une vidéo au ralenti dans Windows Movie Maker
 Vous souhaitez mettre un effet dramatique sur votre vidéo pour mettre en valeur ou au moins faire ressortir un clip du reste au ralenti, et vous ne savez pas comment ? Continuez à lire cet article pour en savoir plus.