


Top Video Resizers to Change Videos to a Perfect Size for Your Project
Video resizers are pieces of software that let people change the size and shape of video files. One of the most common things that video resizers can do is crop videos. This means taking out parts of the video frame to make a new, smaller frame size. This can be useful for a number of things, such as optimizing video content for different devices or social media platforms, cutting out unwanted parts of the frame, or combining multiple cropped videos to make new compositions.
Video editors, people in charge of social media, and people who make content regularly need to resize videos. Video content is becoming more and more popular, so video resizers are now a must-have for anyone who works with video files often. If you share the same predicament who wants to maximize the abilities of video resizers, then this article is for you. Check out handpicked programs to resize videos.

Part 1. The Most Powerful Video Resizers with Various Functions
If you are into powerful video resizers that can do the job to crop videos on Windows and Mac OS, then you can rely on the following tools. These programs guarantee the result and quality output. Without further ado, take a look at the video resizers below.
1. Video Converter Ultimate
FVC Video Converter Ultimate is a popular software tool offering a range of video conversion and editing features, including resizing and cropping videos. This program makes it easy to resize videos to different aspect ratios and resolutions with a range of preset options. The software supports all major video formats, including MP4, AVI, MKV, and more, and you can resize multiple videos simultaneously.
What is more, FVC's video cropping feature is also highly effective, allowing users to remove unwanted portions of a video frame easily. This can be useful for various purposes, such as removing letterboxing, resizing videos for different aspect ratios, or removing unwanted elements from the frame. Needless to say, it also works as an aspect ratio changer. Meanwhile, you can take a look at its key features for your perusal.
Key Features:
◆ Video resizing to different resolutions.
◆ High-quality output.
◆ Fast and batch processing.
Step 1. To start using FVC Video Converter Ultimate to crop your videos, you must download and set up the program on your computer. Just click the Free Download button for your operating system and follow the on-screen instructions to install the program.
Free DownloadFor Windows 7 or laterSecure Download
Free DownloadFor MacOS 10.7 or laterSecure Download
Step 2. Once the program is set up, you can open it and click on the Toolbox tab to get to the toolbox.
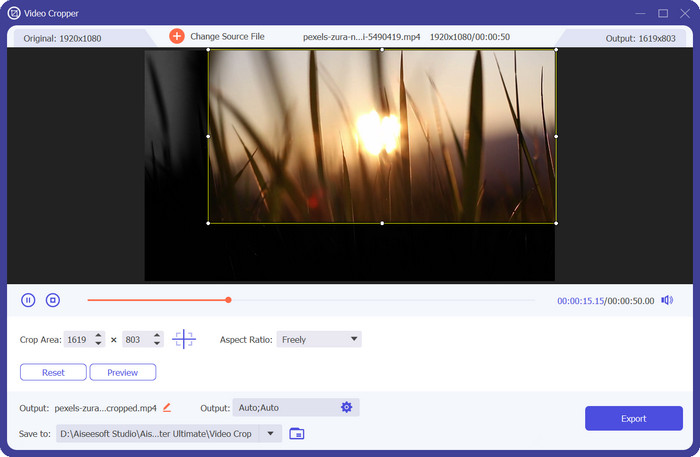
Step 3. From there, choose Video Cropper to open the tool for cropping. Click the plus sign in the upload area of the Video Cropper option to add a video to crop.
Step 4. The next step is to choose the aspect ratio for your video. The best proportion for Snapchat is 9:16. (vertical). Below the video preview is a dropdown menu where you can choose the aspect ratio you want.
Step 5. Click the Export button in the bottom right corner of the interface to save your cropped video file once you're happy with it. Then, you can send it to your followers or post it on Snapchat to show your friends how great you are at editing videos.
2. Premiere
With Premiere Pro, users can crop videos to create new compositions, remove unwanted elements from the frame, or resize videos for different platforms or devices. The software supports all major video formats and offers a range of preset options for resizing and cropping, as well as advanced tools for customizing the crop frame and previewing the results in real time. Aside from that, it offers other useful features, like color correction, advanced special effects, and audio editing. You can also learn how to change frame size in Premiere, as this program supports this feature. Now, find out how to crop a video in Premiere below and learn its key features.
Key Features:
◆ It works as a video resolution changer.
◆ Edit and mix audio tracks.
◆ It offers a wide range of special effects.
Here are the steps on how to change the aspect ratio in Premiere or crop videos:
Step 1. Import your video clip into Premiere Pro by clicking File > Import and selecting your video file. Drag your video clip from the Project panel to the timeline.
Step 2. Select the video clip on the timeline by clicking on it. Go to the Effects Control panel, located in the top-left corner of the interface.
Step 3. Look for the Motion effect in the Effects Control panel and click on the triangle to expand it. Adjust the Scale setting to resize your video. This will adjust the size of the entire video frame.
Step 4. To crop the video, click on the Crop effect in the Effects Control panel and expand it. Use the sliders to adjust the amount of cropping you want for each side of the video frame. You can also enter specific values in the text boxes to get more precise control over the cropping.
Step 5. Preview your cropped video by playing it on the Program Monitor. If you're not happy with the output, adjust the cropping values until you achieve the desired look. When you're finished, export your cropped video by clicking File > Export and selecting your desired output format and settings.

3. DaVinci Resolve
DaVinci Resolve is a comprehensive video editing software that offers advanced features for professional video editors and colorists. One of the standout features of DaVinci Resolve is its precise and flexible cropping capabilities, which allow users to adjust the framing and aspect ratio of their videos with ease.
In addition to its cropping capabilities, DaVinci Resolve offers a range of other powerful features, including color correction, audio editing, and advanced special effects. Whether you're editing a feature-length film, creating social media content, or producing a corporate video, DaVinci Resolve offers the tools and flexibility you need to achieve your vision. You can learn more about this tool through the key features and guide on how to crop video in DaVinci Resolve.
Key Features:
◆ Adjust framing and aspect ratio.
◆ It supports major video formats.
◆ Fusion visual effect for compositing, 3D tracking, and keying.
Step 1. Open DaVinci Resolve and create a new project. Import your video clip into the Media Pool by hitting the Import button and selecting your video file.
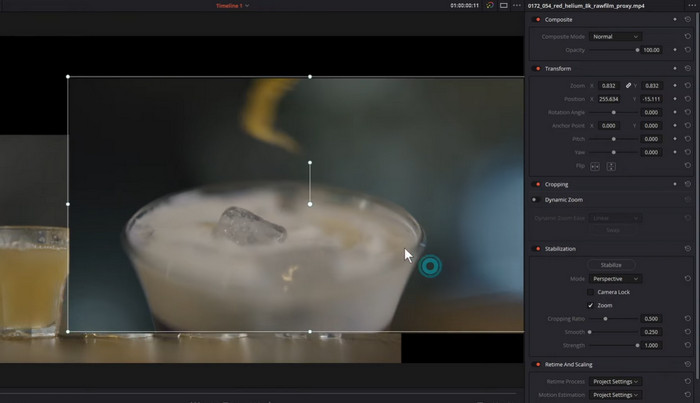
Step 2. Drag your video clip from the Media Pool to the timeline. Select the video clip on the timeline by clicking on it. Next, go to the Inspector panel on the right-hand side of the interface.
Step 3. In the Inspector panel, click on the Crop button to reveal the cropping controls. Adjust the cropping handles to remove unwanted portions of the video frame. You can also use the sliders in the Inspector panel to adjust the crop values numerically.
Step 4. Preview your cropped video by playing it in the viewer. If you're unhappy with the results, adjust the cropping values until you achieve the desired look.
Step 5. When you're finished, export your cropped video by clicking on the Deliver tab at the bottom of the interface. Select your desired output format and settings, then click the Add to Render Queue button to export your video.
4. After Effects
Adobe After Effects is an industry-leading video editing software that is known for its versatility and powerful features. Its cropping capabilities are among its standout features, enabling users to adjust the framing and aspect ratio of their videos with precision and ease. With After Effects, users can crop their videos to remove unwanted portions of the frame, adjust the aspect ratio to fit different screens, or even create unique video compositions. Whether you're a professional video editor, a motion graphics designer, or a hobbyist After Effects' cropping capabilities make it an indispensable tool for video editing and composition.
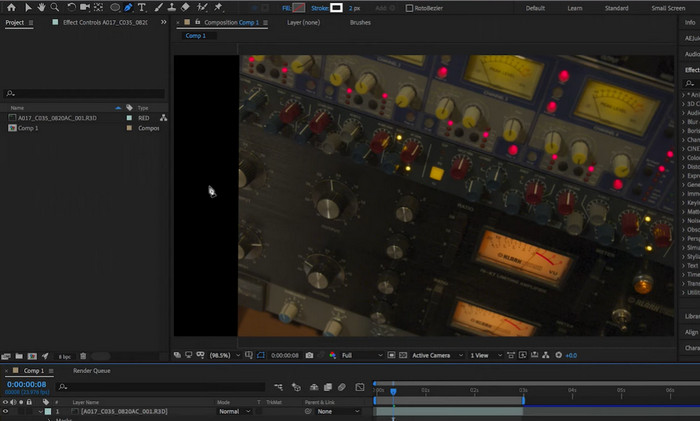
Step 1. Open After Effects and create a new composition. Add your video clip to the project by clicking on File > Import > File. Select your video file and click Open.
Step 2. Drag the video clip from the Project panel to the timeline. Select the video layer by clicking on it in the timeline. In the Effect Controls panel, tick on the Motion dropdown to reveal the Motion controls.
Step 3. Adjust the Scale and Position values to crop the video to your desired size and position.
Step 4. You can also crop the video using the Crop effect. To do this, go to Effect > Video Effects > Transform > Crop. Drag the Crop effect onto your video layer.
Step 5. Use the Crop Left, Crop Right, Crop Top, and Crop Bottom sliders to adjust the crop values in the Effect Controls panel. Preview your cropped video by playing it in the Composition panel.
Step 6. When you're finished, export your cropped video by going to Composition > Add to Render Queue. Select your desired output format and settings, then click on the Render button to export your video. That is how to crop videos in After Effects.
5. Final Cut Pro
If you want to learn how to crop a video on Mac, Final Cut Pro is a powerful video editing software designed exclusively for Mac users. With its intuitive interface and advanced features, Final Cut Pro makes it easy for users to create professional-grade videos, from short clips to full-length movies. With it, you can work on a social media post or a cinematic masterpiece. Final Cut Pro's cropping tools provide a range of options for achieving the perfect composition.
Therefore, if you're a Mac user looking to create high-quality videos with precision and ease, Final Cut Pro's cropping capabilities make it an indispensable tool for achieving professional-grade results. Moreover, here is how to change the video resolution in Final Cut Pro and its key features.
Key Features:
◆ It supports third-party plugins.
◆ Robust audio video editing tools.
◆ Advanced video editing tools.
Step 1. Launch Final Cut Pro and open the project that contains the video clip you want to crop. Select the video clip in the timeline by clicking on it.
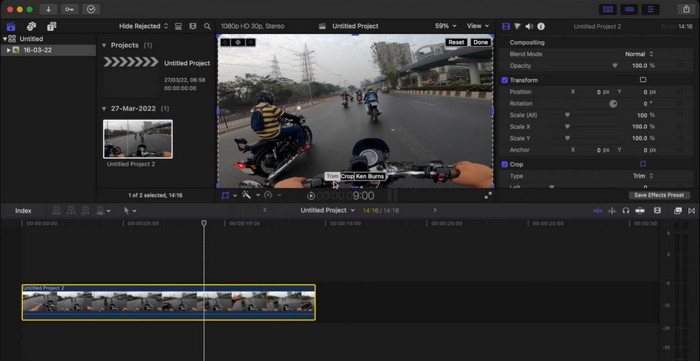
Step 2. Click on the Crop button located in the top-left corner of the Viewer window. Alternatively, you can press Command+4 on your keyboard to open the Crop tool.
Step 3. Use the handles around the video frame to adjust the crop. You can also manually enter values for the crop size and position in the Crop Inspector window.
Step 4. To adjust the aspect ratio of the cropped video, go to the Video Properties section of the Crop Inspector window and select the desired aspect ratio from the dropdown menu.
Step 5. Preview the cropped video by playing it in the Viewer window. If you're satisfied with the result, you can save the changes.
Step 6. To save the cropped video, go to File > Share and select your desired output format and settings. Finally, click on the Share button to export the cropped video.
Part 2. Free Video Resizing Tools
True enough, the previous tools help you to cut the sides of the video off or remove the unwanted parts of a video. Yet, they can be a bit challenging to navigate. Nevertheless, there are more other programs that will fit your preferences. Therefore, we researched and picked easy alternatives you might also want to check out.
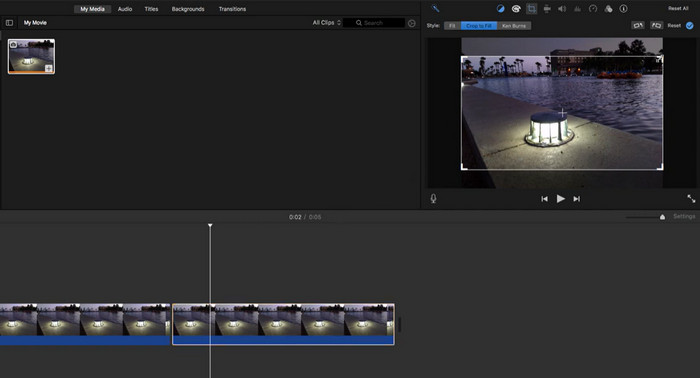
1. iMovie
With iMovie, you can trim, crop, and add effects to your videos, as well as adjust their color, sound, and speed. You can also add text, transitions, and music to your videos and even create stunning movie trailers with pre-designed templates. And thanks to its seamless integration with other Apple products and services, iMovie makes it easy to share your videos on social media, iCloud, or directly to your Apple devices. You can learn more about this program by checking out its key features and guidelines on how to use it. To use iMovie to crop videos, see the sweets below.
Key Features:
◆ Include various title templates.
◆ Add smooth transitions between video clips.
◆ Pre-designed movie trailers.
Step 1. Open iMovie on your Mac. Import the video you want to crop by going to File > Import Media and selecting the video file.
Step 2. Move the video clip into the timeline at the bottom of the iMovie interface by dragging and dropping it there. By clicking on the video clip in the timeline, you can choose it.
Step 3. Click the Crop button in the preview window's upper right corner. The button is shaped like a square with two arrows pointing in the same direction.
Step 4. A cropping rectangle will cover the video clip. You can choose the part of the video you want to keep by dragging the edges of the rectangle.
Step 5. You can also move the rectangle by clicking on it and dragging it to where you want it. Once you have chosen the part of the video you want to crop, click Done to apply the crop.
Step 6. Play back the cropped video in the preview window to see how it looks. If you're happy with the crop, save your project by clicking File > Save and then export the cropped video by clicking File > Share.
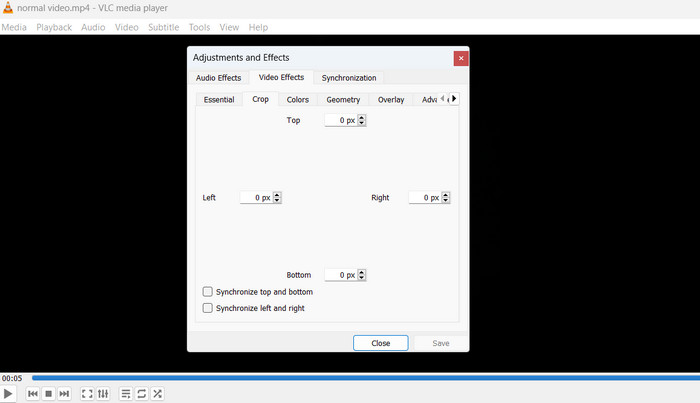
2. VLC
VLC Media Player is a versatile media player with lots of features that are used by millions of people around the world. VLC Media Player is the most well-known media player because it is easy to use and has all the tools you need to play, stream, and even edit videos. But VLC Media Player is more than just a video editor. It also supports various media formats, including audio, video, and streaming, and can play virtually any type of file. Plus, it's free and open-source,
Key Features:
◆ It supports multiple platforms.
◆ Advanced playback controls.
◆ Record and convert media.
Step 1. To know how to VLC crops videos, click Media from the top menu of VLC Media Player. Click Open File and choose the video file you want to crop.
Step 2. Once the video is playing, go to the top menu bar and click on Tools. Then click on Effects and Filters. Click on Video Effects, and then click on Geometry.
Step 3. By checking the Crop box, the cropping feature will be turned on. Use the sliders next to Crop to change the area that will be cropped. You can also type the pixel numbers into the boxes by hand.
Step 4. When you're happy with how you've cropped the picture, click Close to save the changes. Lastly, save the cropped video by going to the top menu bar, clicking on Media, selecting Convert/Save, and then choosing the folder and file format.
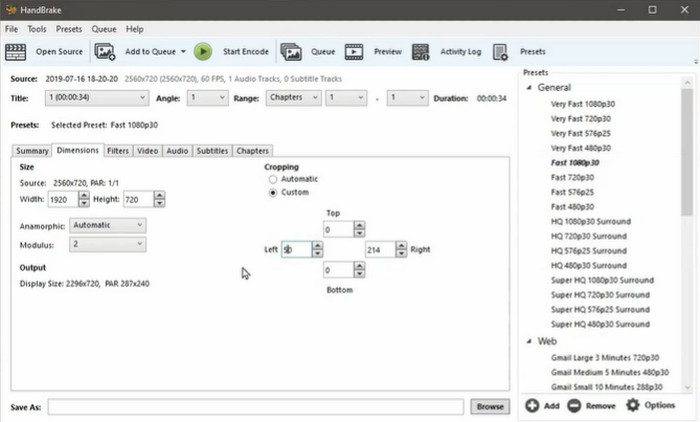
3. Handbrake
Handbrake is an exceptional open-source video transcoder that allows users to convert, compress, and even crop their videos easily. This free software boasts an impressive array of features that make it a popular choice for amateur and professional videographers. Moreover, Handbrake offers a wide range of video editing tools, such as trimming, resizing, adding subtitles, changing the frame rate, and cropping. This makes it a complete solution for video editing. The software is also easy to understand and use. Its clean, simple interface makes it easy for beginners and experts to find their way around. Look into the steps and learn how to utilize Handbrake to change the size of videos.
Key Features:
◆ Video quality adjustments.
◆ Queue exporting.
◆ Advanced encoding settings.
Step 1. Download and install Handbrake from the official website. Next, open Handbrake and click on the Open Source button to load the video file you want to crop.
Step 2. After the video is loaded, select the Crop tab on the right-hand side of the window. In the Crop section, use the sliders to adjust the cropping area or manually input the pixel values.
Step 3. Once you're satisfied with the cropping, click on the Start button to begin the transcoding process.
Step 4. After the transcoding is complete, your cropped video will be saved in the specified destination folder.
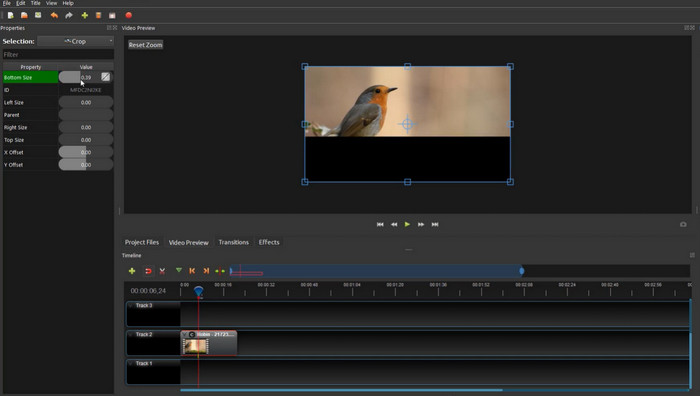
4. OpenShot
OpenShot is free and open-source software for editing videos. It has a wide range of features and tools that can be used to make and edit videos. It works with Windows, macOS, and Linux operating systems and is made to be easy to use, even for people who haven't edited videos before. Overall, OpenShot is a powerful and flexible video editing program that gives users a wide range of tools and features for making and editing videos that look like professionals made them. As open-source software, it is also free to use. This makes it a great choice for people on a budget with video editing.
Key Features:
◆ It has multiple tracks and layers.
◆ It has a built-in title editor.
◆ It comes with 3-D animation tools.
For a hands-on experience, you can follow the guide on how to crop a video in OpenShot below:
Step 1. You can get OpenShot from the official website and install it. Start up OpenShot and start a new project.
Step 2. Click Import Files and then choose the video file you want to crop. Drag the video file from the Project Files section to the Timeline section. In the Timeline section, right-click on the video file and choose Properties.
Step 3. Select the Crop tab in the Properties window. To change the cropping area, use the sliders or type in the pixel values.
Step 4. Once you're happy with the cropping, click the Export Video button to send the video somewhere else.
Part 3. Which One to Choose
To help you select the right video resizer according to your needs, we provided a comparison chart below.
| Tool | Quality | Speed | User Interface | Batch Processing |
| Video Converter Ultimate | Good | Fast | Intuitive | Yes |
| Premiere | Good | Fast | Professional | Yes |
| DaVinci Resolve | Good | Fast | Professional | Yes |
| After Effects | Good | Fast | Professional | Yes |
| Final Cut Pro | Good | Fast | Professional | Yes |
| iMovie | Good | Fast | Simple | Yes |
| VLC | Average | Fast | Simple | No |
| Handbrake | Good | Slow | Simple | Yes |
| OpenShot | Average | Slow | Simple | Yes |
Part 4. FAQs about Video Resizers
Can I use a video resizer to change the aspect ratio of my video?
Yes, many video resizers allow you to change the aspect ratio of a video. It can be useful if you need to resize your video for a specific platform or device.
How to change the aspect ratio in Resolve?
You can change the aspect ratio of a video by selecting the clip in the timeline, going to the Inspector panel on the right-hand side, and adjusting the Scale or Crop values under the Sizing section. You can stretch or compress the video horizontally or vertically to change the aspect ratio.
Can I crop videos in Google Slides?
It is not possible to crop videos in Google Slides directly. While Google Slides allows you to add videos to your presentation, it is primarily a tool and does not offer advanced video editing features such as cropping.
Conclusion
Video resizers are powerful tools that allow you to resize videos, change their aspect ratios, and convert them to different file formats. While many video resizers are available, each utility has its strengths and weaknesses. By comparing different video resizers and choosing the one that best meets your needs, you can ensure that your videos are optimized for the platforms and devices you want to share.
-
 5 of the Best GIF Resizers Available Across All Platforms [2023]
 Want to know the GIF resizers you can use? In that case, the information provided below will talk about the resizers you can use on your GIFs on all platforms.
-
 Cropping Made Easy: How to Crop TikTok Video for Full Engagement
 Learn how to crop your TikTok videos with our simple tutorial! You can create more visually appealing videos with just a few taps and swipes.
-
 Cropping Made Easy: How to Crop TikTok Video for Full Engagement
 Learn how to crop your TikTok videos with our simple tutorial! You can create more visually appealing videos with just a few taps and swipes.