


Improve iPhone Photo Resolution Using The Best Ways You Must Know [Newest]
If you need a mobile device that can capture high-definition images, it is a smart move to pick an iPhone because of its innovative high-end front and back camera. Sorry Android users, we need to face the truth that the camera of the latest iPhone is way better. Most people usually take a snap using iPhone devices, but not all of the images they capture are perfect; some needs adjustment, editing, improvement, or upscaling. If you want to improve your iPhone photo resolution, follow this article as we indicate the information you need to know!

Part 1. Recommended Way: How to Increase Photo Resolution Online with the Best Image Upscaler
How to change photo resolution on iPhone 13? If this is your problem, you must use the FVC Free Image Upscaler. Everything you upload here, this tool will upscale it immediately with its proudly AI technology. You can sit and relax after you upload the image here because the tool will increase the resolution of the image you upload here. Unlike other software you can use, you wouldn’t need to download an installer here to use it. Also, FVC doesn’t require you to log in to your account here, so you are safe from leaking information, and it doesn’t give you cookies. So, if this tool caught your attention, you can immediately follow the steps we added below to fix the problem.
Step 1. Open the online tool by clicking the name of it above, and a new tab will automatically be opened; this will lead you to the official website.
Step 2. Tick the Upload Photo to insert the image you want to upscale in this tool. After you’ve clicked it, a folder will show on your screen, select the image, and press Open.
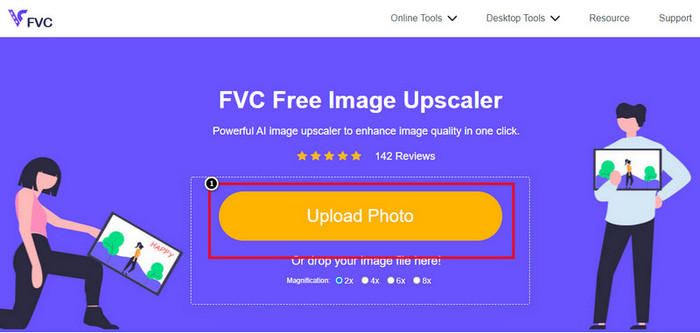
Step 3. Choose what type of Magnification you want to be applied to the enhanced version of the image; you can try them all to see which options make your image better in looks.
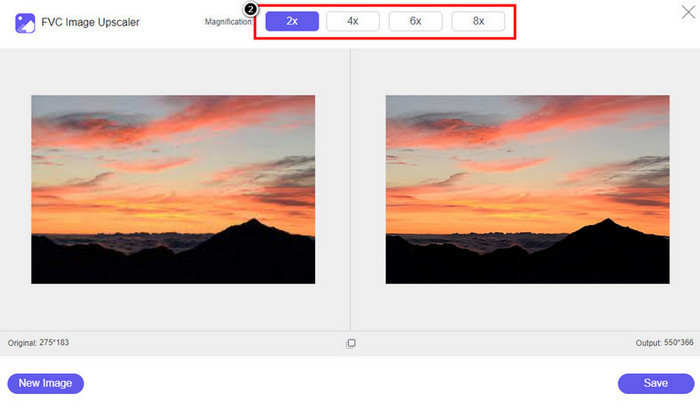
Step 4. Click the Save button to download the software you improve here; This tool will directly save it to your local folder. Check out the upscaled version of the image you edited here.

Part 2. How to Change Photo Resolution on iPhone [Improve Your Image Save Easily]
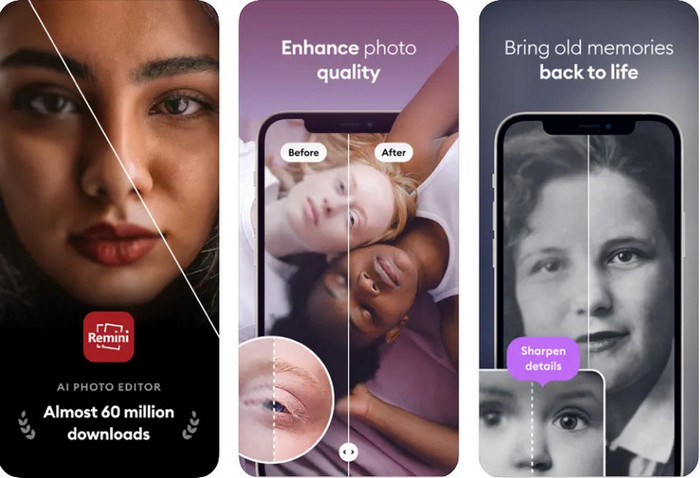
Remini App allows you to change the resolution of pictures iPhone to make them look even better. You can download this app on AppStore once you visit. This app is an all-in-one image editor that can help you enhance and turn black and white images into colorized ones with a single swipe. With this app, you can upscale any images up to 4x with the help of its AI technology. If you want to use this app, then you can copy the step-by-step we add next.
Step 1. Download the app on your iPhone so that you can start using it.
Step 2. Open the app and press Enhance. Select the image you want to improve that is in your Photos.
Step 3. Wait for the processing to enhance the image you upload; you can drag the slider to see the before and after of the image.
Step 4. Now that the processed image is done click the Save button to download the image you enhance.
Part 3. How to Change Photo Resolution on Android [Effectively Enhance Images]
How to change picture resolution on Android? If you want to upgrade the image resolution you capture on your Android; you can try using Picsart. It is a well-known application you can download on your Android to edit images that you have to make them look better. This app is rich in features that you can take advantage of. The enhancement we will teach you isn’t the typical way you think, but it can improve image quality. Follow the detailed information below to know more!
Step 1. Download the app via the Play Store, then launch it. Choose the image you want to improve, then upload it.
Step 2. Go to Effects, click Blur, drag the slider for blur to set it to 5 to 10, and press the check icon to save it.
Step 3. Open the Tools and go to Curve.
Step 4. Adjust the curve by dragging it up and down to make your image resolution look better.
Step 5. Hit the check icon to save the changes you applied to the image by bending the curve, then Export it.
Part 4. How to Adjust the Camera Setting to Capture Better Images! [Tips & Tricks]
How to increase the resolution of a photo on an iPhone to capture a better image portrait? Not all of the features are presented on the Camera app of your iPhone. Some of the to make your image quality better are settings. Are you interested in how to deal with this problem? Then proceed to read the info we add below.
Step 1. Go to your Setting and open the Camera App.
Step 2. Click the Formats.
Step 3. Set the final output to Most Compatible, and that is the JPEG. Every time you capture images are in the JPEG extension, which we all know uses lossy image compression with a high-quality image output.
Related:
How to Fix HEIC Photos Using the Best Tools
Photo Blemish Removers You Must Use to Have Smooth Silky Skin on Images
Part 5. FAQs on How to Change Photo Resolution on iPhone
What makes image quality on iPhone go bad?
There are many factors you need to consider what might be the problem. Before capturing an image, ensure that you clean the lens of your iPhone and have a stable hand, or you can use a camera stand and use the high ISO for moving objects. If you have done that and still have bad quality, you can use the tools we enlist in this article.
Does changing image quality make the file size big?
Indeed, the image quality will become bigger after you enhance it. When you add pixels to the image, after you enhance it, the file size of the improved version will also become bigger.
Does changing photo resolution on iPhone easy?
Yes, you wouldn’t need to have years of experience to do enhance the photo resolution of your iPhone, so if you want to know how to do it you can copy the steps we add above and the tools we introduce that you can use.
Conclusion
After all, we now have a clear idea of how to make iPhone photo resolution even better than before with the help of these dedicated apps! We hope that this article help you deal with the problem with different solution on iPhone and Android. Everyone hates bad image quality so we are here to fix it. Follow the steps we add above to finish it in no time successfully!
-
 How to Convert Low-Resolution Image to High-Resolution Online
 If you want to learn how to convert low-resolution images to high-resolution images online, then this article is for you. Read completely to learn how.
-
 Top 6 Blemish Photo Removers You Must Have Now [2022]
 Need a photo blemish remover to have smooth skin? Worry no more! Here, we will introduce different tools that could help your device.
-
 Remove the StarUML Watermark Using the Free & Paid Version You Can Use
 Want to remove the StarUML watermark on the final output? Well, there are two ways how to do it, and let’s discuss them here.