

4 Ways to Blur Photos on iPhone for Pro-Like Results
In the fast-paced world of smartphone photography, the iPhone stands out as a powerhouse, offering users a wide selection of features to capture memorable moments with unparalleled ease. One often-overlooked gem in the iPhone's photo-editing arsenal is the ability to blur images. This technique can add depth, drama, and a touch of professionalism to your snapshots. In this article, we will walk you through the step-by-step process of blurring photos on your iPhone, unlocking a world of creative possibilities at your fingertips, starting from using portrait mode, online tools, and third-party applications.

Part 1. How to Blur Photos on iPhone
Portrait Mode
Portrait mode on iPhone is a specialized feature designed to add depth to the quality of one's photographs. It creates this shallow depth of field, which lets the subject stand out from its background. Questions like Can you blur the background of a photo on an iPhone are commonly asked by someone new to the Apple ecosystem. Blurring your photos on iPhone is possible as iOS introduced the portrait mode in their 7 Plus model up to the latest, which the steps in doing it are listed below.
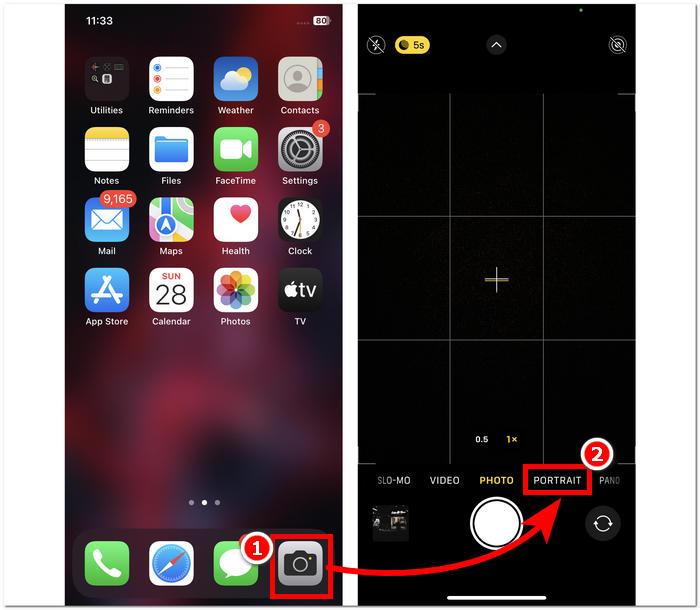
Step 1. On your iPhone device open your Camera app.
Step 2. Click on the Portrait section in your Camera settings.
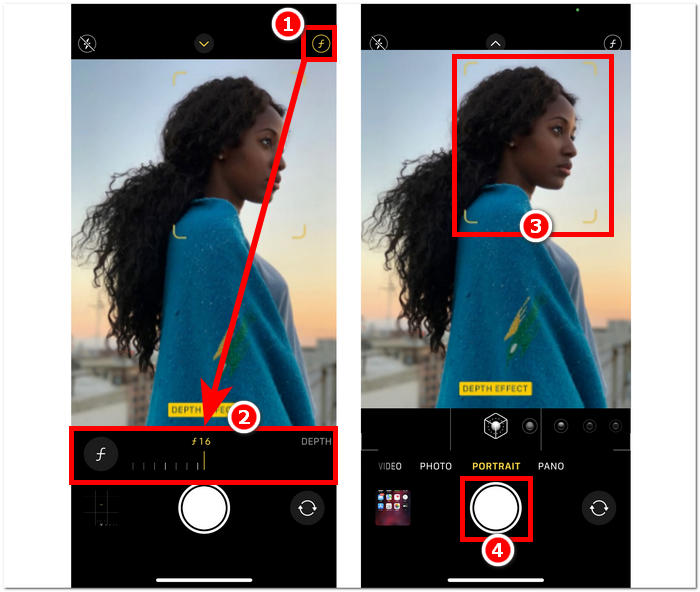
Step 3. On your screen, tap on the f icon located in the upper right corner and adjust the depth you want in your photos.
Step 4. Once you're satisfied with the depth, proceed to tap on your subject to focus on your photo, and finally, click the Shutter button to capture your photos.
Utilizing portrait mode on the iPhone is straightforward when you understand the impact of depth of field on your photos and can navigate your camera app's interface. Also, if you regret that, you can unblur images easily.
Without Portrait Mode
How to blur a photo on an iPhone without portrait mode? Blurring photos using your iPhone when it doesn't have portrait mode can be challenging as portrait mode is introduced in their 7 Plus and above model. Hence, we find ways for users who don't have portrait mode on their iPhones. This is more like a tip or hack and requires the user's manual labor. If done effectively, then you can achieve similar results to portrait mode.
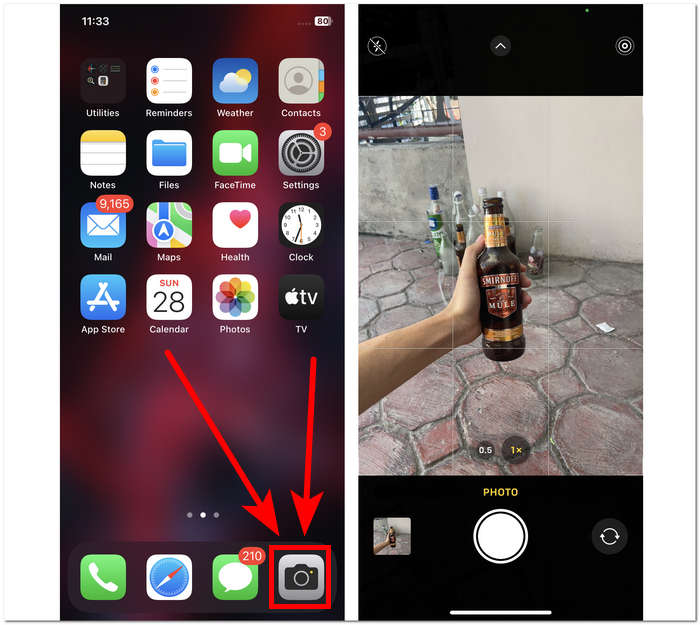
Step 1. On your iPhone, open the Camera app.
Step 2. On the main interface, position yourself and the subject far from the background by moving backward.
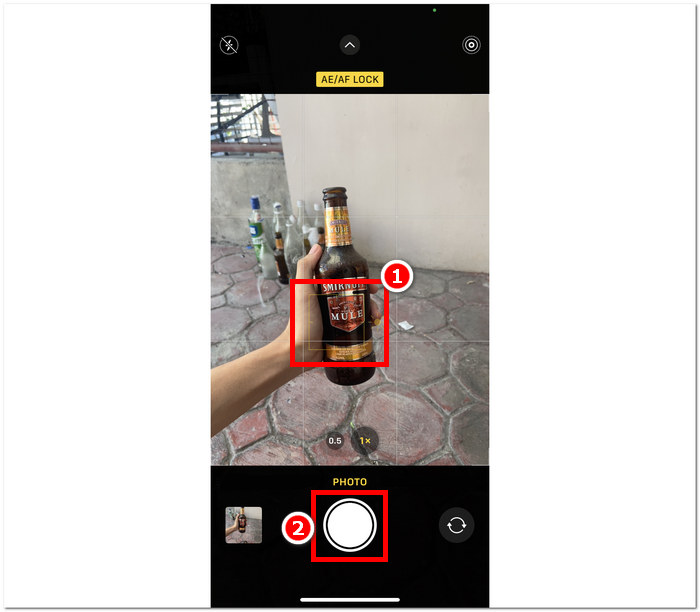
Step 3. Long press on the subject until the AE/AF LOCK appears on your upper screen. This will let your subject be the focus of your camera, making the background blurry.
Step 4. When the subject stands out from its blurry background, then you're ready to capture your photos. Just click on the Shutter button to capture your photos.
It is possible to blur photos on an iPhone even without the portrait mode features in the camera settings by manually creating a distance between your subject and its background as well as getting your focus right. This step is not just applied to iOS users but also to Android users who don't have portrait mode in their camera settings.
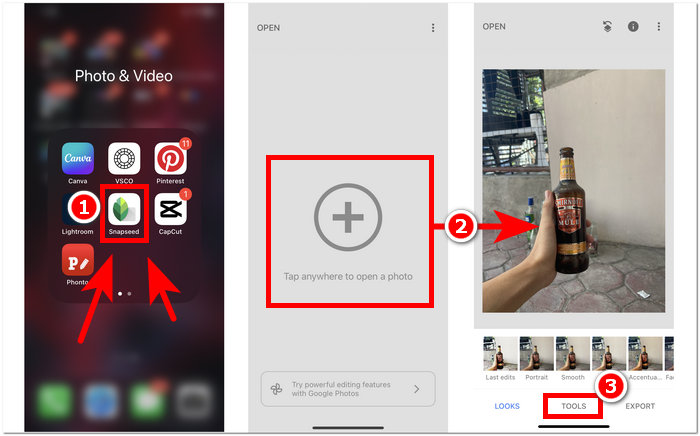
Third-Party App: Snapseed
Snapseed is among the powerful and professional-grade photo editing applications developed by Google. This app is full of features and tools a user needs for every photo editing task, and among them is blurring your photos using just your iPhone. Resorting to a third-party application can also help you address your concerns about how to blur people's faces in photos on iPhone, as the app lets you decide which part you are going to blur, unlike the portrait mode, where you can only select or tap subjects to focus.
Step 1. Download and open Snapseed on your iPhone from your App Store.
Step 2. Once you're in the app interface, tap on the screen to add the photos you wish to add blur in them.
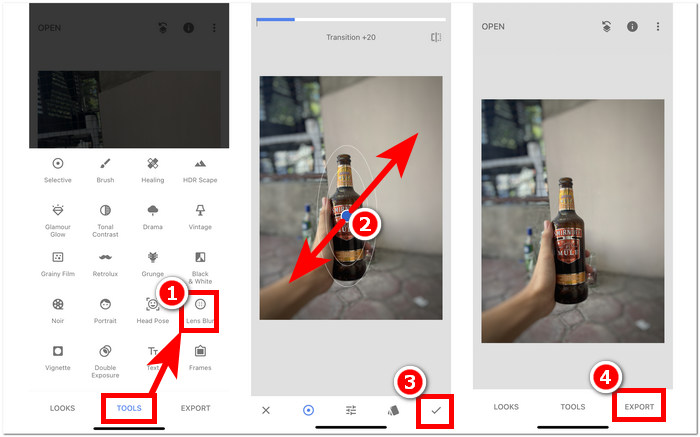
Step 3. In the TOOLS section, find and click on the Lens Blur setting. Your photo will then appear with a circular framing; this circle represents the focus, while the surrounding area will be blurred.
Step 4. Pinch your fingers together to make the circle adjust the size. Remember to base the size of the circle frame on your subject, and when satisfied with your Edit, tap on the check button and proceed to click EXPORT to save the changes to your photos.
Snapseed's versatility extends to various photo editing tasks, including the seamless addition of blur to your images. This app is not only accessible on iPhones but is also available on other devices, making it an ideal and convenient tool for users seeking a comprehensive editing experience. With Snapseed's user-friendly interface and cross-device compatibility, achieving the desired blur effect on your photos has never been more accessible.
Part 2. How to Remove an Object From Your iPhone Photo Without Blurring
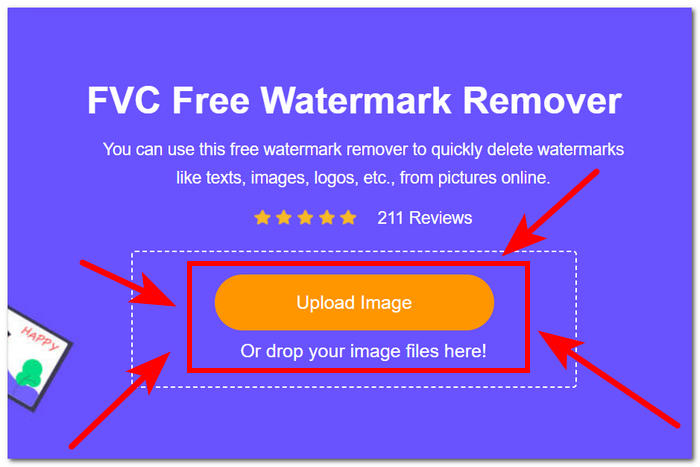
Achieving a flawless blur effect on iPhone photos can be challenging, with issues like overall blurriness or objects appearing unclear. When faced with objects that can't be fixed through blurring, it's best to remove them. Luckily, FVC Free Watermark Remover will help iOS and even non-mobile device users remove blurry, unwanted objects and even watermarks from their photos for free. FVC is a web-based tool that is accessible to all types of web browsers across multiple devices. It promotes free use of service for every user that requires no installation and subscription from them. Simply following the steps below can guarantee you a polished result without blurring them.
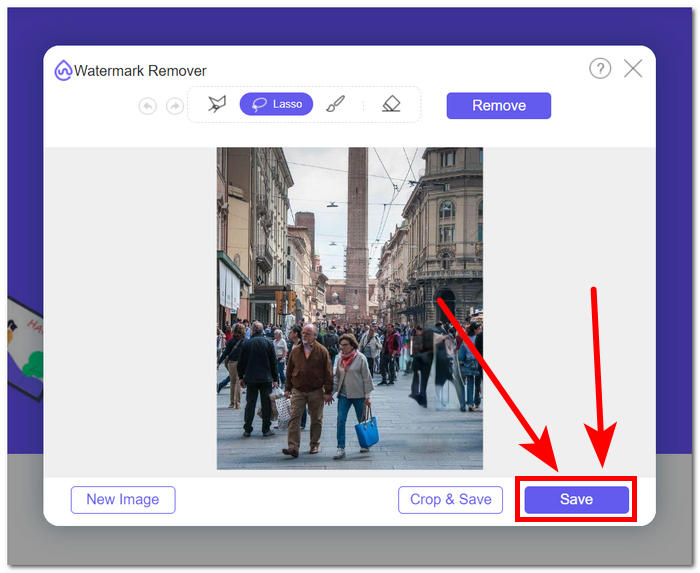
Step 1.Visit FVC Free Watermark Remover to your local browser, either from your mobile or desktop and upload your image by clicking on the Upload Image field.
Step 2. Once your photo is in the interface, click on the Lasso tool above and trace it to the blurry object or text, then finally click the Remove button to remove them from your photos.
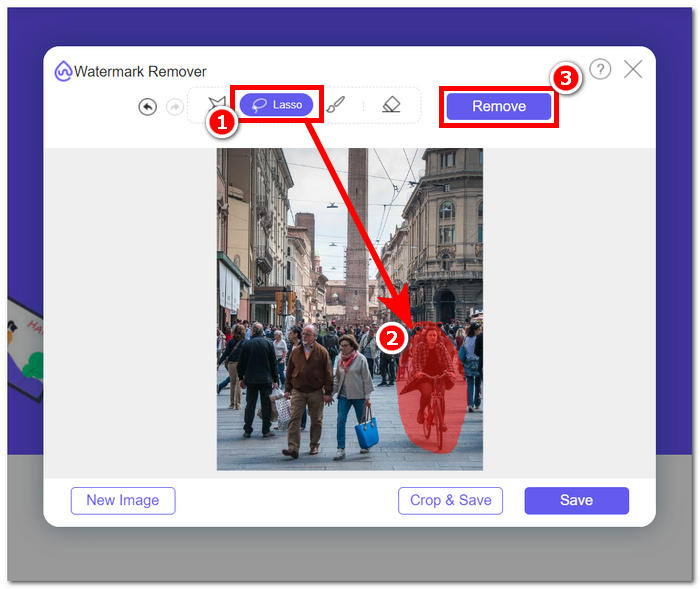
Step 3. Once your photo is done processing, you will be able to see the preview of your newly edited photo, and once satisfied with the object removal, click on the Save button to download your photo.
FVC Free Watermark Remover has demonstrated its ability to remove objects without causing any blurring in your photos. It is safe to assert that whether you are blurring your photos through portrait mode or a third-party app, this tool is an excellent match to assist you in addressing any concerns that may arise along the way. Also it is designed originally for removing watermarks from JPG, PNG, and more.
Part 3. FAQs About How to Blur Photos on iPhone
How do you blur a picture on an iPhone without the app?
To blur a picture on an iPhone without using an app, you can utilize the built-in editing features. Open the Photos app, select the photo you want to edit, tap Edit, choose the three-dots icon, and select Markup. From there, you can use the pen tool to draw over areas you want to blur.
Does the iPhone Photo app have a blurring tool?
The iPhone Photo app does not have a dedicated blurring tool. Still, it does offer various editing options, including the Depth tool for adjusting the background blur in Portrait mode photos. Open the Photo app, select a Portrait mode photo, tap Edit, and use the Depth slider to control the background blur.
Do all iPhones have portrait mode and blur the background?
Not all iPhones have Portrait mode and the ability to blur the background. Portrait mode was available on the iPhone 7 Plus and above. To check if your iPhone has Portrait mode, open the Camera app and see if Portrait appears as an option.
How to blur the background on an iPhone after taking a photo?
To blur the background on an iPhone after taking a photo, you can use the Portrait Mode feature if your iPhone supports it. Open the Photos app, select the photo, tap Edit, and then adjust the background blur using the Depth slider. Keep in mind that this feature is available on specific iPhone models.
How to blur part of a photo on an iPhone?
Blurring a part of a photo on an iPhone can be done using the Markup tool in the Photos app. Open the Photos app, select the photo, tap Edit, choose the three-dots icon, and select Markup. Use the pen tool to draw over the area you want to blur and adjust the intensity as needed.
Conclusion
In conclusion, blurring photos on your iPhone creates endless possibilities, allowing users to enhance their images with depth, drama, and a touch of professionalism. From utilizing the built-in Portrait mode to employing third-party apps like Snapseed, the process offers flexibility for both beginners and seasoned photographers. Additionally, tools like FVC Free Watermark Remover address concerns about unwanted objects in photos without compromising clarity. As iPhone users continue to explore these techniques and tools, the journey into the fascinating realm of photo blurring becomes an exciting and accessible venture. So, grab your iPhone, experiment with these methods, and elevate your photography to pro-like results!
-
 How to Remove Background From Image Using GIMP
 Get started on GIMP and the step-by-step process of removing backgrounds from images. Discover efficient ways to create transparent images using GIMP today!
-
 How to Increase Image Size Online and Offline
 Discover the easiest way to increase image size without losing quality. See our resizing tools and software to ensure optimal quality for your pictures.
-
 How does PPT Remove Background Image? Comprehensive Guide
 Ready to take your presentation to the next level? In this article, discover how PPT removes background images and creates outstanding PowerPoint presentations easily.