


How to PPT Remove Background Image: Desktop & Online
When making PPTs, we often need to set many templates in different styles and insert the prepared icons or pictures. But many material pictures have background color. When there are too many different colors on a page, it will look cluttered. All the elements are stacked randomly and do not make up a complete design.
So we must deal with it seriously and perform PPT removing the background image . PowerPoint itself has two ways to realize this operation. But if you want to experience a more brilliant background removal service, you can try the best online tools recommended in the article. We will not continue to nag; we will immediately start to see how to do it.

Part 1. How to Remove Background in PPT
You can handle pictures in PowerPoint by hand when you make PPT. There are two tools on its interface that will help you remove the picture background. Let's look at how to do it from these two situations next.
Remove the Background with the Set Transparent Color feature
The first one is to add a transparent color effect to pictures. This method is very suitable for pictures with monochrome color, and the effect is immediate.
Here is how to remove the white background from the image in PPT with the transparent color feature.
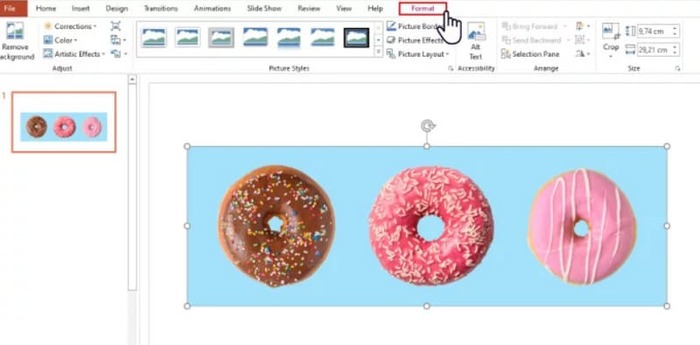
Step 1. Open your PPT. Navigate to the image you want to edit. Please select it and choose Format in the toolbar.
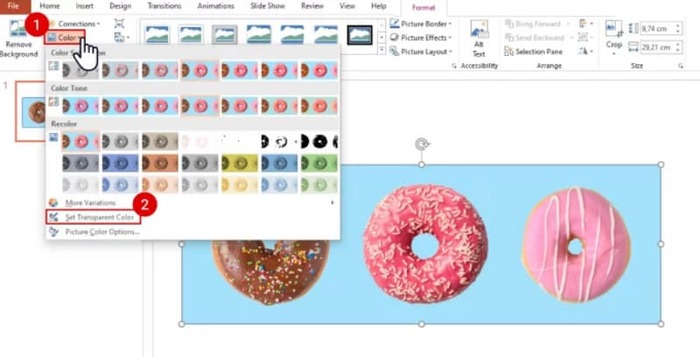
Step 2. Find Color in the top left corner. Expand the menu and choose Set Transparent Color.
Step 3. Your cursor will become a pencil. Hover it on your image and click. The background color of your image will be transparent.
Note that this method does not work for images with shadows in the background. Also, if the objects in the picture are too close in color to the background, the Transparency function may erase both the background and the objects.
Remove the Background with the Remove Background Feature`
You will see a Remove Background button in the upper left corner of the PowerPoint page. Click it and the PPT Remove Background will automatically recognize the background and highlight the part to be removed.
Here is how to remove a background image from a PPT slide with the Remove Background Feature.
Step 1. After inserting your image into your slide, select it.
Step 2. Click Picture Format > Remove Background.
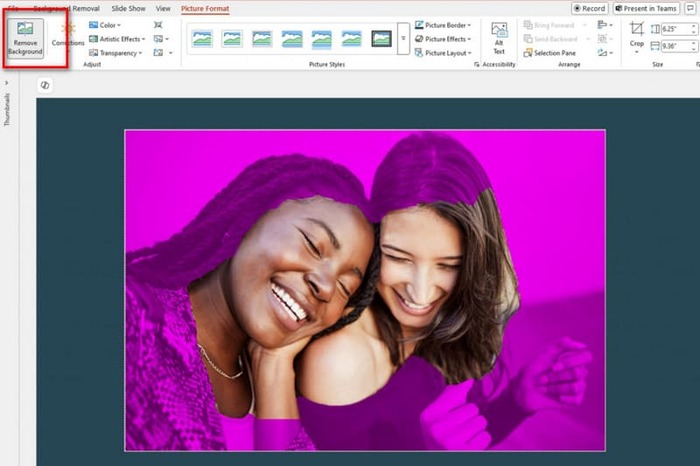
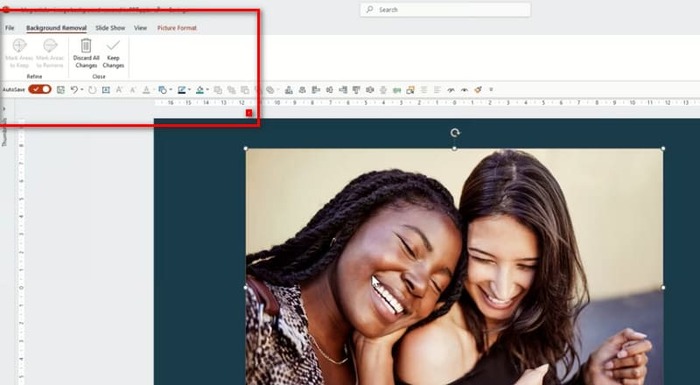
Step 3. The platform will run and detect the background automatically. The background will be highlighted in purple. You can also choose Mark Areas to Keep or Mark Areas to Remove to adjust the frame manually.
Unfortunately, there is a common problem with this feature and the Transparency Effects feature. They are both very bad at detecting the background and are likely to erase the core objects in the image. And even if you try to adjust it manually, PowerPoint will still follow its idea when executing it. If your picture background is dark or not a single color, try to find another more innovative tool to remove or add background to your image.
Part 2. How to Remove White Background from A Picture Online and Upload It to PowerPoint
Free: FVC Background Remover
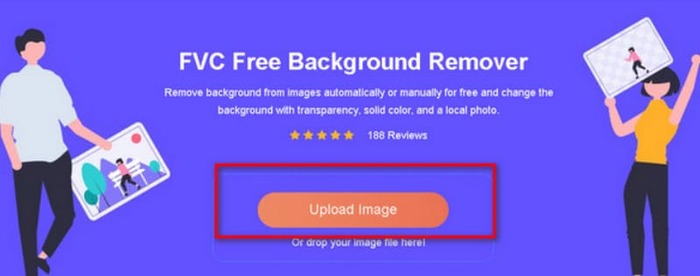
In the above, we can find that the tools provided by PowerPoint, although simple to use, cannot be used to process pictures with complex backgrounds. If you have such tasks, we recommend using FVC Free Background Remover as an assistant. It doesn't cost you anything. All you have to do is upload the image to the platform, which can be in PNG, JPG, or JPEG format, and FVC Free Background Remover can even be used to change the background of the slide image. Upload the new background you want, or pick a solid color.
Here is how to remove background graphics in PPT with FVC Free Background Remover.
Step 1. Open FVC Free Background Remover on your browser. Click Upload Image to add your image to the slide.
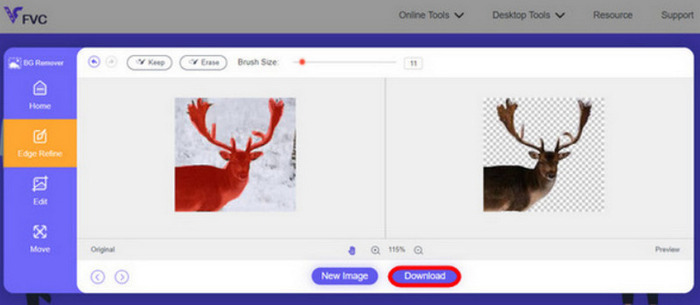
Step 2. FVC Free Background Remover will load the image and perform background removal automatically. You can edit the image and customize the settings when the process is over.
Step 3. Finally, click Download to save the edited video.
The PPT removes the image background method above, mainly for static images. If you have watermarks, logos, etc. on your image screen, find out how to remove watermarks from photos for optimal display.
Part 3. FAQs of PPT Remove Background Image
How do you remove a white background from an image in PPT?
PowerPoint has Background Remove and Transparent Color Effect features to help you. However, there is a chance that they will destroy the integrity of the screen. You can use FVC Free Background Remover to deal with the picture.
Why don't I have Transparent Color in PowerPoint?
You first need to ensure you have selected the target image. If the picture is not selected, you cannot add a transparent color effect to it.
What should I do if the Remove Background tool doesn't work?
First, check whether your image format is compatible with PowerPoint, i.e., JPG, JPEG, or PNG. if not, please convert the format first. This problem may also occur because your PowerPoint is not the latest version. Update it first, and then reopen the operation.
Conclusion
Although PowerPoint has functions that enable PPT to remove background images, they are too basic. It is also very likely that the existing elements in the screen will be destroyed. If your picture has a simple background color or a white background, then the tools within PowerPoint may be enough. Still, if your picture has a lot of details, we recommend using a professional tool like FVC Free Background Remover. It is easy to use and doesn't require downloading additional software.
-
 Step-by-Step Guide to Change Image Background in 4 Ways
 Looking for tools to change photo backgrounds? In this article, learn various image editing tools that you can use to change image backgrounds easily.
-
 GIF Background Removal with Effective and Useful Tools
 Removing the background without the right tool can be frustrating. Check this post for app recommendations on how to make GIF backgrounds transparent.
-
 How to Remove Background From Image Using GIMP
 Get started on GIMP and the step-by-step process of removing backgrounds from images. Discover efficient ways to create transparent images using GIMP today!