


How to Color Correct With The Best 5 Must-Have Tools
Color correction is a fundamental process in video editing that improves and blends the colors in a video, providing a visually appealing and eye-catching result. It involves adjusting a video's contrast, saturation, brightness, and hues to achieve that perfect visual vibe. Whether you're a professional videographer or an aspiring content creator, understanding how to execute color correction is a game-changer for delivering encompassing visuals. The process starts by identifying and analyzing the existing color balance, highlights, shadows, and mid-tones within the video footage. Henceforward, adjustments are made using specialized software that allows authentic control over these color elements. Let's dive deep into this article to learn how to fix video color problems with the best tools you can rely on.

Part 1. Five Ways on How to Color Correct Video
Finding various free video editor color corrections online to elevate your video's visual appeal might be as easy as you think. However, looking for more advanced and reliable ones is kind of tricky to create the right mood for your videos. Discover five effective ways to perfect your video's colors using various versatile software, enhancing your storytelling and engaging your audience.
1. Video Converter Ultimate
Video Converter Ultimate is an all-in-one video solution that empowers you to enhance your video quality by adjusting essential parameters like brightness, contrast, and saturation. This handy color corrector also enables you to edit videos with features such as trimming, cropping, and merging. In addition to this, it offers a plethora of options for video conversion, allowing you to transform videos into thousands of formats and adapt them for various devices like MP4, MKV, MOV, MP3, AAC, GIF, iPhone, Samsung, and Apple TV, ensuring they can be enjoyed across different platforms. Moreover, users can add subtitles and watermarks to make their videos more personalized. With a straightforward interface, this tool is perfect whether you are a beginner or an experienced user. Follow the steps below to learn how to color correct your video using Video Converter Ultimate successfully.
Step 1: Download and Install Color Corrector
First, get the tool by clicking one of the Free Download buttons below. Depending on your computer's operating system, make sure to download Video Converter Ultimate that's right for your computer. Follow the instructions to install it.
Free DownloadFor Windows 7 or laterSecure Download
Free DownloadFor MacOS 10.7 or laterSecure Download
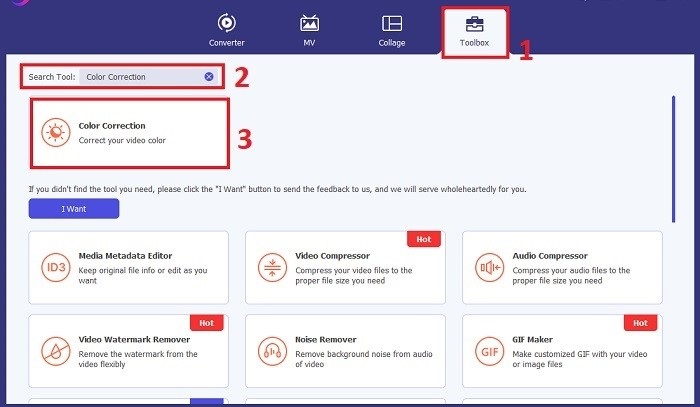
Step 2: Launch Video Converter Ultimate
Once installed, open Video Converter Ultimate. Navigate to the Toolbox in the main menu and look for the Color Correction feature. Click on it to proceed.
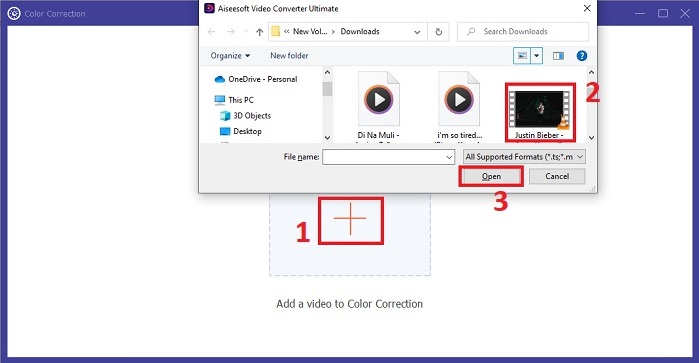
Step 3: Import the Video for Color Correction
Now, click the Plus button to import the video you want to color correct. Find the video file on your computer. Then, select Open to bring it into the software.
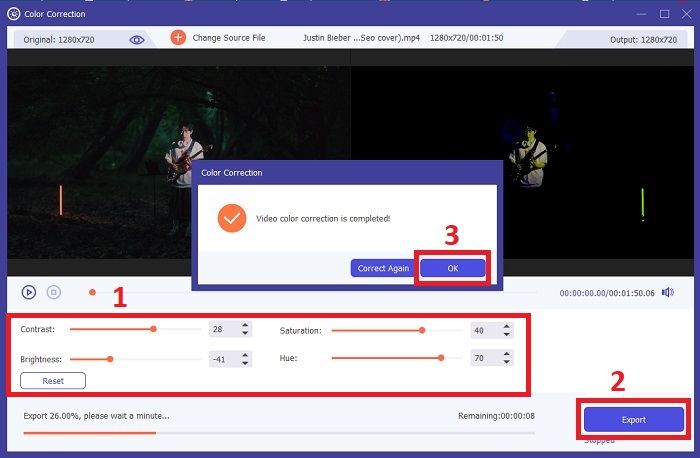
Step 4: Adjust Video Color Settings and Save
After importing the video, fine-tune color parameters like brightness, contrast, saturation, and hue to achieve your desired color correction. When you're satisfied with the color adjustments, click Export. Allow the tool to process the video and save the corrected version to your chosen location.
2. Color Correction Premiere Pro
Premiere Pro is known for its high-quality video editing software and comprehensive color correction abilities. It offers diverse color grading tools and effects to make precise adjustments. Color Correction Premiere Pro enables you to adjust color balance and exposure or apply creative looks to achieve the desired visual style. You can also choose from its hundreds of built-in video effects and transitions or start with professionally designed templates and modify them to create your desired output. Moreover, it has collaboration features and integrates smoothly with other Adobe software, which makes it a top choice among professionals.
Step 1. Begin by opening Premiere Pro and importing your video. Then, go to the Color workspace.
Step 2. Inside the Color workspace, use the Lumetri Color panel to adjust exposure, color balance, and creative looks.
Step 3. Use scopes to ensure accurate color adjustments align with your desired outcome. Finally, preview and export the corrected video.

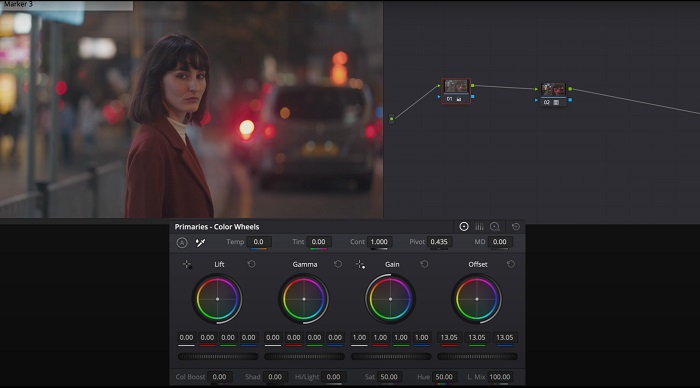
3. Davinci Resolve Color Correction
Explore the exceptional color grading capacities. This all-in-one software combines professional editing, color correction, visual effects, and audio post-production. With the tool's user-friendly interface and comprehensive feature set, you can bring your creative vision to life with precision and style. Davinci Resolve Color Correction's advanced color grading tools enable you to make your videos stand out. Whether you're working on cutting-edge Hollywood films or personal projects, this tool empowers professionals and enthusiasts to create compelling narratives with unparalleled quality.
Step 1. Open Davinci Resolve and import your video. Once imported, navigate to the Color tab.
Step 2. Inside the Color tab, utilize color wheels, curves, and nodes to correct the color of your video. You can use the available scopes for precise adjustments.
Step 3. After making the necessary color adjustments, preview the corrected video to ensure it meets your expectations. Once satisfied, export the corrected video, making it ready for use.
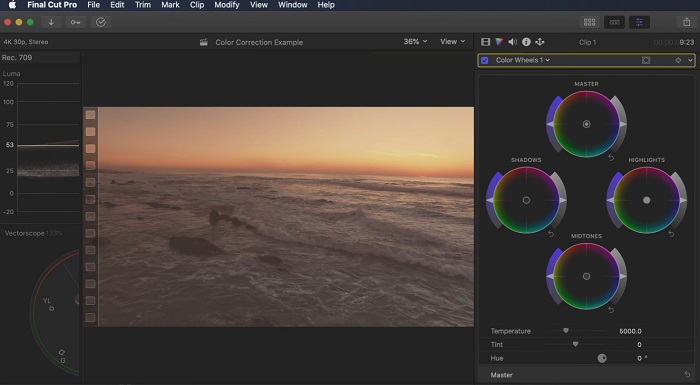
4. Final Cut Pro Color Correction
If you're a Mac user looking for a top-notch video editing application, Final Cut Pro is a great option. It boasts a user-friendly interface and powerful features that make editing a breeze. When it comes to color correction, Final Cut Pro offers a Color Board and Color Wheels for adjusting exposure, saturation, and hue. You can apply real-time color effects and use advanced grading tools to enhance your footage. Plus, it exports smoothly to Apple devices and popular online platforms. If you're a professional seeking efficiency and creativity, Final Cut Pro is a no-brainer. Ensure you have macOS 13.4 or later and a Mac computer with Apple silicon for optimal performance.
Step 1. You can start by importing your video into Final Cut Pro, then head to the Color workspace.
Step 2. Utilize the Color Board or Color Wheels to make essential exposure, saturation, and hue adjustments.
Step 3. Further refine your video's color using additional color grading tools, ensuring the best possible results. Once done, preview and export the corrected video.
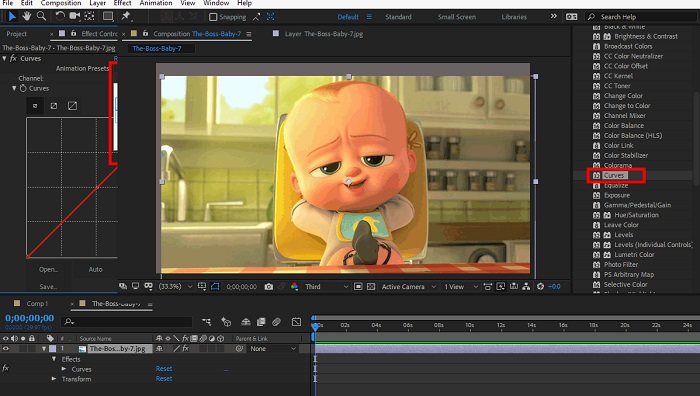
5. Color Correction After Effects
After Effects is a famous motion graphics and visual effects software with robust color correction capabilities. Aside from its basic color correction effects, it provides various adjustment layers and effects to enhance and modify colors. You can quickly animate text and graphics, bringing them to life with captivating movements. Color Correction After Effects enables you to leverage levels, curves, and blending modes to achieve desired color grading. It is a versatile color correction option thanks to its integration with different Adobe products and a large community providing tutorials and plugins. Moreover, the software continuously evolves, introducing features such as an intuitive properties panel, transparent layer control, and efficient multi-frame rendering that streamline workflows and keep creations on the cutting edge of creativity.
Step 1. Import your video clip into the tool's project. Apply color correction effects by navigating the Effects & Presets panel and selecting appropriate color correction tools like Curves, Levels, or Color Balance.
Step 2. Click on the applied color correction effect to access its parameters. Then, modify settings such as exposure, contrast, saturation, and hue to correct and enhance the colors in your video.
Step 3. Preview the video in the Composition panel to see how the color corrections affect the footage. Fine-tune the adjustments based on your preview, ensuring the desired color correction is achieved, and proceed to render or export the corrected video.
Further Reading:
Top Photo Color Enhancer App on Your Android & iOS for Free
4 Amazing Ways to Add a Filter to a Video on Windows & macOS
Part 2. FAQs About Video Color Correctors
How do I perform color correction on an iMovie?
To correct colors in iMovie, import your video clip, select it, and click the Color Correction button (magic wand icon). Adjust the sliders for exposure, saturation, and color to achieve the preferred look.
How can I access color correction tools in OpenShot?
In OpenShot Video Editor Color Correction, select a clip, go to the Effects tab, and click Color Correction. Adjust the sliders for brightness, contrast, hue, and saturation to achieve the desired color correction.
How do I access the color correction tools in Sony Vegas?
In Sony Vegas Color Correction, select the clip you want to color correct, go to the Video FX tab, and search Color Corrector. Drag and drop it onto the clip and adjust the color properties in the Effect Controls window.
Conclusion
Mastering color correction is essential for enhancing the visual appeal of your videos and creating a captivating viewing experience. In this guide, we explored five potent color correctors to achieve impeccable color correction. If you're looking for high-quality video editing tools, consider using Video Converter Ultimate, Premiere Pro, Final Cut Pro, DaVinci Resolve, or After Effects. These programs offer a wide range of features and capabilities to help you create professional-looking videos. Each program has its own set of features and functions that appeal to different preferences and levels of expertise.
-
 How to Add and Make an Instagram Filter Before Posting Image & Video
 What are the filters on Instagram? How to apply it? How to make one? These questions will have straightforward answers in this post, so read them.
-
 Trouble-Free Methods to Convert Images to Black and White
 Do you want to make your photos look nostalgic? We have an answer for you. This post will offer notable ways to convert a color image to black and white.
-
 6 Favorite Choice Snapchat Animated Snapchat Filters on Snapchat
 Want to know the best ways to add filters on Snapchat videos? Well, you can click this and learn the different filters you can use to apply on Snapchat videos.