


Best Video Trimmers with Ways on How to Cut A Part Out of A Video
Do you want to cut some parts of your video to create a highlight? Or do you want to shorten the length of your video? This guidepost might be for you. We will introduce you to numerous video editing software for trimming a video. You will also discover their capabilities, compatibility, and descriptions. Aside from that, the post will also offer you the steps of trimming a video using the tools. If you want to know about these video trimmers, click this post and read more.

Part 1. Reasons to Trim A Video
There are various reasons why users need to trim a video. See the reasons below for a better understanding.
Creating Highlights.
As we observe in this modern era, there are more short clips on the internet. You can just watch videos in just a minute. If you also want to create that kind of video and just show the highlights, trimming a video is the best method you can do.
Unnecessary Footage.
Another reason why you need to trim a video is to remove unnecessary footage. If you want to eliminate some parts of a video, especially the unnecessary ones, trimming it is the best solution.
Length Restrictions.
Some social media platforms don’t support long videos or clips. For example, a long video is prohibited if you post a video on your story, especially on Facebook or Instagram. This way, the best thing you need to do is to cut the video.
Matching video with music.
Some users want to synchronize the video to the audio. In that case, trimming a video is another solution to meet the requirements when syncing the audio.
Part 2. Most Straightforward Video Trimmer
Nowadays, you can find many video editing software online and offline. Some of them are useful, and some are challenging to utilize. If that is the concern, there is an exceptional offline video trimmer you can use to trim your videos. This program is the Video Converter Ultimate. With the assistance of this tool, you can easily shorten and split your video. Additionally, it offers an intuitive interface with straightforward ways, making it perfect for all users. During the trimming process, there are more things you can do. You can navigate to the Output settings and make some changes. You can change the video’s quality, frame rate, encoder, resolution, and other parameters. You can even save your final output in various formats, including MOV, AVI, MP4, MKV, and more. Moreover, after editing the video, the program won’t put watermarks on it. This way, you can still enjoy watching the edited video without disturbance. Furthermore, Video Converter Ultimate is accessible on both Windows and Mac. It means that the program is convenient for both Windows and Mac users.
Rating: 9.5/10
Compatibility: Windows and Mac
Key Features:
◆ It offers a toolbox for trimming video, rotating, editing, removing watermarks, and more.
◆It is capable of converting various video, audio, and image.
◆ It offers a collage maker.
See the basic procedure below to learn how to shorten a video.
Step 1 Download Video Converter Ultimate on your device. Click the Download button below based on the device you use. Windows and Mac versions are available below. Then, proceed to the installation process. After that, launch the program.
Free DownloadFor Windows 7 or laterSecure Download
Free DownloadFor MacOS 10.7 or laterSecure Download
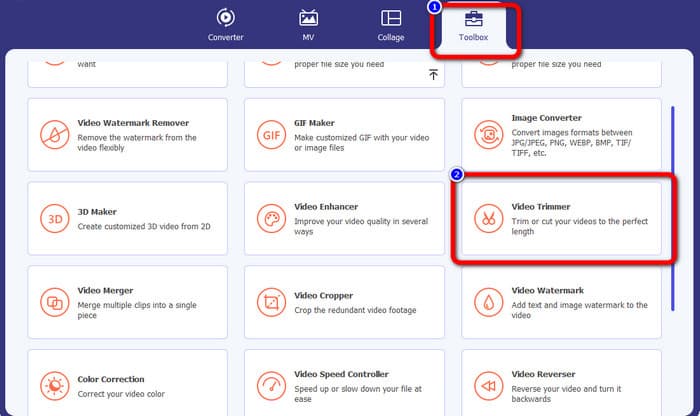
Step 2 After launching the program, the interface will appear on the screen. Select the Toolbox option on the upper interface and click the Video Trimmer tool.
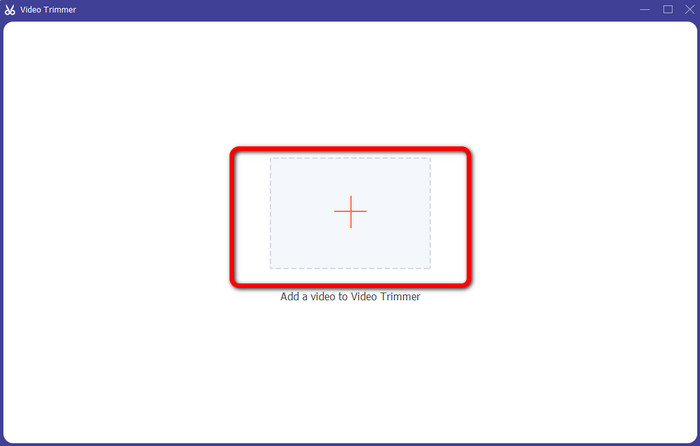
Step 3 Another interface will show up on the screen. Click the Plus symbol on the center part of the interface. Then, open the video you want to trim from your computer folder.
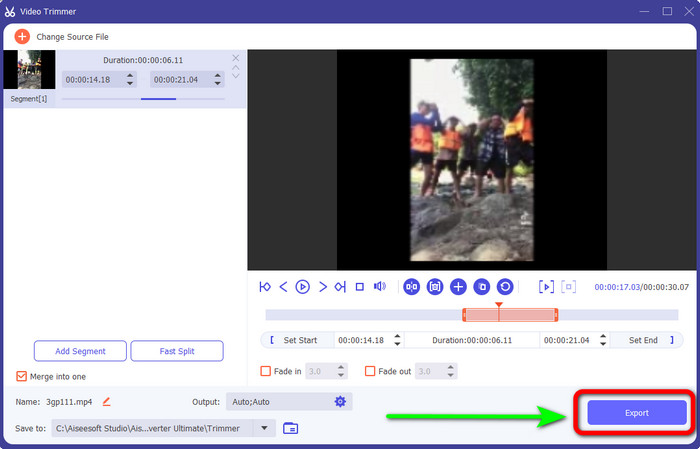
Step 4 In this part, you can already trim the video. Navigate to the adjustable bar section. Then you can control the right and left edges of the bar to trim the video. Go to the part of the video that you want to trim.

Step 5 After trimming, you can save the edited video by clicking the Export button. Then, open the video from the output folder to play the video.
Part 3. Best Free Video Cutter
1. VLC Media Player
VLC Media Player is not only reliable for playing videos. You can use this offline program to cut videos to remove unnecessary parts. This way, VLC is considered video cutting software. With the help of this offline program, you can cut videos to create video clips. It allows you to select a particular part of the video and cut it out. It also enables you to cut a video's beginning and ending points. As we all know, VLC is not an advanced video editing software, but cutting videos is easy. However, since it is not advanced software, VLC has many limitations. If you want to play the video, you must open them first in their folders, making it too time-consuming. Also, the installation process could be faster. You need to be patient when trying to use this offline program.
Rating: 8/10
Compatibility: Windows and Mac
Key Features:
◆ Trimming and cutting videos.
◆ Playing videos easily and instantly.
◆ Convert various video formats.
◆ Audio normalizes for ear protection.
Use the steps below to cut the video in VLC.
Step 1 Download VLC Media Player on your computer. After that, follow the installation process and run the program. Then open the video you want to cut.
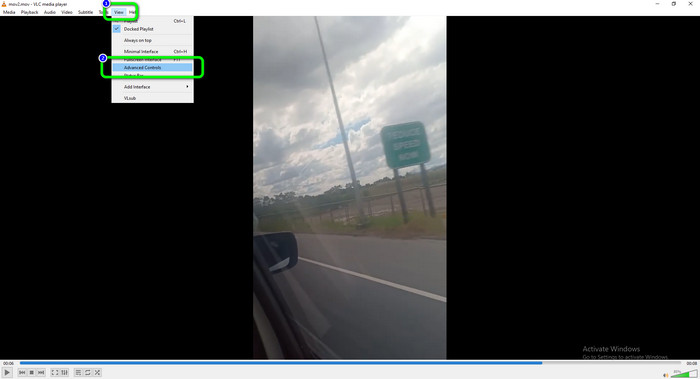
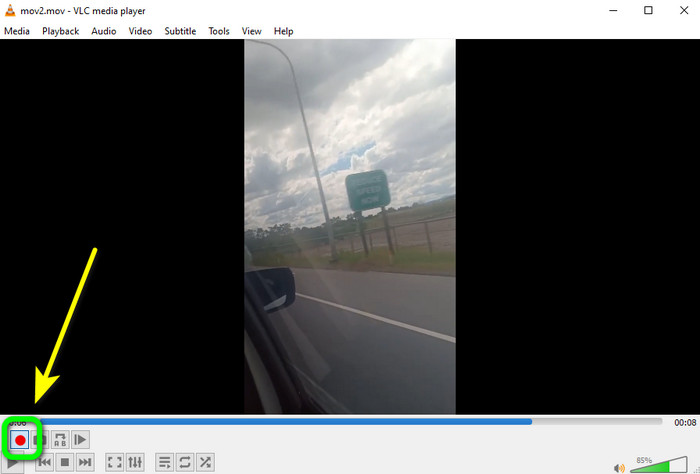
Step 2 Click the View menu on the upper part of the interface. Then, click the Advanced Controls option.
Step 3 The Record button will appear on the upper part of the player control buttons. Click the record button to start cutting the video. You can click the Record button at the video's starting point you want to cut. Then, if you reach the ending point, click the record button again. The record button is the red circle shape on the screen.
Step 4 After that, you can open the edited video on your Computer > Videos option.
2. FFmpeg
If you want to cut some parts of your video, another tool you can use is FFmpeg. It is a command-line utility capable of making, processing, and editing various media types. FFmpeg is beneficial in this kind of field. However, it has some drawbacks. FFmpeg takes work to utilize. When downloading the program, you need to do many processes. Also, setting it up is complicated, making it unsuitable for non-professional users. In addition, there are numerous commands you need to memorize first before operating the program. So, if you are a non-professional user, you must study the program first. Another option is to look for a much easier video cutter to cut some videos.
Rating: 7/10
Compatibility: Windows and Mac
Key Features:
◆ Trimming and cutting videos.
◆ Cut the video using a specific time.
◆ Encode and decode video format to one another.
How to use FFmpeg to trim videos
Step 1 Download FFmpeg on your computer. Follow all the processes to set up FFmpeg on your device. After that, navigate to the start button from your computer and type cmd.

Step 2 Then, type $ ffmpeg -i input.mp4 -ss 00:05:10 -to 00:15:30 -c:v -c:a copy output2.mp4 on the command prompt. The -to command is used to specify the exact time to cut from a starting point. In the example, the cut video is from 00:05:10 to 00:15:30. It results in a 10- and 20 seconds video.

Step 3 Finally, click the Enter key on your keyboard to run the process. After that, you can already open the video from your computer.
3. iMovie
You can use iMovie to cut your videos if you are a Mac user. This program offers a cutting tool to eliminate unnecessary footage on your film. In addition, it has a straightforward process of editing a video. This way, skilled and non-professional users can utilize the program with ease. Aside from that, iMovie has more features to offer. You can also rescale and resize your video using this offline program. However, iMovie has many disadvantages. If you work with large files, the process will be too slow. Also, if you are looking for an advanced program with advanced features, there are better tools than iMovie. You must look for another tool that can meet your expectations.
Rating: 7.5/10
Compatibility: Mac
Key Features:
◆ Trimming and cutting videos.
◆ It offers a video rescaler and resizer.
Follow the methods below to learn how to cut clips in iMovie.
Step 1 The first step is to launch iMovie on your Mac computer. Then, navigate to the Project tab. After that, click the Create New option and select Movie.
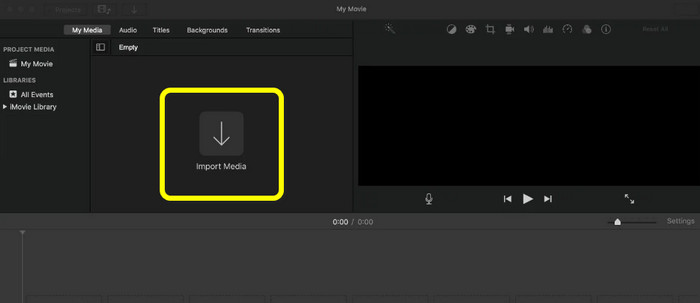
Step 2 Then, click the Import Media option to add the video you desire to edit in iMovie.
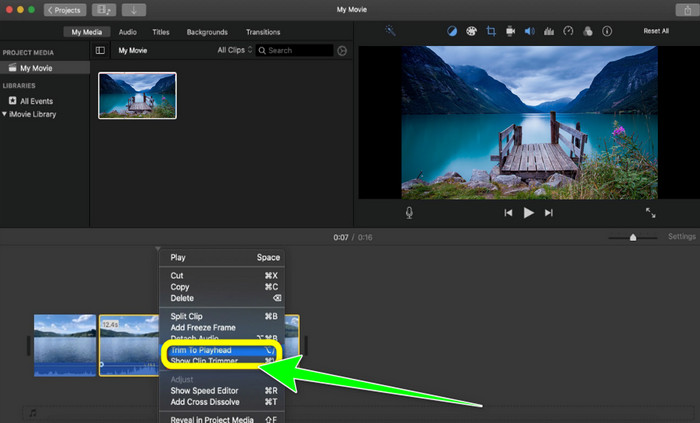
Step 3 The next step is to drag the movie on the Timeline to trim the video. Right-click the video and select the Trim to Playhead option. After that, your video is already finished. You can remove the unnecessary video and see the edited one.
4. Openshot
Another tool is Openshot. This program is also reliable in cutting/trimming a video. Also, this is suitable for beginners. It only offers a simple method for the trimming process. This way, even if you don’t have editing skills, you can still use the program. However, OPenshot has many drawbacks. You can only make a basic edit to videos. Advanced editing tools are not available.
Rating: 8/10
Compatibility: Windows and Mac
Key Features:
◆ A trimming video tool is available.
◆ It offers a real-time preview.
◆ Video Transitions, maks, and wipes
◆ Image sequences and 2D animations.
How to use Openshot to cut videos
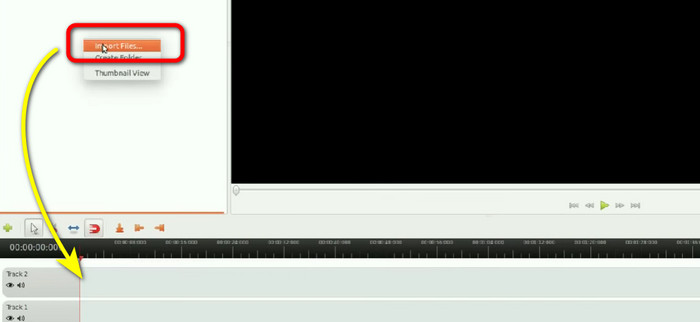
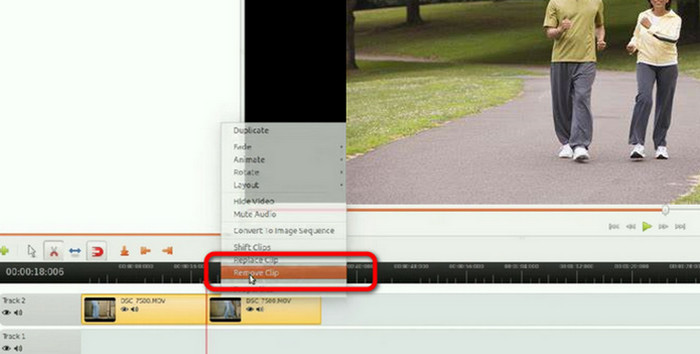
Step 1 Download Openshot on your computer. After installing it, run the program. When the interface shows up, click the Import File option to insert the video. Then put the video on the Timeline.
Step 2 Click the Cut icon and go to the area of the video where you want to cut.
Step 3 When the video is divided into two, right-click the unnecessary one, and select the Remove clip option. After that, you can already save your output.
5. Windows Media Player
Do you want to know how to trim videos using Windows Media Player? Windows Media Player allows users to play media files on Windows operating systems. Windows users frequently want to find a way to edit or trim videos in Windows Media Player directly. So, is Windows Media Player capable of editing videos? Regrettably, this Windows software cannot edit videos. But, it does not imply that Windows Media Player must be abandoned if you wish to modify your films. The best way is to use a Plug-in. It is called SolveigMM. This plug-in helps Windows Media Player to cut videos effectively.
Rating: 7/10
Compatibility: Windows
Key Features:
◆ Play a video.
◆ Trim a video in a simple way.
◆ Convert various video formats.
To trim videos in Windows 11, use Windows Media Player. See the steps below to trim a video.
Step 1 Start by downloading the SolveigMM Trimmer Plugin from the official website. Then, install the program on your computer by completing the installation process.
Step 2 Start the Windows Media Player and inject the plugin to make the trimming feature available. Choose Tools > Plug-ins > SolveigMM WMP. Then, you should notice another choice at the bottom of the panel's interface.
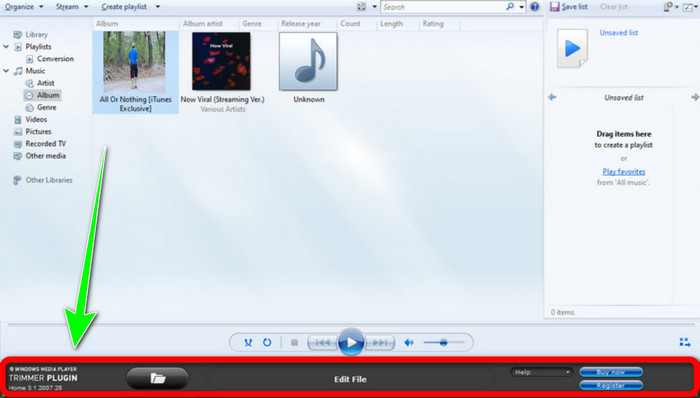
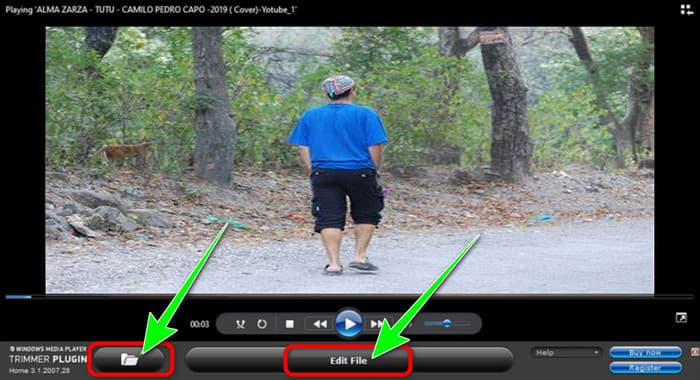
Step 3 Add the video that you want to cut now. To do this, select the video to add to the software by clicking the Folder icon, then browse for it. The video ought to start playing immediately. After that, click Edit File to start reducing the video.
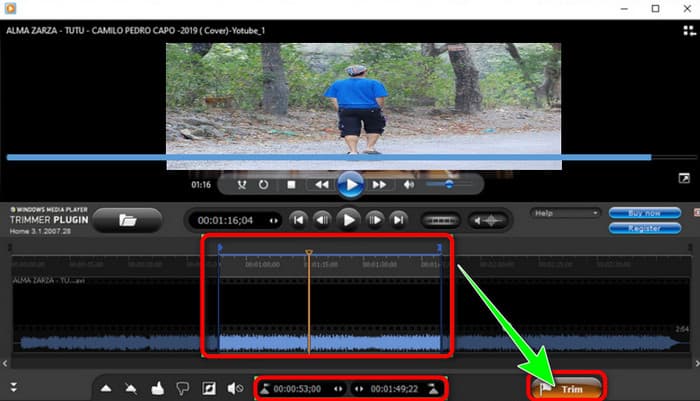
Step 4 Choose the precise time or position that you want to shorten after that. You may also refer to the time to establish the starting and ending positions. Click the Trim button after finishing the process, and preview the video to determine if the adjustments took effect.
6. QuickTime Player
Apple's default media player is QuickTime, but you can also edit and chop your videos. Videos can be rotated, rearranged, and cropped using QuickTime Player's features. A video can be divided into distinct clips, each of which can be edited independently. Quicktime will always be free to use since it is a component of macOS. However, QuickTime Player has limited features. If you want to edit videos professionally, you can use another video editing software.
Rating: 8 /10
Compatibility: Mac
Key Features:
◆ It offers ways to trim a video.
◆ Suitable for rotating and arranging videos.
◆ Play a video in various formats.
Follow the steps below to trim the video in QuickTime.
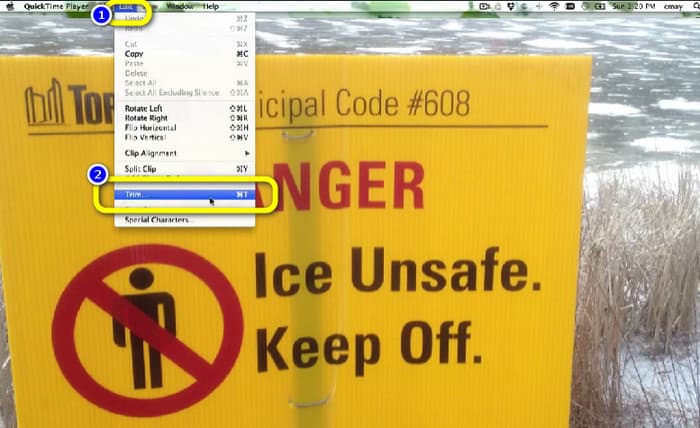
Step 1 Launch QuickTime Player on Mac. After that, go to File > Open and add the video.
Step 2 After opening the video, go to the Edit menu and click the Trim option. This way, you can start trimming the video.
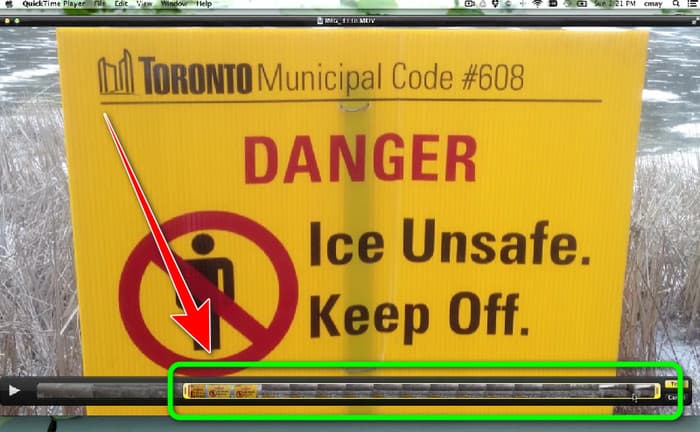
Step 3 In this part, you can already trim the video. Click and drag the edge part of the bar. You can adjust both left and right. After trimming the video, you can go to the File menu and Export your final output.
Part 4. Paid and Professional Video Cutter
1. After Effects
Suppose you are a knowledgeable user looking for an advanced video editing program, After Effects is ideal. Editing in After Effects can be challenging, and with good cause, as it’s not technically editing software. Although After Effects is a robust animation toolset that can help you create fantastic effects, it is not designed for quick clip editing. Even though you'll probably finish editing your project in Premiere Pro, it's still vital to understand how to split and cut your clips in Adobe After Effects. If you are a beginner, maybe this program is too much for you. Its interface is complicated and has many options, which is confusing for beginners.
Rating: 8 /10
Compatibility: Mac and Windows
Key Features:
◆ Animation is available.
◆ Trimming and cutting videos.
How to cut a clip on After Effects
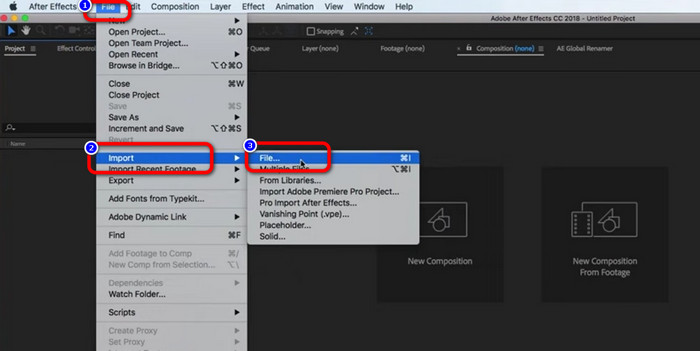
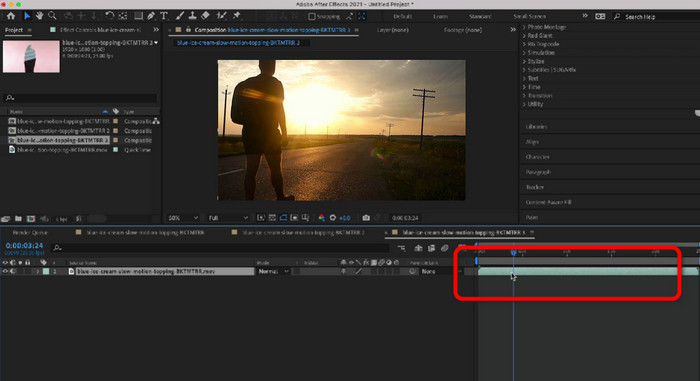
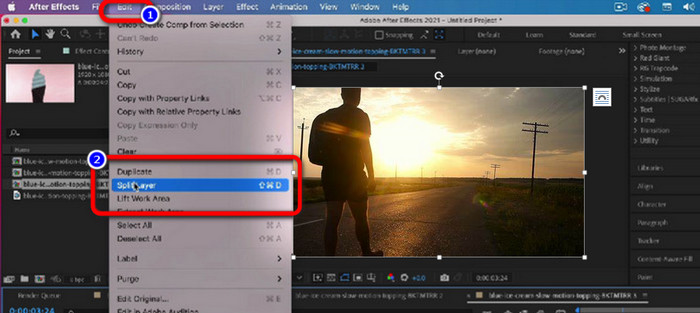
Step 1 Launch Adobe After Effects on your computer. Then go to the File menu. Select the Open > File option to add the video.
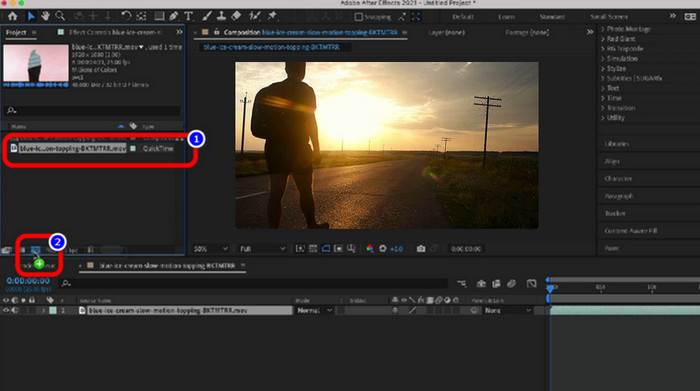
Step 2 Drag the video to the New Comp icon in the Layer panel to start a new composition.
Step 3 Set the playhead to where you wish to separate the layer. If you don't have a full keyboard, you can shift the playhead one frame at a time by pressing Page Up/Down or Cmd+Left Arrow & Cmd+Right Arrow.
Step 4 To remove the unwanted part of the video, go to the Edit menu and click the Split Layer option. You can remove the unnecessary part and save the edited video.
2. DaVinci Resolve
Another advanced video trimmer you can use offline is DaVinci Resolve. This program is reliable in trimming/cutting a video. With the help of this downloadable program, you can eliminate all the disturbing parts of your video. Moreover, there are more features you can encounter when using DaVinci Resolve. You can enhance the video quality, add effects, denoise audio, and more. However, it is difficult for beginners since DaVinci is a professional video editing software. The offline program has a confusing interface, making it complicated to understand. Also, you need to purchase the subscription plan for more great features.
Rating: 8.5/10
Compatibility: Mac and Windows
Key Features:
◆ Cut and trim video clips.
◆ Capable of denoising audio.
◆ It can enhance video quality.
How to cut a clip in DaVinci Resolve
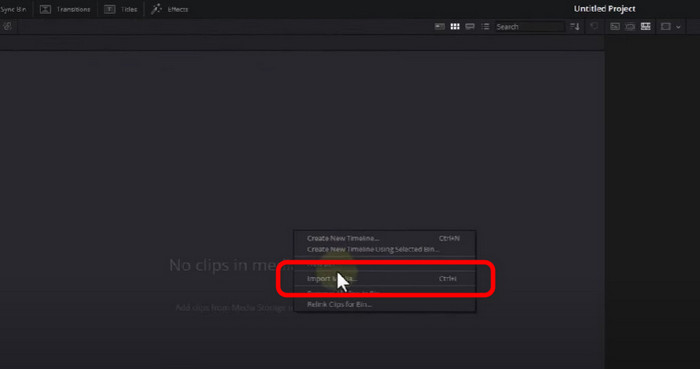
Step 1 Run DaVinci Resolve on your Windows or Mac computer. After that, right-click on the blank part and select the Import Media option. Select the video from your file folder.
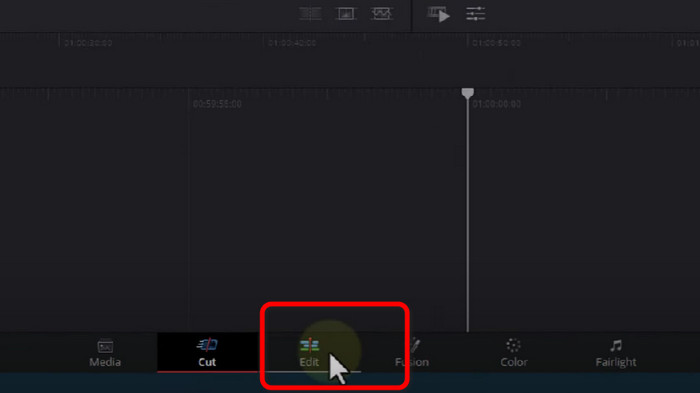
Step 2 Go to the lower part of the interface and ensure you are on the Edit layout.
Step 3 After that, drag and drop the video on the Timeline to start the trimming process.
Step 4 Split the footage using the Blade Edit Mode and edit from there. With this simple technique, you can cut the video as necessary.
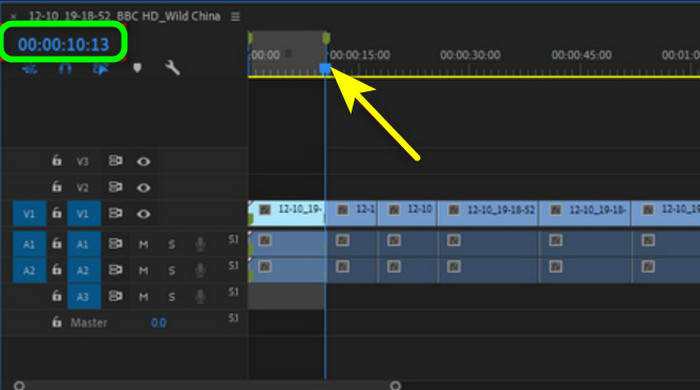
3. Adobe Premiere Pro
Generally speaking, video cutting and trimming are essential skills for any video editor. It is assumed that everyone will inevitably cut out unwelcome scenes and awkward times from the videotapes. Unquestionably, Adobe Premiere Pro offers a one-stop shop for post-editing video, including video cutting. So, if you desire to know how to cut clips in Premiere Pro, read continuously. However, this offline program is suitable only for advanced users. If you don’t have a skill in editing videos, you will find it hard to utilize the program. Also, Adobe Premiere Pro is expensive. You need to buy a subscription plan to use more advanced features.
Rating: 8/10
Compatibility: Mac and Windows
Key Features:
◆ Cut and trim video clips efficiently.
◆ Trim one clip into various parts.
◆ Add filters and effects to the video.
How to cut clips in Premiere
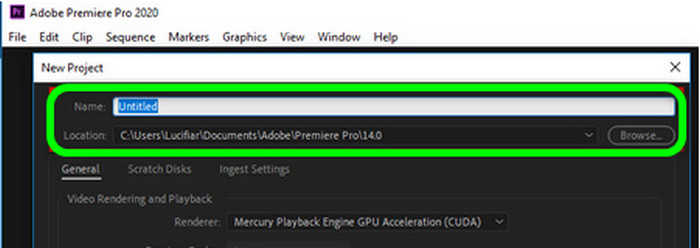
Step 1 Open Adobe Premiere Pro, start a new project, name your project, and select where to save the Premiere files.
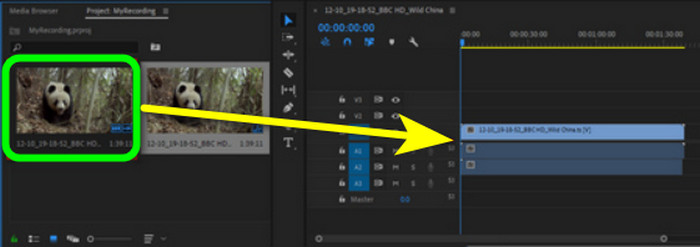
Step 2 Then, go to the blank section and import the clip. Then put it on the timeline.
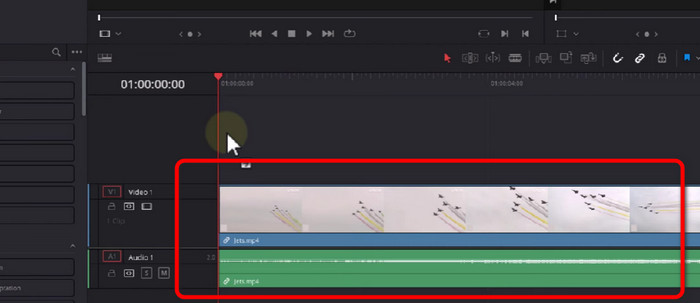
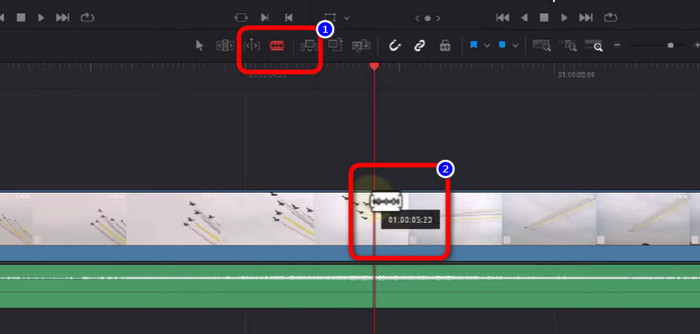
Step 3 To trim a start point, drag the blue slider over it, choose Sequence > Add Edit, or simply press Ctrl + K. You'll find a dividing line that cuts the footage into two sections. After that, remove all the unnecessary footage on the timeline and save the trimmed video.
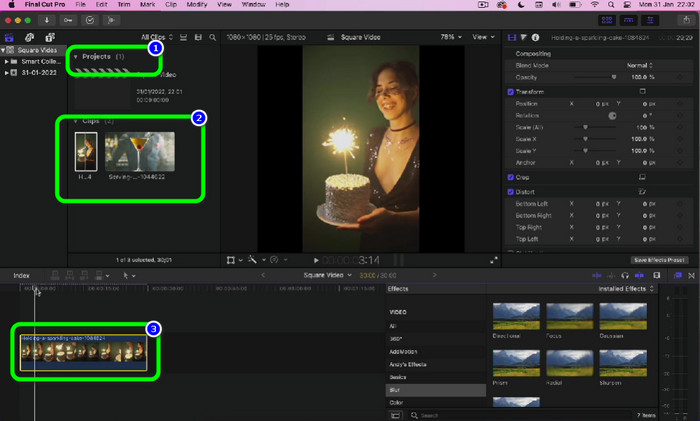
4. Final Cut Pro
If you want another video trimmer for Mac and Windows, use Final Cut Pro. This program can help you efface all the unwanted portions of your video. Also, Final Cut Pro offers an interface with numerous options. This way, there are more things you can do besides trimming. However, the program requires a subscription plan to enjoy more fantastic features. In addition, the installation process is time-consuming. It also consumes storage space, so ensure that you have enough storage.
Rating: 8.5/10
Compatibility: Mac and Windows
Key Features:
◆ Trim and cut a video effectively.
◆ Create videos with high quality.
◆ It offers light and color correction tools.
Here is the instruction you can try to know how to trim video on Final Cut Pro.
Step 1 Download Final Cut Pro on your Windows or Mac. Then, open the program after the installation process.
Step 2 Go to Projects > Clips option to see the video. After that, drag the video to the Timeline.
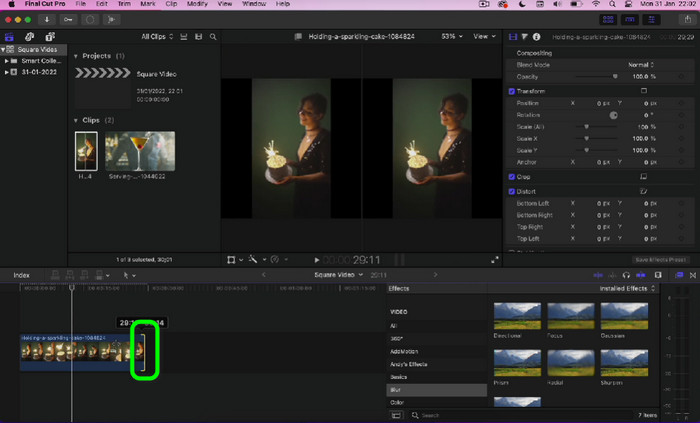
Step 3 After that, go to the part of the video you want to trim. Then, you can click the edge part of the video and drag it to trim the video. You can drag the left and right edges of the video. Then, there you go. You can already save the video after trimming it.
Part 5. FAQs about Video Trimmer
1. Does trimming a video reduce its quality?
If you purchase an excellent video trimmer, trimming will generally not result in a loss of video quality. You should be aware that resolution, bitrate, and frame are critical determinants of video quality. So be sure to retain the original parameters when exporting an edited video.
2. Which video trimmer is the best?
If you want the most exceptional video trimmer, use Video Converter Ultimate. This downloadable program allows you to trim a video with a trouble-free method. Also, its interface is easy to understand. In addition, it is free to download, unlike other video editing software.
3. What is video trimming?
For further explanation, one of the essential steps in editing is trimming. It involves taking a video's beginning or end. Often, the aim is to cut out everything except the most valuable material from the video.
4. How to trim video in PowerPoint?
Launch PowerPoint and navigate to the Insert > Video option. Click Trim Video in the Editing area of the ribbon. You can use the markers to choose the start and end points, manually enter the start and end times, or do a combination of both. If you know, you can type the precise start and end times into the corresponding areas. By checking the duration at the top immediately after trimming the video, you may see if you can only see a certain portion due to time restrictions. Click OK once the desired portion of the video has been prepared.
Conclusion
If you desire to shorten a long video, the best solution is to trim it. Therefore, this guidepost provided the most proven and tested video trimmers. However, some video trimming software is challenging to utilize. So, if you want more accessible software, use Video Converter Ultimate. This downloadable program can help you trim a video without encountering any difficulties.
-
 Discover the Best MP4 Trimmer with Procedure and Information
 Do you want to learn how to cut videos like the vloggers you watch? Then continue reading this post to know what MP4 trimmers you can use.
-
 Discover the Best MP4 Trimmer with Procedure and Information
 Do you want to learn how to cut videos like the vloggers you watch? Then continue reading this post to know what MP4 trimmers you can use.
-
 The Best MP4 Editor for Windows and Mac in 2023
 Whether you’re using your computer for MP4 video editing or just working on your phone, you’ll be able to find some great options here, including the best MP4 editor for Windows and Mac.