


How to Convert TS to MP4 with VLC: The Ultimate Free & Easy Guide
Have you ever stumbled upon a video file with a weird .ts extension and felt like you just hit a digital brick wall? I’ve been there. Last summer, I was trying to save some old-school presentations and family recordings from an outdated digital TV tuner. When I moved them to my laptop, they were all in TS format. My phone wouldn't play them, my iPad gave me the format not supported shrug, and even my basic video editor was acting like I’d handed it a stone tablet. If you’re in that boat, don’t worry. You don’t need to buy expensive software or risk your privacy on sketchy free websites that are riddled with pop-ups. You probably already have the solution sitting on your desktop: VLC Media Player.
In this guide, I’m going to walk you through exactly how to convert TS to MP4 with VLC. We’ll cover the basic steps, some pro-level lossless tricks, and what to do when things go wrong.

Part 1. Can VLC Convert TS to MP4
The short answer is: Yes, absolutely!
While most people know VLC as the player that can play anything, it’s actually a secret powerhouse for file conversion. It’s like the Swiss Army knife of media. It can take those clunky, high-bitrate Transport Stream (.ts) files and repackage them into slick, mobile-friendly .mp4 files.
Before we dive into the how, let’s talk about why you’d want to do this in the first place and why VLC should be your first choice.
Part 2. Why Convert TS to MP4 with VLC
When I first started converting my library, I tried those Online MP4 Converters you find on Google. Huge mistake. Half of them capped my file size at 100MB, and the other half slapped a giant watermark right in the middle of my video.
Here is why converting TS to MP4 using VLC is the way to go:
- Zero cost: VLC is open-source and 100% free. No Premium upgrades, no subscriptions.
- No watermarks: Unlike free trials of professional software, VLC doesn’t ruin your video with logos.
- Privacy & security: When you use an online converter, you’re uploading your personal videos to someone else’s server. With VLC, everything stays on your computer. Your data, your business.
- Batch conversion: You can actually throw a whole bunch of files at it at once.
- No extra software: If you’re a student or someone who doesn’t want to clutter their hard drive, VLC is likely already installed. Why add more stuff?
If you're converting a video of a sensitive family event or a school project you worked hard on, never use an online converter. It’s not just about privacy; it’s about the fact that online tools often compress your video so much that it looks like it was filmed on a potato.
Part 3. How to Convert a TS File to an MP4 with VLC
Alright, let's get into the nitty-gritty. I’m going to break this down into the standard way (which is easy) and the Pro-Tip way (which maintains perfect quality).
The Basic Conversion Workflow
Step 1. Open VLC Media Player
If you don't have it, grab it from the official VideoLAN website.
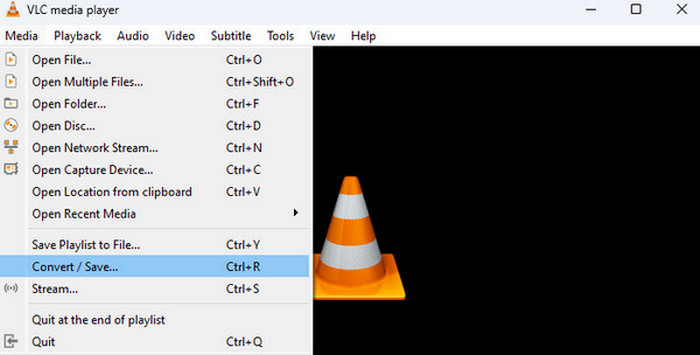
Step 2. Go to Media
In the top menu bar, click on Media and then select Convert / Save... (or just hit Ctrl + R on your keyboard if you want to feel like a hacker).
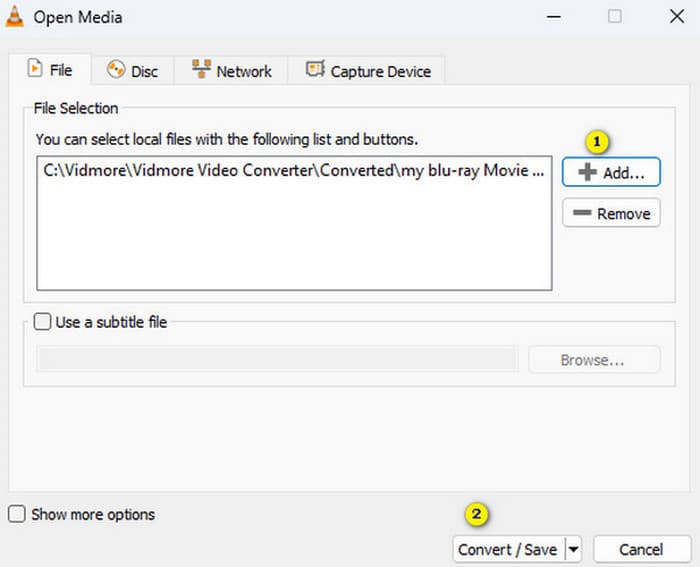
Step 3. Add Your File
A window will pop up. Click the + Add... button and find that stubborn .ts file on your computer.
Step 4. Convert/Save
Once the file is added, click the Convert / Save button at the bottom.
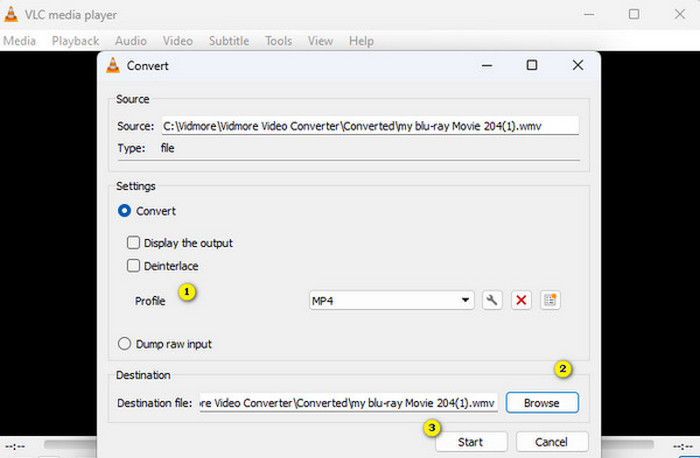
Step 5. Choose the Profile
In the Settings section, you’ll see a dropdown menu next to Profile. Look for Video - H.264 + MP3 (MP4). This is the gold standard for compatibility.
Step 6. Set the Destination
Click "Browse" at the bottom to select where you want to save your new file. Make sure the file name ends in .mp4.
Step 7. Start Converting
Click Start and watch the progress bar (the one you usually use to seek through a video) move across the screen. When it reaches the end, you’re done!
The Pro-Tip: Keeping the Original Video Track (Lossless)
Standard conversion usually re-encodes the video. This means VLC takes the video apart and reassembles it. It takes time and can slightly lower the quality. But here’s a secret: .ts and .mp4 are often just containers for the same type of video data (H.264).
If you want the conversion to be lightning-fast and keep 100% of the original quality, do this:
Step 1. Follow steps 1-4 above.
Step 2. Next to the Profile dropdown, click the wrench icon (Edit selected profile).
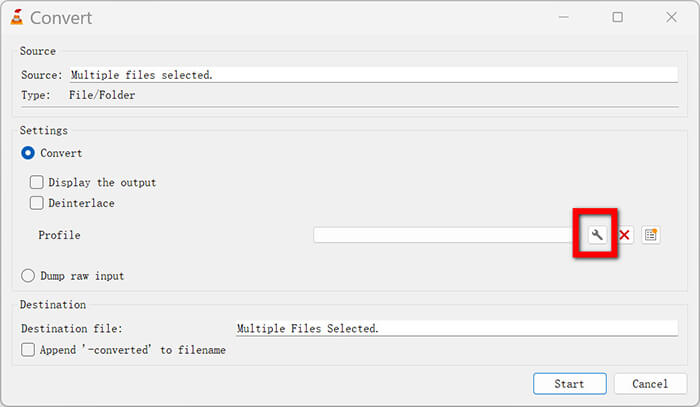
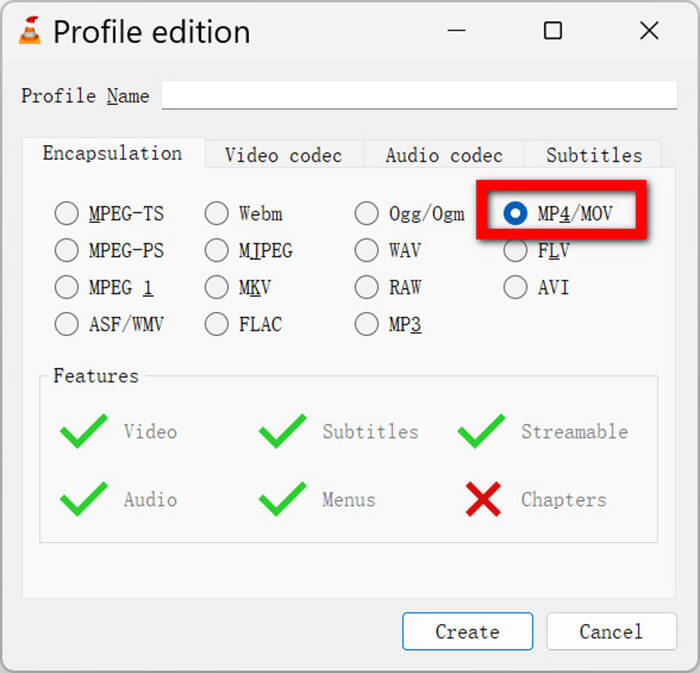
Step 3. Go to the Encapsulation tab and make sure MP4/MOV is selected.
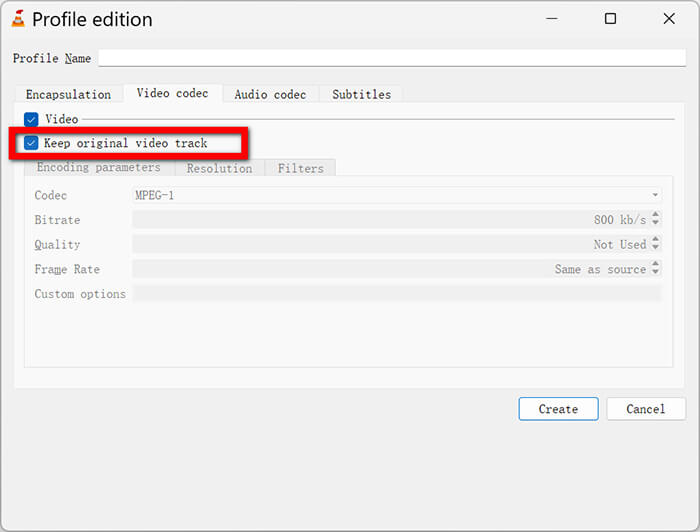
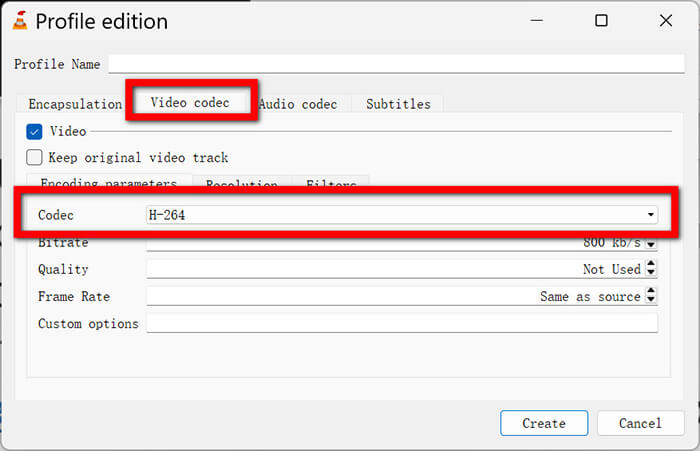
Step 4. Go to the Video codec tab. Select the 'Keep original video track' checkbox.
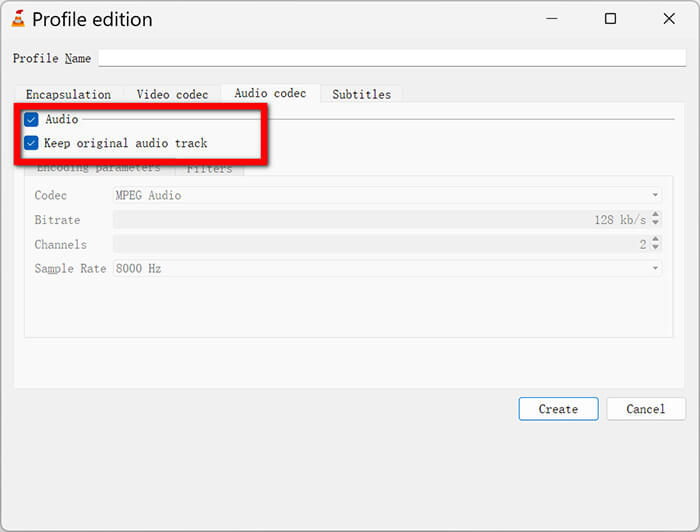
Step 5. Go to the Audio codec tab. Select the Keep original audio track checkbox.
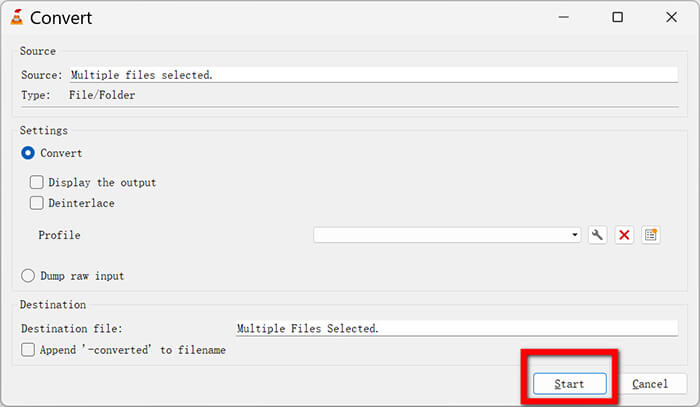
Step 6. Click Save.
Step 7. Now, when you hit Start, VLC won't re-process the video, and it just moves it from the TS box into an MP4 box. It’s nearly instant!
Part 4. My VLC Didn't Work for Converting TS to MP4! (Troubleshooting)
I’ve had my fair share of Why is this not working? Moments. Technology is great until it isn't. Here are the most common issues that occur when trying to convert TS to MP4 in VLC, along with the solutions I found.
No Video / Audio Only
Sometimes you finish the conversion, open the file, and... nothing. Just a black screen with sound. This is super frustrating.
The Fix: This often happens if you tried the Keep original video track trick, but the original video format isn't compatible with MP4. Return to the wrench icon in the conversion settings, uncheck 'Keep original video track', and ensure the codec is set to H.264. This forces VLC to re-encode it into a format that definitely works.
If your VLC is delaying the audio file, check the solutions here.
VLC Convert TS to MP4 No Sound
If you find there's no audio when converting with VLC, it’s usually because the audio bitrate or sample rate is weird.
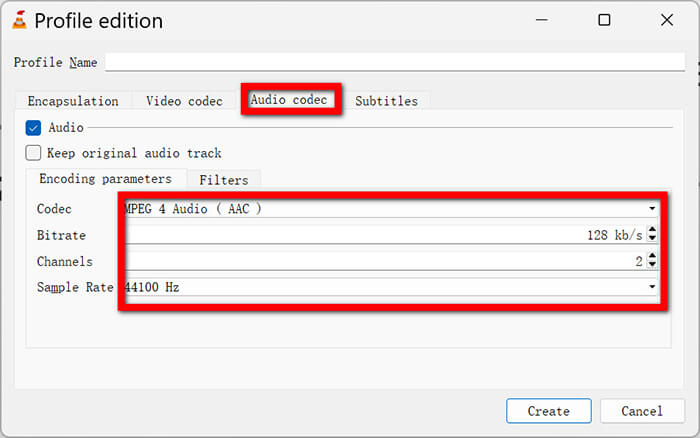
The Fix: In the Profile edition window (represented by a wrench icon), navigate to Audio codec. Instead of Keep original, choose MPEG 4 Audio (AAC) and set the Bitrate to 128 kb/s and the Sample Rate to 44100 Hz. This is the standard safe setting for audio.
VLC Crashing During Conversion
This happened to me on my old laptop. I’d hit Start, and the whole program would just vanish.
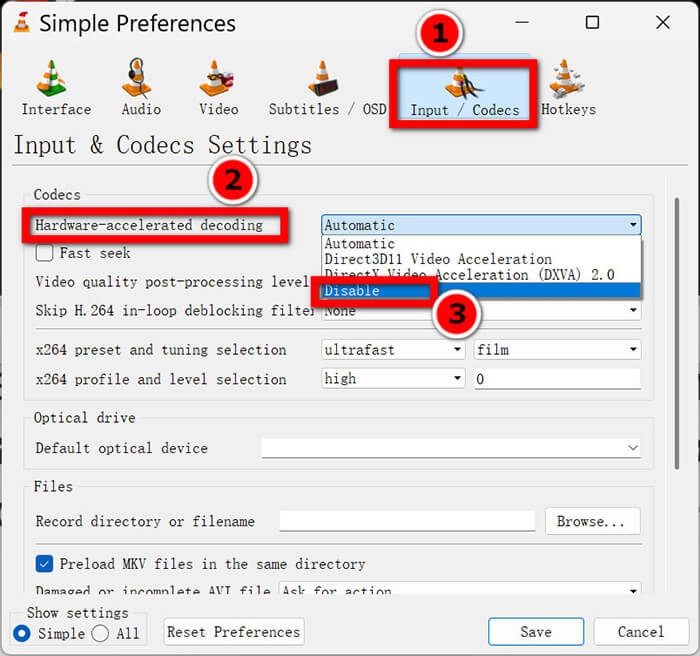
The Fix: This is usually due to Hardware Acceleration. VLC attempts to utilize your computer’s graphics card to enhance performance, but sometimes the two components don't work well together. Go to Tools > Preferences > Input / Codecs. Look for Hardware-accelerated decoding and set it to Disable. Try the conversion again. It might be a tiny bit slower, but it won't crash!
I have a folder, not a file!
If you are trying to convert a video_ts file to MP4 in VLC Media Player, the process is slightly different. A VIDEO_TS folder is what you find on a DVD.
The Fix: Instead of Add File, go to Media > Open Disc. Click the DVD tab, point it to your VIDEO_TS folder, and then hit the small arrow next to Play to select Convert.
This solution also works when VLC is not playing DVDs.
Part 5. Best Alternative to VLC: FVC Video Converter Ultimate
Look, I love VLC. It’s been my go-to since middle school. But I’ll be honest: sometimes it's a bit fussy. If you have 50 files to convert, or if VLC keeps giving you the no audio bug despite your best efforts, you might want something more robust.
FVC Video Converter Ultimate is a fantastic alternative that I’ve used when I’m in a hurry or dealing with massive 4K files. It’s a dedicated converter, which means it’s built specifically for this job, whereas conversion is just a side-hobby for VLC. It supports over 1,000 formats and utilizes high-speed hardware acceleration that works reliably without crashing your system. I personally found the interface much more modern and less intimidating than VLC's nested menus. It’s ideal for those who want a seamless one-click experience without worrying about codecs and bitrates.
How to use FVC Video Converter Ultimate:
Step 1. Add TS Files
Download the software from the buttons below and launch it.
Free DownloadFor Windows 7 or laterSecure Download
Free DownloadFor MacOS 10.7 or laterSecure Download
You can literally drag and drop your .ts files right into the window. It feels very smooth.
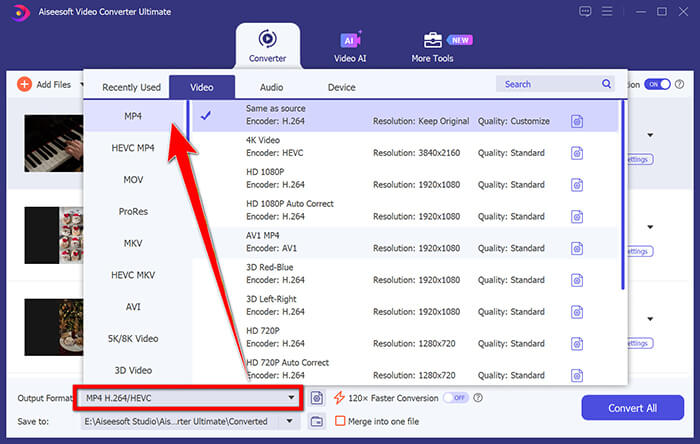
Step 2. Select Output Format
Click the Output Format dropdown on the top right. Select MP4 and choose Same as source to maintain high quality.
Step 3. Edit (Optional)
One thing I love is the little scissors icon. You can trim the video or crop out the black bars before converting.

Step 4. Convert All
Click the big Convert All button at the bottom right. It uses a Lightning mode that is significantly faster than VLC in my experience.
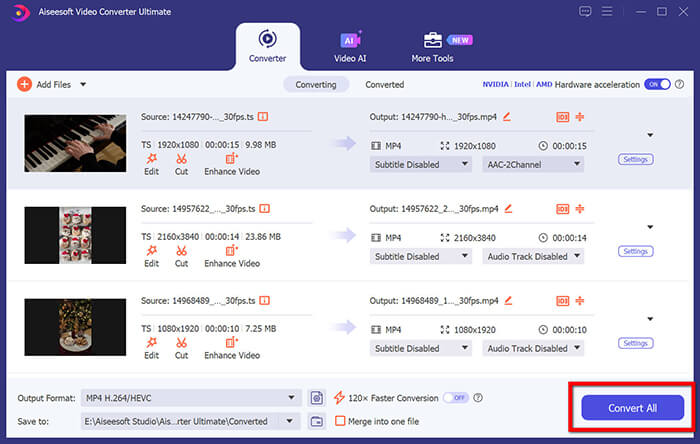
This software is incredibly stable. I’ve never had it crash on me, even with huge files. Batch processing is the real winner here; you can queue up an entire season of a show and simply walk away. Plus, the built-in editor is a nice touch for quickly trimming the start and end of recordings.
Unlike VLC, the Ultimate version is a premium product. While a free version is available, the full version is available only with a license. If you only have one file to convert, stick with VLC. If you're building a media library, FVC is worth the investment.
Part 6. FAQs
Q: Does converting TS to MP4 lose quality?
A: If you use the Keep original track (stream copy) method, there is zero quality loss. If you re-encode (the standard way), there is a tiny bit of loss, but it is usually not noticeable to the human eye unless you crank the settings way down.
Q: How long does it take to convert a .ts file?
A: It depends on your computer and the file size. A 1GB file might take 5 minutes with a standard conversion, or 30 seconds with the Pro-Tip lossless method.
Q: Can I convert TS to MP4 on a Mac using VLC?
A: Yes! The steps are almost identical. The buttons may look a little Mac-like, but the logic remains the same.
Q: Why are TS files so large?
A: TS files were designed for broadcasting (like satellite or cable TV). They contain a lot of extra error correction data to ensure the picture remains stable even if the signal flickers. MP4 is more efficient for storage on a hard drive.
Q: What if my converted file has no sound on my TV?
A: Some older TVs don't like AAC audio. Try converting again, but set the audio codec to MP3 or AC3.
Conclusion
Converting .ts to .mp4 using VLC is one of those life skills that makes you feel like a tech wizard once you master it. It saves you money, protects your privacy, and ensures your memories and projects are playable on any device you own. I hope this guide helps you clear out those unplayable files! If you encounter a specific error I didn't mention, or if you find a trick that works better for you, please continue exploring.
-
 VLC Not Converting to MP4? Here Are 7 Ways to Fix It
 VLC not converting to MP4? Discover seven proven solutions and the best VLC alternative to convert videos quickly without errors or compatibility issues.
-
 How to Fix VLC Media Player Not Playing Video: 5 Methods
 Don't panic after encountering a VLC Media Player not playing video issue. We have prepared all the 5 solutions you may use in this article. Read and explore.
-
 4 Methods to Convert TS to MP4 Free and Online
 What are TS files and want to convert TS to MP4? In this post, we will share you free and online methods to convert TS to MP4.