

Easiest Way to Import and Add DVDs to iTunes Library
iTunes is a well-known media player and management app for all Apple devices, and oftentimes, it is used to sync various media files, like music, movies, and many more, across devices.
If you have a collection of DVDs and you want to add them to your iTunes, then the DVDs must be converted to a digital format. That’s why, in this article, you will be learning two things: ripping DVDs because you can’t sync a physical DVD to iTunes. After that, once it has been converted to a digital format, it’s time to learn how to add DVD to iTunes. Ready to import your DVDs to your iTunes and sync them all over your Apple devices? Then, let’s get started!

Part 1. What Video Formats Does iTunes Support
Before you rip your DVDs to a digital format, you must know what format iTunes supports to avoid any compatibility issues. iTunes is very particular about the formats it can only support. Therefore, learning and understanding the formats supported is important to avoid any inconvenience when you finally add a DVD to iTunes.
Supported formats by iTunes:
• MP4
• MOV
• H.264
• AAC
With that, please ensure that when you rip your DVDs, the format that you choose is supported by iTunes.
Part 2. Rip DVD for iTunes Transfer
There are two ways to digitize DVDs, and this process involves ripping and converting a physical disc. This way, the media content from the DVD is ripped and then converted to any digital format. After that, you can just easily add that to your iTunes.
Method 1. Rip DVD Using FVC picked AnyMP4 DVD Ripper
The FVC picked AnyMP4 DVD Ripper is a well-known full-featured tool that has an incredible ability to handle various media input and output formats, including DVD. This feature is crucial in terms of ripping DVDs and converting them to any digital format. Also, with the advanced encoding technology that this tool has, it can keep the quality of the DVD content once it is ripped. Lastly, this DVD ripper tool is also supported by a fast converting engine with GPU and CPU-based processing, which makes the ripping speed faster compared to other tools.
Steps on how to rip DVD to iTunes using the FVC picked AnyMP4 DVD Ripper:
Step 1. Download and install the FVC-picked AnyMP4 DVD Ripper on your desktop and launch it.
Free DownloadFor Windows 7 or laterSecure Download
Free DownloadFor MacOS 10.7 or laterSecure Download
Note: Ensure that you have inserted the DVD into your computer’s DVD drive.
Step 2. Then, launch AnyMP4 DVD Ripper and click the Getting Started area to read your disk.
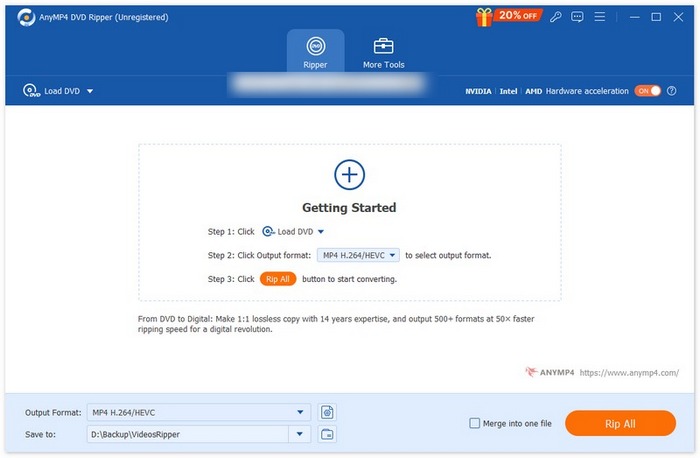
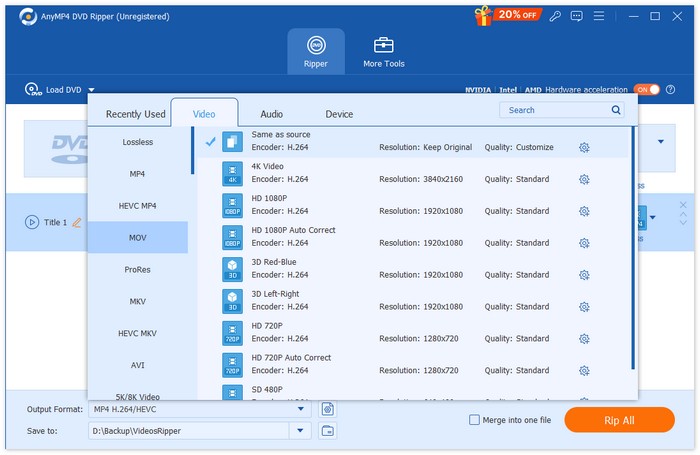
Step 3. After that, click on the Output Format below and choose the format of your choice from the Video tab. Don’t forget that iTunes only supports MP4, MOV, H.264, and AAC. Once done, just simply click on the Convert All button to start ripping your DVD.
Your DVD is now ready for iTunes transfer! Ripping DVDs to digitize their content is super easy. You just need to load the DVD and then choose an output format and convert it. Aside from that, the output quality is top-notch, ensuring that the ripped DVD has the same quality as it. So, if you’re looking for a DVD ripper to easily add DVDs to iTunes, this tool is a great choice.
Method 2. Rip DVD Using HandBrake
Meanwhile, if you prefer a free and open-source tool to rip your DVDs for iTunes transfer, HandBrake might be for you. This tool supports a wide range of most used video formats, as well as inputs such as DVD and Blu-ray. With this, HandBrake can solve the problem if you want to add DVDs to iTunes, as it first requires ripping DVD content. With its rich support for varying audio and video formats, this tool makes it easy and efficient to rip DVDs and Blu-rays into digital files.
Steps on how to rip DVDs to iTunes using HandBrake:
Step 1. First, on your MacBook, insert the DVD into the disk drive.
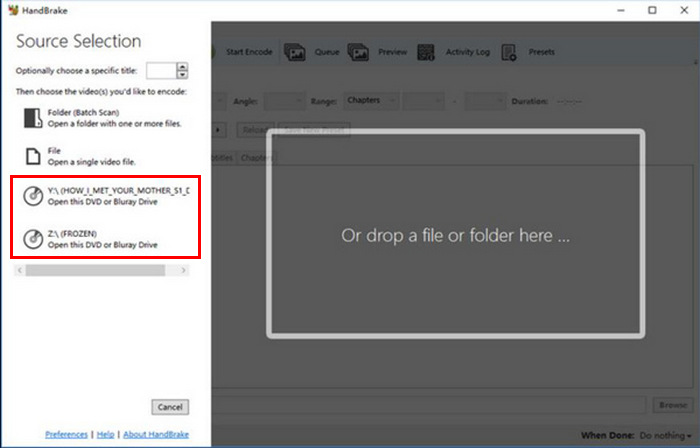
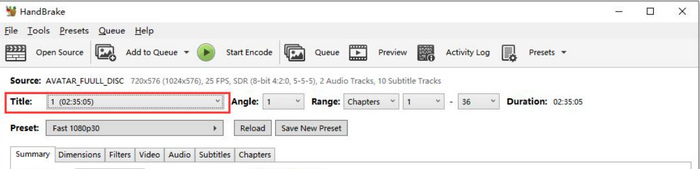
Step 2. Next, insert your DVD into the DVD-ROM. After that, launch the tool and select your DVD under Source Selection. The tool will then start scanning the DVD movie titles.
Step 3. After that, select the title you want to rip by going to the Title’s drop-down menu.
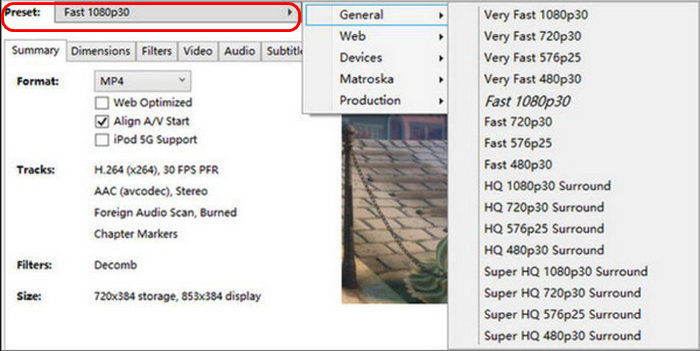
Step 4. Next, click the Preset button and customize your settings to decide on the quality of your output file.
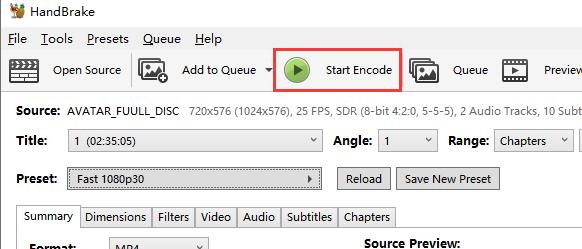
Step 5. Once you’ve chosen a name and preset, it’s now time to rip the DVD by clicking the Start Encode button at the top of the window. You'll see a progress bar at the bottom that tells you how much time you have left to rip.
Note: HandBrake can’t directly handle copy-protected DVDs. However, users have the option to install libdvdcss to bypass copy protection.
Part 3. Import DVD Ripped Files into iTunes
After ripping the DVD, it means to say that you have a digitized file version. With this, you can now easily transfer it to iTunes, and to do that, follow the steps below:
Step 1. First, on your computer, open the iTunes app.
Step 2. After that, tap the File options and click Add File to Library. From there, look for the ripped file that you’re going to transfer.

Step 3. The next thing that you need to do is connect your iPad to your computer via a USB cable.
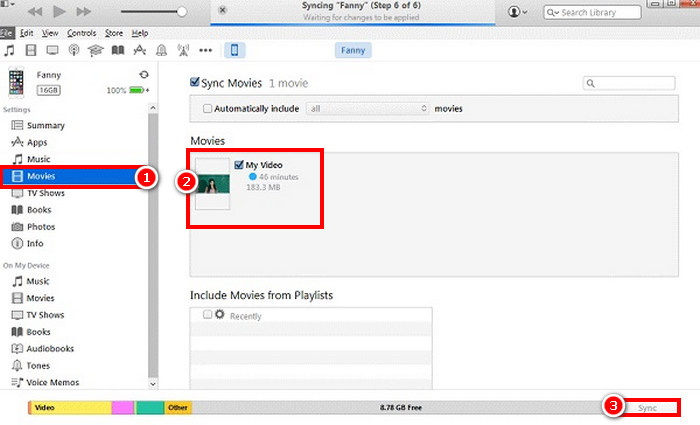
Step 4. Take note that the iPad icon should appear on the left side of your iTunes under the Devices tab. After that, click on it and go to the Movies tab.
Step 5. Check the Sync Movies checkbox, select the DVD movies you just imported to your iTunes library, and press Sync.
Note: It is important to take note of the formats compatible with iTunes MP4, MOV, H.264, or AAC before transferring them. If the files are not in a supported format, you may encounter issues during the transfer or playback process.
Part 4. FAQs on How to Add DVD to iTunes
Can I add a physical DVD directly to iTunes?
Unfortunately, no. You cannot add a physical DVD directly to iTunes. To transfer DVD content, you must first rip and convert the DVD into a digital format that iTunes supports. After that, you can now add DVDs to iTunes.
What should I do if my ripped DVD file isn’t showing up on iTunes?
If your ripped DVD file isn’t appearing in iTunes, the first thing that you need to do is to check whether the file format is compatible with iTunes. Next, ensure that you added the file correctly, and if the file still doesn’t appear, verify that it is not corrupted. In some cases, you may need to re-import the file or re-rip the DVD to resolve the issue.
Can I transfer multiple ripped DVD files to iTunes at once?
Yes. iTunes allows you to add multiple files to your library simultaneously. You can select multiple ripped DVD files when you go to the Add File to Library option in your iTunes.
Conclusion
Always remember that you can’t directly add DVDs to iTunes as it can’t play or handle any physical DVDs. The process will always involve ripping, where the DVDs need to be digitized first. With this, FVC picked Video Converter Ultimate and HandBrake are the best options to rip DVDs.
-
 6 Best DVD Ripping Software – All Information You Need
 In this article, we will introduce 6 DVD-ripping software you can consider using. You will also learn about their pros and cons and the steps for using them.
-
 How to Rip A DVD on a Mac Computer – 5 Methods to Try
 Want to rip a DVD on your Mac but don't know which tool to choose? In this article, we'll provide you with 5 practical options. Read and explore together.
-
 3 Best Open Source DVD Rippers for Easy Video Conversion
 Looking for a Free DVD Ripper? Read this article. We will review three open-source DVD rippers that offer easy solutions for your video conversion needs.