


 Video Converter Ultimate
 Screen Recorder
 Video Repair
 Secure Download
Medal Screen Recorder Review: Is It the Best Tool for Game Clips?
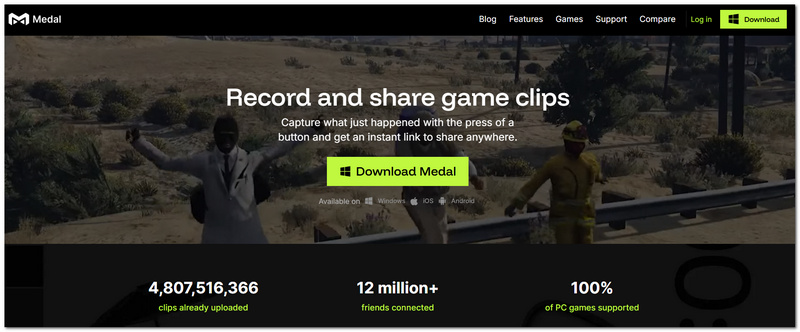
Generally, recording entire gaming sessions just to save one awesome in-game moment is a hassle. No one wants to fiddle with complicated settings or handle the huge video files. The perfect solution would be a tool that instantly captures those moments and allows sharing them with friends. That is precisely why Medal Screen Recorder has risen to fame among gamers. Both the PC and mobile versions of Medal.tv are greatly geared towards capturing game clips and not long videos. That's why it becomes very fast and handy to record your top moments. To make you understand better, this article aims to walk you through the entire Medal.tv, its best features, how to install and run, pros and cons, comparison with OBS Replay Buffer, and an excellent alternative if you want more recording options.

Part 1. What is Medal.tv?
I see Medal.tv as more than a mere game clipping app. For me, it's also a social media for gamers. Rather than logging hours of gameplay, it only captures your most amazing plays, hilarious fails, or lucky wins. Once you make a clip, you can edit it, add captions or effects before sharing it with friends or the Medal community.
Simple and fast were the most important features for me. First, Medal.tv automatically organizes my game clips so that I can easily find and look at them again and post them on social media. Whether I play on PC or one of the supported mobile devices, I can most Yes save my gaming highlights without compromising my storage. Medal.tv is the perfect tool for gamers who mostly capture and share highlights since it provides them with a convenient all-in-one clipping experience.
Part 2. Key Features of Medal Screen Recorder
The great thing about the Medal screen recording is that it doesn't get in the way of recording the moments you really want. It doesn't force you to record whole game sessions; rather, it comes with handy features that allow you to cut, edit, and share your moments with ease.
Zero-Lag Game Clipping
I am able to record game highlights while barely affecting my game's performance. The medal is designed to run in the background so that I can still be gaming even though it is recording my great moments.
Cloud Sync
I can have my clips auto-uploaded to the cloud. That is really convenient when I want to access my clips from other devices. Besides that, it also saves local storage and makes sure that my files are always backed up.
Built-in Meme Templates
Once I have captured my footage, I have the option to customize it with various meme templates, captions, and stickers that are available in the app and other editing features that allow me to add a creative touch before sharing it.
Instant Hotkey Recording
I don't need to record the entire session if I don't want to. I can simply record a portion by clicking the hotkey when something memorable happens. Medal will only keep the recent gameplay footage so that I won't end up with huge video files.
Easy Social Media Sharing
After the editing is complete, sharing the clips on social media or sending them directly to friends is just a matter of a few clicks, and no need to export through another video editor.
Automatic Clip Library
Every clip that I record is stored automatically and neatly organized so that I have an easy time locating, reviewing, and managing the highlights that have been saved.
Part 3. How to Set Up and Use Medal
Starting with Medal is simple and hassle-free. Even if you have never used a game clipping tool, it won't be a problem. First, install the software, and then you can tailor its recording functions, clipping hotkeys, and video quality to suit your gaming style. How to make a Medal record the whole screen: the steps below will help you locate the recording mode and other significant settings for a great experience.
Setting Clipping Hotkeys and Resolution
Prior to recording, I usually adjust Medal's hotkeys and video settings so that they correspond to my gameplay and recording preferences. This not only allows me to capture highlights instantly but also makes sure that my clips are of the quality that I want.
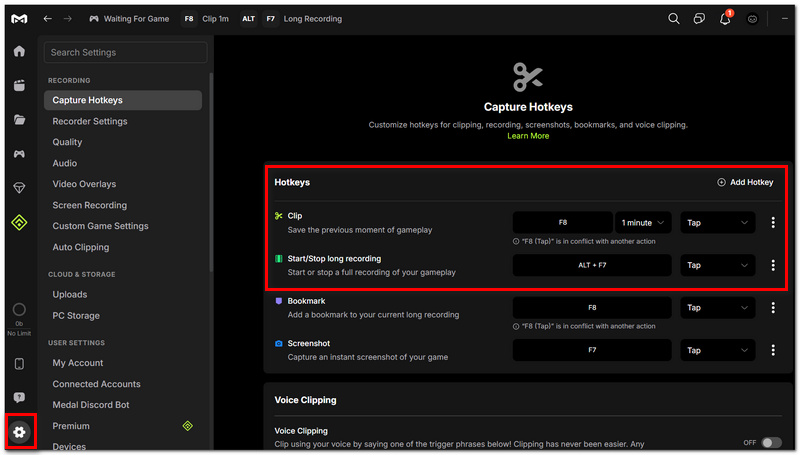
Step 1. Launch Medal and log in. Click the gear icon for Settings.
Step 2. Go to the Clips & Recording tab. Under Hotkeys, choose the shortcut presently linked to saving clips and then hit the key combination you wish to set for saving clips.
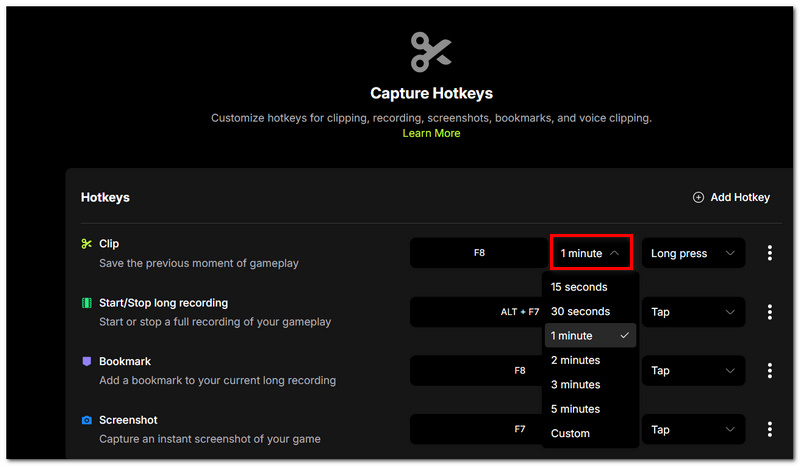
Step 3. Click the dropdown menu to select how many seconds before the hotkey press will be recorded.
Step 4. Head down to the Video Quality section. Pick the resolution you want.
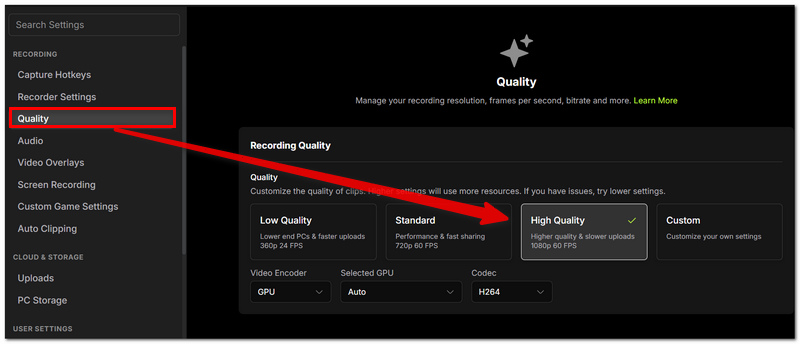
Step 5. Choose the Frame Rate (FPS) plus the video quality. Confirm the changes you have made. Then, start your game and use the hotkey whenever you decide to capture a highlight.
With this configuration, Medal becomes capable of recording your best moments in the game with the shortcut and video quality of your choice.
Editing and Sharing on Social Media
After making a clip, I find I tend to do some basic editing before exporting. The Medal itself has basic editing features like trimming, adding captions, overlays, or basic effects without entering another editor. So where do Medal screen recordings go? They are stored in your Medal library. If cloud sync was turned on, they are also available through your Medal account.
Step 1. Launch Medal again and head over to your Library. Pick the gameplay footage you want to work on.
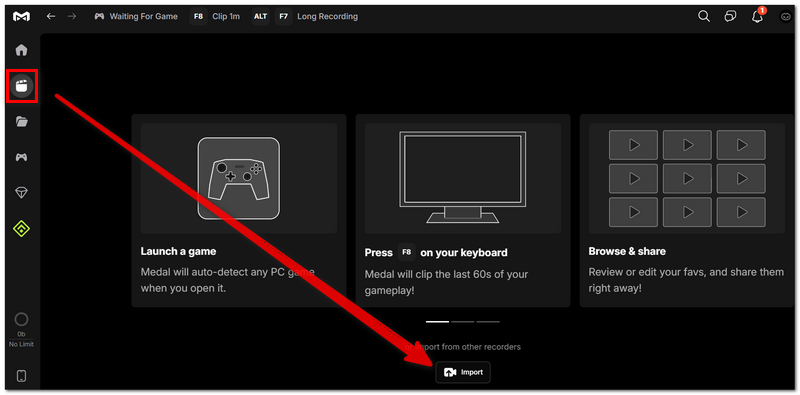
Step 2. Hit Edit to load the integrated editor. Cut the start or the end of the clip if necessary.
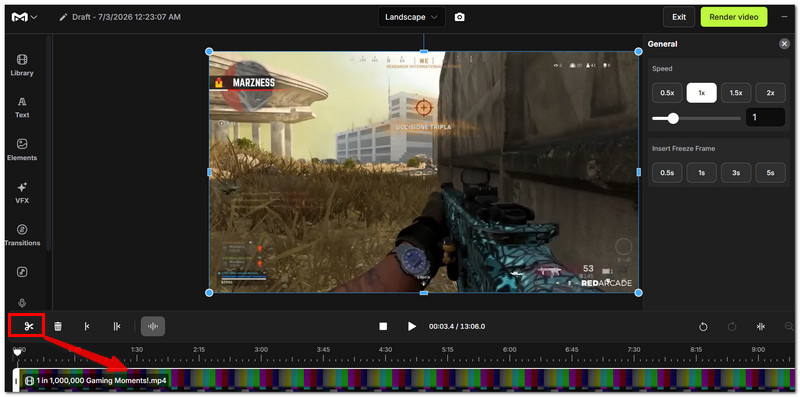
Step 3. Put captions, stickers, meme templates, or other effects to make your video stand out. Look over the edited footage to ensure all is well.
Step 4. Click Share and decide on the destination for the clip, like Discord, X(Twitter), Reddit, or by sharing a Medal link.
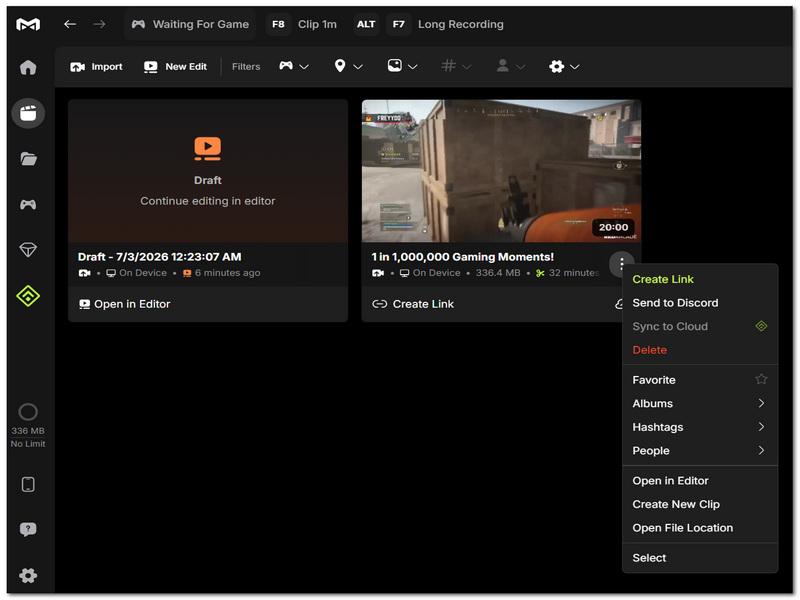
Step 5. Finalize the upload and wait until the clip is processed.
Your gameplay highlight is all set to be shared with your friends or gaming community right from Medal once it is uploaded.
Part 4. Pros and Cons
If you've encountered problems like the Medal recording the wrong screen, it could be a good idea to consider the pros and cons of the software to determine whether or not it is a suitable game recorder for you.
Pros
- Set up is straightforward and good for beginners.
- Game recording with hotkeys to save highlight moments.
- Little effect on PC performance during gaming sessions.
- Includes a video editor with functionalities like adding memes and text.
- With cloud sync, you can always have your clips saved and accessible on different devices.
Cons
- Some users report that the recorder sometimes captures the incorrect monitor or application.
- Features related to cloud storage might require you to sign in or manage your account further.
- Very limited advanced video editing features compared to those in dedicated video editors.
Part 5. Medal vs. OBS Replay Buffer
Medal and OBS Replay Buffer are both very good at recording game highlights, but each targets different user categories. For a fast and easy method of saving and sharing clips, I go for Medal, whereas if I require a more versatile set of features and professional-grade recording, I opt for OBS Replay Buffer.
| Feature | Medal | OBS Replay Buffer |
| Ease of Use | Very beginner-friendly | Requires more setup |
| Gameplay Clipping | ✔ One-key instant clipping | ✔ Replay Buffer with hotkeys |
| Performance Impact | Lightweight for most games | Depends on the OBS settings and encoder |
| Built-in Video Editing | ✔ Yes | ✘ No |
| Cloud Sync | ✔ Yes | ✘ No |
| Social Media Sharing | ✔ Direct sharing from the app | ✘ Export manually before sharing |
| Recording Flexibility | Focused on game highlights | Supports full recordings, streaming, and replay clips |
| Best For | Casual gamers and quick sharing | Streamers, creators, and advanced users |
Part 6. Best Alternative to Medal Screen Recorder
If you want a more versatile recorder than Medal, FVC Screen Recorder is a great alternative. Medal is mostly made to record gaming highlights only; Still, FVC Screen Recorder can do full screen recording, gameplay capture, audio recording, webcam recording, and screenshots all in one program. It is perfect for you if you want to have more control over your recording without getting into a complex setup.
Steps to Record Gameplay with FVC Screen Recorder
Step 1. Get and install FVC Screen Recorder on your PC or Mac.
Free DownloadFor Windows 7 or laterSecure Download
Free DownloadFor MacOS 10.7 or laterSecure Download
Step 2. Open the tool and, from the main window, choose Game Recorder or Video Recorder. Also, pick a game window or a specific screen area to be recorded.
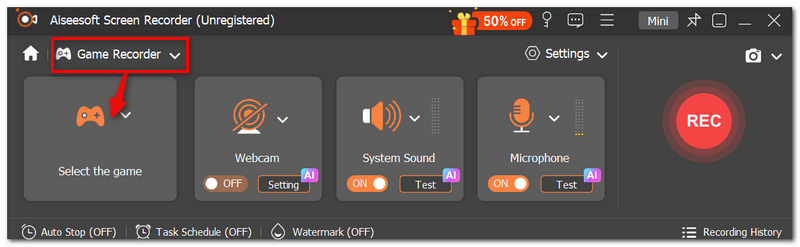
Step 3. Enable System Sound and Microphone if you want to include game audio and your voice in the recording.
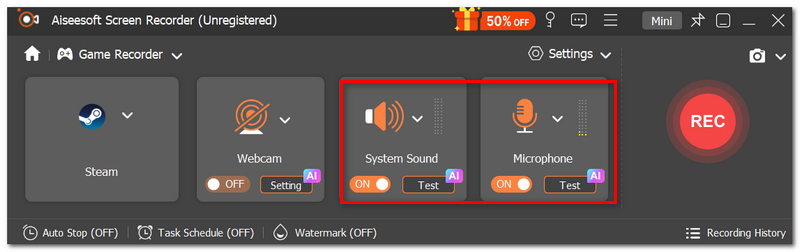
Step 4. Open the Settings menu to alter recording resolution, frame rate, output file format, and hotkeys.
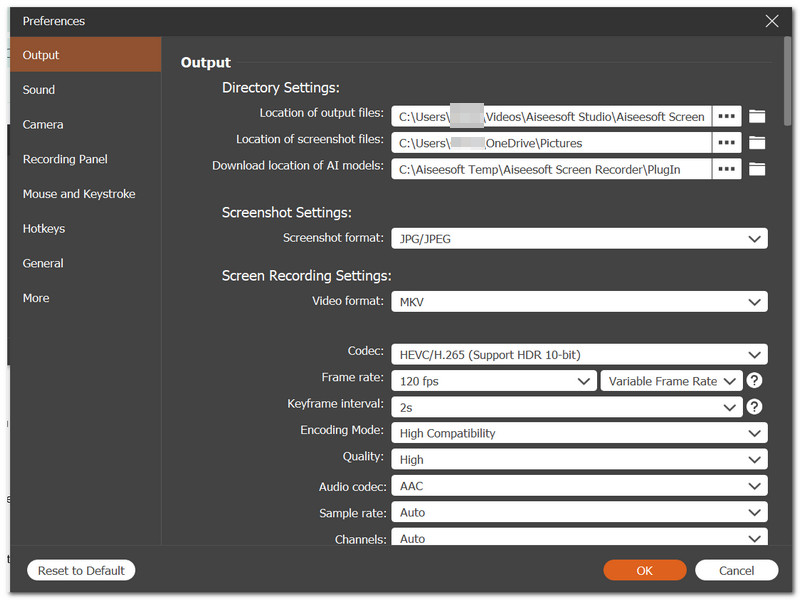
Step 5. Hit REC to begin gameplay recording. Once you're done, hit the Stop button.
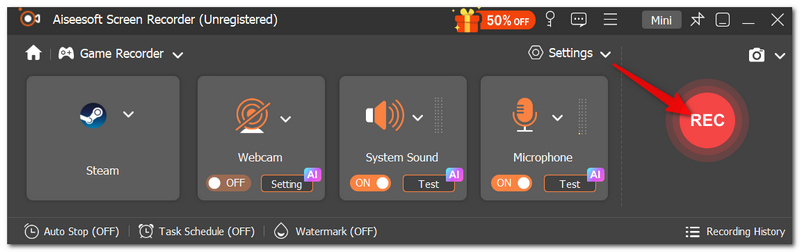
Step 6. Watch your recording, cut out the parts you don't want if necessary, then hit Save to export the video.
In just a few easy steps, FVC Screen Recorder allows you to record high-quality game scenes, make video tutorials, and record your full screen, plus it offers you more recording options than a simple game clip tool.
Part 7. FAQs about Medal Screen Recorder
Will Medal be able to save clips from games that are launched before Medal is started?
The best way to use Medal is to open it first and then launch your game. If you launch the game first, Medal might not detect the game session properly.
Is there a way to lock my most valuable clips so that they are not deleted by accident?
In fact. You are able to mark or favorite clips so they are both more recognizable and less likely to be removed during cleanup.
Is Medal usable with games run in offline mode?
It is possible to capture clips offline, and then they will be uploaded when you get an Internet connection.
Conclusion
Researching the Medal screen recording has definitely helped me to get a clear picture of what it can do, how it can be set up, and what other similar options are available. In case I feel like making short videos of my gameplay or going for a higher-level away recording, using a perfect shot, I can decide on the product that suits my requirements the best and confidently produce quality gaming content.
-
 How to Get 4K Quality on OBS: Most Detailed Description
 If you're playing a high-resolution game and want to record the clearest video of your actions, read this guide. We'll teach you how to get 4K quality on OBS.
-
 [Go-To-Guide] Record Blu-ray on OBS Studio and Alternative Tools
 Know how to record Blu-ray on OBS studio and other substitutes with these helpful simple steps and tips. Continue reading and let's dive into details.
-
 How to Fix OBS Jagged After Screen Recording [Guide]
 If you’re wondering why your screen-recorded video in OBS became pixelated? Learn the possible causes from this article and learn how to fix OBS jagging easily.
