

See the Full Potential of Final Cut Pro in Making Slow Motion Videos
Final Cut Pro is a powerful post-production video editing tool available for Mac users only. Video and audio editing, advanced color grading, closed captioning, and more are all possible with this program. Similar to other editing and delivery software, Final Cut Pro includes everything you'll need from beginning to end. This software is also great in making slow-motion videos, thanks to one of its tools that can adjust the playback speed of the video. In order to achieve the slow-motion effect you desire; continue reading to know all the details to make slow-motion videos using Final Cut Pro. Continue reading for further knowledge.

Part 1. How to Make Slow Motion Videos on Final Cut Pro?
When used in video or film, slow motion can help draw attention to a particular action or enhance the dramatic or emotional impact of the work in question. Dropping the speed of a clip looks cool no matter what you're using it for. We'll show you how to create Final Cut Pro slow-motion effects in just a few simple steps. Let's go for it, shall we?
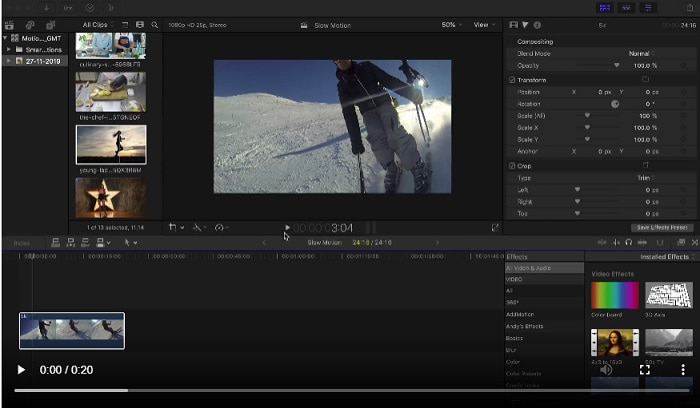
Step 1. In the Timeline, find and click on the clip you want to edit.
Step 2. To access the Retime menu, either click on the Speed Meter icon in the viewer window or press Command + R on your keyboard.
Step 3. Select between two-speed levels: Slow and Fast. Alternatively, press Command + R on your keyboard to bring up a drop-down menu above your clip.
Step 4. Changing the clip's timing is as simple as adjusting the speed percentages found under each option. It will shorten the clip if you speed it up and lengthen it if you slow it down when using this effect. The duration of the clip will change depending on the speed.
Part 2. Excellent Options to Use in Making Slow Motion on Windows
Method 1. Use Video Converter Ultimate
Supposed that Final Cut Pro is very difficult software to use in order to make a slow-motion video, then we recommend using Video Converter Ultimate. This software is free to download and available on both Windows and Mac, so you don't have to worry about downloading it. It has different kinds of tools available that can edit your video like what the Final Cut Pro can do.
Among these tools, there is a Video Speed Controller that can make slow-motion videos by adjusting the playback speed of a normal speed video. Unlike the Final Cut Pro, this software is accessible to use and it doesn't take time to learn in using every tool. In addition, it supports various video formats so that you will not have a hard time looking for the best software for the video format you need to convert. Now that you have the idea of how great the Video Converter Ultimate is, let's dig into the procedures on how to make a slow-motion using this software.
Step 1. You must first download and install the software before you can use it. In order to do this, simply click on the Free Download button that's located below. Download it to your desktop and start installing it by clicking on the Start Now button.
Free DownloadFor Windows 7 or laterSecure Download
Free DownloadFor MacOS 10.7 or laterSecure Download
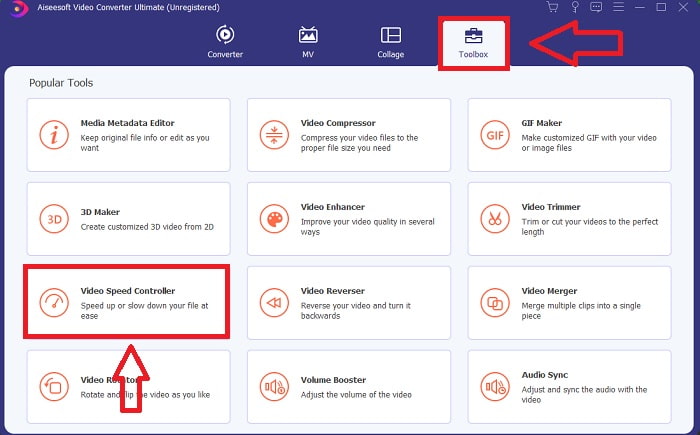
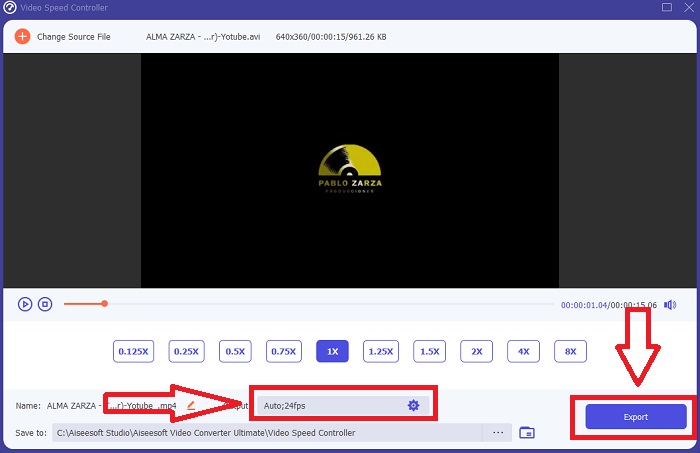
Step 2. Once the program has been installed, you will be able to see the start-up menu on the main software interface after it has been completed. By clicking the Toolbox tab in the menu tab, you can quickly and easily view all the featured tools this software can offer. And if you want to slow down your video or change the speed, choose Video Speed Controller from the list of available tools.
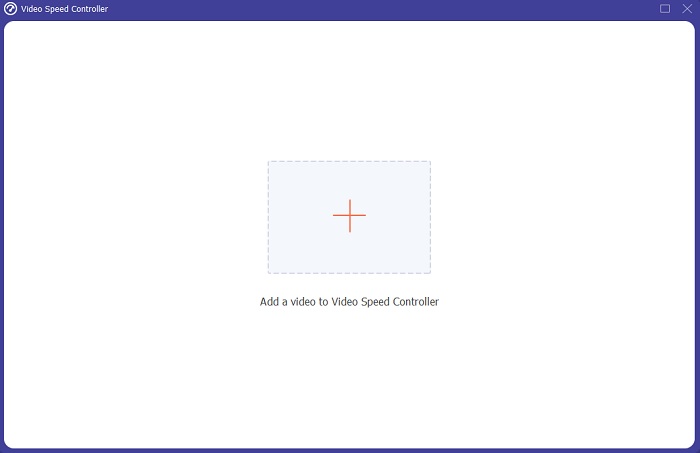
Step 3. In the event that you choose to proceed, another window will appear on your computer's display screen. You can begin uploading your video and start modifying its playback speed by selecting the plus sign +.
Step 4. Unlike the Final Cut Pro you can make the normal speed video to slow motion with one click. To create a slow-motion video out of this tool, you will now decrease the playback speed of your video by clicking all the values below 1, these integers will serve as the multiplier of how low are you going to decrease the frame rate of your video.
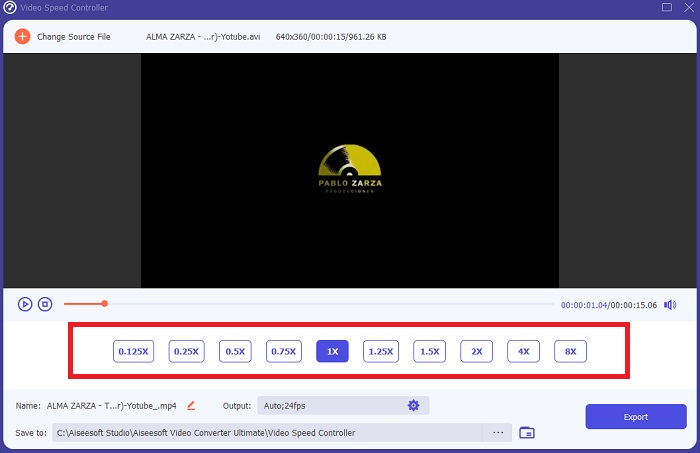
Step 5. You can now fine-tune the quality of your video by adjusting its format, resolution, frame rate, and other parameters if you're satisfied with its overall speed. You will also have the option of renaming your video output if you so desire. You can save your work by selecting Export from the File menu and browsing to a location on your computer's file system.
Method 2. Use Motion 5
Motion is a powerful motion graphics tool designed for video editors that makes it simple to create cinematic 2D and 3D titles, fluid transitions, and realistic effects in real-time. Motion is designed for video editors. Motion is also another alternative to Final Cut Pro in making slow-motion videos since it is also available on Mac. With its helpful tools, you can now make slow-motion videos easily. To know more about how to make slow motion using Motion 5, here are the steps provided.
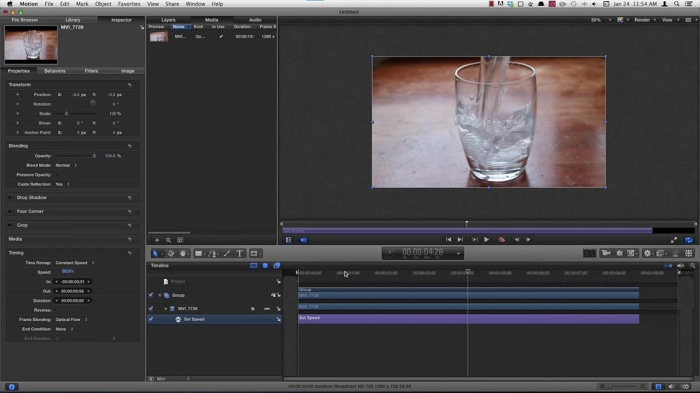
Step 1. Open the Motion 5, and drag the video file to the Timeline.
Step 2. Select the movie clip, and locate the Gear icon on the editing tools above the video track. After that, click Retiming and proceed with Set Speed.
Step 3. After you proceed, at the left corner of the interface, click the Properties and locate the Inspector window. And you will see the Retiming setting at the bottom. Set the speed to below 100 to achieve the slow-motion effect. And in order to make your slow-motion video play smooth, click Frame Blending and choose Optical Flow.
Related:
Part 3. FAQs about Final Cut Pro
How do you equalize audio in Final Cut Pro?
Select the video in the timeline in Final Cut Pro. Select a different equalization setting from the Equalization pop-up menu in the Audio Enhancements section of the Audio inspector. Choose the Flat option if you want to remove all EQ.
How do you stabilize video in Final Cut Pro?
The Video inspector can be accessed by selecting a clip in the timeline in Final Cut Pro and then clicking the inspector button. Toggle between Stabilization and Rolling Shutter by checking the appropriate box. You can use Final Cut Pro's Stabilization feature by checking the box, and Final Cut Pro will look for the best stabilization method based on its analysis.
How do you balance left and right audio in Final Cut Pro?
Select Stereo Left/Right from the Mode pop-up menu in the Audio inspector's Pan section. One of the following will cause the sound to move to the left or right: Pan Amount is where you put your money. Just make sure you don't overshoot it.
Conclusion
In the final analysis, Final Cut Pro makes the best software available on Mac. It has different kinds of tools that can make your post-editing process a bit extraordinary. But it is only available on Mac, how are you going to make slow-motion videos, if you're using Windows? Video Converter Ultimate is the answer to your problem, all the details about this software are already given above. And how great this software is that it can turn your videos to slow motion.
-
 3 Ways to Speed up Video on iPhone [Proven]
 Having trouble adjusting the playback speed of your video because you're using an iPhone? This is an excellent article to help you with your issue.
-
 How to Slow Down a Video: Perfect Tips [Desktop/Mobile Phone]
 Are you tired of searching for the best tools that help slow down a video online? Read this particular article for you to be enlightened with the pieces of information listed below.
-
 Windows Media Player | Learn How to Speed Up Videos [Proven]
 You want to slow down your video clip using your Windows Media Player, but you're having trouble with how to do it? This article is ideal for reading and can enlighten your point of view on how to speed up videos using Windows Media Player.