


How to Make a Video Darker For Your Project Videos
When it comes to video production, one frequently used technique is to darken specific areas of the footage. This process can be done for several reasons, such as to create a mood or atmosphere, draw focus to a particular part of the screen, or help hide imperfections. One of the primary reasons to darken video is to add drama and tension to a scene. By reducing the exposure and increasing the contrast, shadows are intensified, and highlights are minimized, giving the footage a more ominous and foreboding feel. This process can be particularly effective in horror movies or thrillers, where the audience is meant to feel on edge. For your project video, you must learn this technique with the detailed guides below.

Part 1. How to Darken Video Offline
1. Video Converter Ultimate
Video Converter Ultimate is a powerful application and video editing utility that can give you what you need. Need help reducing the brightness of your project video? This tool contains a feasible way to lessen the brightness of the appearance of your video. It comes with an advanced video utility, a Video Enhancer that automatically adjusts the brightness and contrast of the project video. It analyzes the file internally and adjusts the contrast to provide better lighting on the file as if it were captured in a low-light environment or setting. You can check the guidelines below to learn the detailed guide to using this app.
Step 1. Download the App
Begin enhancing and modifying your video file by getting the software on your PC. Click the Free Download presented below this step. Get its file installer and run the file on your computer.
Free DownloadFor Windows 7 or laterSecure Download
Free DownloadFor MacOS 10.7 or laterSecure Download
Step 2. Import Video
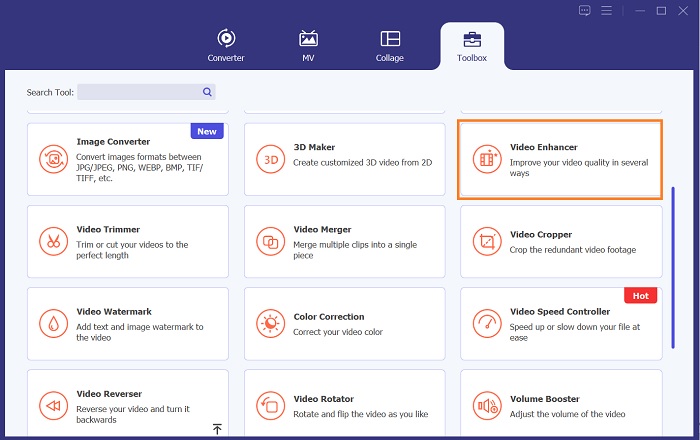
The following step is to launch the app and add the video you need to enhance. Go to the Toolbox option, where all advanced features are located. Select the Video Enhancer feature to access its dialogue box. Import the file by hitting the + icon.
Step 3. Finalize the Process
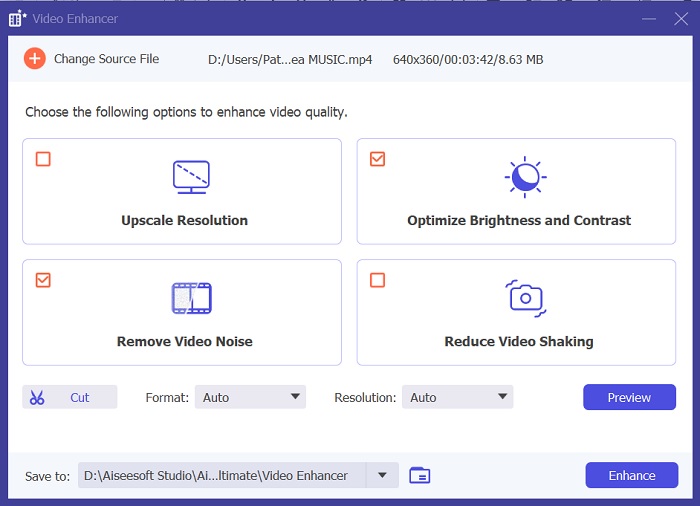
Afterward, once the chosen video is imported, four options will appear on your screen. Select the Optimized Brightness and Contrast menu to process the video automatically. Then, the video will be exported to the designated output folder. Locate the file and play it to check the contrast of the project video.
2. Adobe Premiere Pro
Premiere Pro is an innovative video utility software that has become the go-to choice for many professional video editors, with its intuitive interface, seamless integration with other Adobe products, and robust features. One of the critical benefits of Premiere Pro is its ability to process a wide range of video formats, from SD to HD to 4K and beyond. This feature makes it easy to work with footage from various sources, including cameras, mobile devices, and drones. If there is a need to adjust the lighting of your video, Adobe Premiere Pro is a great help with its Lumetri Color Panel feature, which can adjust the contrast and brightness of a file. In addition, Premiere Pro offers advanced color correction tools, audio editing capabilities, visual effects, and more.
Step 1. To edit brightness on Premiere Pro, you must download the app on your PC. You can search its file installer on its main web page and get its firmware to install the app. Launch the tool and import the video file by hitting the Import button.
Step 2. Open the Lumetri Color panel by clicking on the Color tab in the top left corner of the screen. In the Lumetri Color panel, you will see various color correction options. To adjust brightness, locate the Basic Correction section. You can use the Exposure slider to change the clip's brightness here. Drag the slider to the right to increase brightness or to the left to decrease brightness.
Step 3. Lastly, hit or click the Export button to save the file. Please wait for the video to render and locate it in the tool's output folder. Play and preview the changes on the project video and see if it fits your liking.
3. Adobe After Effects
When adjusting brightness in After Effects, several features come in handy. Firstly, the Levels effect can be used to adjust brightness and contrast. This effect allows you to set black-and-white points, which helps ensure your image doesn't become too washed out or too dark. You can also use the Curves effect to adjust the brightness and contrast of specific video parts. This feature can bring out details in the shadows or highlights. Another helpful feature is the Exposure effect, which permits you to alter the brightness and contrast of the entire image. This effect also includes options for adjusting the gamma and offset, which can help you fine-tune the look of your image.
Step 1. The initial step to edit video appearance on After Effects is to get the tool's firmware and install it on your PC. You can download or acquire it from Adobe's official website and run its file installer. Then, launch the app and navigate its features.
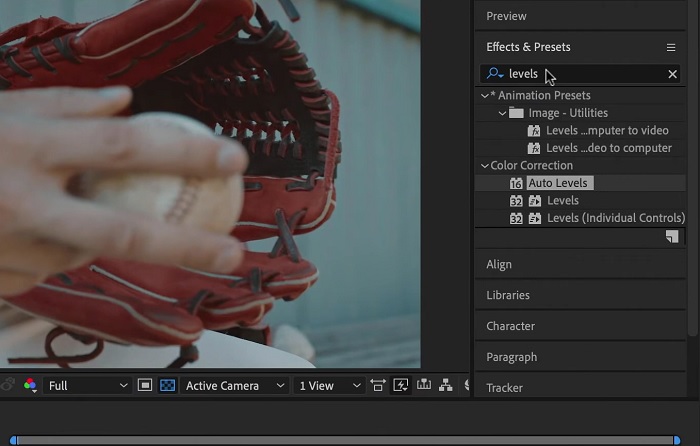
Step 2. Next is to import the video by going to the File option and hitting the Import option. Locate your video and tap it to add it to the video editing. After that, go to the Windows tab and hit Effects and Presets. There will be a tracking box that will appear where you can search for the Levels option.
Step 3. Lastly, hit the Auto Level and drag and drop it to the video you need to lessen the brightness on your project clip. Hit the Export option to save the modifications. You can also use different presets to adjust the brightness of your file. Go to the output folder to preview and check the modified project video.
4. DaVinci Resolve
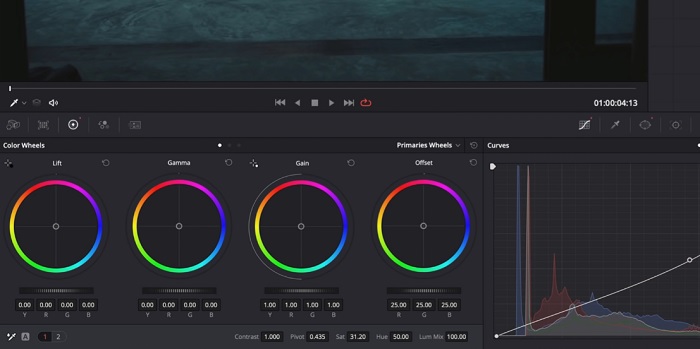
When it comes to video modification, Davinci Resolve is a powerful software and video utility that offers a variety of editing features to enhance the quality of your footage. One of the most common editing techniques is darkening a video, which can dramatically affect your visuals. One of the user's favorite features of this video editing software is the ability to easily color-grade footage. The software has a wide range of color grading tools that authorize users to revise the look and feel of the footage to match an artistic vision. It also comes with a timeline panel in which users can provide a better editing process. Davinci Resolve makes this process easy and efficient with its advanced tools.
Step 1. The initial guide on adjusting the exposure of a video using DaVinci Resolve is to get the tool on your PC. Download the app on its official website and run the file installer to acquire it. Then, launch the video editing app and check its features to familiarize yourself with its editing utilities.
Step 2. To darken a video with Davinci Resolve, import the video to a file by clicking the File option and accessing the Import file button. Then, you can use the software's color grading tools. Select the clip you want to darken in the timeline, then open the Color page.
Step 3. From there, you can use the Lift, Gamma, and Gain controls to adjust the brightness and contrast of the clip. Afterward, hit and select the Export button to save the changes made to the video project. Access the output folder to preview the file.
Part 2. How to Darken Video Online
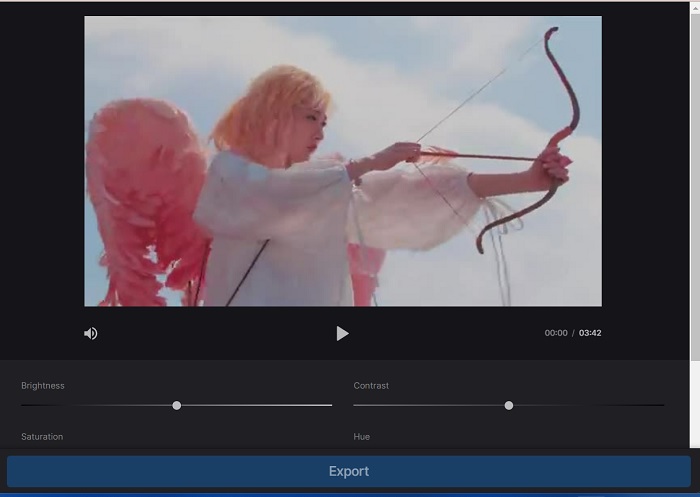
Are you tired of using bulkier video editing software to adjust a simple video clip on your PC? Well, Clideo can be a great help as an alternative to video editing, as it consumes a large amount of computer space. This online tool enables users to easily access its timeline panel and import videos to its API without the need to install or log into an account. Users can directly upload the video file they need to edit, and the online tool will analyze and provide editing features to tweak and enhance the appearance of the project clip. You can check the detailed guide below on using this online app thoroughly.
Step 1. To adjust the brightness on Clideo, access the app on your web browser. Launch the main interface and start uploading your video clip to the platform by hitting the Choose File. Select the video you need to edit and import on the online tool.
Step 2. Next, select the Adjust option from the menu below the video player. This method will use several editing tools, including an option to adjust brightness. Drag the brightness slider left or right to decrease or increase the brightness, respectively.
Step 3. You can also use the auto-adjust button to adjust the brightness automatically. Once you are satisfied with the brightness level, click the Apply icon or button to save your changes. Finally, download your edited video by clicking the Export option.
Further Reading:
Video Filter: Enhance Your Video with Filters and Effects on Desktop
5 Amazing YouTube Movie Makers | Create Excellent Movie Contents
Part 3. FAQs About Darken Video
How to darken a video on an iPhone?
There are different software you can use and install on your mobile device that can adjust the exposure of your project clip. You can also use an online tool that can help you to adjust videos directly on your smartphone. Clideo is recommended as it can be accessed in web browsers, including Safari and others that are compatible with Apple devices.
How do you darken a video on iMovie?
Adjust the brightness and contrast settings to darken a video on iMovie. You can also add a dark overlay or filter to the video to make it appear darker. Another option is to adjust the exposure levels to make the video darker. Experiment with these settings until you achieve the desired look for your video.
Why would you want to darken a video on an iPhone?
Darkening a video can be helpful in many scenarios, such as improving the overall video quality, enhancing the contrast, or creating a certain mood or atmosphere.
Conclusion
After trying different methods, this article found that darkening a video on a PC can be pretty straightforward. You'll need to use video editing software such as Video Converter Ultimate, Adobe Premiere Pro, Da Vinci Resolve, and After Effects to achieve this. Once you have the software installed, you can easily modify the exposure of your video to achieve the desired darkened effect. However, it's vital to ensure that the video is light to the point where it's difficult to see the details. With these tips on how to fix a video that is too bright, you can successfully darken your video and create a visually appealing final product.
-
 Ultimate Guide to Change Video Resolution Available in Cross-Platforms
 Need to change the video resolution of the video? If so, learn the different ways you can easily do to change the video resolution of the video you’re watching.
-
 What Is Watermark on a Video & How to Add or Remove It
 Do you want to what is a watermark, what different types, and the reason why photographers add one? Well, all you need to do is read this article.
-
 How to Crop MP4 File Without Losing Any Quality of the Video [2023]
 Learn how to Crop MP4 with easy steps provided just for you. So, keep up the pace because we present to you the best of the best cropping tools you may use.