


How to Use the Snipping Tool on a Mac: A Most Detailed Guide
When it comes to taking screenshots, different operating systems have their own ways of handling it. On Windows, you can use a keyboard shortcut to bring up the Snipping Tool and capture what's on your screen, and Mac is no different.
Whether you're using a MacBook Pro or MacBook Air, they both come with built-in screenshot tools. If you're not sure how to find them or how to use the snipping tool on Mac, this guide is for you. In this guide, we'll explain the different modes available for screen sniping on Mac, how to activate them, use them, and customize them to suit your daily workflow.
For users who need a screenshot tool but require a more advanced product than the standard Mac screen snipping tool, we also recommend the best alternative software available.

Part 1. Different Modes of the Snipping Tool
Do Macs have a snipping tool? The answer is clear—yes.
We believe that before you start using it, you should understand what features the Mac screenshot snipping tool consists of and how each feature can help you take screenshots.
Therefore, we will use this section to introduce them to you.
The main modes of the Mac snipping tool are Full Screen Snip, Window Snip, and Rectangular Snip. Here is a detailed introduction.” /]Full Screen Snip
This mode allows you to capture the entire content displayed on your computer screen. When you need to capture the entire screen, especially when capturing content from multiple windows simultaneously, you can enable this mode.
Window Snip
This mode helps you capture a specific window on the screen, such as an open browser page, a software interface, a dialog box, or the contents of a folder. After enabling this mode, simply click to select the target window.
Rectangular Snip
This is the most flexible and commonly used mode. It allows you to use the mouse to draw any shape of rectangle for screen capture. If you need to capture an irregular part of the screen, such as an area with an icon or button, you can use this mode.
Screenshots captured in all three modes will be saved on your desktop in the format Screen Shot [date] at [time].png. If you can't find them, check the Finder.
Part 2. How to Use Snipping Tool on Mac
After getting a general understanding of the concept, we will immediately get down to business and see how to use the snipping tool on Mac. There are generally two ways to launch the screenshot tool: hotkeys and the toolbar. This section will introduce the details of these two methods and also provide additional guidance on how to use it to record videos.
How to Use the Snip Tool on Mac with Hotkeys
The fastest way to launch the snip command on Mac is to use hotkeys. Simply press the designated key combination on your keyboard to launch the corresponding screenshot mode.
Here are a few Mac shortcuts for the snipping tool that you will find useful.
• Full Screen Snip
To capture a full-screen screenshot, press and release the following three keys simultaneously: Shift + Command + 3.

• Window Snip
Press and release the following three keys simultaneously: Shift + Command + 4.Do not drag the cursor across the screen. Instead, press and release the Spacebar, then wait for the cursor to turn into a camera icon. Drag the camera icon over the window you want to capture, then click the mouse to take the screenshot.
If you selected the wrong window and want to exit screenshot mode, press the Esc key.

• Rectangular Snip
Press and release the following three keys simultaneously: Shift + Command + 4.
The cursor will then turn into a crosshair.
Click and hold the mouse button while dragging the crosshair to select the screen area you want to capture. Once selected, release the mouse button to capture the screenshot.

How to Take a Snip on a Mac with the Screenshot Toolbar
If you're worried about mixing up hotkeys or pressing the wrong keys, you can use another method: taking a screenshot on Mac with the screenshot toolbar. On the rectangular toolbar, you'll see icons representing several screenshot modes.
Here's how to use the snip tool on Mac with the screenshot toolbar.
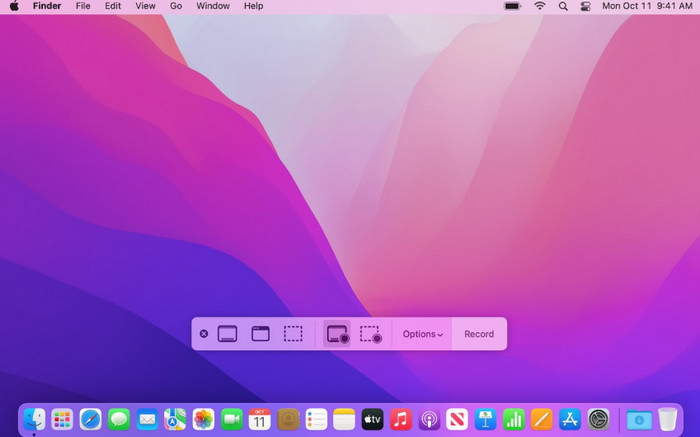
To bring up the toolbar on the screen, you still need to press this set of shortcut keys simultaneously: Shift + Command + 5.
At this point, the screen will dim, and a rectangular toolbar will appear in the middle. Click the corresponding icon to start taking a screenshot.
Similarly, the subsequent images will appear as thumbnails in the lower right corner.
How to Record Video Using the Snipping Tool on Mac
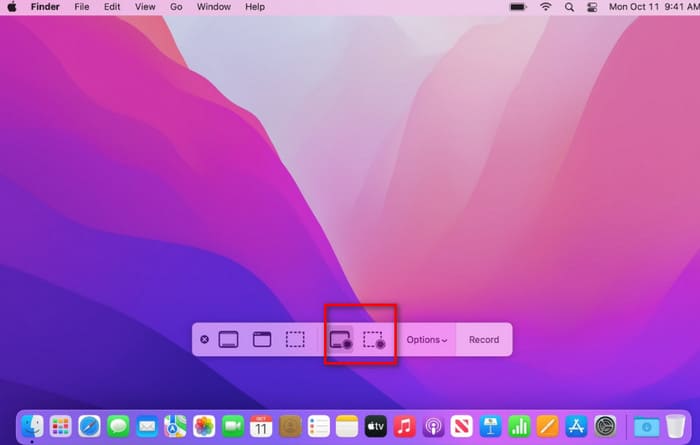
In the toolbar from the previous section, there is an option to record video. The first three options are for recording static images, while the last two are for recording video.
The first icon allows you to record the entire screen. The second icon allows you to record a selected portion of the screen. After launching the program, you can drag the mouse to adjust the frame and select the portion you want to record.
Before you start recording a video, you need to click the Options button and adjust the recording countdown, save location, audio recorder and other options.
Click the Record button to start recording.
Part 3. Tips for Using the Snipping Tool on a Mac
Now you know how to take a screenshot on a Mac. However, the above methods only allow you to record in the default settings. If you want to customize the output format of the screenshot, change the save location, and place the screen recorder in the most convenient location, you need to do more.
How to Change Save Location
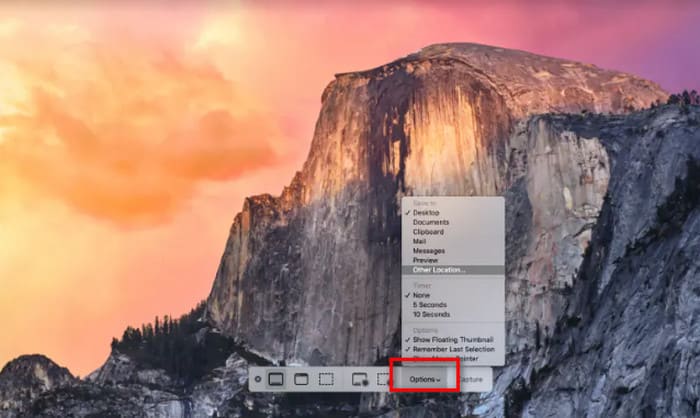
Mac will save your screenshots to the desktop by default. If you want to change the storage path, first press Shift + Command + 5 to bring up the toolbox. Then click the Options option to expand the menu below.
In the menu, select Save to, then choose your desired storage path from the directory.
How to Add the Snipping Tool to the Touch Bar
Don't want to press the shortcut key every time to bring up the toolbox? Then set it to appear on the Mac Touch Bar for easy access.
Here is how to do.
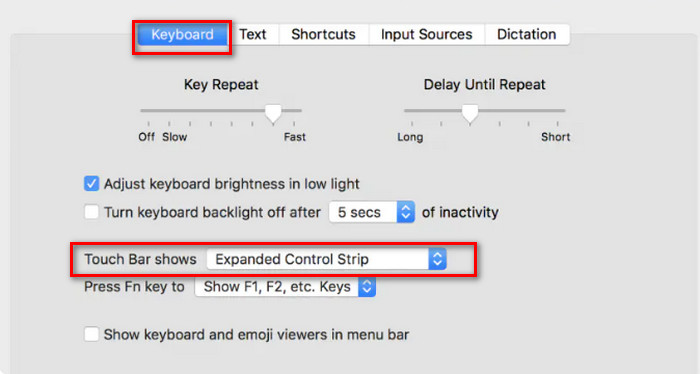
Step 1. Open System Preferences and go to Keyboard settings.
Step 2. Under the Touch Bar shows section, use the dropdown to choose App Controls.
Step 3. Click Customize Control Strip.
Step 4. From the options that appear, locate Screenshot, then drag it onto your Touch Bar.
How to Change Screenshot File Format
The default screenshot output format for Mac is PNG. However, you can customize it to change to JPEG, HEIC, GIF, PDF, or TIFF.
Here is the guide.
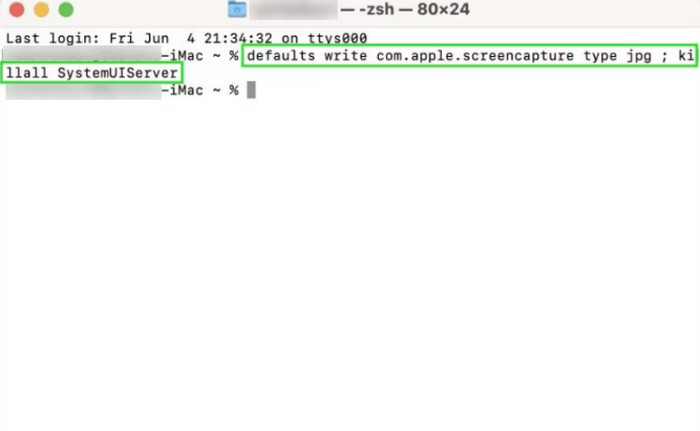
Step 1. Go to Applications > Utilities > Terminal.
Step 2. Type the following command (replace png with your desired format like jpg, pdf, or tiff):
defaults write com.apple.screencapture type jpg
Step 3. Run this command to make the change take effect:
killall SystemUIServer
Part 4. Best Alternative to the Mac's Snipping Mac
Mac's Snipping Tool is easy to use, but accordingly, its functionality is very basic, and its subsequent screenshot capture and editing features are also quite limited. Additionally, it can only record content from the current screen.
For users seeking more recording options, we strongly recommend using FVC Screen Recorder as an alternative. This software not only supports recording images and videos from the screen, audio from the microphone or system speakers, but also video from the webcam. You can even connect your phone to your computer and use FVC Screen Recorder to record content from your phone's screen.
More importantly, FVC Screen Recorder provides a full suite of screenshot and video capture editing features. On a single platform, you can complete the entire process from recording to processing to output.
Free DownloadFor Windows 7 or laterSecure Download
Free DownloadFor MacOS 10.7 or laterSecure Download
Here is how to take a screenshot with FVC Screen Recorder.
Step 1. Start by downloading and installing FVC Screen Recorder on your Windows computer.
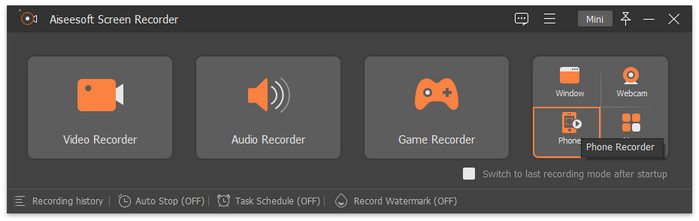
Step 2. Launch the program, and from the main screen, pick a feature you need—like Video Recorder.
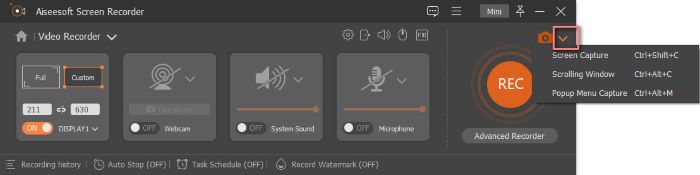
Step 3. Click Screen Capture. You’ll see options like Screen Capture, Scrolling Window, and Popup Menu Capture. Just choose the one that fits your task.
Conclusion
Here is a complete guide on how to use the Snipping Tool on Mac. You can learn how to activate the screenshot function using hotkeys or the toolbox, as well as how to record videos. For users who want to adjust the recording settings, we have prepared a guide on how to change the output format and storage path.
If you find the Snipping Tool on Mac too limited, we recommend trying FVC Screen Recorder.
-
 QuickTime Screen Recording – Record Video with Audio on Mac & PC
 Recording screen with audio on Mac comes in handy. The built-in player, QuickTime Player can do it. Read his post and know how to capture screen with sound on Mac and PC.
-
 Top 8 Best Webcam Recorders for Windows and Mac
 If you are looking for the best webcam recorders, we have what you want. Read this article with the top eight choices for your Windows and Mac.
-
 Shottr Review: The Best Screenshot Software Tool for Mac
 Are you looking for the best screenshot software for your Mac? Try the Shottr screenshot tool, an extremely impressive and exemplary free-to-use tool.