


Complete Process on How to Use GIMP to Resize Images
Resizing an image is essential when it comes to editing an image. Sometimes, you need to change the height and width of your picture so that you would get your preferred size. Also, resizing an image is done by other photo editors to reduce the size of their image or to upscale the quality. Luckily, we found an application that allows you to resize an image.
GIMP is an online tool manipulation software where you can edit your image. In addition, GIMP enables you to change the height and width of your image, increasing the quality of your image. Therefore, if you want to use GIMP to resize an image, check this article now.

Part 1. How to Use GIMP to Resize Images
GIMP is a graphic manipulation application platform that allows graphic designers to create excellent outputs. It enables users to make design elements, scripted images, icons, and more. Additionally, it is a free, open-source application that you can use on almost all media platforms, like Windows, Mac, and Linux. Many people recommend this application when searching for an alternative to Adobe Photoshop.
And despite that it has an easier interface than Photoshop, some people are still having a hard time using GIMP. What’s even more interesting about GIMP is that it allows you to edit the pixels of your picture. And if you are searching for the best image resizer, you might want to consider GIMP as your preference.
In this part, we will present to you two methods to use GIMP for image resizing (dimensions and size).
How to use GIMP to resize image dimensions
Step 1. First, download the GIMP application on your device and install it. After installing, open the app on your device. And then, open the image on GIMP.
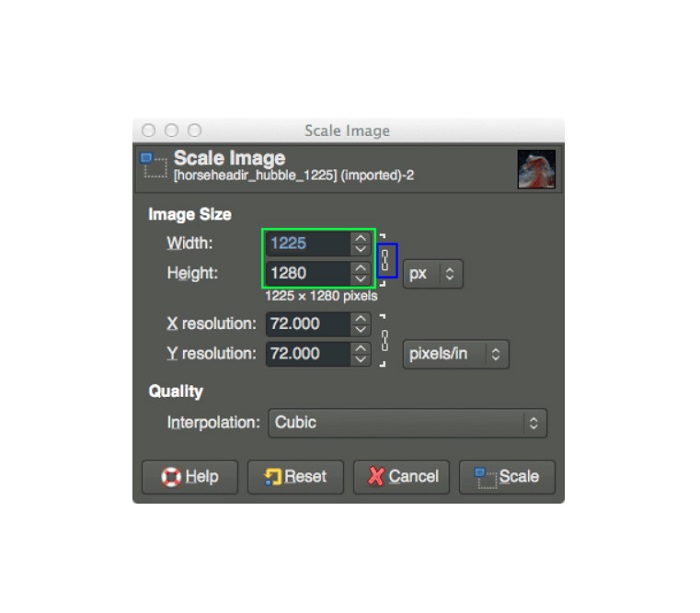
Note that when you open your image on GIMP, the image will be zoomed so that the whole image will fit in your image canvas. You will see the current size of your image at the top right corner of your window.
Step 2. To resize the dimensions of your image, go to Image, then select the Scale Image dialog. And on the Scale Image dialog, you can change the Width and Height of your image. Type your preferred dimension size and proceed to the next step. Besides the height and width of your image, you will see a chain indicating that the height and width of your image are chained to each other, which means when you change the height, the width will follow.
Step 3. Once you are done altering the size of your photo’s dimension, you can now move to export your image. To export your image, go to File > Export. And to export your output with a new file name, go to File > Overwrite, then name your file.
How to use GIMP to resize images without losing quality (file size):
In this tutorial, we will use a JPEG image because this type of format is a lossy compression which means when compressing the size of this image, we will sacrifice some of its quality. But by using GIMP, it is possible to resize your image without affecting its quality.
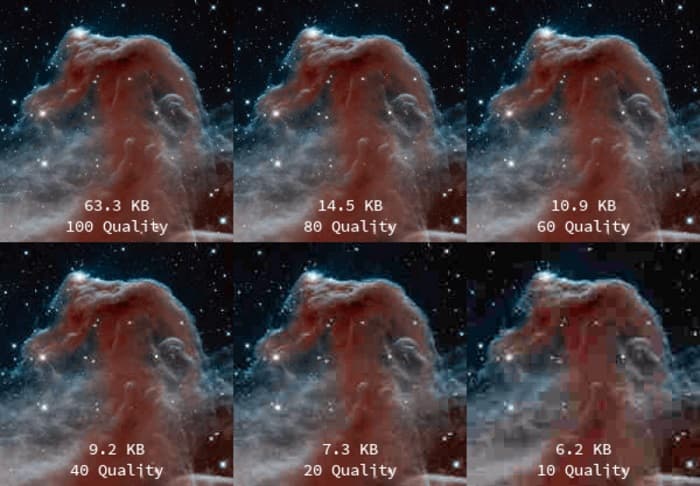
Step 1. Using the same image above, we will resize the image to 200px wide and export the file with varying JPEG compression levels. You will observe in the example below that at a quality setting of 80, the file size of your image is smaller than at 100 while having almost the same quality.
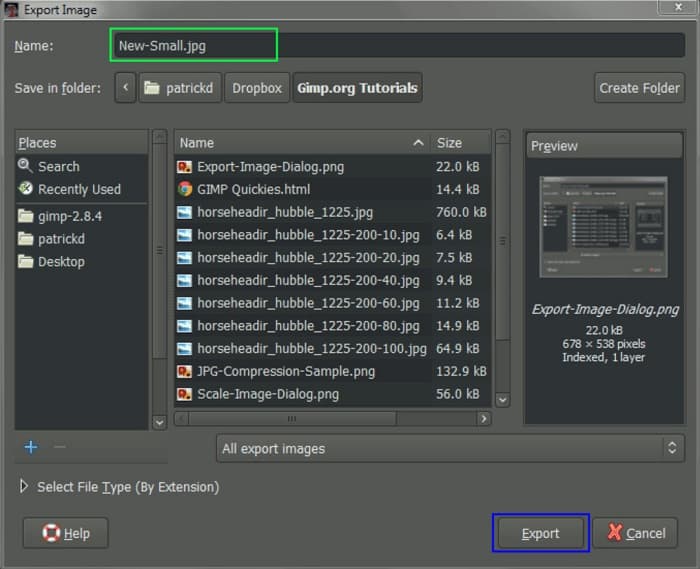
Step 2. When you are done modifying the size of your image, we will now export your output. Click the File button and select Export.
Step 3. On the Export Image tab, enter the new name of your image. If you worry about what format your output will be saved in, GIMP automatically exports the original file format. In our example, you will see that the output format is still .jpg.
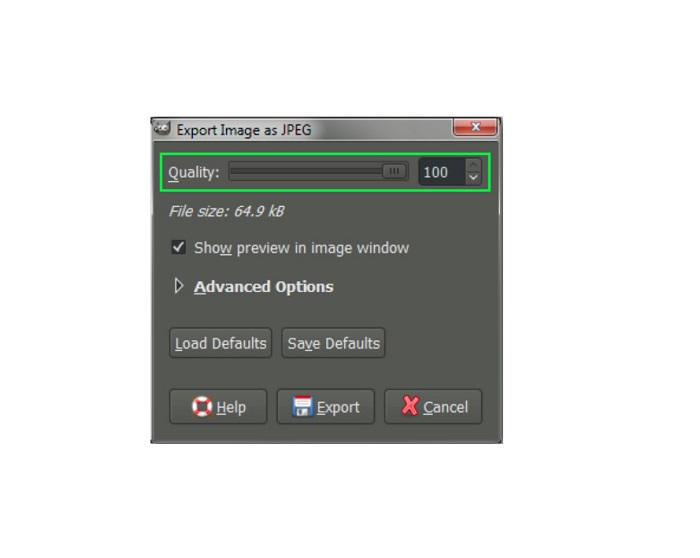
Step 4. After clicking the Export button, the Export Image as JPEG tab will prompt, where you will change the quality of the image you are exporting. If you also have the Show preview in the image window, you can tick the box and see the preview of your image. You will also see the File size information so that you will know the resulting file size of your image.
Step 5. And finally, tick the Export button to export your image and save it on your device.
And that’s how to use GIMP to resize your image’s dimension and file size. You can do more editing on your image, like rotating an image, flipping a photo, and cropping your image. Read the next part if you still want an option to resize your image or improve your pictures' quality.
Part 2. Alternative to GIMP
GIMP is among the most standard photo editing applications that many professionals use. However, some users have difficulty using this software to edit photos, like resizing images. And if you are among the users who want to use a more straightforward application, then we have the solution for you.
FVC Free Image Upscaler is a free online application with a simple user interface, making it a beginner-friendly tool if you are searching for the best image upscaling tool to enhance the quality of your image. It uses an AI upscaling process, automatically detecting the blurry parts of your image and enhancing it. Moreover, you can improve your photo with up to 8x magnification. It also supports the most common image formats, such as JPEG, JPG, PNG, and BMP. And unlike other editing applications, FVC Free Image Upscaler can resize your image without losing its quality. So, if you want to use this tool to resize and enhance your image, follow the easy steps below.
How to resize image without losing quality GIMP alternative:
Step 1. Open your web browser and search FVC Free Image Upscaler on the search box. You can also click the link directly to the main page. And on the software’s main user interface, click the Upload Photo button to launch the app on your device.
Step 2. Then, tick the Upload Photo button on the main user interface to add the photo you want to resize/upscale.
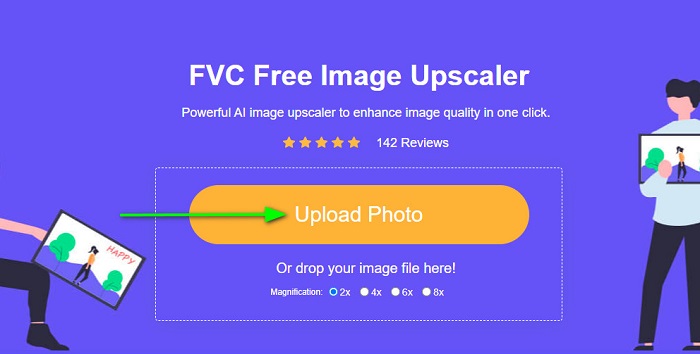
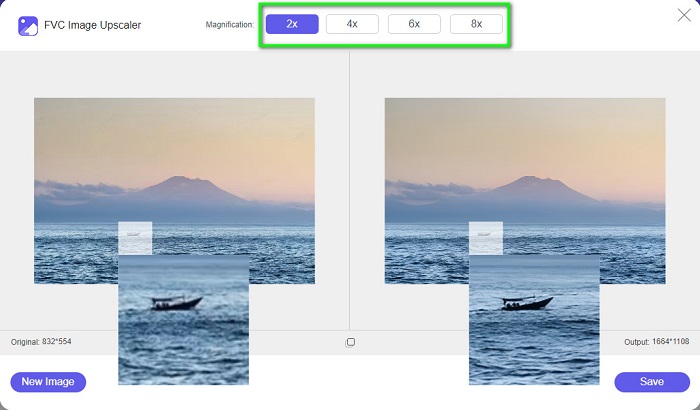
Step 3. After uploading your file, select among the magnification presets. You can select between 2x, 4x, 6x, and 8x. Then, you can check the preview of your output by sliding your cursor on the image.
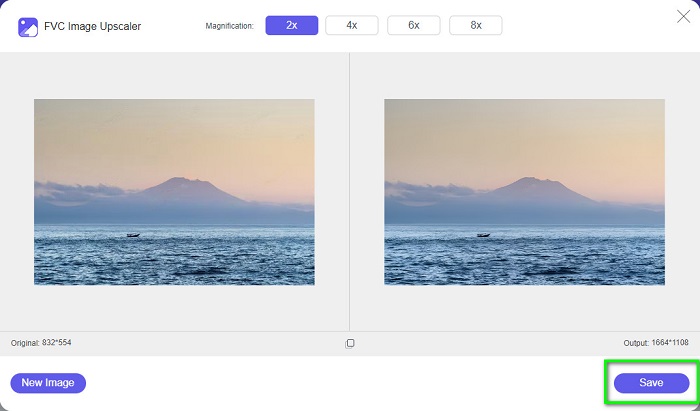
Step 4. Lastly, hit the Save button at the bottom right corner of the interface to save your output on your device.
Related to:
How to Optimize Image for the Web Using the Best Solutions [Quick]
3 Ways to Resize the Picture for Twitter Without Losing Quality
Part 3. FAQs about How to Use GIMP to Resize Images
Does GIMP have an online version?
Yes, it does. GIMP is not just an offline photo editing application; it also has an online version. However, GIMP online does not contain all the features like the desktop version of GIMP.
Is GIMP the best free Photoshop?
GIMP is not comparable to Photoshop. Photoshop is still the most excellent photo editing software for desktops. Yet, GIMP is one of the best alternatives for Adobe Photoshop.
Does GIMP support PNG files?
Yes. GIMP allows you to save your outputs in JPEG, JPG, PNG, and other formats.
Conclusion
And that’s the process of how to use GIMP to resize images. Although GIMP has a complex interface, following the steps we provided above, you can resize your image's dimensions and size. But if you like to use a free online image resizer that can enhance the quality of your image, use FVC Free Image Upscaler.
-
 6 Ways to Reize an Image on the Web & Offline [100% Working]
 With the tutorial we add in here, you can now easily resize an image based on your prefered size. Learn how to do it here!
-
 Factual PicResize Review You Must Know This 2022
 Do you want to know if PicResize is the best option on editing image? Read this article as we review the overall tool.
-
 Everything You Need to Know About the Waifu2x and Alternative
 Need to know more about the Waifu2x? This article provides the information that needs to be highlighted in this app and its alternative.