


How to Resize a Picture in Powerpoint without Degrading the Quality
Lately, many people present everything digitally rather than in the traditional way, even before the pandemic. As we strive for the future, everything can become easier with the help of technology and software for presenting the business, visual aids, ideas, sales, etc., and you can all do them on Powerpoint. You can have this presenter on your device for its purpose—furthermore, many users are looking for a way to resize the image in this presenter. Are you willing to learn how to resize a picture in PowerPoint? Keep reading this article as we cover the information you need to know about this topic.

Part 1. How to Resize a Picture in PowerPoint Using 2 Effective Ways You Can Use [Indicidually & Multiple]
When you adjust the image's length and height on each slide, you can either set an exact dimension or change the aspect ratio by dragging the frame. Though you can do it here naturally, some distortion happens when the image's size is changed. So, if you want to know how to resize pictures on multiple slides in PowerPoint or individually, you can follow the steps we add below. Follow it accordingly, and you will resize it in less than a minute.
3 Ways to Resize the Image on PowerPoint [Individually & Batch]
1. Resize Image by Dragging the Frame
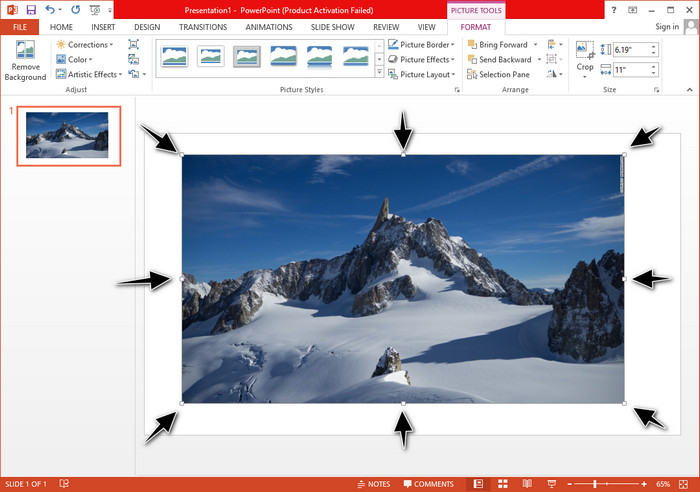
Once you have uploaded the image on PowerPoint, you will see tiny dots on it. These dots on the picture are adjustable, which means you can freely resize the photo according to your specification. Once you change the length, the height will not follow the same as adjusting the size.
2. Resize Image by Changing the Height and Length
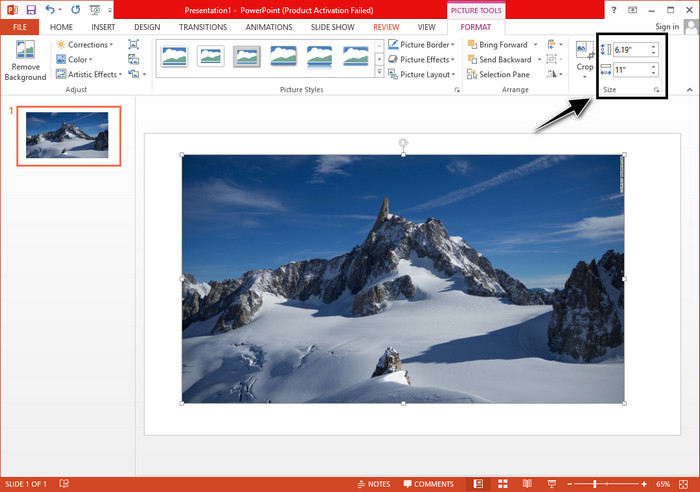
When you upload the image on PowerPoint, click the Format tab to change the image to a specific size. On the upper part, you can add its exact height and length. However, once you’ve changed one measurement, the other one will automatically be adjusted because the main aspect ratio is active.
3. Resize Image as a Batch on Powerpoint
What should you do to change multiple images on a single PowerPoint slide? To do it, you will need to upload the photos on the slide. Once you’ve uploaded various images on the slide, you must press and hold Control, then tick every picture you want to resize. Follow what resizing option you want to use that we introduce above; drag the frame or change the numerical value.
Part 2. How to Resize a Picture in PowerPoint without Distorting for Free [Web Service]
How to resize a picture in PowerPoint without distorting it? You can use the FVC Free Image Upscaler to automatically resize the photo you upload that you want to use on a PowerPoint presentation. Despite being an online tool, its performance is better than the PowerPoint resizer because it creates PPI to prevent the blurriness of the image even though you have to resize it. Are you wondering, or do you want to use this tool and start resizing your image? In that case, follow the succeeding steps we include as we teach you how to use this tool as easy as possible.
Advantages of Resizing a Photo Using the FVC Free Image Upscaler:
◆ You can use this photo resizer for free without quality loss.
◆ It supports a wide range of formats you can upload.
◆ It has powerful AI technology that could help you resize any photos.
◆ You can access this web solution on any search engine you have on your desktop.
◆ There is no installation or downloading needed before using it.
Steps on How to Resize without Distoting Using FVC Free Image Upscaler:
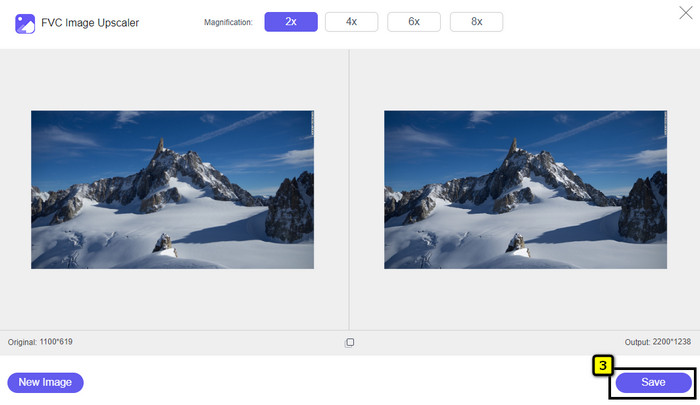
Step 1. Open the website of this resizer by clicking this link.
Step 2. When the website is opened, click the Upload Photo to add the photo you want to resize and use it on your PowerPoint presentation.
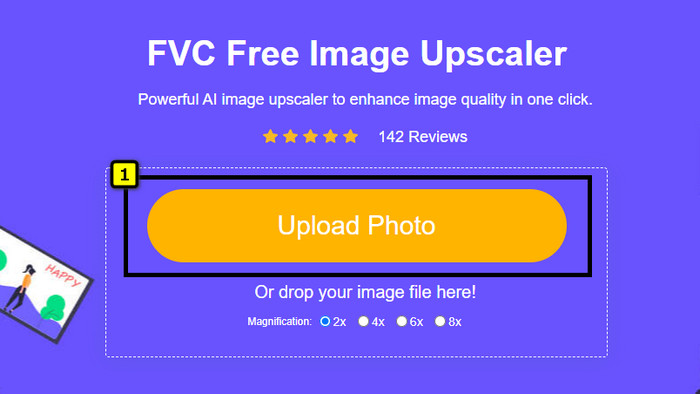
Step 3. After uploading the image, wait for it to load up. Select the Magnification you want to apply to your image by choosing the options such as 2x, 4x, 6x, or 8x.
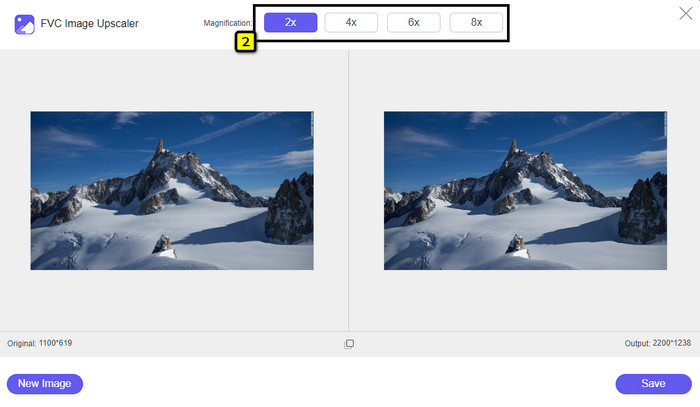
Step 4. Click Save to export the resized image you change here. As easy as that, the resized image on your local drive without any distortion or blurriness added.
Part 3. FAQs on How to Resize a Picture in PowerPoint
What is the maximum length and height of a photo for Powerpoint?
When resizing the image into the maximum dimension for Powerpoint as a widescreen, you can set the pixel to 1280 x 720 px. But when you are displaying it on-screen, you will need to follow the 16:9 aspect ratio, which is 1920 x 1080 px.
Is there any shortcut to resize the photo on PowerPoint?
To change the height of the image, you must hold the Shift key, then click the up arrow to increase and the down arrow to decrease the height of it. For those who want to change the image's width, you can hold the Shift key again, then press the right arrow to increase the width and the left arrow to decrease the width according to your preference.
Why did my image become blurry after resizing it on PowerPoint?
When you are about to resize the image on PowerPoint, the image has been streched-out, and there is a chance that the image will become blurry. But if you want an image editor capable of creating pixels while being changes of the dimension, then you can avoid having a pixelated image in PowerPoint.
Can I use GIFs for Powerpoint?
Yes, you can use GIFs on every slide on PowerPoint. However, when the GIF dimension isn’t favored in your desired size, you will need to resize it. And the result of the resized GIF became blurry or pixelated.
Conclusion
To wrap it up, you can learn the three techniques for resizing the image on PowerPoint by following the tutorial we add in this post. Though you can easily do it on the presenter, there are times that it produces distortion when the image dimension is changed. You can solve this problem using the online tool we added because it doesn’t distort any resized images here. With the steps we add, you can learn how to resize the image on FVC Free Image Upscaler.
-
 Best Photo Resizer App Online, Offline, Android, and iPhone
 What are the best photo resizer apps? Click the page to learn the top five most powerful photo resizer apps you can use to enhance or resize your file.
-
 How to Resize Image – Adobe Resize Image [Online and Offline]
 If you are searching for Adobe resize image, then we have the solution for you. View this post thoroughly to learn how to resize images using Adobe on your PC.
-
 How to Resize Photo for Facebook [Quick and Easy Steps]
 If you are having trouble uploading a large-sized image on Facebook, we have a solution for you. Finish this article to learn how to resize photos for Facebook.