What Should We Do to Convert 8mm Film to Digital or DVD
Before the advent of digital cameras and mobile phones capable of shooting videos, most people used film cameras to record the beautiful moments in their lives. After the shooting, we needed to send the film to a professional photo studio for processing before we could get a complete picture or video. Nowadays, unlike some filmmakers who pursue a special texture and shoot videos on film, most ordinary people have no access to this old object. However, our parents may have preserved some old films that have been influenced by the recorder a long time ago, and the memories contained in them are very precious. However, the film is subject to degradation and ageing at any time and can be easily lost by accident. We had better make a backup for them, that is, convert them to popular video or DVD formats, and save them in the memory of our computers or the cloud. So how do we preserve these fond memories and convert 8mm film to digital formats? In this article, we will introduce the best methods. You can seek professional help or manually operate the equipment yourself.

Part 1. Why Convert 8mm Film to DVD or Digital Format
If we have a film in perfect condition at home, why would we want to export the images or videos from it? You might think. However, we need to understand that to view the content of an 8mm film, we have to use a dedicated 8mm player. Even if you have this equipment at home, you must consider the film's wear and tear. Every time you play the content on an 8mm film, it causes new scratches. But it would be pointless to keep the film if you could not see its contents. When the wear and tear reaches a certain point, the images or films on the film will be lost, and we will not be able to see some of the videos and pictures that carry the time spent with our loved ones. Therefore, even if you want to keep the film as a souvenir, we recommend converting 8mm film to digital format as a backup.
After exporting the files on the film, you can put them on various modern storage devices, such as USB sticks, external hard drives, DVDs, or directly on the computer's internal memory. If you don't have enough storage space because the files are too large, you could consider uploading the videos to a cloud drive. If you remember your account, you can always reflect on these precious memories online and share them with important family and friends. In the following, we recommend three possible solutions to help you successfully transfer 8mm to digital.
Part 2. Digitize the DVD Film Using a DVD Ripper
AnyMP4 DVD Ripper is a professional tool that can rip your physical DVD into a digital version. With wide output format support, it allows you to convert to common formats like MP4, MOV, or other uncommon formats. It is easy to use, thanks to its simple interface. And if your DVD has a different region code that can’t be played in the current region using a locally purchased DVD player, you can also use it to convert it easily. Adopting advanced tech, it can rip your DVD to other formats at a fast speed.
Here we will show you how to convert 8mm film into a digital version:
Step 1. Download AnyMP4 DVD Ripper on your computer, load your DVD into the drive, and it will detect it automatically. If it isn’t, you can manually click “Load DVD” to let this tool recognize and analyze it.
Free DownloadFor Windows 7 or laterSecure Download
Free DownloadFor MacOS 10.7 or laterSecure Download
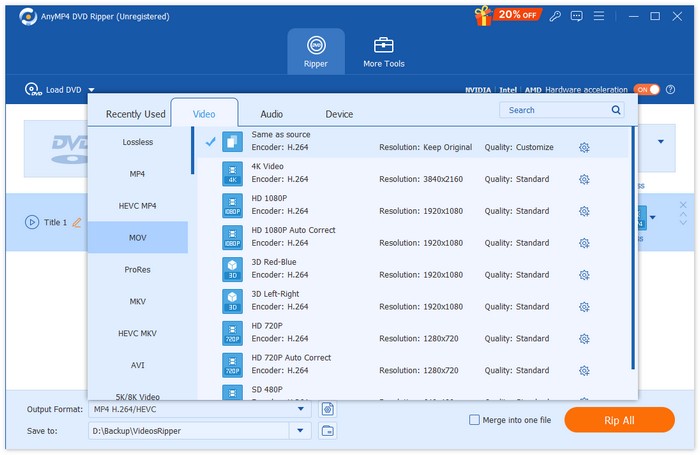
Step 2. Click the drop-down button next to “Output Format” and select your preferred save format.
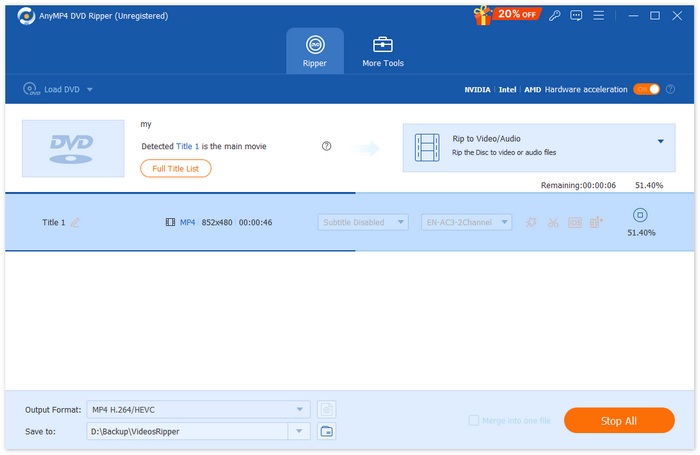
Step 3. You can also edit subtitles, audio tracks based on your needs. If you are satisfied with the result, you can click “Rip All” to digitize your physical 8mm film.
Part 3. Record the Film While Playing to Digitize
If you have an 8mm film player at home, you can try converting it yourself at home. This way, you won't have to pay extra or spend time finding a reliable film processing service. The key to this operation is to use an 8mm film projector to play the video on a blank wall or flat screen and then use a video recording device to record what is being played. The best choice for a recording device is a professional camcorder, which will help you achieve the highest possible resolution. However, you can also use more common devices such as a mobile phone. After starting the projector, carefully adjust the focal length of the projection so that the image is clearly displayed on the screen. Then, a tripod or mobile phone holder is used to secure the camera and ensure that the camera frames the projected image. Before recording the entire film, you can record a few seconds for testing.
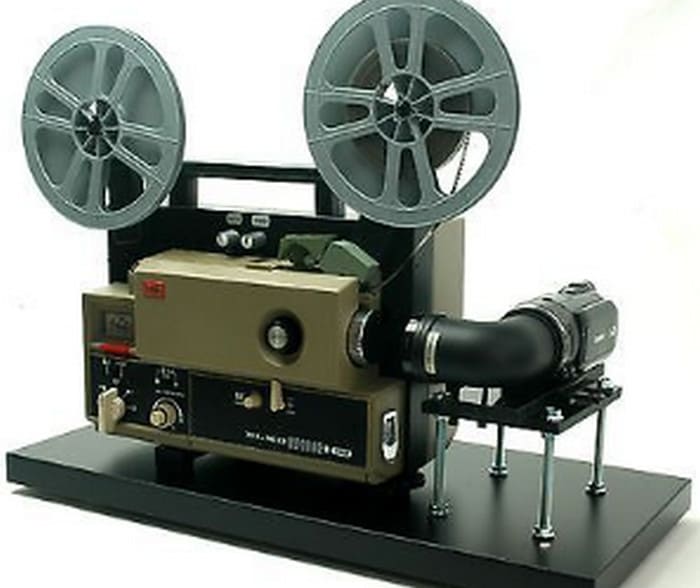
If you want to record a screen using your mobile phone and don't want to spend too much time transferring the video to your computer afterwards, we recommend the FVC Screen Recorder. Simply connect your mobile phone to it; it can record what your phone camera sees directly on your computer screen without delay. Afterwards, you can enhance the quality of the recording and convert it to a more popular digital format using some video editing software directly on your computer. The FVC Screen Recorder also has some simple processing tools built in, which allow you to edit the length of the video.
Free DownloadFor Windows 7 or laterSecure Download
Free DownloadFor MacOS 10.7 or laterSecure Download
Here is what you must do to record 8mm film with this best MP4 recorder
Step 1. Prepare an 8mm projector, clean white wall, or projecting surface. Stabilize your phone in front of the surface.
Step 2. Download and install FVC Screen Recorder on your computer. Launch it, and choose Phone Recorder.

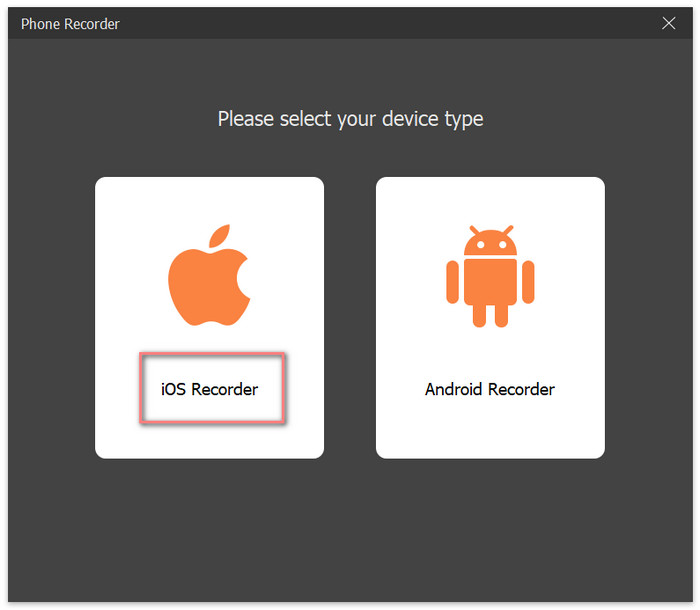
Step 3. Choose iOS Recorder.
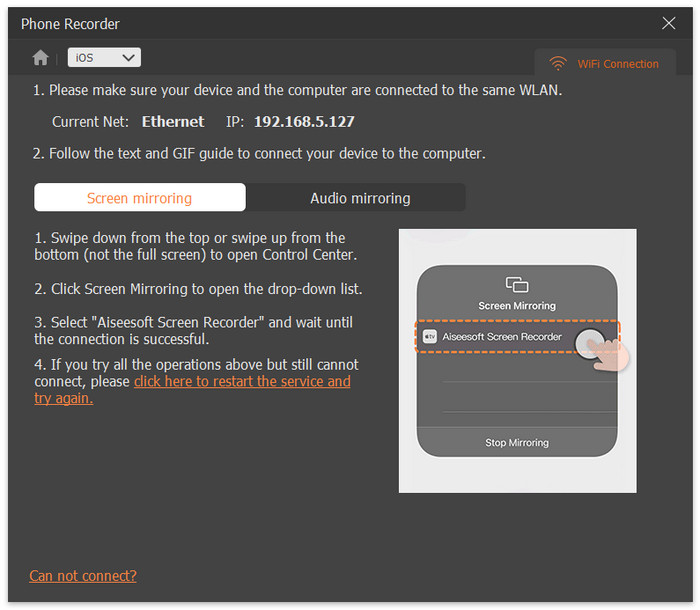
Step 4. Follow the on-screen guide to connect your iPhone to the FVC Screen Recorder.
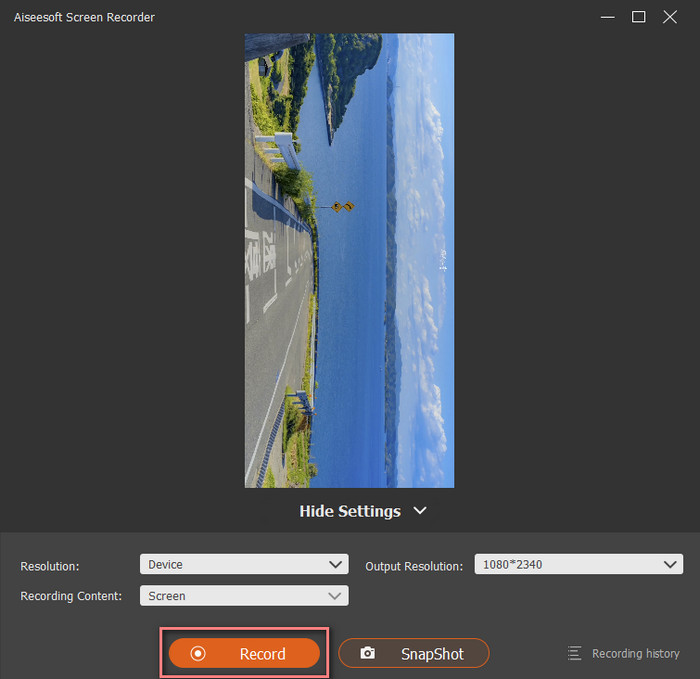
Step 5. Now, you can see your iPhone's content on the FVC Screen Recorder interface. Choose a resolution and click Record.
Part 4. Hire A Professional Film Transfer Service
If you have no experience processing film, are worried that you might damage it, or don't have a machine at home that can read 8mm film, the safest option is to find a professional film-to-digital service. They will have a full range of equipment and experienced film handlers. You can find these online or offline, but it's a good idea to check the quality of their service and customer satisfaction before handing over your film. The cost of restoration often depends on the size of the film. Some companies may also price based on the size of the film box, but if the total amount of film you have is not large, this method may not be very cost-effective.
Before paying for the 8mm to digital conversion service, you must ask several questions, including the price of conversion, the time required, the location of processing, whether there are any hidden fees and the types of film that can be processed. Suppose your film is damaged or the video is blurry. In that case, you can also ask the service provider to help you clean and repair the film and perform color correction, sharpness enhancement, contrast adjustment, etc., on the exported video.
Part 5. FAQs of Converting 8mm Film to Digital
What is the cost of converting 8mm film to digital?
The price generally quoted by institutions is 25 cents per foot. If your film is 16mm, it will cost 40 cents per foot.
How do you clean 8mm film before digitizing?
Preferably, you should use a film-specific cleaning agent, as these can even fill in scratches on the surface. If you don't have one, you can also use 98% alcohol.
How do you convert old 8mm film to digital?
Record the video in one of these formats and then use a professional converter like AnyMP4 DVD Ripper to convert the file to a common format. MP4 is the best choice, as many platforms and devices have MP4 players.
Conclusion
This article explains the necessity of processing 8mm film and several methods for applying it. To prevent the loss of video in the film over time, we recommend that you convert 8mm film to digital format and save it on other storage devices. The AnyMP4 DVD Ripper is your best helper in this process.
Free DownloadFor Windows 7 or laterSecure Download
Free DownloadFor MacOS 10.7 or laterSecure Download


 Video Converter Ultimate
 Screen Recorder