

How Can You Record FaceTime Video Calls [Quick Guide]
Are you also one of those who wish they could directly and easily record FaceTime video calls? Well, unfortunately, FaceTime doesn’t have a built-in feature that allows users to record their calls. But this isn’t something that FaceTime only does, because there’s really a reason why these kinds of features are natively unavailable. Apple prioritizes user confidentiality, which is why recording calls isn’t an option by default. However, that doesn’t mean you’re completely out of luck.
In this quick guide, we’ll show you how to record FaceTime video calls on your iPhone, iPad, or Mac using the built-in screen recording features of your device. Moreover, don’t miss out to learn a new tool that can help you screen record FaceTime calls easily and effectively. Excited about this? Continue reading to learn more!

Part 1. Can You Record FaceTime Video Calls?
You might be asking. Can you record FaceTime video calls? The truth is, FaceTime doesn’t have a built-in recording feature. Apple designed it this way to protect users’ privacy and security, ensuring that personal conversations remain confidential.
Still, it’s important to understand that recording a FaceTime call involves legal and ethical considerations. In many places, you’re required to inform or get consent from the other person before recording. This helps avoid any privacy violations and ensures everyone is aware that the call is being captured.
In the next part, we’ll show you how to record a FaceTime video call on your iPhone, iPad, or Mac without compromising quality or security.
Part 2. How to Record FaceTime Calls on iPhone or iPad?
Recording a FaceTime call on an iPhone or iPad is possible with the help of built-in and external tools. Although FaceTime doesn’t include a direct recording feature, iOS devices have a built-in screen recording feature that is capable of recording your FaceTime video calls.
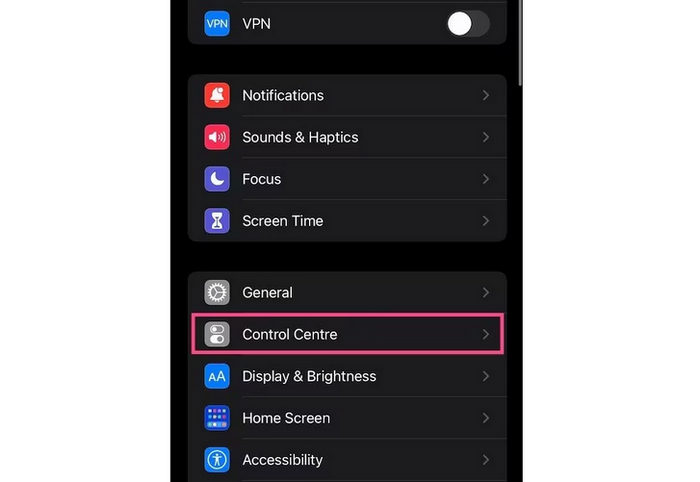
Step 1. Go to your Settings app and tap Control Center.
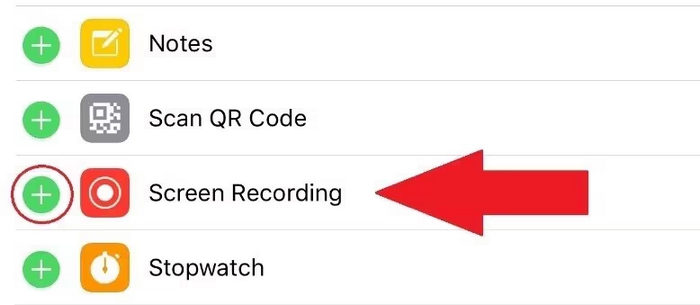
Step 2. Check if Screen Recording is listed under Included Controls. If it’s not, tap the plus icon next to it to add it.
Step 3. Swipe down from the top-right corner of your screen or swipe up from the bottom on older iPhones to open the Control Center.
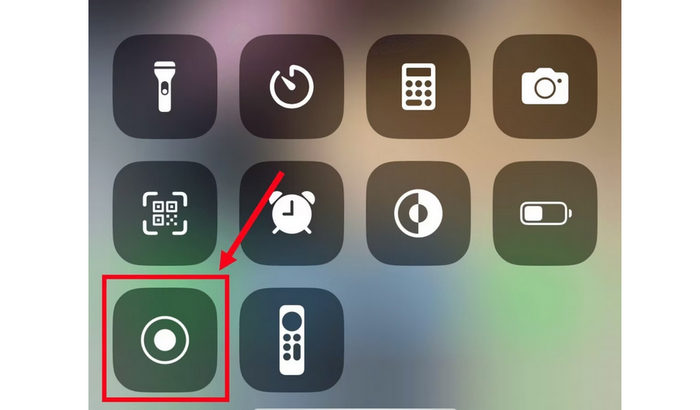
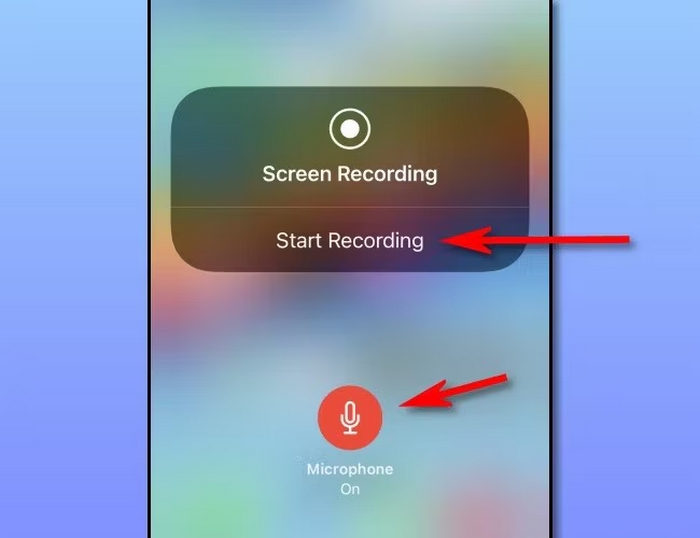
Step 4. Press and hold the Screen Recording icon, then tap the Microphone to turn it on. This allows your FaceTime audio to be recorded.
Step 5. Lastly, tap Start Recording, then open FaceTime and begin your call. Your iPhone will now record both video and sound during the conversation.
The same works with an iPad if you are using it to record FaceTime video calls. Moreover, with this method, you can capture both the screen and audio directly from your device without needing any third-party apps. Just make sure your microphone is turned on before starting the recording to include the sound from your FaceTime call. However, there are times when the screen recording feature of these devices also fails to record, but nevertheless, this is still the best and easiest way to record FaceTime calls.
Part 3. How to Record FaceTime Video Calls on Mac?
Recording a FaceTime video call on a Mac is just as easy as on an iPhone or iPad. macOS has a built-in screen recording feature that lets you capture your entire screen, including your FaceTime call, without installing extra software. Here’s how you can record FaceTime video calls with sound directly on your Mac:
Step 1. First, you need to open the FaceTime app and get ready for your call.
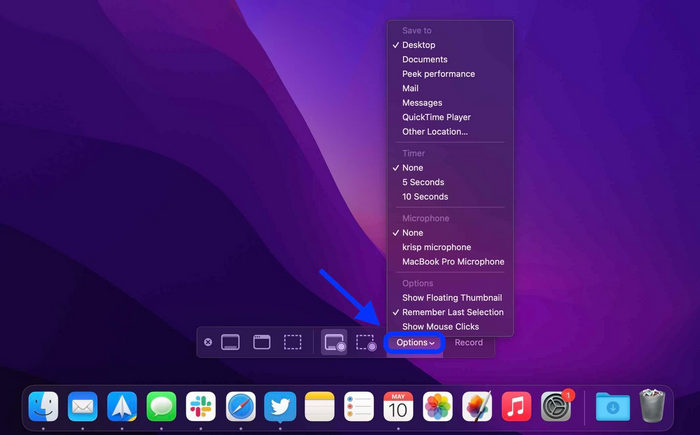
Step 2. Next, press Command + Shift + 5 on your keyboard to open the macOS screen recording toolbar.

Step 3. After that, click Options, then choose a microphone to capture sound during your FaceTime call. You can also adjust other recording settings if needed.
Step 4. Select Record Entire Screen, then make sure the FaceTime window is visible
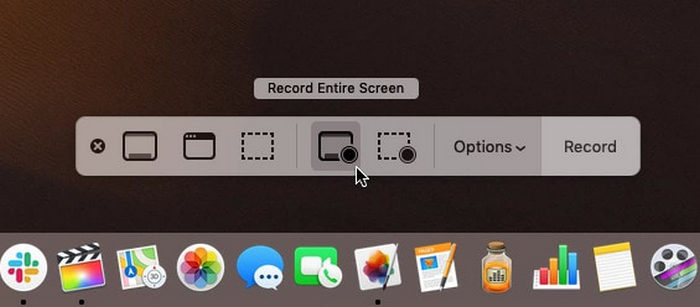
Step 5. Lastly, click the Record button to begin capturing your FaceTime video call with audio. Once done, press Command + Control + Escape to stop the recording. Your video will automatically be saved to your Mac.
Recording FaceTime calls on a Mac is easy and reliable since you can use the built-in screen recorder to capture both video and audio without extra apps. However, it’s limited to basic recording only, so you’ll need another tool if you want to edit or enhance the video afterward.
Part 4. Bonus: An Online Tool to Record FaceTime Video Calls with Internal & External Audio
If you’re looking for an online tool that has the ability to record FaceTime video calls with internal and external audio, the best tool for that is the FVC Free Screen Recorder. It’s a web-based screen recording tool that lets you capture your FaceTime video calls directly from your browser. With FVC Free, you can record both your system sound, which is the internal audio, and your microphone, which is the external audio, at the same time. This ensures clear and complete recordings of your conversations. It’s simple to use, accessible on any device, and perfect for those who want flexibility and quality in one tool.
Main Features:
• Lets you record your entire screen, a specific window, or a custom area of your choice.
• Can be used directly from your web browser without installation.
• Ideal for recording video calls, meetings, gameplay, or online classes.
• Enables you to add text, shapes, highlights, and annotations while recording.
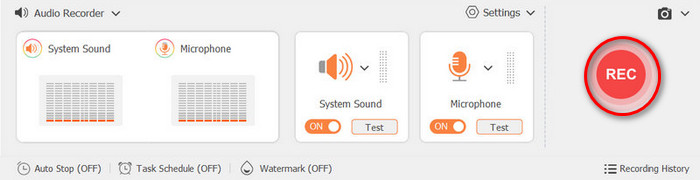
• Captures both system sound and microphone voice at the same time.
• Supports multiple video and audio output formats for flexibility.
• Records videos in high-definition (HD) quality.
• Works seamlessly on both Windows and macOS platforms.
Steps on How to Record FaceTime Video Calls with FVC Free Screen Recorder:
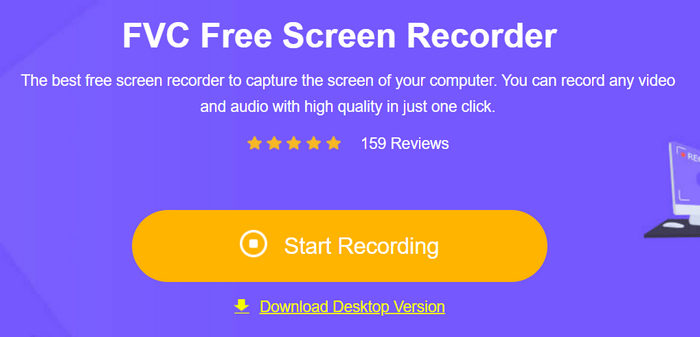
Step 1. First, you need to look for the FVC Free Screen Recorder on your browser. Please note that it is available for both Windows and macOS.
Step 2. Now, go to your FaceTime app and start calling. After that, in the main interface of the tool, click Start Recording.
Step 3. Lastly, to finally start recording, click the Record button.
What makes FVC Free Screen Recorder a better option to record FaceTime video calls instead of the built-in tools is that it offers more control and flexibility. Unlike default screen recorders that only provide basic functions, this online tool lets you record both internal and external audio, choose your recording area, make FaceTime screenshot and add real-time annotations while capturing. It also supports multiple formats and high-quality output, making it ideal for saving, sharing, or editing your FaceTime recordings with ease.
Part 5. FAQs about Recording FaceTime Video Calls
Where are my recorded FaceTime videos saved?
On iPhone and iPad, your recordings are automatically saved to the Photos app. On Mac, the file is usually saved to your desktop unless you change the save location in the recording settings.
Why is my FaceTime recording not capturing audio?
If your recording has no sound, it’s likely that the microphone was turned off before starting. Make sure to press and hold the Screen Recording icon and enable the Microphone Audio option to record both video and sound.
Can the other person know if I record a FaceTime video call?
No, FaceTime doesn’t notify the other person when you start recording. However, it’s always best to ask for their permission before recording to respect privacy and follow legal guidelines.
Conclusion
While FaceTime may not have a feature that can directly record FaceTime video calls, there are still ways you can record it. However, it is important to always ask permission from both parties. Moreover, if the built-in screen recording features may not work well or might feel limited on your part, you can try the FVC Free Screen Recorder. So, what are you waiting for? Grab your device now and start recording your FaceTime video call.
-
 2 Preferred Ways on How to Record External Audio from Mac
 If you’re wondering how to record external audio from a Mac, read this article and be guided by two quality audio recording tools that you can easily use.
-
 3 of the Best Techniques on How to Record Audio on iPhone
 Having difficulties because you can't record audio properly on iPhone? Then read this article to learn the steps and available tools.
-
 QuickTime Screen Recording – Record Video with Audio on Mac & PC
 Recording screen with audio on Mac comes in handy. The built-in player, QuickTime Player can do it. Read his post and know how to capture screen with sound on Mac and PC.